State is a crucial part of any application as it handles how data is passed within the application itself. The management of state becomes complex as applications become larger, necessitating the use of a central repository for accessing application data. This central repository helps ensure that state management in the application is simple, atomic, and extendible.

In this article, we’ll take a closer look at and compare two of the most popular state management libraries available in the frontend ecosystem today: Redux and Vuex.
State management is the method of reading and changing state (i.e., data) that is shared between various components of an application.
State is not always complex. In some cases, state can be small and easily managed locally. For example, it would be pretty straightforward to handle passing data from a parent component A to a child component B. But, what if there was a need for a piece of information from component A in a foreign component J?
One way to manage state, in this case, might be to propagate the data. However, this is not always an efficient practice.
As mentioned earlier, when applications become larger, data management tends to become more complex. This drives the need for a centralized repository for storing state that can be used across various components (even unrelated components), as opposed to prop-drilling, which can become a pain in the neck for deeply nested components.
This precipitates the need for a global state, a central source of truth where all application components can have easy access to all application state, with little to no restrictions.
Since its creation in 2015, Redux has grown to be the most popular state-management library for React app development. It is a predictable state container that lets us use plain JavaScript while enforcing consistent patterns that ensure our app is reliable across client, server, and native environments and is also easy to test.
In addition to React, Redux can be used with any other JavaScript framework or library, such as Vue.js. However, Redux has received some criticism lately claiming that it is difficult to use. This negative feedback probably came about because writing actions to define every possible state change and then creating multiple reducers to control those actions can result in a lot of code, which can quickly become hard to manage.
To solve this problem, Dan Abramov and Andrew Clark, software engineers at Facebook and React core team members, created Redux Toolkit. It simplifies the store setup and reduces the required boilerplate, making it the go-to tool for efficient Redux development. Redux Toolkit also follows best practices by default.
Before we look at how Redux is used to manage state in a React application, let’s find out how it works.
A typical Redux setup is comprised of the following:
Here’s a diagram from redux.js.org showing what the flow of data looks like in the Redux state management library:
Let’s take a closer look at how Redux is used for managing application-wide state in a React application. For this demonstration, we’ll keep things simple by building a basic counter app to show implementation.
To start, create a React project and name it redux-demo, using the below command:
create-react-app redux-demo
Now, install the redux package (this will enable us to use Redux in the application) and another package called react-redux that makes connecting React applications to Redux stores and reducers very simple:
npm install redux react-redux
>
Next, start the server:
npm start
Since we’re focusing on using Redux, we won’t go through the details of building React components.
In the src folder, create a new folder called components, then create two files called Counter.js and Counter.css. Add the following code to the Counter.js file:
const Counter = () => {
  return (
    <main>
      <h1>Redux Counter</h1>
      <div>{counter}</div>
      <button>Increment Counter</button>
      <button>Decrement Counter</button>
    </main>
  );
};

export default Counter;
Here, we have two buttons that we’ll later use to increment or decrement the counter value.
Next, import Counter.js into App.js. The updated App.js file should look like this:
import Counter from './components/Counter';

function App() {
  return <Counter />;
}

export default App;
In the src folder, create another folder called store; within this folder create a file called index.js. We will not subscribe to the store yet, since we are just setting up the counter value; we are not ready to start listening for changes in its state.
Next, connect the app to the Redux store, so that components within the app can use the store; and export an instance of the counterReducer.
The src/store/index.js file should now look like this:
import { createStore } from "redux";

const counterReducer = (state = { counter: 0 }, action) => {
    if (action.type === "increment") {
        return {
            counter: state.counter + 1,
        };
    }
    if (action.type === "decrement") {
        return {
            counter: state.counter - 1,
        };
    }
    return state
};

const store = createStore(counterReducer);
export default store;
In order for the app components to use the store as a central state repository, we must wrap the root App component with the Provider component, which we import from react-redux. Then, we’ll make reference to the store by passing it as a prop to the Provider component.
To achieve this, update the src/index.js file, like so:
import React from 'react';
import ReactDOM from 'react-dom/client';
import './index.css';
import App from './App';
import { Provider } from 'react-redux';
import store from './store/index'

const root = ReactDOM.createRoot(document.getElementById('root'));
root.render(
  <Provider store={store}>
    <App />
  </Provider>
);
To get access to the data in the store from the Counter component, we’ll import the useSelector Hook from the react-redux library. This Hook will enable us to make use of the specific pieces of the store that we wish to use.
Another benefit of useSelector is that it manages subscriptions behind the scenes.
We’ll use the useSelector Hook to extract the counter state from the store. Next, we’ll pass a function that receives the state that is managed by Redux and the part of the state that we want to extract. Then, we’ll output the counter value, as shown below:
import { useSelector } from 'react-redux';

const Counter = () => {
  const counter = useSelector((state) => state.counter);

  return (
    <main>
      <h1>Redux Counter</h1>
      <div>{counter}</div>
      <button>Increment Counter</button>
      <button>Decrement Counter</button>
    </main>
  );
};

export default Counter;
So far, we’ve seen how we can retrieve data that is managed by Redux. Now, let’s see how we can update data.
To increment or decrement the counter value by 1, we’ll make use of the useDispatch Hook from the react-redux package.
First, we’ll call the useDispatch, which gives us a dispatch function that we can call to dispatch the actions against the Redux store. Next, we’ll create methods that we can call using the various buttons. We’ll also pass the type identifiers.
The updated Counter.js file looks like this:
import { useSelector, useDispatch } from 'react-redux';

const Counter = () => {
  const counter = useSelector((state) => state.counter);
  const dispatch = useDispatch();
  const incrementHandler = () => {
    dispatch({ type: 'increment' });
  };
  const decrementHandler = () => {
    dispatch({ type: 'decrement' });
  };
  return (
    <main>
      <h1>Redux Counter</h1>
      <div>{counter}</div>
      <button onClick={incrementHandler}>Increment Counter</button>
      <button onClick={decrementHandler}>Increment Counter</button>
    </main>
  );
};

export default Counter;
Now, when either the increment or decrement button is clicked, appropriate actions take place to either increase or decrease the counter value by 1.
We’ve had a close look at how Redux is used to manage state in a React app. Now, let’s see how Vuex can be used to manage state within a Vue application.
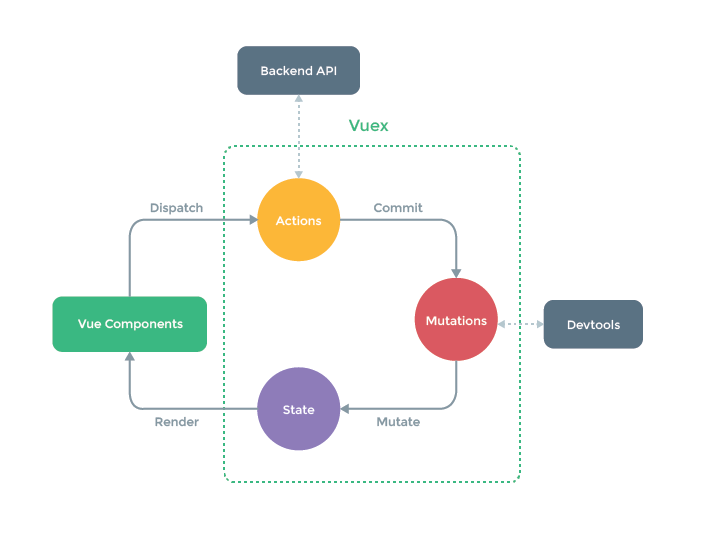
Vue was created by Evan You and is maintained by the Vue Core Team. Vuex is based on the same flux architecture as Redux. Vuex is a state management pattern and library for Vue.js applications.
With this library, application state is centralized so that every component in an application has access to the state the app needs at any point in time. With Vuex, getting state is made easy, and changing state is purposeful.
Vuex is a collection of states, getters, mutations, and actions:
Here’s a diagram from vuex.vuejs.org, illustrating what the flow of data looks like in the Vuex state management library:
To show how Vuex is used to manage state in Vue applications, let’s build a replica of the counter app from the Redux demo, with the same structure and functionality.
Start by creating the Vue project name vuex-demo, using the below command:
vue create vuex-demo
During the Vue project setup, we’ll be asked a series of questions. For this tutorial, let’s go with the following configurations:
| Prompt | Option |
|---|---|
| Please pick a preset | Manually select features |
| Check the features needed for your project | All pre-selected options + Vuex |
| Choose a version of Vue.js that you want to start the project with | 3.x |
| Pick a linter / formatter config | ESLint with error prevention only |
| Pick additional lint features | Lint on save |
| Where would you prefer placing config for Babel, ESLint, etc. | In dedicated config files |
| Save this as a preset for future projects? | N |
Notice how easy it was to install Vuex into our application right from its creation, which can be found by navigating to src/store/index.
If an app doesn’t have Vuex, simply install the library using the following command:
npm install vuex@next --save
N.B., adding @next in the above code installs the latest version of Vuex
Moving on, since we are focusing on using Vuex, we’ll keep the Counter components simple.
Navigate to the src folder, create a file called Counter.vue, and add the following code:
<template>
  <main>
    <h1>Vuex Counter</h1>
    <div>0</div>
    <button>Increment Counter</button>
    <button>Decrement Counter</button>
  </main>
</template>
Next, import Counter.vue into the App.vue file. The App.vue file should look like this:
<template>
  <Counter />
</template>
<script>
import Counter from './components/Counter.vue';
export default {
  name: 'App',
  components: {
    Counter
  }
}
</script>

export default App;
Next, we need to create an appropriate state, mutations, actions, and getters for the demo.
State is a bag of properties in the store. So, to define a state for the counter value, we insert it as a key value to the state object in the store. We also give it an initial value of 0, as shown below:
import { createStore } from 'vuex';

export default createStore({
  state: {
    counter: 0,
  },
  mutations: {},
  actions: {},
  modules: {},
});
To access the counter value in the Counter component, we first import the store, then target the required state (in this case, counter):
<template>
  <main>
    <h1>Vuex Counter</h1>
    <div>{{counter}}</div>
    <button>Increment Counter</button>
    <button>Decrement Counter</button>
  </main>
</template>
<script>

import { computed } from '@vue/reactivity';
import store from '../store';

export default {
  setup() {
    const counter = computed(() => {
      return store.state.counter
    })
    return {
      counter
    };
  },
};
</script>
In order to make the buttons update the counter value, we’ll create methods in the Counter component and dispatch an action that calls the mutation (where we pass a payload) for updating the state. It is the payload passed from the Counter component that is used to update the counter state (decrementing or incrementing it by 1).
To achieve this, we’ll update Counter.vue, like so:
<template>
  <main>
    <h1>Vuex Counter</h1>
    <div>{{ counter }}</div>
    <button @click="increment">Increment Counter</button>
    <button @click="decrement">Decrement Counter</button>
  </main>
</template>

<script>
import { computed } from '@vue/reactivity';
import store from '../store';
export default {
  setup() {
    const counter = computed(() => {
      return store.state.counter
    })
    const increment = () => {
      store.commit('increment', { value: 1 })
    }
    const decrement = () => {
      store.commit('decrement', { value: 1 })
    }
    return {
      counter
    };
  },
};
</script>
Next, update the store:
import { createStore } from 'vuex';
export default createStore({
  state: {
    counter: 0,
  },
  mutations: {
    increment(state, payload) {
      state.counter = state.counter + payload.value;
    },
    decrement(state, payload) {
      state.counter = state.counter - payload.value;
    },
  },
  actions: {},
  modules: {},
});
Suppose we want to read the value of a state and perhaps use it to perform an external operation. We can achieve that using getters.
In the Counter demo, we’ll read the counter value and render that value multiplied by 2 on the DOM.
Let’s update the store to use getters, like this:
import { createStore } from 'vuex';

export default createStore({
  state: {
    counter: 0,
  },
  mutations: {
    increment(state, payload) {
      state.counter = state.counter + payload.value;
    },
    decrement(state, payload) {
      state.counter = state.counter - payload.value;
    },
  },
  actions: {},
  getters: {
    modifiedCounterValue(state) {
      return state.counter * 2;
    },
  },
  modules: {},
});
We can now access the modifiedCounterValue from the App.vue file. We achieve that using a computed property, as shown below:
<template>
  <Counter />
  <div>Modified counter value: {{modifiedCounterValue}}</div>
</template>

<script>
import { computed } from '@vue/reactivity';
import Counter from './components/Counter.vue';
import store from './store';

export default {
  name: 'App',
  components: {
    Counter,
  },
  setup() {
    const modifiedCounterValue = computed(() => {
      return store.getters.modifiedCounterValue
    })
    return {
      modifiedCounterValue,
    }
  }
}
</script>
In Vue, it’s best practice to use actions only while performing asynchronous operations. Since our little demo is not asynchronous, we can lean into the Vuex docs to learn about how to use actions to dispatch data while working with asynchronous operations and handling promises, such as fetching data from an API.
The Redux and Vuex state management libraries that both widely used in the developer ecosystem. In this article, we explored both libraries, showed how they work, and demonstrated how to use them. We also looked at the Redux Toolkit and showed how it helps simplify Redux setup, helps avoid common bugs, and replaces the createStore with an improved version called configureStore.
You can read more about the Redux Toolkit in the official docs. Likewise, you can learn more about Vuex from its official documentation.
These libraries can serve as a predictable, central store for all application state, but it is best to avoid using them with applications that are not very complex as this could become a tedious and cumbersome approach.
Redux is a more popular and better-supported library compared to Vuex, but Vuex seems to be a better state management library for maintaining performance. However, the choice is yours and depends on your specific project needs.
I hope this article has helped you better understand how both Redux and Vuex work and has provided you with useful information to determine which solution is best for your project.
Debugging Vue.js applications can be difficult, especially when users experience issues that are difficult to reproduce. If you’re interested in monitoring and tracking Vue mutations and actions for all of your users in production, try LogRocket.

LogRocket lets you replay user sessions, eliminating guesswork by showing exactly what users experienced. It captures console logs, errors, network requests, and pixel-perfect DOM recordings — compatible with all frameworks.
With Galileo AI, you can instantly identify and explain user struggles with automated monitoring of your entire product experience.
Modernize how you debug your Vue apps — start monitoring for free.

A guide for using JWT authentication to prevent basic security issues while understanding the shortcomings of JWTs.

Discover how to build, render, and automate product demo videos with Remotion, replacing traditional screen recordings with reusable React code.

Chrome’s Modern Web Guidance embeds modern web platform skills into AI coding agents, helping them choose native HTML, CSS, and browser APIs over legacy patterns.

Learn how to use Fallow to analyze AI-generated code, detect dead code, duplicate logic, and complexity issues, and integrate automated code quality checks into your AI-assisted development workflow.
Would you be interested in joining LogRocket's developer community?
Join LogRocket’s Content Advisory Board. You’ll help inform the type of content we create and get access to exclusive meetups, social accreditation, and swag.
Sign up now

