
Vercel’s recent release of Next.js v13 has created quite a buzz in the developer community. And while the release of Next.js is exciting, I was looking forward to trying out Vercel Serverless Storage. With this new service, developers can harness the robust capabilities of the battle-tested Postgres database without hosting it themselves.

While Postgres is suitable for storing application data that changes frequently and for storing data that seldom changes (but is read more frequently), Vercel released Vercel KV to fulfill all product needs. Vercel KV is a key-value pair that is suitable for storing JSON-like data. In this tutorial, we will take a look at how to set up Vercel Postgres and Vercel KV and build a simple shopping cart app.
Jump ahead:
The Replay is a weekly newsletter for dev and engineering leaders.
Delivered once a week, it's your curated guide to the most important conversations around frontend dev, emerging AI tools, and the state of modern software.
Vercel recently introduced its Serverless Postgres SQL, and the hobby tier is free and offers decent data storage and data transfer limits. We will use Vercel Postgres as our database store to build our shopping cart app. Under the hood, Vercel relies on Neon to manage the serverless Postgres database instance.
To get started, create a project via the dashboard. Once created, navigate to the dashboard and click the Storage tab in the nav bar. Then, select the Create Database button. From there, choose Postgres, a database name, and a region. Here’s a visual of that:
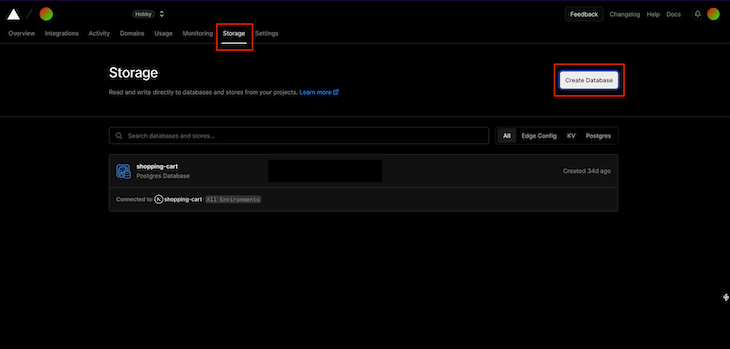
Tip: Choose a region closest to you for better response times. There aren’t many regions available right now.
To connect your Postgres database, run vercel link in the project folder. Then, run vercel env pull .env.development.local. This will pull all the latest secrets for the development environment. Finally, install the Postgres npm package from Vercel by running npm i @vercel/postgres. If you don’t want to install Vercel CLI globally, you can use npx to run Vercel CLI commands
To set up a KV store, navigate to the Vercel dashboard, open the Storage tab, and click Create Database. Then, choose Redis KV, enter the necessary information, and hit Create:
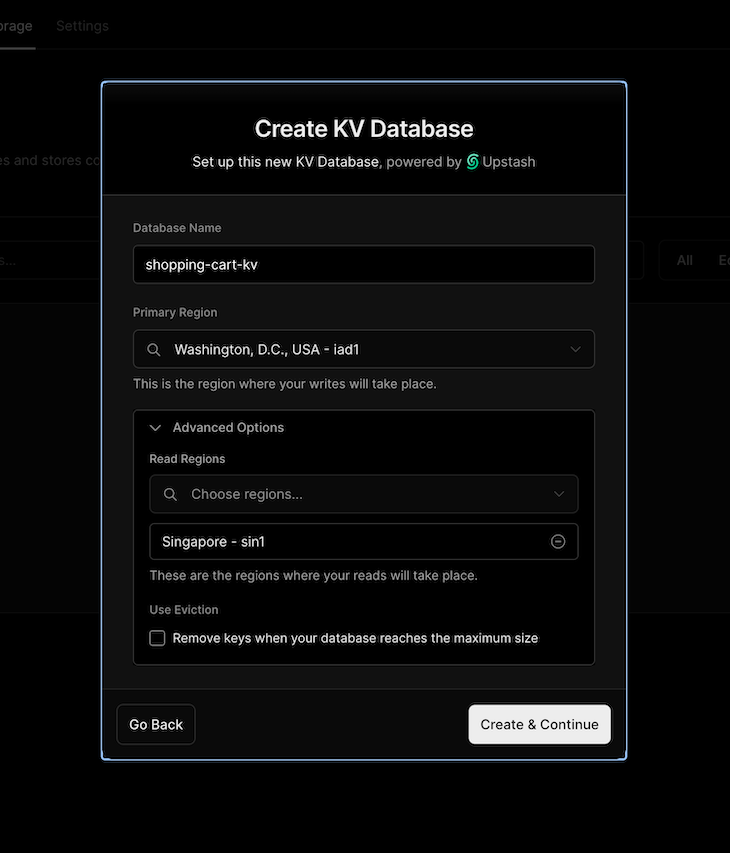
Similar to Postgres, we need to pull down the secrets. So, run the vercel env pull .env.development.local command to pull down the latest secrets from Vercel. We are done with the setup!
To set up a Next.js v13 project, run the npx create-next-app@latest command. After filling in the prompts, a new folder will be created with the app’s name. To run the app, CD into the project folder and run npm run dev. This will start a server locally and serve the Next.js app on port 3000. Navigate to localhost:3000 to see the app in action.
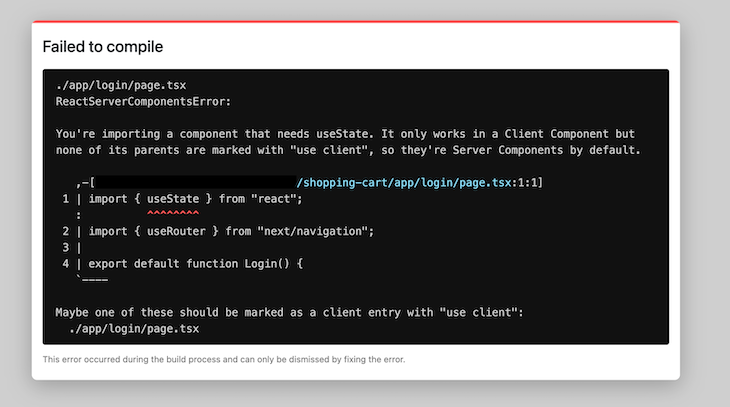
One major change in Next.js v13 is all components are server components by default. This means components are rendered on the server, and the HTML output is sent to the browser. This means these components aren’t interactive. If you try to add a useState Hook in a server-rendered component you will get this error:
Before we start coding, let’s create a couple of tables that will hold our users, products, and cart data. Let’s first start with a users table. To create this table, open the Data tab. In the text editor, we can put a DB query and run it, as shown below:
CREATE TABLE users(
  id SERIAL,
  email TEXT UNIQUE,
  password TEXT
);
The UNIQUE constraint will make sure that no duplicate accounts are created. Now, let’s create our products table. Enter the following code:
CREATE TABLE products(
  id SERIAL,
  name TEXT,
  price INT,
  description TEXT
);
We now have products and users, so let’s create another table that will hold all the items in a cart for our users. Let’s call it cart_items:
CREATE TABLE cart_items(
    cart_item_id SERIAL,
    product_id INT REFERENCES products(id),
    user_id INT REFERENCES users(id),
    PRIMARY KEY(product_id, user_id)
);
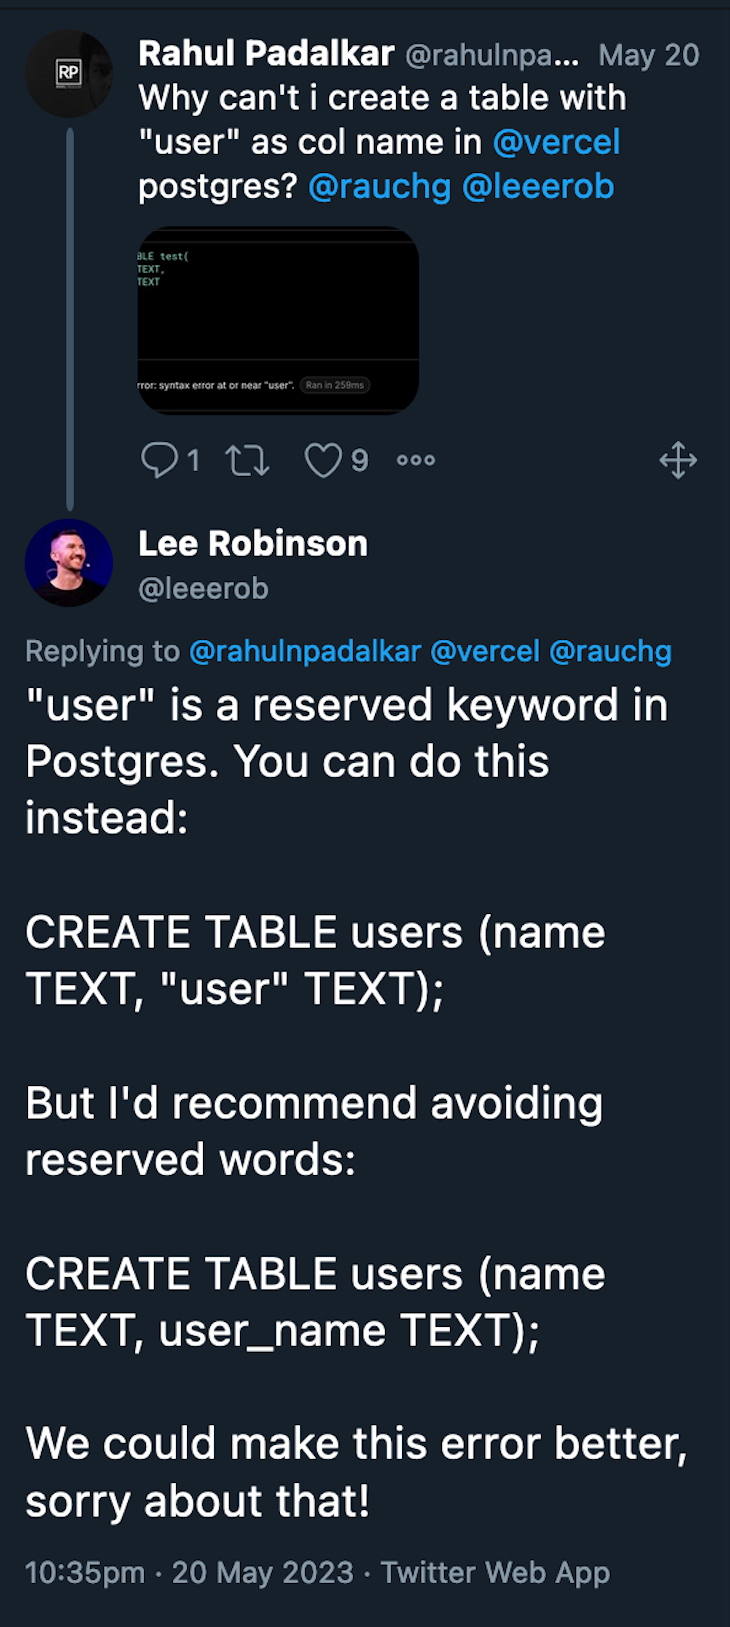
One thing to note is that we cannot create tables that have a reserved keyword as column names. If you try to create a table like the one below, you will see this error:
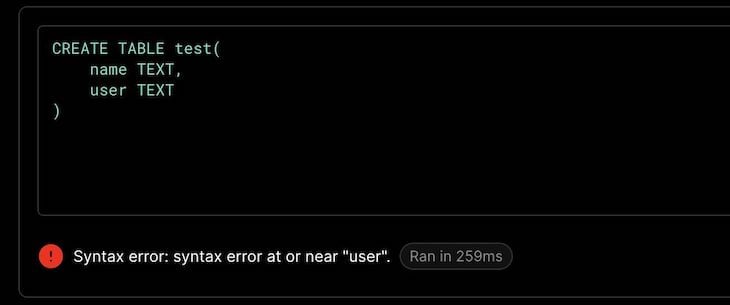
The error message isn’t super accurate, and Lee Robinson (VP DX at Vercel) feels the same:
Let’s first start by building the UI. Create a login folder in the app directory and add a page.tsx file inside it. Those familiar with Next.js might know that Next has file system-based routing. This means that our login page is now served under /login path. To check, navigate to localhost:3000/login. You should see a blank page. Here’s the code:
// app/login/page.tsx
"use client";
import { useState } from "react";
import { useRouter } from "next/navigation";
export default function Login() {
  const [email, setEmail] = useState<string>("");
  const [password, setPassword] = useState<string>("");
  const router = useRouter();
  const loginUser = async () => {
    let res = await fetch("/api/login", {
      method: "POST",
      body: JSON.stringify({ email, password }),
    });
    const { result } = await res.json();
    if (result) {
      router.replace("/products");
    }
  };
  return (
    <div className="flex flex-col items-center">
      <div>Login with username and password to get started</div>
      <div className="flex flex-col w-1/6 bg-gray-100 p-10 rounded-md">
        <div className="flex flex-col flex-1 mt-3">
          <label htmlFor="password">Email Address</label>
          <input
            type="email"
            id="email"
            className="rounded"
            onChange={(e) => setEmail(e.currentTarget.value)}
          />
        </div>
        <div className="flex flex-col flex-1 mt-3">
          <label htmlFor="password">Password</label>
          <input
            type="password"
            id="password"
            className="rounded"
            onChange={(e) => setPassword(e.currentTarget.value)}
          />
        </div>
        <div className="text-center">
          <button
            className="bg-slate-950 text-white p-2 rounded mt-3"
            onClick={() => {
              loginUser();
            }}
          >
            Login
          </button>
        </div>
      </div>
    </div>
  );
}
A few things to observe here, "use client" at the top of the file makes it explicitly a client-side component. By default, components are server-side components in Next.js v13. By using use client, we tell Next not to render it on the server and let the client (browser) handle the rendering and interactivity part.
We use the useState to capture the email and password here. When the user clicks the login button, we make an API call to the login endpoint, and upon success, we route the user to /products route. We create a router using the useRouter Hook made available by next/navigation.
We also use Tailwind CSS classes to make styling easier. We can choose the Tailwind option for styling when we create a new project via the create-next-app command. Now, let’s move to the /login API endpoint, which authenticates the user.
To start, create an api folder under the app directory and create a login folder inside it. The hierarchy should look like this app/api/login. Inside the login folder, create a file route.ts. This file will be responsible for handling any API requests that are made to /api/login path. Here’s the code:
// app/api/login/route.ts
import { sql } from "@vercel/postgres";
import { NextResponse } from "next/server";
export async function POST(req: Request) {
  const { email, password } = await req.json();
  const { rows } =
    await sql`SELECT * FROM users WHERE email=${email} AND password=${password}`;
  if (rows.length === 1) {
    const res = new NextResponse(
      JSON.stringify({ message: "Successfully logged in", result: true })
    );
    res.cookies.set("email_address", email);
    return res;
  }
  return NextResponse.json({ message: "Failed to login", result: false });
}
Here, we accept POST requests made to the login endpoint. In the code above, we get the email and password from the Request body and query the database to see if the email and the password match. If they do, we set a cookie and send a successful response back to the client.
We use the Postgres package from Vercel to connect to the serverless database that we created earlier. It automatically picks up the connection string and creds from the env.development.local file that we pulled using the vercel CLI earlier. We then use the sql method from the package to make a database query. We use the tagged template literal syntax in JavaScript to make the DB query. Here’s more on how tagged template literals work.
For the sake of simplicity, we are comparing plaintext passwords here. We should never store passwords are plaintext strings. We have also skipped password and email validations. Also, we should set a session ID as a cookie value. The session ID will point to the user details when a request comes in.
Along the same lines, let’s build the signup page. Here’s the code:
// app/signup/page.tsx
"use client";
import { useState } from "react";
export default function Login() {
  const [email, setEmail] = useState<string>("");
  const [password, setPassword] = useState<string>("");
  const loginUser = () => {
    fetch("/api/signup", {
      method: "POST",
      body: JSON.stringify({ email, password }),
    });
  };
  return (
    <div className="flex flex-col items-center">
      <div>Signup with username and password to get started</div>
      <div className="flex flex-col w-1/6 bg-gray-100 p-10 rounded-md">
        <div className="flex flex-col flex-1 mt-3">
          <label htmlFor="password">Email Address</label>
          <input
            type="email"
            id="email"
            className="rounded"
            onChange={(e) => setEmail(e.currentTarget.value)}
          />
        </div>
        <div className="flex flex-col flex-1 mt-3">
          <label htmlFor="password">Password</label>
          <input
            type="password"
            id="password"
            className="rounded"
            onChange={(e) => setPassword(e.currentTarget.value)}
          />
        </div>
        <div className="text-center">
          <button
            className="bg-slate-950 text-white p-2 rounded mt-3"
            onClick={() => {
              loginUser();
            }}
          >
            Login
          </button>
        </div>
      </div>
    </div>
  );
}
The following code is for the signup endpoint:
// app/api/signup/route.ts
import { sql } from "@vercel/postgres";
import { NextResponse } from "next/server";
export async function POST(req: Request) {
  const { email, password } = await req.json();
  try {
    await sql`INSERT INTO users(email, password) VALUES(${email},${password});`;
    return NextResponse.json({ message: "Added account", result: true });
  } catch (e) {
    return NextResponse.json({
      message: "Failed to add account",
      result: false,
    });
  }
}
For the sake of simplicity, I’ve skipped email and password validation. To reiterate, never store passwords in plaintext. Encrypt them using a secret and a randomly generated salt string. To learn more about keeping your Next.js apps secure, check out our guide to authentication.
It’s common on many websites to observe that if a user is already logged in and attempts to access the login or signup page, they are automatically redirected to the homepage or their dashboard. We can achieve similar behavior with middleware. A middleware is a function that gets called for an incoming request.
We can redirect, respond or modify headers in these middlewares. For our use case here, we want to check if a logged-in user is navigating to the login or signup route. If yes, then redirect them to the products page. To write a middleware, create a middleware.ts file in the root of your project like this:
import { NextRequest, NextResponse } from "next/server";
export function middleware(request: NextRequest) {
  if (
    request.nextUrl.pathname.startsWith("/login") ||
    request.nextUrl.pathname.startsWith("/signup")
  ) {
    if (request.cookies.get("email_address")) {
      return NextResponse.redirect(new URL("/products", request.url));
    }
  }
}
Following the same steps as above, we will create a simple product page. Here’s the code:
// app/products/page.tsx
import ProductList from "./components/ProductsList";
export default async function ProductsPage() {
  return (
    <div>
      {/* @ts-expect-error Server Component */}
      <ProductList />
    </div>
  );
}


// app/products/components/ProductsList.tsx
import { sql } from "@vercel/postgres";
import Image from "next/image";
import AddToCart from "./AddToCart";
export default async function ProductList() {
  const { rows } = await sql`SELECT * FROM products`;
  return (
    <div className="flex flex-row">
      {rows.map(({ name, id, price, description }) => (
        <div key={id} className="p-2">
          <Image
            src={`https://picsum.photos/100/100?random=${id}`}
            alt="randomImage"
            width={150}
            height={150}
          />
          <div className="text-base">{name}</div>
          <div className="text-sm">{description}</div>
          <div className="text-xl mb-1">${price}</div>
          <AddToCart productId={id} />
        </div>
      ))}
    </div>
  );
}


// app/products/components/AddToCart.jsx
"use client";
export default function AddToCart({ productId }) {
  const addToCart = async () => {
    let res = await fetch("/api/cart", {
      method: "POST",
      body: JSON.stringify({ productId }),
    });
  };
  return <div onClick={addToCart}>Add To Cart</div>;
}
In the AddToCart component, when the user clicks the add to cart button, it makes an API call to the /cart endpoint. One thing to note here is the ProductsList page is a server-rendered component and imports AddToCart client-side rendered component. So, we can mix server-side and client-side rendered components. Now, let’s quickly take a look at the /carts endpoint:
// app/api/cart/route.ts
import { sql } from "@vercel/postgres";
import { RequestCookie } from "next/dist/compiled/@edge-runtime/cookies";
import { cookies } from "next/headers";
import { NextResponse } from "next/server";
export async function POST(req: Request) {
  const { productId } = await req.json();
  const { value } = cookies().get("email_address") as RequestCookie;
  try {
    const { rows: users } =
      await sql`SELECT id FROM users WHERE email=${value}`;
    const user_id = users[0].id;
    const { rows } =
      await sql`INSERT INTO cart_items(user_id, product_id) VALUES(${user_id}, ${productId})`;
    return NextResponse.json({ message: "Added item to cart", result: true });
  } catch (e) {
    return NextResponse.json({ message: "Failed to add", result: false });
  }
}
The endpoint does a few things. First, it reads the email address from the cookie we set when the user logs in. Then, it fetches the user’s ID from the users table. And finally, it creates an entry in the cart_items table for a user and the selected product.
We will store profile data inside Redis KV storage. For the profile, we will have two routes: /profile for viewing the profile data and /profile/edit for editing the profile information. Let’s start with building a profile edit page:
// /app/profile/edit/page.tsx
"use client";
import { useState } from "react";
import { useRouter } from "next/navigation";
export default function EditProfile() {
  const router = useRouter();
  const [name, setName] = useState<string>();
  const [tel, setTel] = useState<string>();
  const updateProfile = async () => {
    let res = await fetch("/api/profile", {
      method: "POST",
      body: JSON.stringify({ name, tel }),
    });
    const { result } = await res.json();
    if (result) {
      router.replace("/profile");
    }
  };
  return (
    <div className="flex flex-col w-36 justify-center">
      <div>Edit User Profile</div>
      <input
        type="text"
        placeholder="Name"
        onChange={(e) => setName(e.target.value)}
      />
      <input
        type="tel"
        placeholder="Phone Number"
        onChange={(e) => setTel(e.target.value)}
      />
      <button
        className="bg-slate-950 text-white p-2 rounded mt-3"
        onClick={() => {
          updateProfile();
        }}
      >
        Update Profile
      </button>
    </div>
  );
}
We call the /profile API endpoint when the user clicks the Update Profile button. We send the name and the phone number as a payload to that endpoint. Now, let’s create the /profile API endpoint:
// app/api/profile/route.ts
import { kv } from "@vercel/kv";
import { NextResponse } from "next/server";
import { RequestCookie } from "next/dist/compiled/@edge-runtime/cookies";
import { cookies } from "next/headers";
export async function POST(req: Request) {
  const { name, tel } = await req.json();
  const { value } = cookies().get("email_address") as RequestCookie;
  await kv.hmset(value, { name, tel });
  return NextResponse.json({ result: true });
}
Here, we use kv from @vercel/kv package. We get the name and number from the payload and save it against the Redis KV store. It is stored as a hashmap with a key as the logged-in user’s email address. We get the email address from the cookie we set when the user logged in. Now, let’s fetch this data from the KV store and show it to the user. To show, let’s create a profile page:
// app/profile/page.tsx
import { kv } from "@vercel/kv";
import { cookies } from "next/headers";
export default async function Profile() {
  const cookieStore = cookies();
  const email = cookieStore.get("email_address")?.value;
  const data = await kv.hgetall(email as string);
  console.log(data);
  return (
    <div className="flex flex-col w-32">
      <div>View Profile</div>
      <div>
        {data &&
          Object.keys(data).map((key) => (
            <div key={key}>
              {key} 👉 {data[key]}
            </div>
          ))}
      </div>
    </div>
  );
}
The above component is a server-rendered component. So, we can directly access the KV store there. To get the key for the hashmap, we read the email_address cookie value and search for that in the KV store using the hgetall command. We then display that to the user. We can also use the CLI provided by Vercel to run Redis commands and check the data inside the KV store.
Vercel started as a hosting provider for Next.js applications but now provides a full suite of features for developing and deploying apps easily on their platform. Vercel offers a pretty generous hobby tier for the services that we used.
So, if you are looking to build something on the side, try out an idea, or build something just for fun, you might want to try out Vercel Stack. That’s it, folks! Thanks for reading!
Debugging Next applications can be difficult, especially when users experience issues that are difficult to reproduce. If you’re interested in monitoring and tracking state, automatically surfacing JavaScript errors, and tracking slow network requests and component load time, try LogRocket.
LogRocket captures console logs, errors, network requests, and pixel-perfect DOM recordings from user sessions and lets you replay them as users saw it, eliminating guesswork around why bugs happen — compatible with all frameworks.
LogRocket's Galileo AI watches sessions for you, instantly identifying and explaining user struggles with automated monitoring of your entire product experience.
The LogRocket Redux middleware package adds an extra layer of visibility into your user sessions. LogRocket logs all actions and state from your Redux stores.


Modernize how you debug your Next.js apps — start monitoring for free.

Claude Code is deceptively capable. Point it at a codebase, describe what you need, and it’ll autonomously navigate files, write […]

Compare the top AI development tools and models of February 2026. View updated rankings, feature breakdowns, and find the best fit for you.

Broken npm packages often fail due to small packaging mistakes. This guide shows how to use Publint to validate exports, entry points, and module formats before publishing.

Discover what’s new in The Replay, LogRocket’s newsletter for dev and engineering leaders, in the February 11th issue.
Would you be interested in joining LogRocket's developer community?
Join LogRocket’s Content Advisory Board. You’ll help inform the type of content we create and get access to exclusive meetups, social accreditation, and swag.
Sign up now
One Reply to "Building a shopping cart app with Vercel Stack"
When I try to create this table, I see this: Syntax error: there is no unique constraint matching given keys for referenced table “products”.
CREATE TABLE cart_items(
cart_item_id SERIAL,
product_id INT REFERENCES products(id),
user_id INT REFERENCES users(id),
PRIMARY KEY(product_id, user_id)
);