Since its inception in 2016, Next.js has seen massive growth and adoption across the dev community. It one of the most popular and, arguably, the most efficient React framework available. It has key features like a built-in routing system, an ability to write server codes in the same project as your client.

With frameworks like Next.js, you can build complex, multiple-page applications without the need for external libraries. When using just React, you’d have to write your server code elsewhere and then make requests from your React application to your server to fetch data. But with Next.js, you can write server codes inside of Next.js.
In this article, we will be creating a travel blog to learn how to use dynamic routing on both the client and server side in Next.js. We will also look at how pages are and should be rendered in Next.js. You can follow along in the GitHub repository for this tutorial.
Jump ahead:
One cool thing about Next.js is that you can control how pages are rendered to the client individually. All of your Next.js pages are server-rendered, but when you make use of the newly stable App Router feature, you can render pages from the client or server. We will be focusing on server-rendered pages in this article.
By default, Next.js pre-renders all your pages (server-rendered pages). This means that Next.js generates the HTML of each page ahead of time. There are two different ways of pre-rendering your pages: static site generation (SSG), and server-side rendering (SSR).
What makes these methods different is when the pages are generated. For example, when using SSG, the pages are generated at build time while the ones using SSR are generated at runtime. When we say runtime, it means the pages are generated on each request of a page.
This is very different from SSG, which only generates a page once and reuses it for each request. The reason SSR pages are regenerated on each request is that it was built for pages where the data will always change. So when you have a page where the data changes almost every time a user makes a request to that page, then you can make use of SSR.
In our tutorial, we will create a simple blog to demonstrate dynamic routing and SSR using Next.js and Agility, a headless content management system (CMS). If you don’t already have Agility, the first step of this tutorial will be for you to create an account.
We’re just going to set up the contents we need on Agility and later on, we will fetch these contents using the Agility Content Fetch JS SDK.
After signing up, you’ll be prompted to create a new instance:
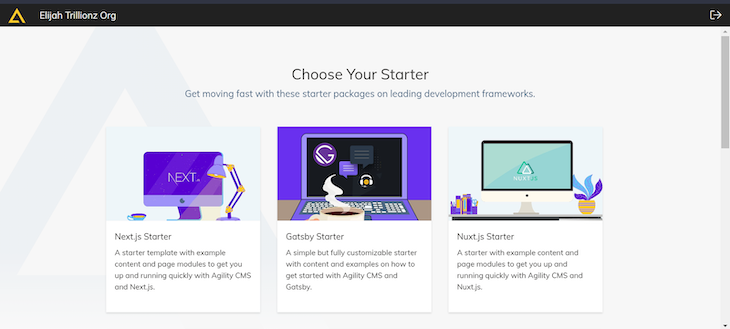
Select the Next.js Starter option. After this, you’ll be required to name the instance; choose whatever name you like.
By default, you’d already have a list of blog posts, so head to Content > Blog Posts from the left sidebar:
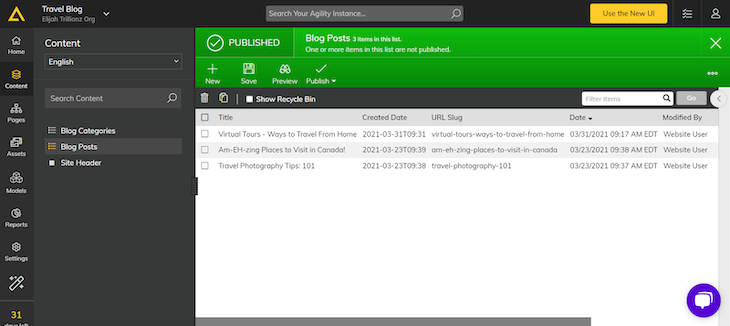
You can add more posts or simply use the default for this tutorial. Now that we have our account set up, let’s get the API key of our instance and save it somewhere. Head up to Settings > API Keys from the left sidebar. Agility provides two API keys: preview and live. For this tutorial, we will make use of the live API key, so copy that and save it somewhere.
To set up our development environment, let’s first create a new Next.js project. To do this, run the following command, which will trigger the installation of the latest version of Next.js:
npx create-next@latest
This command will trigger a few prompts. This tutorial uses JavaScript, but we will use Tailwind CSS for styling, so select Yes when asked about that. Finally, if you’re not familiar with using the src directory in Next.js , select No as the value for the src/ directory prompt.
Then, Next.js will ask if you want to use the regular Pages Router or the new App Router. The Pages Router simply means using the traditional router where all files under the pages directory are a route. The App Router is the new form of router where a special page.js file is used to define a route for any directory. For this tutorial, we will use the Pages Router because the App Router doesn’t support the traditional SSR used by the Pages Router. Although it is also rendered from the server, it is rendered as a component (React Server Components).
Once installed, open up the project in your preferred editor and create a .env file. This is the file where we will save our API key from Agility, so add it to your .gitignore file. Then, save the API key you copied earlier as AGILITY_API_KEY in your .env file.
Let’s proceed by installing the essential dependency required to retrieve content from Agility. Run the following command:
npm install @agility/content-fetch
Once installed, create an agility.lib.js file in the root directory. In this file, we will create the configuration to connect our project to our Agility instance. Paste the following in the file:
// agility.lib.js
import agility from '@agility/content-fetch';
const instanceGuid = '';

export const api = agility.getApi({
  guid: instanceGuid,
  apiKey: process.env.AGILITY_API_KEY,
  isPreview: false,
});
The instanceGuid is the ID of the instance you created. Head back to your Agility dashboard and on the top of the same page where you got your API key, you’ll find an Instance GUID section with a series of characters. Copy and paste the characters into the instanceGuid variable.
Unlike React, where you have to install an external library to handle routing, Next.js has a built-in routing system that handles all of your routes.
In this section, I’ll provide a brief introduction to routing in Next.js so you can follow along with this tutorial. If you would like more information, check out this in-depth guide to how routing works in Next.js.
As I mentioned earlier, this article focuses on the Pages Router. The way that this router works is that any .ts, .js, .tsx, and .jsx file that is under the pages directory becomes a route. In your file structure, you will find a pages directory with an index.js file.
In your terminal, run npm run dev. When you open the app’s local URL, you’ll observe that the contents in the index.js file are what’s displaying on the browser. To confirm, make some change to index.js and save it. Go back to your browser and you’ll see that the change has been made:
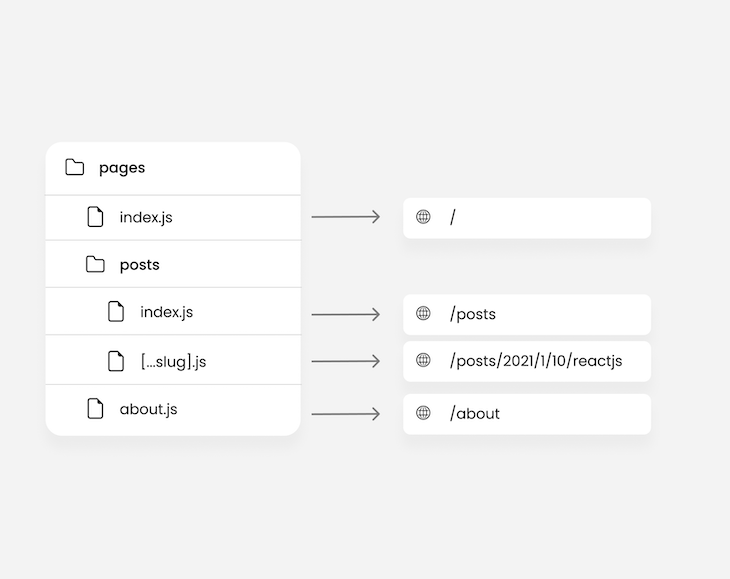
From the image above, we can deduce that:
index.js file of a directory represents the root route of that directorypages directory becomes a nested route. So a file structure like pages/users/profile.js will yield a /users/profile route[] and the spread operator (...). The braces indicate a dynamic route, and the spread operator is used to catch all routes of that directoryTo enhance your understanding of Next.js routing, we’ll now explore how to create pages and seamlessly navigate between them.
First, let’s update the contents of the / route by heading to pages/index.js and replacing it with the code below:
const Home = () => {
  return (
      <main className={`pb-14 mt-28 max-w-[800px] mx-auto`}>
        <h1 className='font-bold text-3xl mb-4'>Welcome to my blog</h1>
        <p>There are no posts yet</p>
      </main>
  );
};
export default Home;
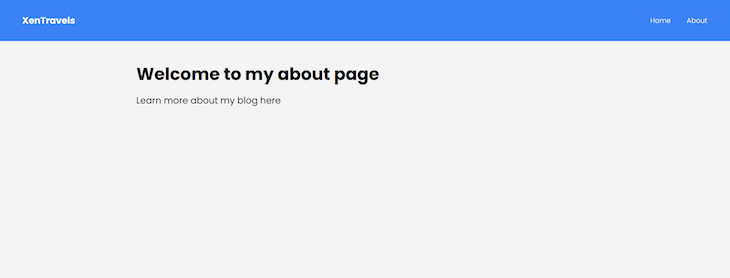
Now, let’s create a new About page. Head to the pages directory and create an about.js file. Paste the code below:
const About = () => {
  return (
      <main className={`pb-14 mt-28 max-w-[800px] mx-auto`}>
        <h1 className='font-bold text-3xl mb-4'>Welcome to my about page</h1>
        <p>Learn more about my blog here</p>
      </main>
  );
};
export default About;
Save the project and go to /about in your browser. This will load the About page.
Next, let’s work on creating a small header that navigates from the home page to the About page and vice versa. In the root directory of your project, create a components folder and in it, create a Header.js file. Now, paste the following:
import Link from 'next/link';

const Header = () => {
  return (
    <header
      className={`fixed w-full left-0 top-0 bg-blue-500 text-white py-6 px-10 flex items-center justify-between`}
    >
      <h1 className={`font-bold`}>XenTravels</h1>
      <ul className={'flex'}>
        <li>
          <Link
            href={'/'}
            className={
              'text-xs text-gray-200 hover:underline block ml-7 hover:text-white transition-all'
            }
          >
            Home
          </Link>
        </li>
        <li>
          <Link
            href={'/about'}
            className={
              'text-xs text-gray-200 hover:underline block ml-7 hover:text-white transition-all'
            }
          >
            About
          </Link>
        </li>
      </ul>
    </header>
  );
};
export default Header;
The Link component is used for navigating across different pages in your Next.js application. It is similar to the <a> tag in HTML, but it has more features. For example, when you use the Link component in a page, Next.js automatically prefetches the linked page in the background. This helps with smooth navigation.
In the example above, we can now import and use the Header component in both the pages/index.js and pages/about.js files. Assuming we had several pages, reusing the Header component in every single one of them would simply be redundant. Instead, we can import and use the Header component on a file that is global to all pages in our app. Let’s take a look at that next.
The _app.js file is global, applying to all pages — even those we haven’t created yet. Let’s utilize this by integrating the Header component within it.
Your _app.js file should now look like this:
import Header from '@/components/Header';
import '@/styles/globals.css';
export default function App({ Component, pageProps }) {
  return (
    <>
      <Header />
      <Component {...pageProps} />
    </>
  );
}
Dynamic routing is having an “n” number of different content with similar content structure. For example, take a social network where users can sign up and post content. When you want to display a list of users or a collection of posts by a specific user, it’s impractical to create a separate file for each individual. However, despite each user having unique data, the content structure will remain the same — every user page will feature a username, profile picture, and a list of their posts.
This is where dynamic routing comes in. In Next.js, we make use of braces [] to signify a dynamic route in the file structure. So a file structure like pages/users/[username].js could yield a /users/elijah or /users/elonmusk route as the case may be. Having a billion users would not change the file; they are all going to make use of the same file structure, but each of them will have unique details on the profile.
These are the steps to dynamic routing:
pages/users/[username].js for a set of users/users/elijah, you’ll be able to fetch the username as a query parameter from that pageusername you received (in this case, it is elijah), you can fetch the details of that user:
The catch-all routes feature is often very useful in scenarios where you want all routes of a particular directory to return a similar page. For example, we saw an image where a file structure like pages/posts/[...slug].js would yield a /posts/2021/1/10/reactjs URL path.
Let’s say I want all posts in my blog to be fetched by the year, month, and day:

Notice that the webpage on the right has an additional route (i.e., /nothing), but didn’t throw an error. Instead, it still returned the blog post of the specified day (we will see how this was done later).
Next.js employs the spread operator in [...slug].js to return all the routes. Within that file, you can get your desired values and disregard the rest.
Catch-all routes can be made optional by adding double braces: pages/posts/[[...slug]].js. This means that while [[...slug]].js can catch the posts/2021/1/10/anything route, it can also catch posts. We will see a real-world application of this later.
Dynamic segments are made when you wrap square braces around a folder within pages. You can think of it as a dynamic folder. For example, pages/[username]/posts.js can yield /elijah/posts or /elonmusk/posts.
You can have multiple dynamic segments within a route. In a travel blog for example, you could have pages/categories/[continent]/[country]/[state].js, which can yield /categories/africa/nigeria/lagos.
Alternatively, you could use a structure like pages/posts/[year]/[month]/[day].js to render paths such as posts/2022/1/11. This approach mirrors the catch-all routes we discussed earlier, but with a more explicit file structure.
Static routes take precedence over dynamic routes. Consider a folder, such as pages/posts, containing both [slug].js (dynamic) and my-intro-post.js (static). When navigating to posts/my-intro-post in a browser, it loads the static file. But for any route other than “my-intro-post”, the dynamic file is loaded.
Query parameters are often used to represent query string parameters and dynamic routing parameters. Query string parameters are the parameters of a query string in a URL. For example, in google.com/search?q=somesearch, the q is a query string param and the value is somesearch. When you see query parameters in this article, we are referring to dynamic routing parameters.
Dynamic routing parameters are of a dynamic route. For example, a route like mytravelblog.com/posts/traveling-to-new-york with a file structure like posts/[slug].js will return slug as the dynamic route param with the value of traveling-to-new-york.
In this section, we will see how to access query parameters within a dynamic route. Head back to your project’s root directory, create a posts.json file, and paste this:
{
  "posts": [
    {
      "id": 1,
      "title": "Exploring the Serene Beaches of Bali",
      "slug": "exploring-the-serene-beaches-of-bali",
      "body": "<p>Bali, the Island of Gods, is renowned for its picturesque beaches and stunning landscapes</p>"
    },
    {
      "id": 2,
      "title": "A Safari Adventure in the Heart of Africa",
      "slug": "a-safari-adventure-in-the-heart-of-africa",
      "body": "<p>Embark on a once-in-a-lifetime safari adventure in the heart of Africa...</p>"
    },
  ]
}
For now, we’ll retrieve posts locally from posts.json rather than from Agility. Start by creating a blog folder inside pages. Within this folder, we’ll set up two files: [slug].js and index.js:
// blog/index.js
import postsData from 'posts.json';
export default function Blog() {
  const posts = postsData.posts;
  return (
    <main className={`pb-14 mt-28 max-w-[800px] mx-auto`}>
      <ul className={'grid grid-cols-3 gap-x-4 gap-y-8 items-center'}>
        {posts.map((post) => (
          <li key={post.id}>
            <Link
              href={`/blog/${post.slug}`}
              className={
                'block bg-white rounded-md shadow-md transition-all hover:scale-125'
              }
            >
              <span className={'px-5 pb-6 mt-5 block font-medium capitalize'}>
                {post.title}
              </span>
            </Link>
          </li>
        ))}
      </ul>
    </main>
  );
}
In the code above, we are fetching the posts directly from posts.json and displaying them as a list to our users. Now let’s dynamically render each post from [slug].js:
//blog/[slug].js
import { useRouter } from 'next/router';

export default function PostItem() {
  const { query } = useRouter();
  const [post, setPost] = useState({});
  useEffect(() => {
    if (query?.slug) {
      const post = postsData.posts.find((post) => query.slug === post.slug);
      setPost(post);
    }
  }, [query?.slug]);
  return (
    <main className={'pb-14 mt-28 max-w-[800px] mx-auto'}>
      <div
        className={
          'mt-10 border-b-2 pb-3 border-[#ccc] flex justify-between items-center'
        }
      >
        <h1 className={'font-bold text-3xl capitalize leading-relaxed'}>
          {post.title}
        </h1>
      </div>
      <div
        className={'blog-body mt-10'}
        dangerouslySetInnerHTML={{ __html: post.body }}
      />
    </main>
  );
}
The useRouter Hook provides several properties and methods for accessing all the properties of a route and for manually taking control of how you want the Next.js routing system to work.
One of the properties of this Hook is the query parameter that gives you access to the parameter of a dynamic route. In our example above, the parameter is slug because we named the file [slug].js. This is how we access query parameters in dynamic routes — we make use of the useRouter Hook. We’ll look at how this works in SSR in a later section.
So far, we’ve only seen how to use the Link component to navigate across different pages in Next.js. There is another way of navigating across different pages, and that is navigating imperatively.
The Link component is the declarative way of navigating to a different page in Next.js while the router.push method is the imperative way. Navigating imperatively means you tell Next.js how it should transit to the next page. For example, the router.push method, which is from the useRouter Hook, is used to programmatically navigate to a different page:
export default function Dashboard() {
  const router = useRouter();

  useEffect(() => {
    if (!token) return router.push('/login');
  }, []);

  return <></>;
}
Note that router.push doesn’t generate an <a> tag, similar to window.location. Consequently, crawlers may not detect it, which can be detrimental to Search Engine Optimization (SEO). However, in some cases, this might be the desired outcome.
Next.js has an api folder that allows you to structure all of your server routes. Structuring your server routes within this folder is the same way you’d do it in the client. This means you could have dynamic API routes.
Recall that our posts were contained within the posts.json file. Now, instead of rendering it directly to the client, we can do it through the server. Head to pages/api and create a posts directory. In this new directory, create a new file called index.js:
//pages/api/posts/index.js
import postsData from 'posts.json';

export default function handler(req, res) {
  const posts = postsData.posts;
  res.status(200).json(posts);
}
This works similarly to the way an Express server works. Open your browser or Postman, and make a request to /api/posts. You’ll retrieve all your posts from the posts.json file.
This is just a simple example with local data. In a real-world application, you might pull data from a database like MongoDB, complete with models and other features. So it’s a fully functional Node.js server.
The next API route we would need is for fetching each post, so create a [slug].js file:
// pages/api/posts/[slug].js
import postsData from 'posts.json';

export default function handler(req, res) {
  const { slug } = req.query;
  const post = postsData.posts.find((post) => post.slug === slug);
  res.status(200).json(post);
}
When making a request to this API route, a unique slug will have to be passed to it, just like we’ve seen in the client.
Now we can update the files in our blog directory to fetch from our API routes:
// blog/index.js
export default function Blog() {
  useEffect(() => {
    const res = await fetch('http://localhost:3000/api/posts');
    const posts = await res.json()
  }, []);

  return ()
}

// blog/[slug].js
export default function PostItem() {
  useEffect(() => {
    const res = await fetch(`http://localhost:3000/api/posts/${query.slug}`);
    const post = await res.json()
  }, [])

  return ();
}
Client-side data fetching is not great for SEO in Next.js apps. But in cases where you have to fetch from the client, you can make use of client-side data-fetching libraries like SWR.
Nested routing covers both multiple dynamic segments and multiple dynamic routes. So far we’ve only seen an example of a nested route with multiple dynamic segments. Now let’s look at an example in action. For this example, we will be going a little bit beyond the scope of our tutorial to make use of JSONPlaceholder.
We’re going to be fetching a list of posts for different users. Create a file structure like pages/users/[userId]/posts.js and paste the code below into the posts.js file:
//pages/users/[userId]/posts.js

const UserPosts = () => {
  const [posts, setPosts] = useState([]);
  const { query } = useRouter();

  useEffect(() => {
    if (query?.userId) {
      (async () => {
        const res = await fetch(
          `https://jsonplaceholder.typicode.com/posts?userId=${query.userId}&_limit=3`
        );
        const posts = await res.json();
        posts.length >= 1 && setPosts(posts);
      })();
    }
  }, [query?.userId]);

  return (
    <main className={`pb-14 mt-28 max-w-[800px] mx-auto`}>
      <ul className={'grid grid-cols-3 gap-x-4 gap-y-8 items-center'}>
        {posts.map((post) => (
          <li key={post.id}>
            <span className={'px-5 pb-6 mt-5 block font-medium capitalize'}>
              {post.title}
            </span>
          </li>
        ))}
      </ul>
    </main>
  );
};
Using server-side rendering is very useful when you have data that changes often. This is why Next.js regenerates the HTML of pages using SSR whenever a request is made to that page.
In this section, we will look at how SSR can be used with dynamic routing and how we can access the query parameters inside the getServerSideProps. If you’re new to SSR, getServerSideProps is the function you create to indicate that a page should use SSR.
The way it works is that you create a function within a page, name it getServerSideProps, and export it:
export const getServerSideProps = () => {};
Any code you write within the getServerSideProps function runs on the server, and Next.js usually runs the getServerSideProps function before rendering the page. This means you can make all of your fetch requests here, and prepare them before they are displayed to the client.
To see this in action, head back to pages/index.js, create a getServerSideProps function, and paste the following into the function:
const posts = await api.getContentList({
  referenceName: 'posts',
  languageCode: 'en-us',
  sort: 'properties.date',
});
return {
  props: {
    posts: posts.items,
  },
};
api is imported from ../agility.lib.js. The function returns an object of props, which will be passed into our page component as props:
export default function Home({ posts }) {
  return (
    <div>
      <main className={`pb-14 mt-28 max-w-[800px] mx-auto`}>
        <ul className={'grid grid-cols-3 gap-x-4 gap-y-8 items-center'}>
          {posts.map((post, index) => (
            <PostCard postFields={post.fields} key={index} />
          ))}
        </ul>
      </main>
    </div>
  );
}
You can find the PostCard component in the GitHub repo here.
The same applies for dynamic routes. If we aim to access each of these posts, initiate a posts directory, and create a [slug].js file within it.
Recall that we already have a blog directory where the posts are fetched locally. Now we want to fetch from our Agility instance:
// pages/posts/[slug].js

export const getServerSideProps = async (context) => {
  const { slug } = context.query;
  const posts = await api.getContentList({
    referenceName: 'posts',
    languageCode: 'en-us',
  });

  const post = posts.items?.find((post) => post.fields.slug === slug);

  return {
    props: {
      post: post.fields,
    },
  };
};

const PostItem = ({ post }) => {
  return (
    <main className={'pb-14 mt-28 max-w-[800px] mx-auto'}>
      <div
        className={
          'mt-10 border-b-2 pb-3 border-[#ccc] flex justify-between items-center'
        }
      >
        <h1
          className={
            'font-bold text-3xl capitalize leading-relaxed max-w-[500px]'
          }
        >
          {post.title}
        </h1>
        <span className={'text-xs text-[#aaa]'}>
          {new Date(post.date).toDateString()}
        </span>
      </div>
      <div
        className={'blog-body mt-10'}
        dangerouslySetInnerHTML={{ __html: post.content }}
      />
    </main>
  );
};
export default PostItem;
Because we’re fetching in the server, we can’t use the useRouter Hook. But the getServerSideProps provides a context param that has properties of the page’s route, including the query. This method facilitates fetching dynamic data within a dynamic route using SSR.
So far, we’ve seen multiple common examples of using dynamic segments and routes. In this section, we will take a look at a common use case of query string parameters for filtering posts. But instead of using query string parameters, we will use the optional catch-all route.
Head to index.js in the pages directory, and rename it [[...filter]].js:
export const getServerSideProps = async ({ query }) => {
  const posts = await api.getContentList({
    referenceName: 'posts',
    languageCode: 'en-us',
    sort: 'properties.date',
  });

  if (query?.filter) {
    const [year, month] = query.filter;
    const filteredPosts = posts.items.filter(({ fields: post }) => {
      const date = new Date(post.date);
      if (date.getFullYear() === +year) {
        if (month && date.getMonth() + 1 === +month) return post;
        else if (!month) return post;
      }
    });

    return {
      props: {
        posts: filteredPosts,
      },
    };
  }

  return {
    props: {
      posts: posts.items,
    },
  };
};

export default function Home({ posts }) {
  return (
    <main className={`pb-14 mt-28 max-w-[800px] mx-auto`}>
      <ul className={'grid grid-cols-3 gap-x-4 gap-y-8 items-center'}>
        {posts.map((post, index) => (
          <PostCard postFields={post.fields} key={index} />
        ))}
      </ul>
    </main>
  );
}
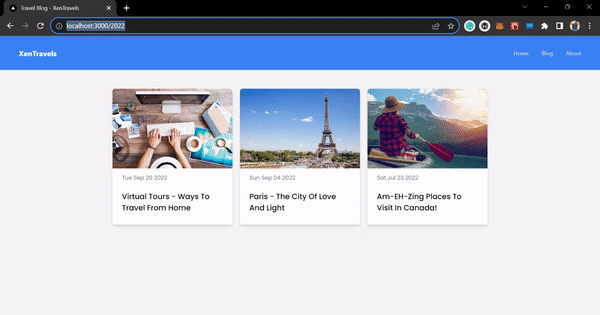
Now, when you navigate to /2022, you’ll get all the posts from 2022, and /2022/9 will pull up all the posts from September 2022:
In this article, we delved deep into dynamic routing, both on the client and server sides, and explored nested routing and query parameters with SSR. As you decide which pages in your app should use SSR and which should use SSG, consider whether you want the page to be pre-rendered during build time or runtime.
Pages using SSR are pre-rendered during runtime, which is not ideal for SEO. On the other hand, pages using SSG are pre-rendered during build time, which is often excellent for SEO.
With this knowledge, you should be well-equipped to create a fully functional full-stack web application, just as we demonstrated in this article using the Agility CMS.
Thanks for reading and happy hacking!
Debugging Next applications can be difficult, especially when users experience issues that are difficult to reproduce. If you’re interested in monitoring and tracking state, automatically surfacing JavaScript errors, and tracking slow network requests and component load time, try LogRocket.
LogRocket captures console logs, errors, network requests, and pixel-perfect DOM recordings from user sessions and lets you replay them as users saw it, eliminating guesswork around why bugs happen — compatible with all frameworks.
LogRocket's Galileo AI watches sessions for you, instantly identifying and explaining user struggles with automated monitoring of your entire product experience.
The LogRocket Redux middleware package adds an extra layer of visibility into your user sessions. LogRocket logs all actions and state from your Redux stores.


Modernize how you debug your Next.js apps — start monitoring for free.

Learn how to build smooth staggered animations in CSS using modern features like sibling-index(), complete with practical examples, fallbacks, and accessibility tips.

Compare the top AI development tools and models of July 2026. View updated rankings, feature breakdowns, and find the best fit for you.

Learn how to detect unused and ghost dependencies in JavaScript projects using Knip, a project-level linter that keeps your dependency graph accurate.

Learn how Storybook MCP enables AI agents to understand your component library, generate accurate UI, and validate code using documentation, stories, and automated tests.
Would you be interested in joining LogRocket's developer community?
Join LogRocket’s Content Advisory Board. You’ll help inform the type of content we create and get access to exclusive meetups, social accreditation, and swag.
Sign up now

