Editor’s note: This article was updated on 2 Jun 2022 to include more up-to-date information on Create React App and Netlify.

Progressive web apps are a (terribly named) wonderful idea. You can build an app that serves all devices and form factors once using web technologies. It can be accessed over the web but also surface on the home screen of your Android or iOS device. That app can work offline, display a splash screen when it launches, and have notifications, too.
PWAs can be a money saver for your business. The alternative, should you want an app experience for your users, is building the same application using three different technologies (one for web, one for Android, and one for iOS).
When you take this path, it’s hard to avoid a multiplication of cost and complexity. It often leads to dividing up the team as each work on a different stack. It’s common to lose a certain amount of focus as a consequence. PWAs can help here; they are a compelling alternative not just from a developer standpoint, but from a resourcing one, too.
However, the downside of PWAs is that they are more complicated than normal web apps; writing one from scratch is just less straightforward. But there are easy onramps to building a PWA that help guide you on the road to success. This post will highlight one of these: how you can travel from zero to a PWA of your very own using React and TypeScript.
Note that this post presumes knowledge of:
To create our PWA, we’re going to use Create React App. This excellent project has long had inbuilt support for making PWAs. In recent months, that support has matured to a very satisfactory level.
From Create upwards, it is possible to create a /src/serviceWorker.js to benefit from the inbuilt support for Workbox’s InjectManifest plugins, which will compile our service workers and inject the URLs for pre-caching. The easiest way to get started creating a new PWA is to use one of the custom templates shipped with Create React App.
To create a PWA with TypeScript support using Create React App, run the npx command below in the terminal:
npx create-react-app pwa-react-typescript --template cra-template-pwa-typescript
This builds you a React web app built with TypeScript with support for PWA out of the box. It can be tested locally with the following:
cd pwa-react-typescript
yarn start
From web app to PWA is incredibly simple — it’s just a question of opting in to offline behavior.
If you open up the index.tsx file in your newly created project, you’ll find this code:
// If you want your app to work offline and load faster, you can change
// unregister() to register() below. Note this comes with some pitfalls.
// Learn more about service workers: https://bit.ly/CRA-PWA
serviceWorker.unregister();
As the hint suggests, swap serviceWorker.unregister() for serviceWorker.register() and you now have a PWA. Amazing! What does this mean? Well, to quote the docs:
– All static site assets are cached so that your page loads fast on subsequent visits, regardless of network connectivity (such as 2G or 3G). Updates are downloaded in the background.
– Your app will work regardless of network state, even if offline. This means your users will be able to use your app at 10,000 feet and on the subway.
It will take care of generating a service worker file that will automatically precache all of your local assets and keep them up to date as you deploy updates. The service worker will use a cache-first strategy for handling all requests for local assets, including navigation requests for your HTML, ensuring that your web app is consistently fast, even on a slow or unreliable network.
Under the bonnet, Create React App is achieving this through the use of technology called Workbox. Workbox describes itself as “a set of libraries and Node modules that make it easy to cache assets and take full advantage of features used to build Progressive Web Apps.”
The good folks at Google are aware that writing your own PWA can be tricky. There’s much new behavior to configure and be aware of; it’s easy to make mistakes. Workbox is there to help ease the way forward by implementing default strategies for caching or offline behavior, which can be controlled through configuration.
A downside of the usage of Workbox in create-react-app is that (as with most things in Create React App) there’s little scope for configuration of your own if the defaults don’t serve your purpose. This may change in the future — indeed, there’s an open PR that adds this support.
But it’s not just an offline experience that makes this a PWA. Other important factors are:
All of the above is “in the box” with Create React App. Let’s start customizing these.
First of all, we’ll give our app a name. Fire up index.html and replace <title>React App</title> with <title>My PWA</title>. (Feel free to concoct a more imaginative name than the one I’ve suggested.)
Next, open up manifest.json and replace the following:
  "short_name": "React App",
  "name": "Create React App Sample",
With this:
  "short_name": "My PWA",
  "name": "My PWA",
Your app now has a name. The question you might be asking is: What is this manifest.json file? Well, to quote the good folks at Google:
The web app manifest is a simple JSON file that tells the browser about your web application and how it should behave when ‘installed’ on the user’s mobile device or desktop. Having a manifest is required by Chrome to show the Add to Home Screen prompt. A typical manifest file includes information about the app name, icons it should use, the
start_urlit should start at when launched, and more.
So the manifest.json is essentially metadata about your app. Here’s what it should look like right now:
{
  "short_name": "My PWA",
  "name": "My PWA",
  "icons": [
    {
      "src": "favicon.ico",
      "sizes": "64x64 32x32 24x24 16x16",
      "type": "image/x-icon"
    },
    {
      "src": "logo192.png",
      "type": "image/png",
      "sizes": "192x192"
    },
    {
      "src": "logo512.png",
      "type": "image/png",
      "sizes": "512x512"
    }
  ],
  "start_url": ".",
  "display": "standalone",
  "theme_color": "#000000",
  "background_color": "#ffffff"
}
You can use the above properties (and others not yet configured) to control how your app behaves. For instance, if you want to replace the icons your app uses, then it’s a simple matter of:
public foldermanifest.json<link rel="apple-touch-icon" ... /> in the index.htmlSo far, we have a basic PWA in place. It’s installable. You can run it locally and develop it with yarn start. You can build it for deployment with yarn build.
What this isn’t, however, is recognizably a web app in the sense that it doesn’t have support for different pages/URLs. We’re typically going to want to break up our application this way. Let’s do that now. We’re going to use react-router, the de facto routing solution for React.
To add it to our project (and the required type definitions for TypeScript), we use the following:
yarn add react-router-dom @types/react-router-dom
Now let’s split up our app into a couple of pages. We’ll replace the existing App.tsx with this:
import React from "react";
import { BrowserRouter as Router, Routes, Route, Link } from "react-router-dom";
import About from "./About";
import Home from "./Home";

const App: React.FC = () => (
  <Router>
    <nav>
      <ul>
        <li>
          <Link to="/">Home</Link>
        </li>
        <li>
          <Link to="/about">About</Link>
        </li>
      </ul>
    </nav>
    <Routes>
      <Route path="/about">
        <About />
      </Route>
      <Route path="/">
        <Home />
      </Route>
    </Routes>
  </Router>
);
export default App;
This will be our root page. It has the responsibility of using react-router to render the pages we want to serve, and also to provide the links that allow users to navigate to those pages. In making our changes, we’ll have broken our test (which checked for a link we’ve now deleted), so we’ll fix it with the following.
Replace the App.test.tsx with this:
import React from 'react';
import { render } from '@testing-library/react';
import App from './App';

test('renders about link', () => {
  const { getByText } = render();
  const linkElement = getByText(/about/i);
  expect(linkElement).toBeInTheDocument();
});
You’ll have noticed that in our new App.tsx we import two new components (or pages): About and Home. Let’s create those.
First, About.tsx:
import React from "react";

const About: React.FC = () => (
  <h1>This is a PWA</h1>
);

export default About;
Then, Home.tsx:
import React from "react";

const Home: React.FC = () => (
  <h1>Welcome to your PWA!</h1>
);

export default Home;
Now that we’ve split up our app into multiple sections, we’re going to split the code, too. A good way to improve loading times for PWAs is to ensure that the code is not built into big files.
At the moment, our app builds a single-file.js. If you run yarn build, you’ll see what this looks like:
  47.88 KB  build/static/js/2.89bc6648.chunk.js
  784 B     build/static/js/runtime-main.9c116153.js
  555 B     build/static/js/main.bc740179.chunk.js
  269 B     build/static/css/main.5ecd60fb.chunk.css
Notice the build/static/js/main.bc740179.chunk.js file. This is our single-file.js. It represents the compiled output of building the TypeScript files that make up our app. It will grow and grow as our app grows, eventually becoming problematic from a user loading speed perspective.
Create React App is built upon webpack. There is excellent support for code splitting in webpack, and thus, Create React App supports it by default. Let’s apply it to our app. Again, we’re going to change App.tsx.
Where we previously had:
import About from "./About";
import Home from "./Home";
Let’s replace it with:
const About = lazy(() => import('./About'));
const Home = lazy(() => import('./Home'));
This is the syntax to lazily load components in React. You’ll note that it internally uses the dynamic import() syntax, which webpack uses as a “split point.”
Let’s also give React something to render while it waits for the dynamic imports to be resolved. Just inside our <Router> component, we’ll add a <Suspense> component, too:
 <Router>
    <Suspense fallback={<div>Loading...</div>}>
    {/*...*/}
    </Suspense>
  </Router>
The <Suspense> component will render the <div>Loading...</div> while it waits for a route’s code to be dynamically loaded.
So our final App.tsx component ends up looking like this:
import React, { lazy, Suspense } from "react";
import { BrowserRouter as Router, Switch, Route, Link } from "react-router-dom";
const About = lazy(() => import("./About"));
const Home = lazy(() => import("./Home"));

const App: React.FC = () => (
  <Router>
    <Suspense fallback={<div>Loading...</div>}>
      <nav>
        <ul>
          <li>
            <Link to="/">Home</Link>
          </li>
          <li>
            <Link to="/about">About</Link>
          </li>
        </ul>
      </nav>
      <Switch>
        <Route path="/about">
          <About />
        </Route>
        <Route path="/">
          <Home />
        </Route>
      </Switch>
    </Suspense>
  </Router>
);

export default App;
This is now a code-split application. How can we tell? If we run yarn build again, we’ll see something like this:
  47.88 KB          build/static/js/2.89bc6648.chunk.js
  1.18 KB (+428 B)  build/static/js/runtime-main.415ab5ea.js
  596 B (+41 B)     build/static/js/main.e60948bb.chunk.js
  269 B             build/static/css/main.5ecd60fb.chunk.css
  233 B             build/static/js/4.0c85e1cb.chunk.js
  228 B             build/static/js/3.eed49094.chunk.js
Note that we now have multiple *.chunk.js files: our initial main.*.chunk.js, then 3.*.chunk.js representing Home.tsx, and 4.*.chunk.js representing About.tsx.
As we continue to build out our app from this point, we’ll have a great approach in place to ensure that users load files as they need to and that those files should not be too large — great performance that will scale.
Now that we have our basic PWA in place, let’s deploy it so the outside world can appreciate it. We’re going to use Netlify for this.
The source code for our PWA lives on GitHub here.
We’re going to log in to Netlify, click on the Create a new site option, and select GitHub as the provider. We’ll need to authorize Netlify to access our GitHub.
You may need to click the Configure Netlify on GitHub button to grant permissions for Netlify to access your repo, like so:
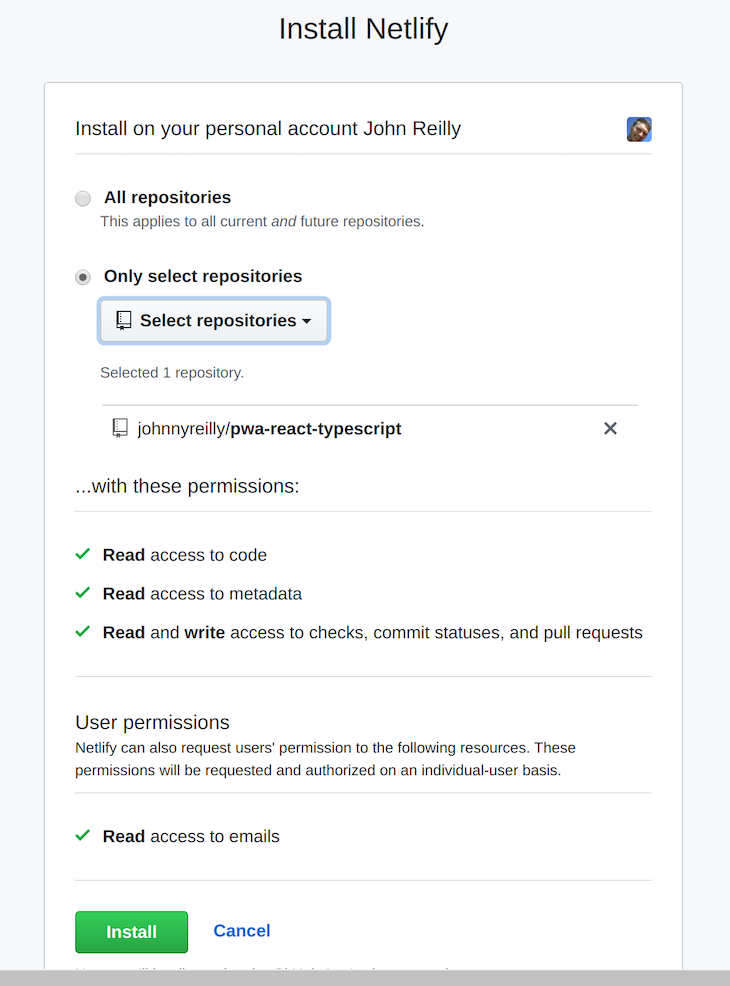
Then you can select your repo from within Netlify. All of the default settings that Netlify provides should work for our use case:
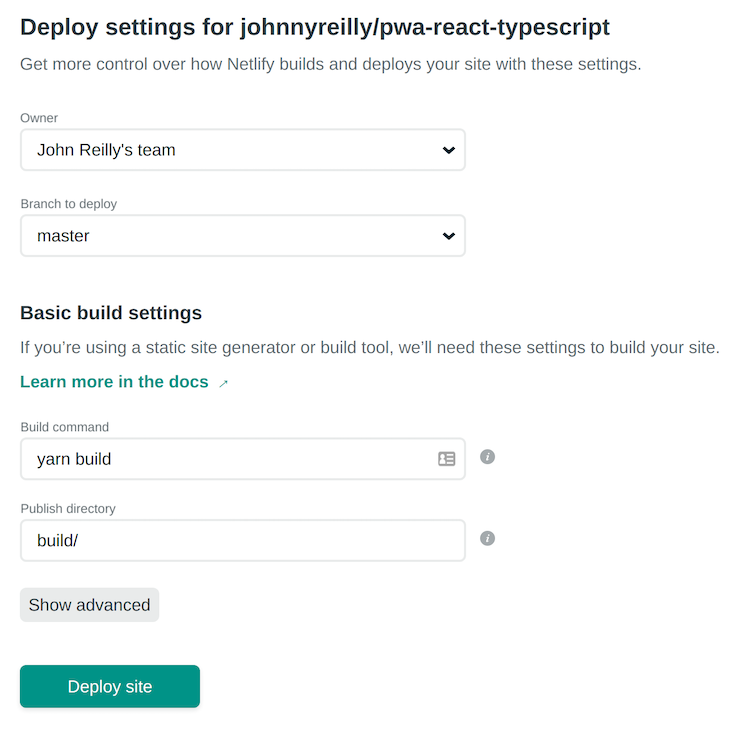
Let’s hit the magic Deploy site button! In a matter of minutes, you’ll find that Netlify has deployed our PWA.

If we browse the URL provided by Netlify, we’ll be able to see the deployed PWA in action. You also have the opportunity to set up a custom domain name, which you would typically want outside of a simple demo such as this. Importantly, this will be served over HTTPS, which will allow our service worker to operate.
Now that we know it’s there, let’s see how what we’ve built holds up according to the professionals. We’re going to run the Google Chrome DevTools Audit against our PWA:

That is a good start for our PWA!
Converting your new or existing React applications to PWA has numerous benefits, especially considering that the future of frontend development is anchored on web optimization. This approach will help you build a performant web application from the start.

LogRocket lets you replay user sessions, eliminating guesswork by showing exactly what users experienced. It captures console logs, errors, network requests, and pixel-perfect DOM recordings — compatible with all frameworks, and with plugins to log additional context from Redux, Vuex, and @ngrx/store.
With Galileo AI, you can instantly identify and explain user struggles with automated monitoring of your entire product experience.
Modernize how you understand your web and mobile apps — start monitoring for free.
Install LogRocket via npm or script tag. LogRocket.init() must be called client-side, not
server-side
$ npm i --save logrocket

// Code:

import LogRocket from 'logrocket';
LogRocket.init('app/id');
// Add to your HTML:

<script src="https://cdn.lr-ingest.com/LogRocket.min.js"></script>
<script>window.LogRocket && window.LogRocket.init('app/id');</script>
Hey there, want to help make our blog better?
Join LogRocket’s Content Advisory Board. You’ll help inform the type of content we create and get access to exclusive meetups, social accreditation, and swag.
Sign up now
Discover how the Interface Segregation Principle (ISP) keeps your code lean, modular, and maintainable using real-world analogies and practical examples.

<selectedcontent> element improves dropdowns

Learn how to implement an advanced caching layer in a Node.js app using Valkey, a high-performance, Redis-compatible in-memory datastore.

Learn how to properly handle rejected promises in TypeScript using Angular, with tips for retry logic, typed results, and avoiding unhandled exceptions.


7 Replies to "Build a progressive web app (PWA) with React"
Great article to get started with PWA and being smart about breaking up code.
Just wanted to point out something small that needs to be corrected in your article (where you break up the code in different chunks):
It currently states:
Note that we now have multiple *.chunk.js files: our initial main.*.chunk.js, then 3.*.chunk.js representing Home.tsx, and 4.*.chunk.js representing Home.tsx.
As you can see you named them both Home.tsx instead of 1 About.tsx and 1 Home.tsx
Thanks for pointing that out, post is updated
Two questions! So does create react totally handle what goes on in the service worker? I watched a tutorial where this logic was written manually, but it was not create react app.
With a PWA is there any any difference in how we handle react state, for example the context api? Thank you.
These days it is not necessary to write three different applications (web, ios, android).
Take a look at react-native (ReactJS for IOs/Android) or Xamarin (C# for Android and IOS).
But of course, a PWA nevertheless saves this effort independent from which second app you create.
Great ! Thanks
Great article, thanks, but it is a bit stale for now. Anyone having issues with Switch would like to read this React Router v5-v6 transition article: https://dev.to/arunavamodak/react-router-v5-vs-v6-dp0
Thanks for sharing your article.