Editor’s note: This article was last updated by Muhammed Ali on 4 November 2024 to cover common issues when building micro-frontends and their solutions, as well as examples of micro-frontend communication strategies such as event-based communication and using React’s Context API.

Working on large-scale projects and managing their codebases can be a big challenge for teams. Although micro-frontends have been in the picture for a while, they are growing in popularity because of their unique features.
With a micro-frontend, multiple teams can work on individual modules of the same project without impacting the other modules; it doesn’t matter how many modules are added to a current system.
In this article, we’ll cover the basics of what a micro-frontend is and learn how to implement one using React. We’ll also discuss the advantages of using micro-frontends in your applications. Let’s get started!
The current web development trend involves building a monolithic frontend app that sits on top of a microservice architecture. But, as developers on different teams contribute to this frontend monolith, it becomes increasingly difficult to maintain. Microservices provide a solution for this.
The term micro-frontend extends the concept of microservices to the frontend; a micro-frontend is to the frontend what microservices are to the backend. Essentially, the goal of a micro-frontend is to treat a web app as a composition of features owned by different, independent teams with different missions; each team works end-to-end, from databases to the UI.
Micro-frontends don’t follow any particular structure and have no fixed boundaries. Your project will likely evolve as time passes, and you may need to revise your micro-frontend as you go along:
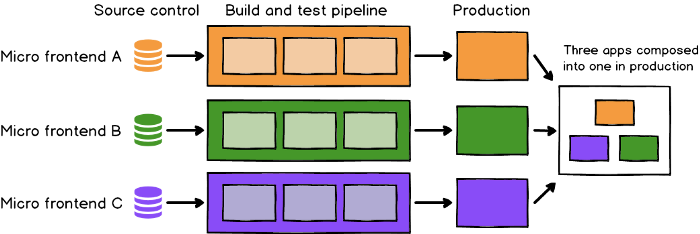
Image source: https://microfrontends.com/
React is a popular frontend tech stack, so it’s a great choice for implementing a micro-frontend. The micro-frontend architecture is still fairly new and being adopted by different frameworks, so best practices are still evolving. Therefore, you may find it challenging to implement a micro-frontend from scratch. Here is where the create-mf-app package comes in.
According to its docs, create-mf-app creates either a module federation application, API server, or library based on one of its templates. It is framework agnostic, meaning it supports multiple frameworks and libraries including Preact, React, and Svelte.
Let’s cover some best practices for you to keep in mind when implementing a micro-frontend architecture.
Each team should develop its features as an independent app, without using a shared state or depending on global variables. Consequently, there should be no sharing of runtime, even if all teams use the same framework.
When isolation is not yet possible, teams should agree on the ownership of namespaces to avoid possible collisions, i.e., CSS, events, local storage, etc.
Each independent team should implement resilient features; even if JavaScript is not enabled or fails, the feature should still work. Additionally, you should foster performance through universal rendering and progressive enhancement.
You should favor browser events for communication instead of building a global pub/sub system; keep cross-team APIs simple.
Simply put, micro-frontends make web applications more maintainable. If you’ve ever been part of building a large application, you know it’s very tedious to manage everything; micro-frontends work similarly to the divide-and-conquer rule.
Now, let’s understand the most valuable benefits of using a micro-frontend.
A significant advantage of the micro-frontend architecture is that you can separate a single body into individual pieces that can be deployed independently. Vercel can support an individual repo with different frontends regardless of the language or framework, deploying them together. Otherwise, you can use deployment services like Netlify. Once the micro-frontend is deployed, you can use it as an individual frontend only.
To secure your micro-frontend, you can use an SSL certificate like Wildcard, a single or multi-domain, or a SAN SSL certificate. One SAN or multi-domain SSL certificate can secure multiple sites and subdomains.
With a micro-frontend architecture, you can combine any language or framework in a single project, like React, Vue, Angular, etc. Each frontend team can independently choose and upgrade its own tech stack without an obligation to coordinate with other teams.
Your team can develop and deploy your frontend whenever you want. There are zero dependencies associated with individual modules, meaning releases can be done quickly. The main goal of defining the micro-frontend is faster iterations.
Each team handles an isolated app feature, which is easier for new developers to understand compared to a frontend monolith. Consequently, the learning curve is linear, translating to lower input costs and higher overall output for new developers.
Before the introduction of micro-frontends, vertical domain ownership was only possible on the backend via the microservices architecture. Companies could scale product development among independent teams to promote ownership of the backend, but, the frontend remained monolithic.
With the introduction of the micro-frontend, the frontend is split into components with vertical domains owned by each team, ranging from the database to the UI.
Micro-frontends foster code reusability because one team can implement and deploy a component that can be reused by multiple teams.
Before jumping into integration testing, it’s better to test individual pieces of an application. Teams will test the micro-frontend before testing the application, thereby decreasing the chances of bugs in the real system.
Apart from that, other advantages include a small codebase that’s easily maintainable and the ability to quickly add or remove any module from the system.
React enables the development of components and also supports a modular approach in web development which is helpful in developing microfrontends. It is compatible with various state management libraries and context providers. This makes React suitable for micro-frontend architectures.
A major advantage of using React is its ecosystem and community support, which offers many libraries and tools that can be integrated into micro-frontends for routing, state management, and UI component libraries, enhancing the development experience.
In this tutorial, we’ll build a micro-frontend with React. To follow along, you’ll need the following:
To follow along with the code, you can check out the GitHub repo for this project.
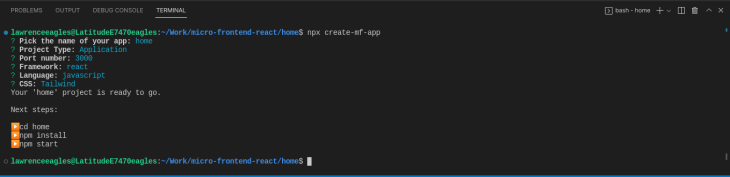
Create an application folder called micro-frontend-react. To bootstrap a React micro-frontend app, from this folder, run npx create-mf-app and pass the following data to the interactive terminal:
homeApplication3000Select React, JavaScript, and Tailwind as your stack. A React micro-frontend application called home will be bootstrapped for you. In your terminal, you should see the following:
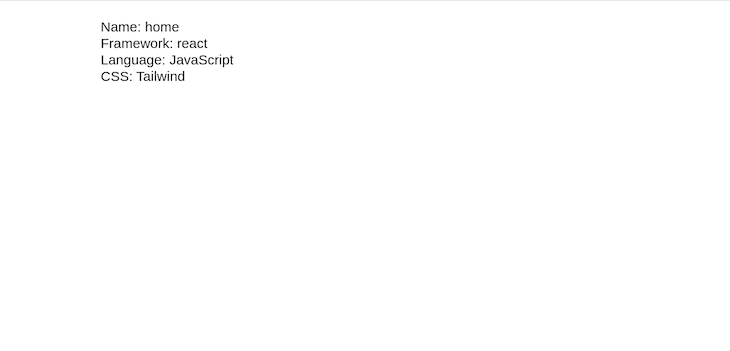
To test the app from the home folder, run yarn install to install all dependencies. Then, run yarn start to start the dev-server. If everything was successful, you should see the following on your screen:
From the about folder, repeat the steps from above using the following data:
aboutApplication3001Like before, select React, JavaScript, and Tailwind as your stack, and the application will be bootstrapped for you.
Finally, to test the app, install the required dependencies by running yarn install. Then, start the dev-server by running yarn start. If everything was successful, you should see the following on your screen:

In our micro-frontend implementation, the home application will contain and expose two components, Header and Footer. The about application imports and consumes these components.
To implement this, in the src directory in the home application, create two components, Header.jsx and Footer.jsx. Add the following respective code snippets to Header.jsx and Footer.jsx:
import React from "react"
export default function Header() {
    return (
        <div className="p-5 bg-blue-500 text-white -text-3xl font-bold">
            Micro Frontend Header
        </div>
    )
}
import React from "react"
export default function Footer() {
    return (
        <div className="p-5 bg-blue-500 text-white -text-3xl font-bold">
            Micro Frontend Footer
        </div>
    )
}
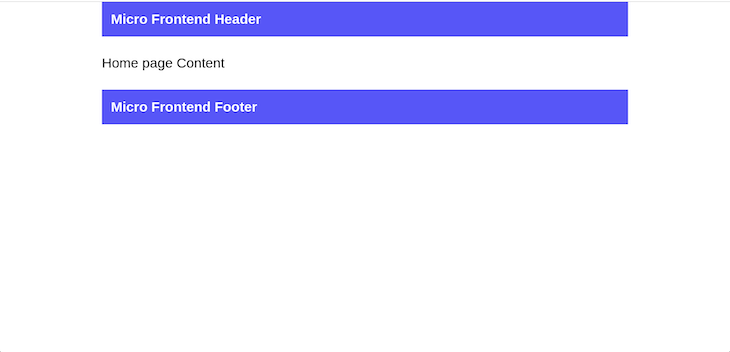
Next, update the App.jsx component to use the following navbars:
import React from "react";
import ReactDOM from "react-dom";
import "./index.scss";
import Header from "./Header"
import Footer from "./Footer";

const App = () => (
  <div className="text-3xl mx-auto max-w-6xl">
    <Header />
    <div className="my-10">
      Home page Content
    </div>
    <Footer />
  </div>
);

ReactDOM.render(<App />, document.getElementById("app"));
Test the app by restarting the server, and you’ll get the following:
We need to build the about page in the about app. To do so, update the App.jsx component in the about app, as shown below:
import React from "react";
import ReactDOM from "react-dom";
import "./index.scss";
const App = () => (
  <div className="text-3xl mx-auto max-w-6xl">
    <div class="text-center">
      <img
        src="https://mdbcdn.b-cdn.net/img/new/avatars/8.webp"
        class="rounded-full w-32 mb-4 mx-auto"
        alt="Avatar"
      />
      <h5 class="text-xl font-medium leading-tight mb-2">John Doe</h5>
      <p class="text-gray-500">Web designer</p>
    </div>
  </div>
);

ReactDOM.render(<App />, document.getElementById("app"));
Restart the dev-server, and you’ll get the following:

From the UI above, we see the need for header and footer navigation. But, we don’t need to create duplicate copies because we can share them via micro-frontends.
We noted above that the about page in the about app needs to consume the Header and Footer components of the home application. To do this, we need to add module federation.
We’ll begin by turning the Header and Footer components of the home application into micro-frontends so that components in other applications can consume them.
Open the webpack.config.js file in the home app, which is already created and configured by the create-mf-app package. First, update the exposes property in the ModuleFederationPlugin configuration, as seen below:
exposes: {
        "./Header": "./src/Header.jsx",
        "./Footer": "./src/Footer.jsx"
      },
In the code above, we specified that the home application exposes the Header and Footer components as micro-frontends. Consequently, these components can be shared.
Now, rebuild and restart the server with the following commands:
yarn build
yarn start
Although nothing changes in the UI, a remote entry file has been created for us under the hood. To view the remote entry file, navigate your browser to the URL localhost:3000/remoteEntry.js, and you’ll see the following:
This remote entry file, remoteEntry.js, is a manifest file of all the modules that are exposed by the home application.
To complete our setup, copy the link of the manifest file localhost:3000/remoteEntry.js, then update the remotes property of the ModuleFederationPlugin configuration in the webpack.config.js file in the about app, as seen below:
remotes: {
        home: "home@http://localhost:3000/remoteEntry.js",
      },
The code above specifies that the about component has a remote micro-frontend application called home that shares its module with it. With this setup, we can access any of the components exposed from the home application.
Now, update the App.jsx component of the about application with the shared navbars, as seen below:
import React from "react";
import ReactDOM from "react-dom";
import "./index.scss";
import Header from "home/Header";
import Footer from "home/Footer";
const App = () => (
  <div className="text-3xl mx-auto max-w-6xl">
    <Header />
    <div class="text-center">
      <img
        src="https://mdbcdn.b-cdn.net/img/new/avatars/8.webp"
        class="rounded-full w-32 mb-4 mx-auto"
        alt="Avatar"
      />
      <h5 class="text-xl font-medium leading-tight mb-2">John Doe</h5>
      <p class="text-gray-500">Web designer</p>
    </div>
    <Footer />
  </div>
);
ReactDOM.render(<App />, document.getElementById("app"));
Now, rebuild and restart the server with the following commands and you’ll see the following in your browser:
yarn build
yarn start
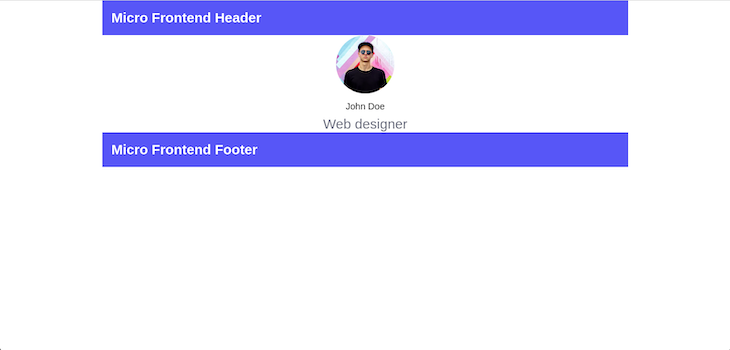
From the code above and the displayed UI, we see that we have successfully shared components between two applications using micro-frontends.
For more information, check out this article about methods for microservice communication.
While building micro-frontends, there are some challenges you might encounter. In this section, you will learn about them and their possible solutions.
Ensuring a consistent styling across different micro-frontends can be tasking especially when they are being developed by different teams. Adopting CSS-in-JS libraries like Styled Components or Emotion in React micro-frontends can encapsulate styles at the component level, avoiding global conflicts.
Managing state across micro-frontends, especially when actions in one micro-frontend need to update the state in another, can complicate state management.
You can handle shared state management libraries like Redux or Zustand with careful namespace management ensures smooth state synchronization. Implementing a global event bus or leveraging the Context API can also enable state sharing and actions across micro-frontends.
Micro-frontends may depend on different versions of libraries or React itself, leading to potential runtime issues or bloated bundle sizes.
webpack’s Module Federation allows you to share libraries across micro-frontends, ensuring that only a single version of React and other shared libraries are loaded.
In this article, we explored the concept of micro-frontends with examples, discussing their advantages over monolithic frontend applications and other available setups. Micro-frontends offer some great features and are easy to adopt.
With create-mf-app, we implemented the micro-frontend architecture as easily as using Create React App. Personally, I like the micro-frontend style because it’s easily maintained among teams. Additionally, frontend building and security are managed pretty elegantly.
I hope you enjoyed this article, and be sure to leave a comment if you have any questions. Happy coding!
Install LogRocket via npm or script tag. LogRocket.init() must be called client-side, not
server-side
$ npm i --save logrocket

// Code:

import LogRocket from 'logrocket';
LogRocket.init('app/id');
// Add to your HTML:

<script src="https://cdn.lr-ingest.com/LogRocket.min.js"></script>
<script>window.LogRocket && window.LogRocket.init('app/id');</script>

We built the same app in TanStack Start RSC and Next.js RSC. TanStack shipped 40% less JS and built 4x faster — but Next.js is still the safer production bet.

From RSC vulnerabilities and the Vercel breach to TypeScript 7.0 Beta and AI agents — the nine frontend storylines that defined H1 2026, ranked.

AI tools generate working React code fast, but miss race conditions, empty states, debouncing, and accessibility. Here’s how to catch bugs before production.

Learn how to use Gemini CLI subagents to delegate frontend, backend, testing, and docs tasks to specialized agents with guardrails and clear ownership.
Hey there, want to help make our blog better?
Join LogRocket’s Content Advisory Board. You’ll help inform the type of content we create and get access to exclusive meetups, social accreditation, and swag.
Sign up now

