Editor’s note: This guide on how to build a blockchain with Go was last updated on 30 March 2023 to reflect changes to Go and include more information about using blockchains with Go. To learn more about Go, check out our guide to getting started with Go for frontend developers.

Blockchains are the underlying technology for many decentralized applications and cryptocurrencies. They are also applicable in many industries and are creating new job roles and opportunities for developers, artists, gamers, content writers, and many more.
This tutorial aims to teach you how blockchains work by guiding you through building one from scratch with Go. If you have heard of blockchains but are still confused about how they work, this article is for you. To follow and understand this tutorial, you will need working knowledge of Go, Go v1.x installed on your machine, and a Go development environment (e.g., text editor, IDE).
Jump ahead:
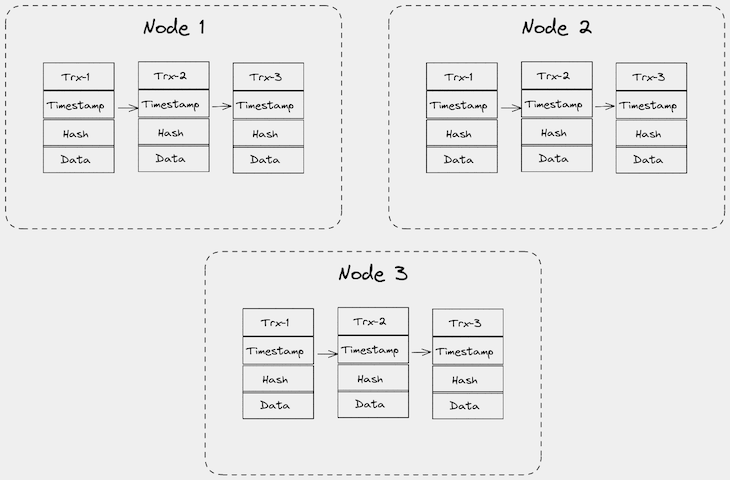
A blockchain is a digital record of transactions distributed and shared among the nodes of a computer network. Each transaction in the blockchain is called a block and links to another with cryptography techniques.
You can also think of a blockchain as a special kind of distributed database. In this database, each record is unique and immutable, and every record (except the first) contains a reference to the record that came before it. Every record has a hash that identifies the record and ensures that any tampering done to it can be detected. Every device that’s a part of this network contains a copy of the database, and multiple devices have to agree that a record is valid using a consensus mechanism before it can be added to the database.
Here’s a visual example to illustrate the concept:
We mentioned blocks earlier, and you might be wondering what they are. Put simply, a block is a group of data, and multiple blocks come together to form a blockchain.
Every block in a blockchain possesses the following properties:
Because of their structure, blockchains are most useful when you are trying to build a system that requires decentralization on a large scale, requires data to be unchangeable once added to the system, or requires transparency and integrity of the system’s data. The most common applications of blockchain technology are in the fields of cryptocurrency and decentralized finance. Still, they can also be used in voting systems, supply chain management, and even healthcare.
Go provides many unique features and functionalities that make it a good fit for building a blockchain. For example, Go allows you to create highly efficient and performant applications with little effort. Go is also excellent for building applications that require parallelism and concurrency (like blockchains) with its ability to spawn and manage thousands of Goroutines.
Go implements automatic garbage collection and stack management with its runtime system. Finally, it compiles applications to machine code and single binaries, supporting multiple OSs and processor architectures, and deploys easily on server infrastructure.
Let’s start by creating a new Go project and importing all the necessary packages to build our blockchain. Create a file named blockchain.go and import all the dependencies you need by saving the following code in it:
package main

import (
        "crypto/sha256"
        "encoding/json"
        "fmt"
        "strconv"
        "strings"
        "time"
)
Next, we will create a custom type to represent the blocks that will make up our blockchain. Add the following code to the blockchain.go file:
type Block struct {
        data         map[string]interface{}
        hash         string
        previousHash string
        timestamp    time.Time
        pow          int
}
Then, we will create a custom Blockchain type that contains our blocks. Add the following code to the blockchain.go file:
type Blockchain struct {
        genesisBlock Block
        chain        []Block
        difficulty   int
}
The genesisBlock property represents the first block added to the blockchain. In contrast, the difficulty property defines the minimum effort miners must undertake to mine and include a block in the blockchain.
As we discussed earlier, the hash of a block is its identifier generated using cryptography. We will derive the hash for each block in our blockchain by combining and then hashing the hash of the previous block, the data of the current block, the current block’s timestamp, and PoW using the SHA256 algorithm.
Let’s create a method on our Block type that generates a hash:
func (b Block) calculateHash() string {
        data, _ := json.Marshal(b.data)
        blockData := b.previousHash + string(data) + b.timestamp.String() + strconv.Itoa(b.pow)
        blockHash := sha256.Sum256([]byte(blockData))
        return fmt.Sprintf("%x", blockHash)
}
In the code above, we did the following:
hash, and the current block’s data, timestamp, and PoWSHA256 algorithmstringMining is the process of adding a new block to the blockchain. This involves generating a block hash that starts with a desired number of zeros (the number of zeros is called the mining difficulty). This means if the mining difficulty is three, you have to generate a block hash that starts with "000" like, "0009a1bfb506…".
Because we are deriving a block’s hash from its data and PoW, we need to keep changing the PoW value of the current block until we get a hash that satisfies our mining condition (starting zeros > difficulty). To implement this, we will create a mine() method for our Block type that repeatedly increments the PoW value and calculates the block hash until we get a valid one.
Add the following code to the blockchain.go file:
func (b *Block) mine(difficulty int) {
        for !strings.HasPrefix(b.hash, strings.Repeat("0", difficulty)) {
                b.pow++
                b.hash = b.calculateHash()
        }
}
genesis blockNext, we will write a function that creates a genesis block (the first block on the blockchain) for our blockchain and returns a new instance of the Blockchain type. Add the following code to the blockchain.go file:
func CreateBlockchain(difficulty int) Blockchain {
        genesisBlock := Block{
                hash:      "0",
                timestamp: time.Now(),
        }
        return Blockchain{
                genesisBlock,
                []Block{genesisBlock},
                difficulty,
        }
}
Here, we set the hash of our genesis block to "0". Because it is the first block in the blockchain, there is no value for the previous hash, and the data property is empty. Then, we created a new instance of the Blockchain type and stored the genesis block along with the blockchain’s difficulty.
Now that we have implemented functionalities for our blocks to calculate their hash and mine themselves, let’s create a function that will construct a new block from its arguments and then add the new block to the blockchain. Add the following code to the blockchain.go file:
func (b *Blockchain) addBlock(from, to string, amount float64) {
        blockData := map[string]interface{}{
                "from":   from,
                "to":     to,
                "amount": amount,
        }
        lastBlock := b.chain[len(b.chain)-1]
        newBlock := Block{
                data:         blockData,
                previousHash: lastBlock.hash,
                timestamp:    time.Now(),
        }
        newBlock.mine(b.difficulty)
        b.chain = append(b.chain, newBlock)
}
Here, we created an addBlock method to the Blockchain type that does the following:
block hash, current block data, and generated PoWWe have successfully created a blockchain that can record transactions. So, now we need functionality that checks if the blockchain is valid. A valid blockchain is one where no transactions have been tampered with. Add the following code to the blockchain.go file:
func (b Blockchain) isValid() bool {
        for i := range b.chain[1:] {
                previousBlock := b.chain[i]
                currentBlock := b.chain[i+1]
                if currentBlock.hash != currentBlock.calculateHash() || currentBlock.previousHash != previousBlock.hash {
                        return false
                }
        }
        return true
}
Here, we recalculated the hash of every block, compared them with the stored hash values of the other blocks, and checked if the previous hash value of any other block is equal to the hash value of the block before it. If any of the checks fail, the blockchain has been tampered with.
We now have a fully functional blockchain! Let’s create a main() function to show its usage. Add the following code to the blockchain.go file:
func main() {
        // create a new blockchain instance with a mining difficulty of 2
        blockchain := CreateBlockchain(2)

        // record transactions on the blockchain for Alice, Bob, and John
        blockchain.addBlock("Alice", "Bob", 5)
        blockchain.addBlock("John", "Bob", 2)

        // check if the blockchain is valid; expecting true
        fmt.Println(blockchain.isValid())
}
A blockchain isn’t useful to anyone if it’s confined to just one device. So, you might be wondering how to add new nodes to the blockchain prototype you just built. Pulling this off involves creating a Peer-to-Peer (P2P) network to connect the nodes, implementing a consensus algorithm, and taking security countermeasures. However, modifying the blockchain we built to include these features is out of the scope of this tutorial.
In this tutorial, you learned about blockchains and Go. More specifically, you learned how blockchains work under the hood — including what blocks are and what they contain — and how to calculate a block hash, implement a consensus algorithm for mining blocks, record transactions on the blockchain, and validate the authenticity of a blockchain.
The source code of the Go blockchain is available as a GitHub Gist, and you can play with it in your browser on the Go Playground. I can’t wait to see the amazing things you build with Go, as it is a good fit for applications where efficiency and performance are a top priority. Happy coding!
Client-side issues that impact users’ ability to activate and transact in your apps can drastically affect your bottom line. If you’re interested in monitoring UX issues, automatically surfacing JavaScript errors, and tracking slow network requests and component load time, try LogRocket.

LogRocket lets you replay user sessions, eliminating guesswork around why bugs happen by showing exactly what users experienced. It captures console logs, errors, network requests, and pixel-perfect DOM recordings — compatible with all frameworks.
LogRocket's Galileo AI watches sessions for you, instantly identifying and explaining user struggles with automated monitoring of your entire product experience.
Modernize how you debug web and mobile apps — start monitoring for free.

Learn how to protect full-stack projects from NPM supply chain attacks with a practical security checklist.

Explore 15 essential MCP servers for web developers to enhance AI workflows with tools, data, and automation.

Learn how contrast-color() automatically picks accessible text colors using native CSS, without JavaScript.

Learn how to build a harness-style AI workflow using Claude Code with specialized Dev, QE, and Ops subagents, gated handoffs, MCP telemetry, and LEARNING.md.
Hey there, want to help make our blog better?
Join LogRocket’s Content Advisory Board. You’ll help inform the type of content we create and get access to exclusive meetups, social accreditation, and swag.
Sign up now

