A splash screen is the first screen that pops up when a mobile application launches. It’s an important part of a mobile app, as it can help boost user experience.

This important element can be set to cover the entire screen or just a portion of the screen. It can contain an image, icon, or an important detail about the app — like the version.
In this article, we’ll investigate four libraries, and some associated tools, that can be used to add splash screens to mobile apps. For each library, we’ll look at its advantages and disadvantages and then walk through the process of using the library to prepare, set up and launch a splash screen.
As a bonus, we’ll examine app icon guidelines for mobile devices, demonstrate how to generate and set app icons, and how to provide a custom name for a mobile application.
Here’s the default splash screen for React Native applications. Each time we create a new React Native app, this is the splash screen that we’ll see until we set a new one:
Jump ahead:
The React Native Bootsplash library is a great option for adding splash screens and app icons to mobile applications. It comes with a CLI that can be leveraged to generate a splash screen and app icons on the fly. Let’s take a closer look.
To prepare a splash screen with the React Native Bootsplash library, you’ll need a 4096px x 4096px image. If you’re having difficulty sourcing an image, you can click here to download the one I have already generated. Or, you can just follow along.
To use the React Native Bootsplash library, you’ll need to open an existing React Native application or follow this guide to set up a new React Native app. Alternatively, you can clone the complete source code for this project on GitHub.
When you start up your app, you’ll see a blank, white screen displayed before the app content. The next step is to install the react-native-bootsplash CLI using one of the following commands:
$ npm install react-native-bootsplash
# --- or ---
$ yarn add react-native-bootsplash
Now, create an assets folder in the root directory and add the rectangular PNG or SVG image or logo that you’d like to use as the splash screen. For this example, I’ll be using this dog image from catalyststuff on Freepik.
Now, run the code in the terminal to generate the splash screens and app icons:
// Terminal

// npx react-native generate-bootsplash <logoPath>

 npx react-native generate-bootsplash ./assets/dog.png \
  --background-color=36dbff \
--width=200
If the generation works successfully, it will generate the following files for Android and iOS:
// Path to generated files

    Android
 android/app/src/main/res/values/colors.xml
 android/app/src/main/res/mipmap-mdpi/bootsplash_logo.png (288x288)
 android/app/src/main/res/mipmap-hdpi/bootsplash_logo.png (432x432)
 android/app/src/main/res/mipmap-xhdpi/bootsplash_logo.png (576x576)
 android/app/src/main/res/mipmap-xxhdpi/bootsplash_logo.png (864x864)
 android/app/src/main/res/mipmap-xxxhdpi/bootsplash_logo.png (1152x1152)

    iOS
 ios/splashA/BootSplash.storyboard
 ios/splashA/Images.xcassets/BootSplashLogo.imageset/bootsplash_logo.png (100x150)
 ios/splashA/Images.xcassets/BootSplashLogo.imageset/[email protected] (200x300)
 ios/splashA/Images.xcassets/BootSplashLogo.imageset/[email protected] (300x450)
In this example, splashA is the name assigned to the React Native application because the package relies on the naming convention used in the project. If your project is named awesomeApp, that will be the name assigned to the app. Later in the article, we’ll discuss how to specify a different name for your app.
If you wish to customize your app’s output, use the following command:
// Terminal

yarn react-native generate-bootsplash ./assets/dog.png \
  --background-color=color \
  --logo-width=width \
  --assets-path=path \
  --flavor=flavor \
  --platforms=platforms
  -h, --help


// Terminal

yarn react-native generate-bootsplash ./assets/dog.png \
  --background-color=36dbff \
  --logo-width=100 \
  --assets-path=assets \
  --flavor=main \
  --platforms=android,ios
You can also modify the ios/YourProjectName/AppDelegate.mm file, or for my case ios/splashA/AppDelegate.mm as stated here. The file content should look similar to this:
// ios/splashA/AppDelegate.mm

#import "AppDelegate.h"
#import "RNBootSplash.h"
#import <React/RCTBundleURLProvider.h>
@implementation AppDelegate
- (BOOL)application:(UIApplication *)application didFinishLaunchingWithOptions:(NSDictionary *)launchOptions
{
  self.moduleName = @"splashA";
  // You can add your custom initial props in the dictionary below.
  // They will be passed down to the ViewController used by React Native.
  self.initialProps = @{};
  return [super application:application didFinishLaunchingWithOptions:launchOptions];
}
- (NSURL *)sourceURLForBridge:(RCTBridge *)bridge
{
#if DEBUG
  return [[RCTBundleURLProvider sharedSettings] jsBundleURLForBundleRoot:@"index"];
#else
  return [[NSBundle mainBundle] URLForResource:@"main" withExtension:@"jsbundle"];
#endif
}
/// This method controls whether the `concurrentRoot`feature of React18 is turned on or off.
///
/// @see: https://reactjs.org/blog/2022/03/29/react-v18.html
/// @note: This must be rendered on Fabric (i.e., on the New Architecture).
/// @return: `true` if the `concurrentRoot` feature is enabled. Otherwise, it returns `false`.
- (BOOL)concurrentRootEnabled
{
  return true;
}
- (UIView *)createRootViewWithBridge:(RCTBridge *)bridge
                          moduleName:(NSString *)moduleName
                           initProps:(NSDictionary *)initProps {
  UIView *rootView = [super createRootViewWithBridge:bridge
                                          moduleName:moduleName
                                           initProps:initProps];
  [RNBootSplash initWithStoryboard:@"BootSplash" rootView:rootView]; // ⬅️ initialize the splash screen
  return rootView;
}
@end
Next, open the android/app/build.gradle file and add implementation("androidx.core:core-splashscreen:1.0.0") to the dependencies as indicated here:
// android/app/build.gradle

apply plugin: "com.android.application"
apply plugin: "com.facebook.react"
import com.android.build.OutputFile

react {

def enableSeparateBuildPerCPUArchitecture = false
def enableProguardInReleaseBuilds = false
def jscFlavor = 'org.webkit:android-jsc:+'
def reactNativeArchitectures() {
    def value = project.getProperties().get("reactNativeArchitectures")
    return value ? value.split(",") : ["armeabi-v7a", "x86", "x86_64", "arm64-v8a"]
}
android {
    ndkVersion rootProject.ext.ndkVersion
    compileSdkVersion rootProject.ext.compileSdkVersion
    namespace "com.splasha"
    defaultConfig {
        applicationId "com.splasha"
        minSdkVersion rootProject.ext.minSdkVersion
        targetSdkVersion rootProject.ext.targetSdkVersion
        versionCode 1
        versionName "1.0"
    }
    splits {
        abi {
            reset()
            enable enableSeparateBuildPerCPUArchitecture
            universalApk false  // If true, also generate a universal APK
            include (*reactNativeArchitectures())
        }
    }
    signingConfigs {
        debug {
            storeFile file('debug.keystore')
            storePassword 'android'
            keyAlias 'androiddebugkey'
            keyPassword 'android'
        }
    }
    buildTypes {
        debug {
            signingConfig signingConfigs.debug
        }
        release {
            signingConfig signingConfigs.debug
            minifyEnabled enableProguardInReleaseBuilds
            proguardFiles getDefaultProguardFile("proguard-android.txt"), "proguard-rules.pro"
        }
    }
    applicationVariants.all { variant ->
        variant.outputs.each { output ->
            def versionCodes = ["armeabi-v7a": 1, "x86": 2, "arm64-v8a": 3, "x86_64": 4]
            def abi = output.getFilter(OutputFile.ABI)
            if (abi != null) {
                output.versionCodeOverride =
                        defaultConfig.versionCode * 1000 + versionCodes.get(abi)
            }
        }
    }
}
dependencies {
    implementation("com.facebook.react:react-android")
    implementation("androidx.core:core-splashscreen:1.0.0")
    implementation("androidx.swiperefreshlayout:swiperefreshlayout:1.0.0")
    debugImplementation("com.facebook.flipper:flipper:${FLIPPER_VERSION}")
    debugImplementation("com.facebook.flipper:flipper-network-plugin:${FLIPPER_VERSION}") {
        exclude group:'com.squareup.okhttp3', module:'okhttp'
    }
    debugImplementation("com.facebook.flipper:flipper-fresco-plugin:${FLIPPER_VERSION}")
    if (hermesEnabled.toBoolean()) {
        implementation("com.facebook.react:hermes-android")
    } else {
        implementation jscFlavor
    }
}
apply from: file("../../node_modules/@react-native-community/cli-platform-android/native_modules.gradle"); applyNativeModulesAppBuildGradle(project)
Now, cd into the android folder and run the following command in your terminal:
./gradlew clean && ./gradlew build
Next, open the android/app/src/main/res/values/styles.xml file and add the following code:
// android/app/src/main/res/values/styles.xml

<resources>
  <style name="AppTheme" parent="Theme.AppCompat.DayNight.NoActionBar">
      <!-- Your base theme customization -->
  </style>
  <!-- BootTheme should inherit from Theme.SplashScreen -->
  <style name="BootTheme" parent="Theme.SplashScreen">
    <item name="windowSplashScreenBackground">@color/bootsplash_background</item>
    <item name="windowSplashScreenAnimatedIcon">@mipmap/bootsplash_logo</item>
    <item name="postSplashScreenTheme">@style/AppTheme</item>
  </style>
</resources>
You can update the android/app/src/main/AndroidManifest.xml file by simply searching for @style/AppTheme and replacing it with @style/BootTheme:
// android/app/src/main/AndroidManifest.xml

// Other code
  <application
    android:name=".MainApplication"
    android:label="@string/app_name"
    android:icon="@mipmap/ic_launcher"
    android:roundIcon="@mipmap/ic_launcher_round"
    android:allowBackup="false"
    android:theme="@style/BootTheme">
// Other code
Finally, update the android/app/src/main/java/com/yourprojectname/MainActivity.java file, or in my case, the android/app/src/main/java/com/splashA/MainActivity.java file to look like this:
// android/app/src/main/java/com/splashA/MainActivity.java

package com.splasha;
import com.facebook.react.ReactActivity;
import com.facebook.react.ReactActivityDelegate;
import com.facebook.react.defaults.DefaultNewArchitectureEntryPoint;
import com.facebook.react.defaults.DefaultReactActivityDelegate;

import android.os.Bundle;
import com.zoontek.rnbootsplash.RNBootSplash;

public class MainActivity extends ReactActivity {
  /**
   * Returns the name of the main component registered from JavaScript. This is used to schedule
   * rendering of the component.
   */
  @Override
  protected String getMainComponentName() {
    return "splashA";
  }

  @Override
  protected ReactActivityDelegate createReactActivityDelegate() {
    return new DefaultReactActivityDelegate(
        this,
        getMainComponentName(),

        DefaultNewArchitectureEntryPoint.getFabricEnabled(),
        DefaultNewArchitectureEntryPoint.getConcurrentReactEnabled()
        );
  }
  @Override
  protected void onCreate(Bundle savedInstanceState) {
    RNBootSplash.init(this);
    super.onCreate(savedInstanceState);
  }
}
At this point, when you start up the application, you’ll notice that the splash screen does not appear to go away. This is because the React Native Bootsplash library expects that we will only hide the splash screen when we are ready. To manually hide the splash screen, we’ll need to add the code for this functionality to our project’s entry point — for example, the App.tsx file.
First, you’ll need to import the library into your file:
// Typescript
// App.tsx
import RNBootSplash from "react-native-bootsplash";
RNBootSplash.hide() is the actual code that can be used to hide the splash screen. It also can accept duration and fade properties, giving you more control over how you hide the splash screen. It can be used inside a useEffect function, like so:
// JavaScript
// App.tsx

  useEffect(() => {
    const init = async () => {
      // Perform other tasks here
    };
    init().finally(async () => {
      await RNBootSplash.hide({ fade: true, duration: 500 });
    });
  }, []);
Suppose you’re using React Native Navigation, you can actually call the hide method inside the onReady prop in the NavigationContainer:
 // JavaScript
// App.tsx
<NavigationContainer onReady={() => RNBootSplash.hide()}>
      {/* content */}
</NavigationContainer>
A full implementation should look similar to this example:
 // JavaScript
// App.tsx

import React, { useEffect } from "react";
import { Text } from "react-native";
import RNBootSplash from "react-native-bootsplash";

function App() {
 useEffect(() => {
    const init = async () => {
      // Perform other tasks here
    };
    init().finally(async () => {
      await RNBootSplash.hide({ fade: true, duration: 500 });
    });
  }, []);

  return <Text>Other application content</Text>;
}
Or, it may look similar to this example with NavigationContainer:
 // JavaScript
// App.tsx

import React, { useEffect } from "react";
import { Text } from "react-native";
import RNBootSplash from "react-native-bootsplash";
import { NavigationContainer } from '@react-navigation/native';

function App() {
  return <NavigationContainer onReady={() => RNBootSplash.hide()}>
      {/* Other app content */}
    </NavigationContainer>;
}
Here’s our splash screen built with React Native Bootsplash:
React Native Splash Screen is a very popular library for adding an efficient splash screen to a React Native project. It doesn’t come with a CLI. Instead, you’ll need to generate any required images and logos.
To prepare a splash screen with the React Native Splash Screen library, you’ll need a 4096px x 4096px image like this. Next, you can visit the Ape Tools website to generate splash screens of different sizes to use as shown in the following steps:
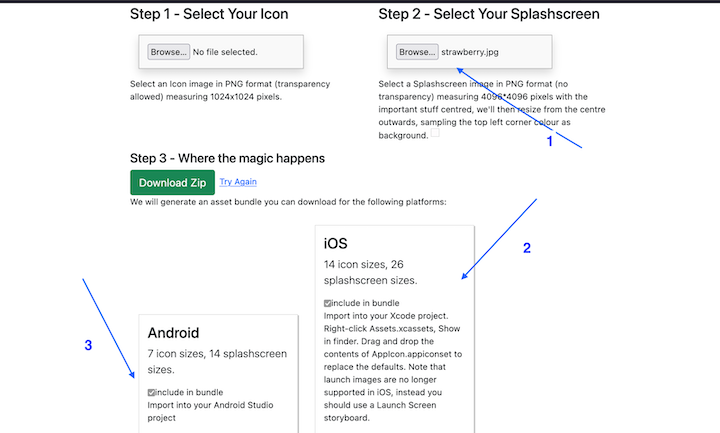
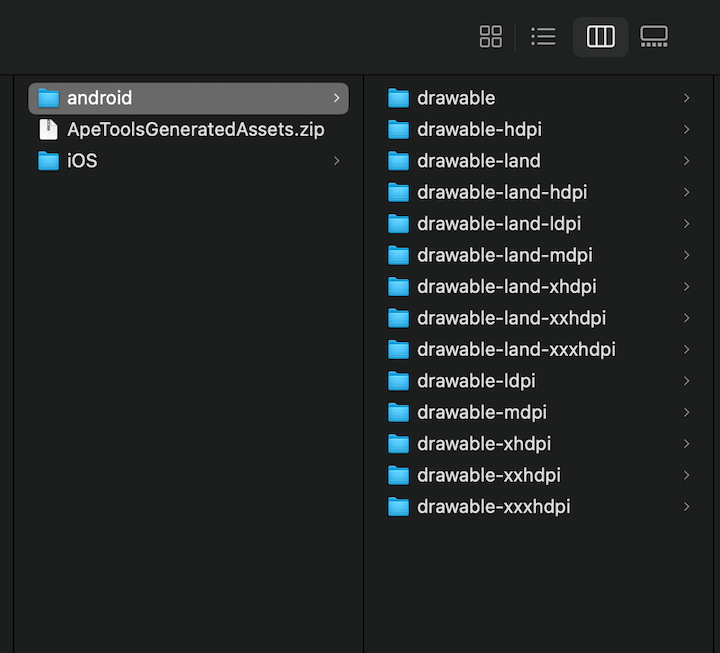
Once you’ve generated the splash screen, click the Download Zip button to download it to your machine. The unzipped files should contain a folder structure that looks like this:
To set up your project, generate a new React Native project as directed here. You can also simply clone this GitHib repo or run the following command:
// Terminal
npx react-native init splashDd
N.B., you can use whatever folder name you like; however, I will use splashDd
Now, install the React Native Splash Screen library, like so:
// Terminal
npm i react-native-splash-screen
To set up the splash screen properly, follow the instructions from the official docs. Here’s a summary for Android and iOS.
Start by opening the android/settings.gradle file and adding the following code:
// android/settings.gradle
include ':react-native-splash-screen'
project(':react-native-splash-screen').projectDir = new File(rootProject.projectDir, '../node_modules/react-native-splash-screen/android')
Next, add the following code to the dependency:
// android/app/build.gradle

implementation project(':react-native-splash-screen')
Now, open the android/app/src/main/java/com/your-app-name/MainActivity.java file or, in my case, android/app/src/main/java/com/splashdd/MainActivity.java and add this snippet:
/// android/app/src/main/java/com/splashdd/MainActivity.java

import android.os.Bundle;
import org.devio.rn.splashscreen.SplashScreen;

// Inside the MainActivity class we will add the following code:
//public class MainActivity extends ReactActivity {
   @Override
    protected void onCreate(Bundle savedInstanceState) {
        SplashScreen.show(this);  // here
        super.onCreate(savedInstanceState);
    }

    // Other code
Next, create a new folder, layout, inside the android/app/src/main/res folder and then create a new file, launch_screen.xml. Paste the following code into the new file:
/// android/app/src/main/res/layout/launch_screen.xml

<?xml version="1.0" encoding="utf-8"?>
<RelativeLayout xmlns:android="http://schemas.android.com/apk/res/android"
    android:orientation="vertical" android:layout_width="match_parent"
    android:layout_height="match_parent">
    <ImageView android:layout_width="match_parent" android:layout_height="match_parent" android:src="@drawable/launch_screen" android:scaleType="centerCrop" />
</RelativeLayout>
Now, open your android/app/src/main/res/values/styles.xml file and modify the default item to use your newly created layout:
// android/app/src/main/res/values/styles.xml

<resources>
    <!-- Base application theme. -->
    <style name="AppTheme" parent="Theme.AppCompat.DayNight.NoActionBar">
        <!-- Customize your theme here. -->
        <item name="android:editTextBackground">@layout/launch_screen</item>
    </style>
</resources>
Next, copy all the folders inside the android folder that was created with the splash screen image file generator:
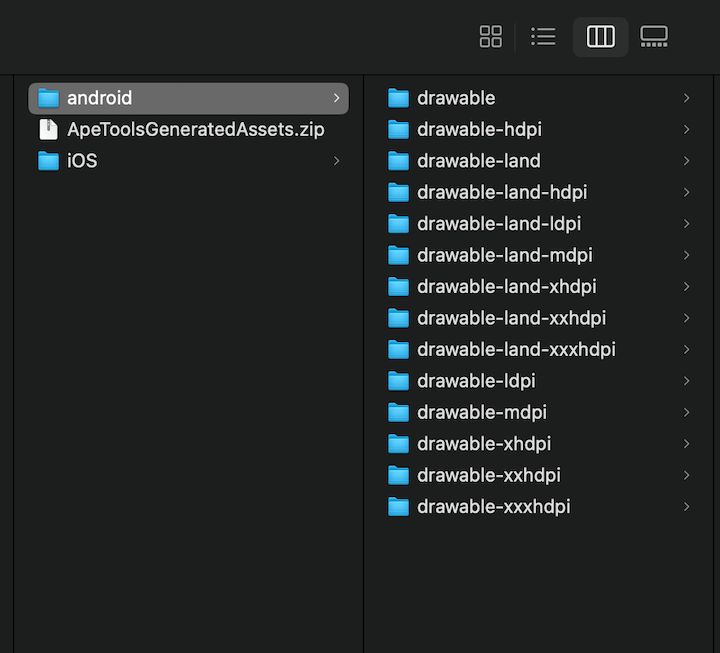
After copying the folders, paste them in the android/app/src/main/res folder. Opening each folder will reveal a screen.png file. This file is your splash screen, but you can’t use it until you open the android/app/src/main/res/layout/launch_screen.xml file and replace it with the following code:
// android/app/src/main/res/layout/launch_screen.xml

<?xml version="1.0" encoding="utf-8"?>
<RelativeLayout xmlns:android="http://schemas.android.com/apk/res/android"
    android:orientation="vertical" android:layout_width="match_parent"
    android:layout_height="match_parent">
    <ImageView android:layout_width="match_parent" android:layout_height="match_parent" android:src="@drawable/screen" android:scaleType="centerCrop" />
</RelativeLayout>
N.B., we only changed android:src="@drawable/launch_screen" to android:src="@drawable/screen"
At this point, your splash screen has been configured correctly for Android, but you’ll still need to hide it when your app has finished launching. You can do this in the App.tsx file:
// Typescript
// App.tsx
// Other codes
import SplashScreen from 'react-native-splash-screen';

// Other codes -- Inside our component

  useEffect(() => {
    if (Platform.OS === "android") {
      SplashScreen.hide();
    }
  }, []);
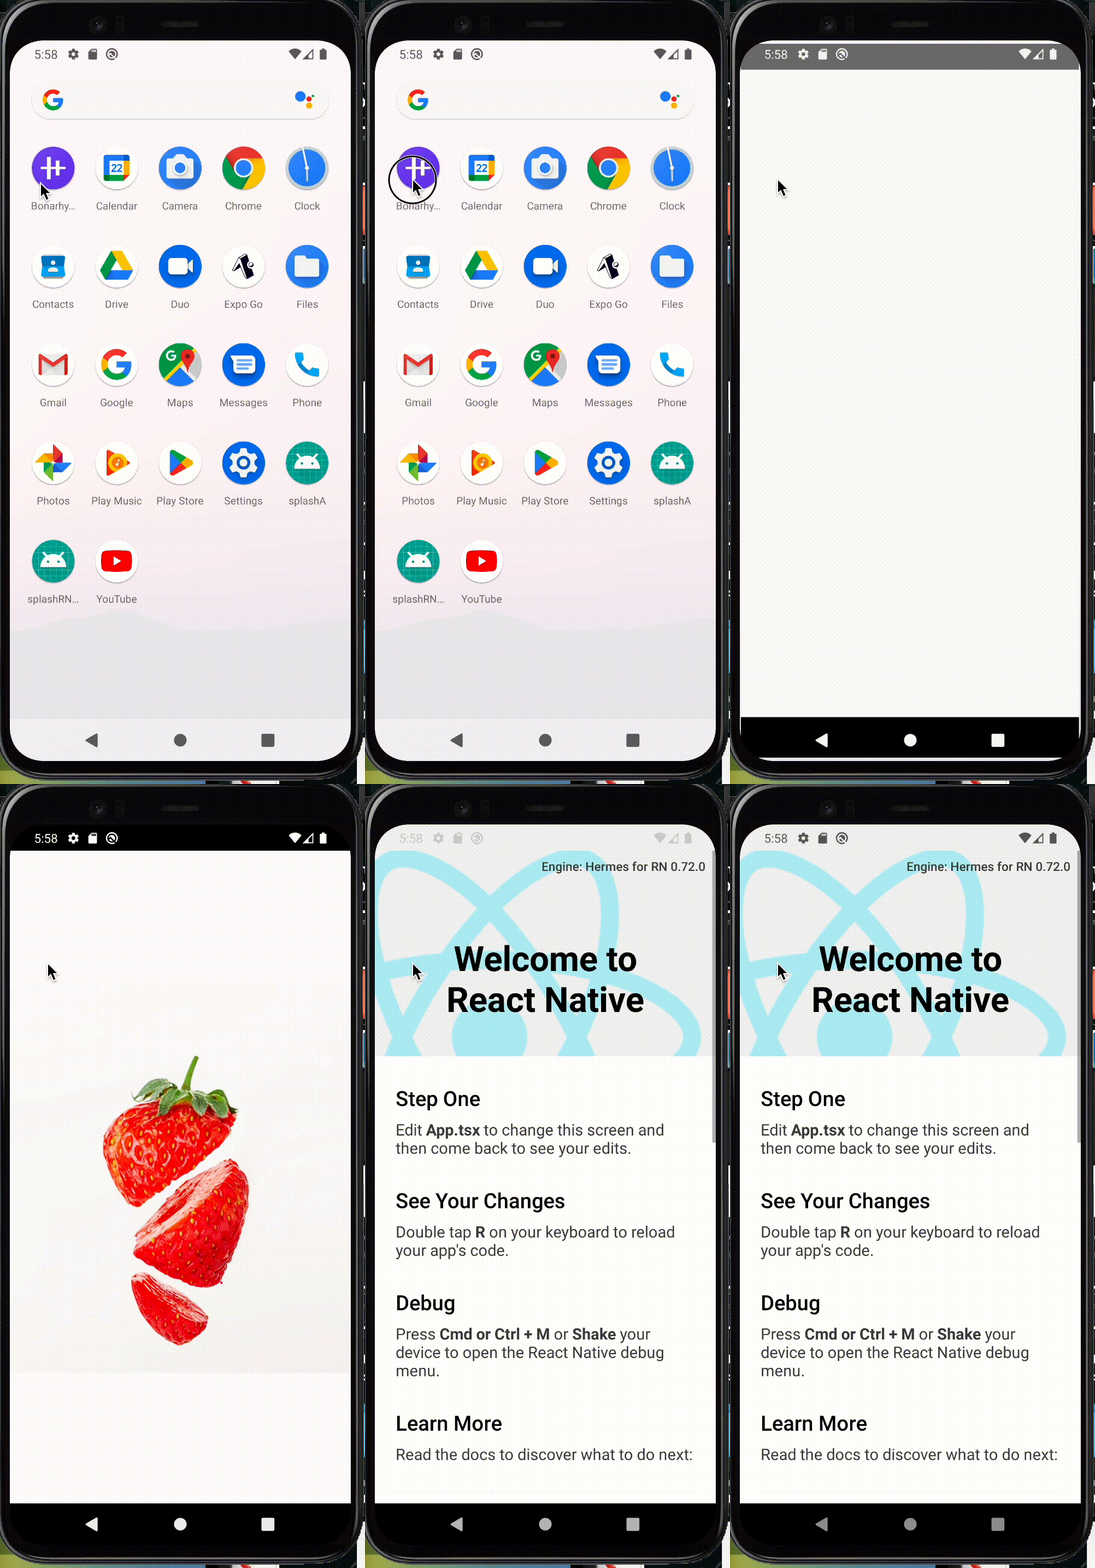
Once, everything has been configured properly, your splash screen and app should function like this:
To set up the splash screen for iOS, start by opening your workspace in Xcode by running the following command:
// Terminal
cd ios && open splashDd.xcworkspace
You’ll see the following screen:
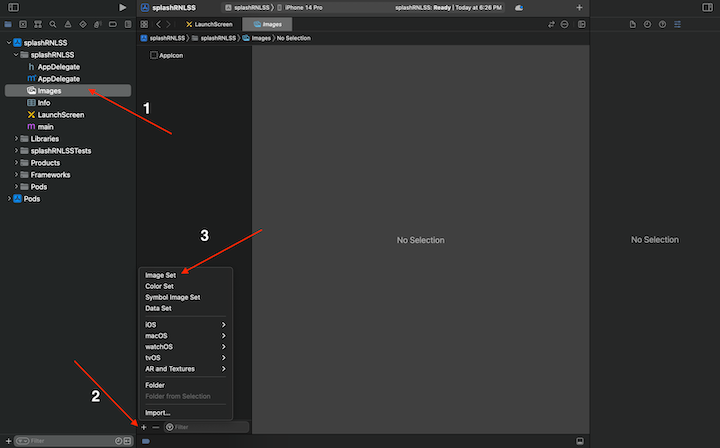
Select Images (#1, above), click + (#2, above), and then click Image Set (#3, above) to generate a new file, as shown below:
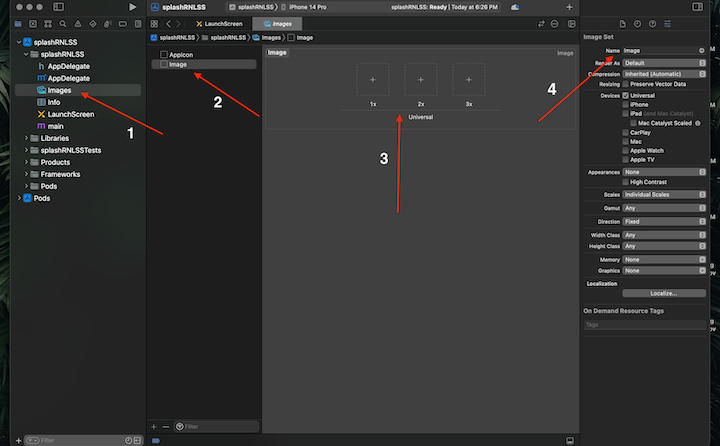
Next, under Application (#2, above), rename the project “Image” to “LaunchImage”.
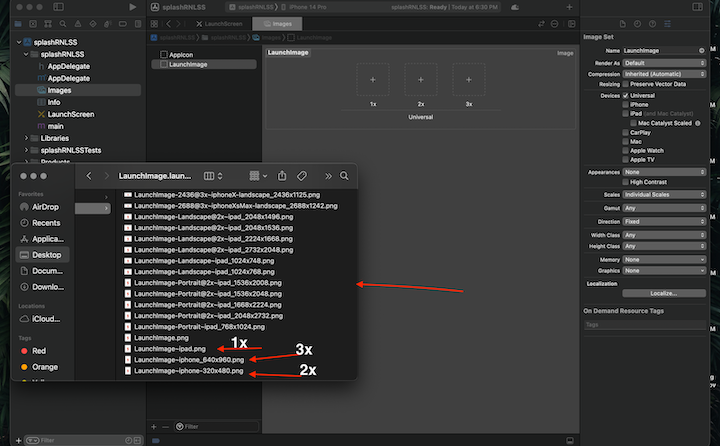
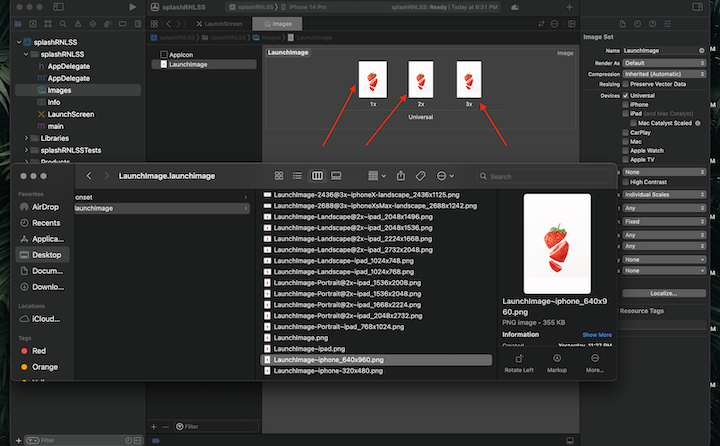
In the left nav menu, open the ios/LaunchImage.launchimage folder that was generated by the splash screen library and drag the labeled image to the appropriate boxes into the canvas in the middle of the screen:
The canvas should now look like this:
Now, click LaunchScreen in the left nav menu and delete the files indicated by red arrows in the image below:
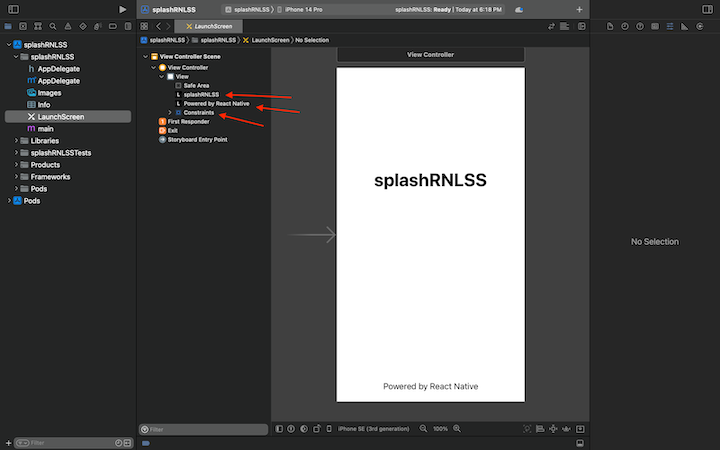
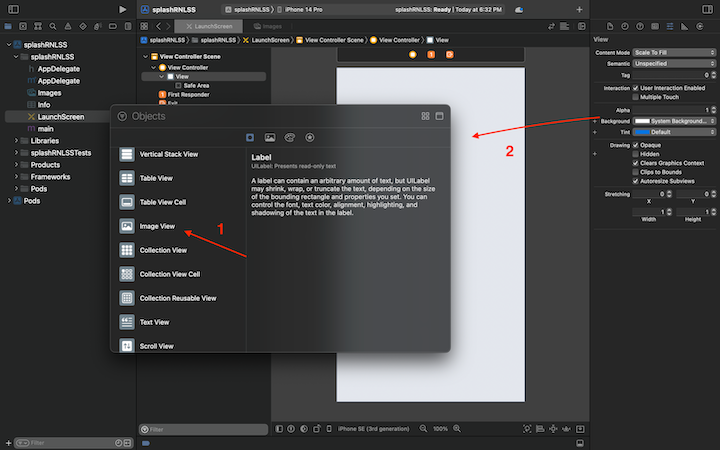
Once the files are deleted, you’ll be left with a blank canvas. Click View in the top menu and then Show Library.
Next, scroll down to Image View and drag the window to the middle of the canvas (#2, below), like so:
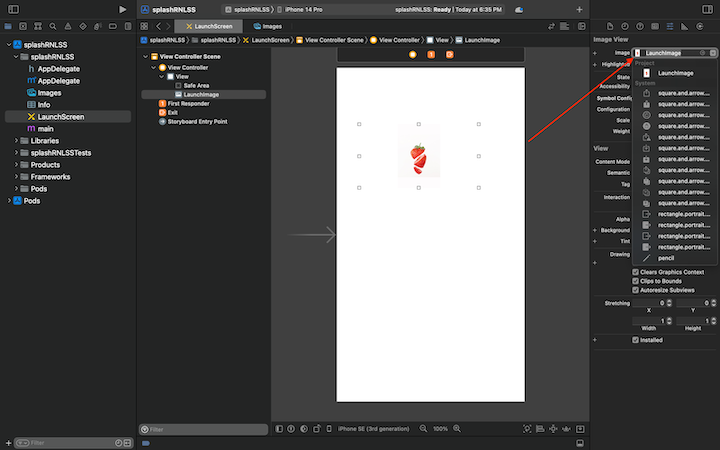
Now, use the Image dropdown to select LaunchImage:
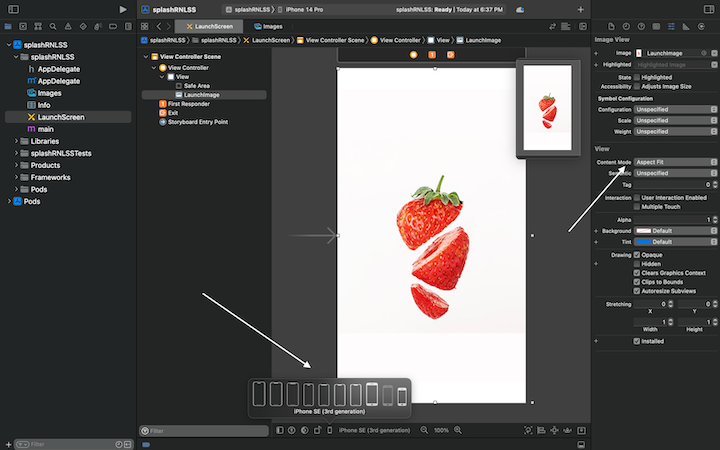
Under Position View, use the Fill Container Horizontally and Fill Container Vertically options, as well as the autosizing and other available options to ensure that the splash screen image fits correctly:
Now, follow these instructions to uninstall and start your iOS application with your new splash screen:
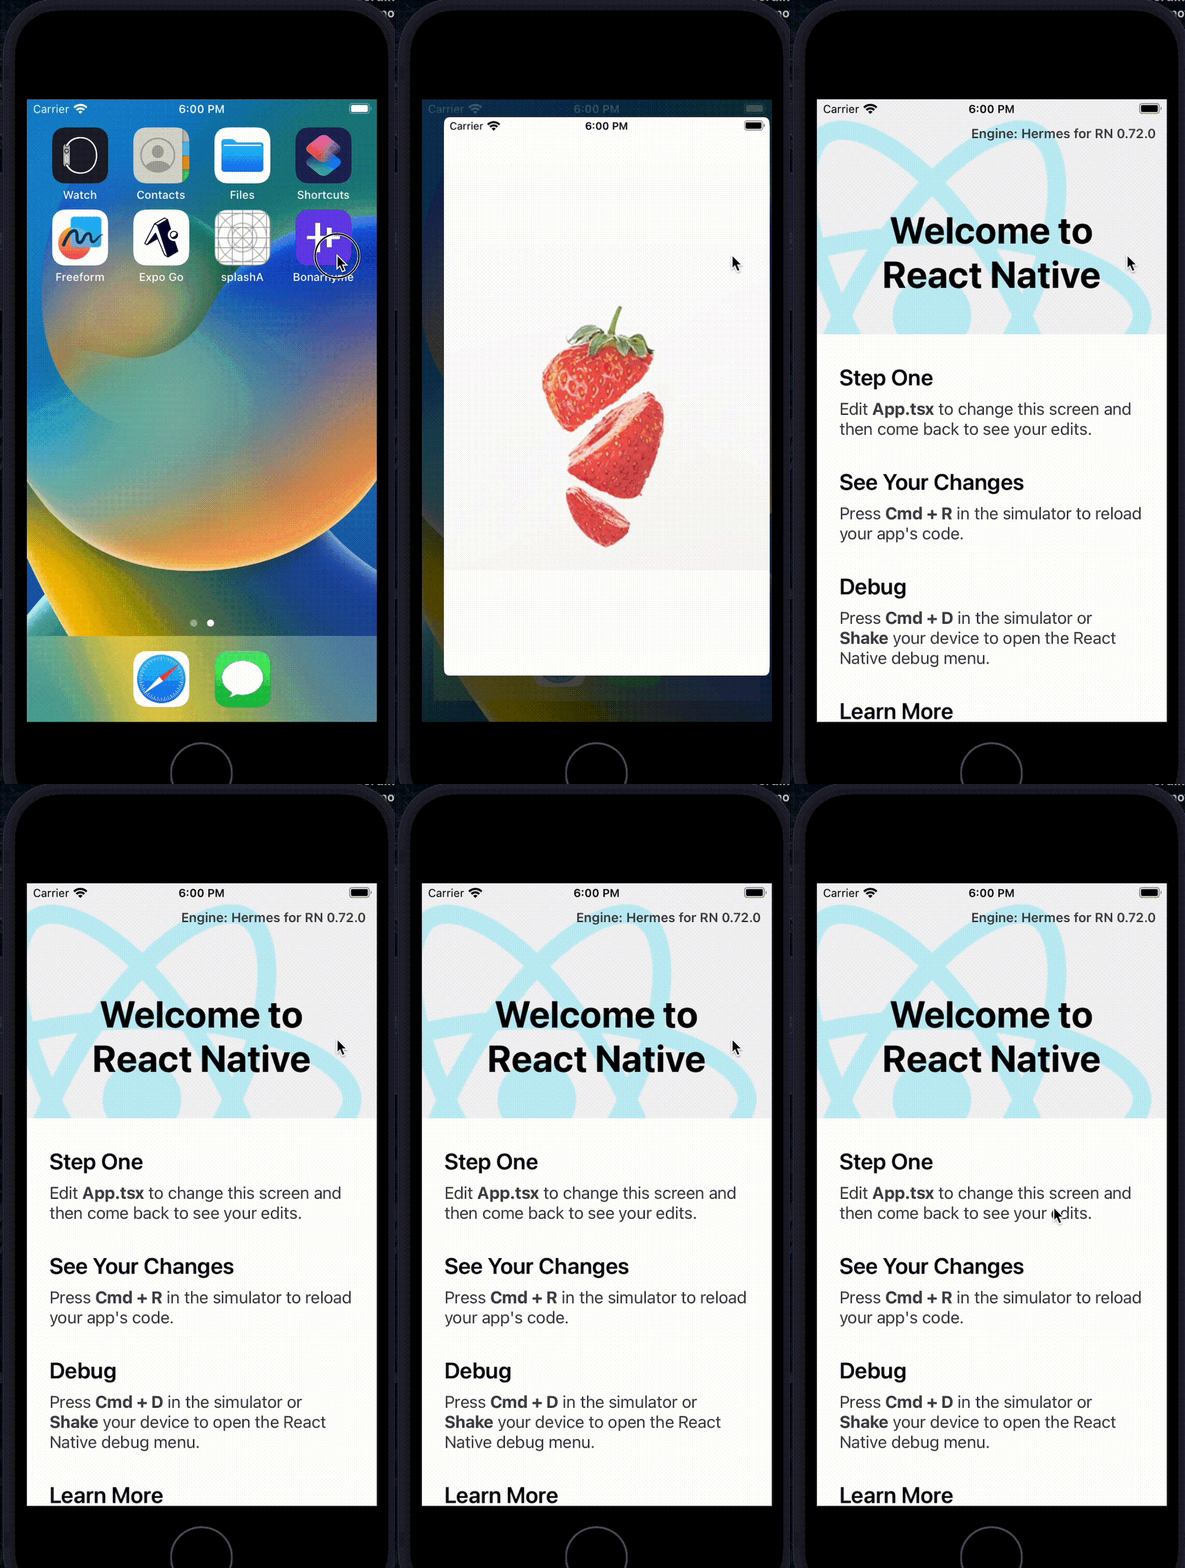
The Obit Animated Splash Screen library is helpful for adding a splash screen to your application without any extra configuration. It allows you to set the width of the splash screen logo or image and also the background color of the splash as props. It works for both Expo and bare-managed React Native projects.
To use this library, simply install the obit-animated-splash-screen package into an existing or new React Native project. Let’s add this dog image by catalyststuff from Freepik into an assets folder we will create in the root folder after converting it to a PNG file.
Next, import the library, declare a state for hiding the library, and then straight up wrap your whole application with the library, like so:
// Typescript
// App.tsx

import React, { useEffect, useState } from 'react';
import {
  Text,
  View,
} from 'react-native';
import AnimatedSplash from "react-native-animated-splash-screen";

function App(): JSX.Element {
  const [isLoaded, setIsLoaded] = useState(false);
  useEffect(() => {
    setIsLoaded(true);
  }, []);
  return (
    <AnimatedSplash
      translucent={true}
      isLoaded={isLoaded}
      logoImage={require("./assets/dog.png")}
      backgroundColor={"#82b1ff"}
      logoHeight={200}
      logoWidth={200}
    >
      <View>
        <Text>
          Lorem ipsum, dolor sit amet consectetur adipisicing elit. Tenetur dignissimos inventore tempore excepturi nobis aut obcaecati veritatis recusandae numquam commodi doloribus, pariatur sint placeat, ipsa dolorum, repudiandae necessitatibus neque fugit.
        </Text>
      </View>
    </AnimatedSplash>
  );
}

export default App;
In the above code, we use logoHeight and logoWidth to size the splash screen image.
Once, you run your code, it should look similar to this on Android and iOS:
Expo Splash Screen is a very powerful library that can be used to display a splash screen during initial app loading. It can also be used to display a splash screen when a component or page is still performing some asynchronous action.
As a first step, install your new Expo application in a new folder, such as splashB, as stated in this guide. Then you can simply copy the dog image by catalyststuff on Freepik into your assets folder and rename it as splash.png. The image must be a PNG or SVG format. There is no need to do any additional setup for the image as this library will resize it for you.
Next, open the app.json file and set #96c5fd as the splash.backgroundColor. If you’d like the image to cover the entire screen, you can use the resize mode.
The Expo Splash Screen library provides an option to control when to hide the splash screen. For example, you may not want it to be automatically hidden when the application loads when fetching initial content from an API. The official documentation provides the necessary information for the setup.
To install the package, use the following command:
// Terminal

npx expo install expo-splash-screen
Once the installation is complete, open the App.js file and add the following code:
// JavaScript
// App.js

// -- other imports
import * as SplashScreen from 'expo-splash-screen';

// keep splash screen visible until we are ready
SplashScreen.preventAutoHideAsync();

export default function App() {
  const [appIsReady, setAppIsReady] = useState(false);

  useEffect(() => {
    async function prepare() {
      try {
        // Perform any initial action here
      } catch (e) {
        console.warn(e);
      } finally {
        // Tell the application to render
        setAppIsReady(true);
      }
    }
    prepare();
  }, []);

  // Function that hides our splash screen.
  // We will call it when we are sure our application is loading on the root view
  const onLayoutRootView = useCallback(async () => {
    if (appIsReady) {
      await SplashScreen.hideAsync();
    }
  }, [appIsReady]);

  // Show a white screen if the app is not ready or the splash screen is not showing.
  if (!appIsReady) {
    return null;
  }

  return (
    <View style={styles.container} onLayout={onLayoutRootView}>
      <Text>Open up App.js to start working on your app!</Text>
      <StatusBar style='auto' />
    </View>
  );
}
const styles = StyleSheet.create({
  container: {
    flex: 1,
    backgroundColor: '#fff',
    alignItems: 'center',
    justifyContent: 'center',
  },
});
Here’s your splash screen on Expo Android and Expo iOS:
N.B., refer to this guide for information on animating the view
App icons are helpful for quickly identifying applications on mobile devices and in app stores. They are part of user experience, so they should follow good design principles.
Here are the general guidelines you should follow to achieve uniformity and consistency for app icons on different devices and operating systems:
As a first step in setting up an app icon, you’ll need to generate it; then you can customize it. Here are some app icon generators to consider:
For this example, let’s use Icon Kitchen. Start by selecting a logo from the menu, then you can customize it, and then download the custom app icon to your machine.
To set up an app icon for Android, start by navigating to ourApp/android/app/src/main/res. Next, replace the following folders with the ones provided by the app icon generator: mipmap-hdpi, mipmap-mdpi, mipmap-xhdpi, mipmap-xxhdpi, and mipmap-xxxhdpi.
Now, open app/splashDd/android/app/src/main/AndroidManifest.xml and remove android:icon="@mipmap/ic_launcher_round" since it does not currently exist in your application. Then, uninstall the application from your simulator and restart the server to see the app icon.
To set up an app icon for iOS, open then the project in Xcode or by running the following command, replacing splashDd with your folder name:
// Terminal
cd ios && open splashDd.xcworkspace
Now, open Xcode, open the ios folders in the folder provided by the app icon generator and follow the steps in the below Xcode screenshot:
![]()
After you’ve dragged the equivalent icons to the correct boxes, you can then uninstall the app in your iOS simulator and then restart the server.
As mentioned earlier in this article, there are times when you may wish to set a custom name for your application. You can do this by opening and editing the android/app/src/main/res/values/strings.xml file on Android, like so:
// android/app/src/main/res/values/strings.xml

<resources>
    <string name="app_name">Bonarhyme</string>
</resources>
On iOS, you can open the ios/splashDd/Info.plist file, locate CFBundleDisplayName, and then edit the string, like so:
// ios/splashDd/Info.plist

<?xml version="1.0" encoding="UTF-8"?>
<!DOCTYPE plist PUBLIC "-//Apple//DTD PLIST 1.0//EN" "http://www.apple.com/DTDs/PropertyList-1.0.dtd">
<plist version="1.0">
<dict>
    <key>CFBundleDevelopmentRegion</key>
    <string>en</string>
    <key>CFBundleDisplayName</key>
    <string>Bonarhyme</string> // Edit here

    // Other codes
Below are the custom app icon and app name added to your application:
In the article, we investigated four React Native splash screen libraries and some associated tools that can be used to set or generate a new splash screen for Android or iOS apps. We also reviewed app icon guidelines for mobile devices, looked at how to generate and set app icons, and how to provide a custom name for a mobile application.
I hope you found this article useful for better understanding how to add branding to your React Native application in a very elegant manner. Thanks for reading! Be sure to leave a comment if you have any questions. Happy coding!

LogRocket's Galileo AI watches sessions for you and and surfaces the technical and usability issues holding back your React Native apps.
LogRocket also helps you increase conversion rates and product usage by showing you exactly how users are interacting with your app. LogRocket's product analytics features surface the reasons why users don't complete a particular flow or don't adopt a new feature.
Start proactively monitoring your React Native apps — try LogRocket for free.
Would you be interested in joining LogRocket's developer community?
Join LogRocket’s Content Advisory Board. You’ll help inform the type of content we create and get access to exclusive meetups, social accreditation, and swag.
Sign up now
Discover how the Interface Segregation Principle (ISP) keeps your code lean, modular, and maintainable using real-world analogies and practical examples.

<selectedcontent> element improves dropdowns

Learn how to implement an advanced caching layer in a Node.js app using Valkey, a high-performance, Redis-compatible in-memory datastore.

Learn how to properly handle rejected promises in TypeScript using Angular, with tips for retry logic, typed results, and avoiding unhandled exceptions.