
The React ecosystem has a multitude of state libraries, so you’ll never run out of alternatives. But, having so many options can make it difficult to choose just one state library for your project.
Zedux was introduced in April 2023 as a feature-rich, molecular state engine for React. It was specifically designed to address some of the performance and maintenance issues associated with other React state management tools.
If you haven’t heard of Zedux, or if you’re new to it, that’s okay. Until very recently, this library was new to me as well. In this article, we’ll investigate the features of Zedux and we’ll see how it compares to Redux.
Jump ahead:
The Replay is a weekly newsletter for dev and engineering leaders.
Delivered once a week, it's your curated guide to the most important conversations around frontend dev, emerging AI tools, and the state of modern software.
Before we start exploring Zedux, let’s quickly review some of the other React state management options that are already available to us. There’s a wide assortment of state library tools out there. Here are some of the most popular:
Other than using an external React state library, we can also use the inbuilt React Context API with Reducer. Another solution is to use GraphQL to manage our data and state. So, as you can see, we have lots of alternatives to manage the state and data of our React apps. But, today we’ll focus on Zedux and Redux!
Zedux is a fairly new state engine for React featuring a composable store model wrapped in a dependency injection (DI)-driven atomic architecture. The creators of Zedux spent five years evaluating other React state libraries, taking the best features, and combining them to create a new powerhouse state management library. They also built their own unique features to make Zedux truly feature rich.
What sets Zedux apart from other state management libraries is the way it distinguishes itself by separating the state layer (stores) from the architectural layer (atoms). This enables a strong DI approach that is theoretically comparable to, yet simpler and more dynamic than, that of Angular.
Now, let’s see how Zedux stacks up to Redux, which is arguably the most popular state management library for React.
Redux and Zedux have similar aims and general methodologies, but there are some fairly broad differences between these libraries. It’s also worth noting that Zedux is more similar to Redux Toolkit than it is to Redux. Let’s take a close look at some specific aspects to see how Zedux and Redux differ.
Getting up and running with Zedux in a React project is very easy. Take a look at the below code example; it’s so easy on the eye! Unlike more complex state libraries that have lots of boilerplate code, like Redux, the code you see here is very lightweight and consists of just a few lines:
import { atom, useAtomState } from '@zedux/react';

const narutoAtom = atom('naruto', 'Naruto');

const nameAtom = atom('name', '');

export default function Greeting() {
  const [naruto, setNaruto] = useAtomState(narutoAtom);

  const [name, setName] = useAtomState(nameAtom);

  return (
    <>
      <input value={name} onChange={(event) => setName(event.target.value)} />

      <div>
        <p>{naruto}</p>

        <button onClick={() => setNaruto(name)}>Change Name</button>
      </div>
    </>
  );
}
The above is all the code you need after the Zedux package has been installed. That’s ridiculously easy, which is one of the greatest advantages of Zedux compared to Redux.
Much like other popular state management libraries, Zedux uses stores to manage global states in applications. Zedux stores are lightweight, powerful, and fast and use a composable store model.
The library also offers a zero config option, which is optional since Zedux stores are opinionated and configurable. With zero config, there’s no need to set up a traditional reducer hierarchy with actions and reducers as is generally required in Redux projects:
import { createStore } from '@zedux/react';

const easySauceStore = createStore();
As you can see in the above snippet, very little code is required to set up a basic Zedux store. This is arguably the main selling point of Zedux. In fact, zero config is where the “Z” in Zedux comes from!
Zedux and Redux are very different in terms of build architecture. Redux follows the Elm architecture pattern, which consists of three separate parts: Model, View, and Update. The interaction of these independent elements results in an organized and productive application cycle.
Zedux takes a different approach that focuses on representing the state as a limited state machine. State machines with distinct states and transitions are easier to define given the design.
Zedux and Redux also vary in terms of how they handle reducers. Reducers are purely functional elements in Redux that take the current state and an action and return a new state.
In Zedux, action-handling functions are referred to as “actors.” Zedux actors also have the ability to send out new actions, which can have unintended consequences. With Zedux it is possible to allow for synchronous or asynchronous actions as well as “staged” activities, enabling many actions to be delivered in succession with a predetermined delay.
Zedux and Redux also differ in terms of their middleware. Zedux middleware can intercept actions, alter actors, and construct its own mini-state machines. Redux enables features like log tracking, crash analysis reports, and action processing for asynchronous code. With Zedux middleware, we can write logic that intercepts actions before they reach the reducer.
Let’s put some of our new knowledge to good use and see what Zedux looks like in a real codebase.
For this tutorial, we’ll build a settlement-type application to demonstrate how state management works in a Zedux app compared to a Redux app. The app will describe four main settlement types. Here they are ranked from smallest to largest population:
Our application will have buttons for incrementing and decrementing each settlement by 1. It will have an input field for adding people to our hypothetical plot of land, which will increase or decrease in size. Lastly, it will have a description of the type of settlement based on the population size.
Here’s how our demo app will look:
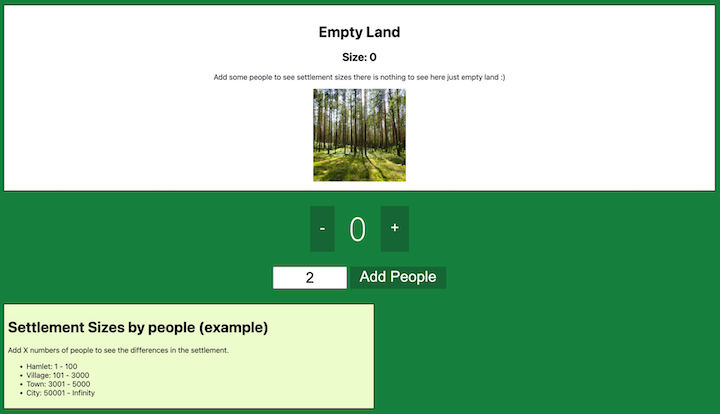
In this tutorial, we’ll build two identical Next.js applications — one with Zedux and the other with Redux. The codebase for both applications is available on GitHub.
Spoiler alert: The Zedux application has less boilerplate and, as a result, a much smaller codebase.
First, navigate to a folder on your computer and then set up your Next.js project by running the below command; ensure you use all the default settings:
npx create-next-app my-app-zedux
Now cd into your project folder and install the Zedux package:
cd my-app-zedux
npm i @zedux/react
Now, create the project folders and files. Go to the root folder for my-app-zedux and run the below commands:
mkdir src/app/components src/app/components/Counter
mkdir src/app/styles
touch src/app/components/Counter/Counter.js src/app/components/Counter/counter.module.css
touch src/app/styles/globals.css
touch src/app/store.js
<
At this point, the project has the right files and folders. Now, just add the rest of the code and then you’ll be ready to run it. The images for the app are hosted on Cloudinary so you’ll need to add the domain to the next.config.js file to give it access:
/** @type {import('next').NextConfig} */

module.exports = {
  images: {
    domains: ['res.cloudinary.com'],
  },
};
Now create the Counter.js file in the components folder. This is the main component because it has the state, business logic, and UI design with all the content for the application:
'use client';
import { useState } from 'react';
import { useAtomState } from '@zedux/react';
import Image from 'next/image';
import { countAtom, settlementAtom } from '../../store';
import styles from './counter.module.css';
export default function Counter() {
  const [count, { decrement, increment, incrementByAmount }] =
    useAtomState(countAtom);
  const [settlement] = useAtomState(settlementAtom);
  const [incrementAmount, setIncrementAmount] = useState(2);
  const [imgSize] = useState(200);
  const Settlements = () => {
    if (count > 0 && count <= 100) {
      return (
        <>
          <h1>{settlement[0].type}</h1>
          <h2>Size: {settlement[0].size}</h2>
          <p>{settlement[0].description}</p>
          <Image
            alt={settlement[0].type}
            src={settlement[0].img}
            height={imgSize}
            width={imgSize}
          />
        </>
      );
    } else if (count > 100 && count <= 3000) {
      return (
        <>
          <h1>{settlement[1].type}</h1>
          <h2>Size: {settlement[1].size}</h2>
          <p>{settlement[1].description}</p>
          <Image
            alt={settlement[1].type}
            src={settlement[1].img}
            height={imgSize}
            width={imgSize}
          />
        </>
      );
    } else if (count > 3001 && count <= 5000) {
      return (
        <>
          <h1>{settlement[2].type}</h1>
          <h2>Size: {settlement[2].size}</h2>
          <p>{settlement[2].description}</p>
          <Image
            alt={settlement[2].type}
            src={settlement[2].img}
            height={imgSize}
            width={imgSize}
          />
        </>
      );
    } else if (count > 5001) {
      return (
        <>
          <h1>{settlement[3].type}</h1>
          <h2>Size: {settlement[3].size}</h2>
          <p>{settlement[3].description}</p>
          <Image
            alt={settlement[3].type}
            src={settlement[3].img}
            height={imgSize}
            width={imgSize}
          />
        </>
      );
    }
  };
  return (
    <div className={styles.container}>
      <div className={styles.settlements}>
        <Settlements />
        {count <= 0 ? (
          <div className={styles.settlementempty}>
            <h1>Empty Land</h1>
            <h2>Size: 0</h2>
            <p>
              Add some people to see settlement sizes there is nothing to see
              here just empty land :)
            </p>
            <Image
              src="https://res.cloudinary.com/d74fh3kw/image/upload/v1695310253/empty-land_ralhqp.jpg"
              height={imgSize}
              width={imgSize}
              alt="Empty Land"
            />
          </div>
        ) : (
          <div></div>
        )}
      </div>
      <div className={styles.counter}>
        <button
          className={styles.button}
          aria-label="Decrement value"
          onClick={decrement}
        >
          -
        </button>
        <span className={styles.value}>{count}</span>
        <button
          className={styles.button}
          aria-label="Increment value"
          onClick={increment}
        >
          +
        </button>
      </div>
      <div className={styles.buttonmenu}>
        <input
          className={styles.textbox}
          aria-label="Set increment amount"
          value={incrementAmount}
          onChange={(e) => setIncrementAmount(Number(e.target.value ?? 0))}
        />
        <button
          className={styles.button}
          onClick={() => incrementByAmount(incrementAmount)}
        >
          Add People
        </button>
      </div>
      <div className={styles.legend}>
        <h1>Settlement Sizes by people (example)</h1>
        <p>Add X numbers of people to see the differences in the settlement.</p>
        <ul>
          <li>Hamlet: 1 - 100</li>
          <li>Village: 101 - 3000</li>
          <li>Town: 3001 - 5000</li>
          <li>City: 50001 - Infinity</li>
        </ul>
      </div>
    </div>
  );
}
Next, add some CSS styling for the Counter.js file. The below code goes into the counter.module.css file and has all the CSS for the main application to style all of the elements displayed on the screen:
.container {
  margin: 0 auto;
  max-width: 96rem;
}
.counter {
  display: flex;
  justify-content: center;
}
.settlements {
  display: flex;
  background-color: #ffffff;
  flex-flow: column nowrap;
  align-items: center;
  margin: 2rem auto;
  padding: 1rem;
  border: 0.1rem solid black;
}
.buttonmenu {
  display: flex;
  flex-flow: row nowrap;
  justify-content: center;
  margin-top: 2rem;
}
.settlementempty {
  text-align: center;
}
.value {
  font-size: 5rem;
  padding-left: 1.6rem;
  padding-right: 1.6rem;
  margin-top: 0.5rem;
  font-family: 'Courier New', Courier, monospace;
  color: #ffffff;
}
.button {
  appearance: none;
  background: none;
  font-size: 2rem;
  padding-left: 1.2rem;
  padding-right: 1.2rem;
  outline: none;
  border: 2px solid transparent;
  color: rgb(240 253 244);
  padding-bottom: 0.4rem;
  cursor: pointer;
  background-color: rgb(22 101 52);
  transition: all 0.15s;
}
.textbox {
  font-size: 2rem;
  padding: 0.2rem;
  width: 10rem;
  text-align: center;
  margin-right: 0.4rem;
}
.button:hover,
.button:focus {
  background-color: rgb(34 197 94);
  color: #ffffff;
}
.button:active {
  background-color: rgba(76, 85, 182, 0.2);
}
.legend {
  margin-top: 2rem;
  width: 100%;
  max-width: 50rem;
  padding: 0.5rem;
  border: 0.1rem solid black;
  background: rgb(236 252 203);
}
Now, add some global styling to structure all of the components in the globals.css file in the styles folder. These are just some basic CSS resets for the whole application:
html,
body {
  min-height: 100vh;
  padding: 0;
  margin: 0;
  font-family: system-ui, sans-serif;
  background-color: rgb(21 128 61);
  color: rgb(2 6 23);
}
a {
  color: inherit;
  text-decoration: none;
}
* {
  box-sizing: border-box;
}
Now, let’s make some minor adjustments in the layout.js file which is the app folder. We give our app the title of “Settlements” and this will display in the browser tab. Replace the code with the following:
import './styles/globals.css';

export default function RootLayout(props) {
  return (
    <html lang="en">
      <body>
        <main>{props.children}</main>
      </body>
    </html>
  );
}

export const metadata = {
  title: 'Settlements',
};
Next, open the page.js file and replace its contents with the below code:
'use client';

import Counter from './components/Counter/Counter';

export default function IndexPage() {
  return (
    <>
      <Counter />
    </>
  );
}
In the above code we import the main Counter component that displays in the main application.
Now, update the store.js file with the store and state data:
import { api, atom, injectStore } from '@zedux/react';
export const countAtom = atom('count', () => {
  const store = injectStore(0);
  return api(store).setExports({
    decrement: () => store.setState((state) => state - 1),
    increment: () => store.setState((state) => state + 1),
    incrementByAmount: (action) => store.setState((state) => (state += action)),
  });
});
export const settlementAtom = atom('settlement', () => {
  const store = injectStore([
    {
      type: 'Hamlet',
      size: '1 - 100',
      description:
        'A hamlet is a smaller-scale community than a town or village. The term "smaller settlement" is frequently only a colloquial term for a smaller settlement, or even a subdivision or satellite organization to a bigger community.',
      img: 'https://res.cloudinary.com/d74fh3kw/image/upload/v1691415034/hamlet_n50lem.jpg',
    },
    {
      type: 'Village',
      size: '101 - 3000',
      description:
        'Although the term is sometimes used to cover both hamlets and smaller towns, a village is a grouped human settlement or community, bigger than a hamlet but less than a town, with a population generally ranging from a few hundred to a few thousand.',
      img: 'https://res.cloudinary.com/d74fh3kw/image/upload/v1691415578/village_n7hoyb.jpg',
    },
    {
      type: 'Town',
      size: '3001 - 5000',
      description:
        'An urban area, or town, is a place where people reside. It alludes to the entirety of the human community, including all of its social, material, organizational, spiritual, and cultural components. Towns are often smaller than cities and bigger than villages, however the criteria used to differentiate between them vary greatly throughout the world.',
      img: 'https://res.cloudinary.com/d74fh3kw/image/upload/v1691416139/town_lhwwza.jpg',
    },
    {
      type: 'City',
      size: '5001 - Infinity',
      description:
        'A large-scale urban area is referred to as a city. It can be described as a location that is permanently populated, has clearly defined administrative boundaries, and whose inhabitants focus mostly on non-agricultural jobs. For housing, transportation, sanitation, utilities, land use, the manufacturing of commodities, and communication, cities often have vast systems.',
      img: 'https://res.cloudinary.com/d74fh3kw/image/upload/v1691416356/city_aw2lvq.jpg',
    },
  ]);
  return store;
});
The codebase should be complete! Make sure you are in the root for the my-app-zedux folder, then run the npm run dev command to start the application.
We can build an identical app with Redux, but the codebase will be much larger due to the huge boilerplate and setup for the codebase, which includes creating a store. The Zedux setup does not require a store so there are fewer files to create. You can see both codebases on GitHub.
Here’s a side-by-side comparison of the Zedux and Redux app codebases:
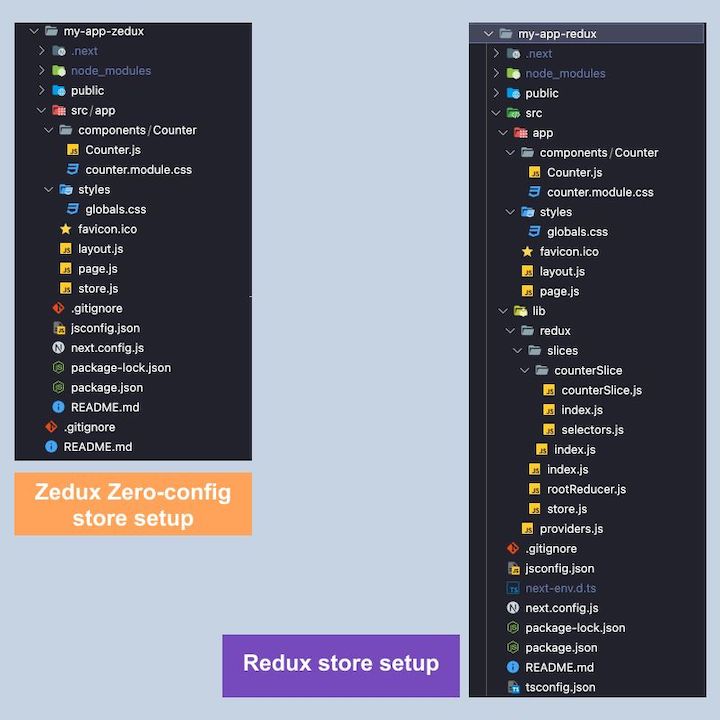
The Zedux project is much smaller overall because there is no store to configure its setup for zero config. The Redux project includes the entire boilerplate and store setup in the lib folder.
Of course, this is just one example; every project can have a different setup and every developer has a different way of doing things. The main point here is to show what a zero config setup looks like without a store.
Here’s our completed app in action:
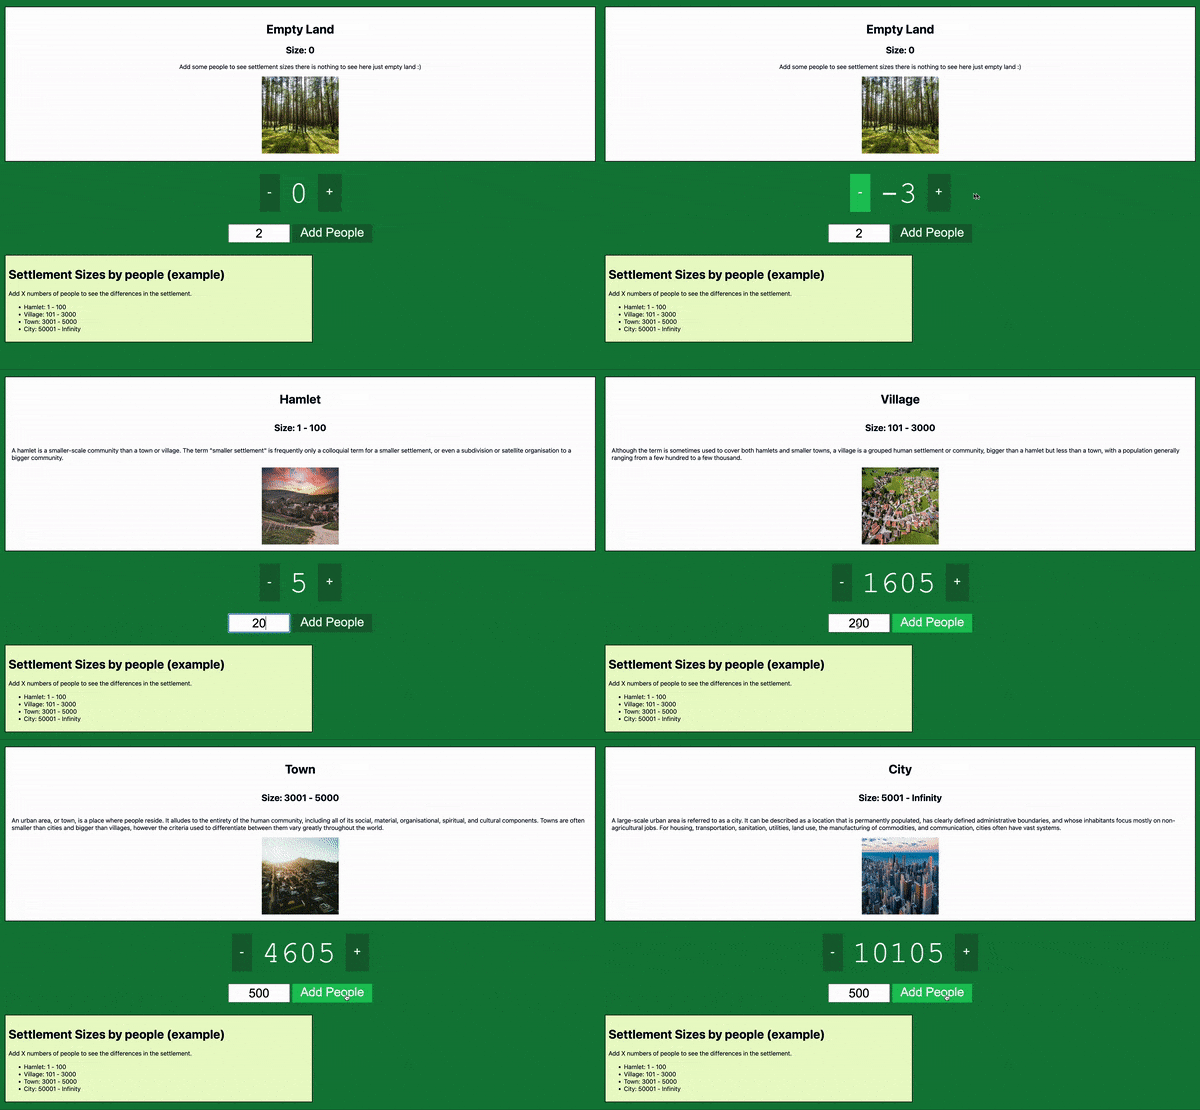
Now let’s take another look at the differences between Zedux and Redux applications, so that you can better understand the differences you can expect to see when building apps with these state libraries.
In terms of speed and project setup, Zedux requires less time and less work compared to setting up a Redux store for the first time. As a result, there are far fewer files to manage, which will obviously decrease the size of the codebase.
The creators of Zedux acknowledge that Redux stores have superior performance in side-by-side comparisons, although there are several factors that make it difficult to measure the difference in performance.
With Zedux atomic and composable store model architecture, the state is split into numerous different stores. The creators of Zedux claim that this approach provides significantly larger gains in performance as the complexity of an app grows over time.
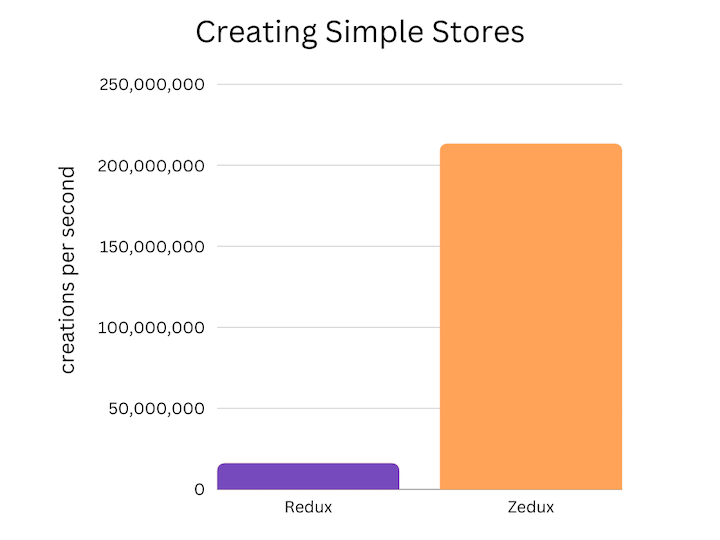
As you can see from this chart from the creators of Zedux, Zedux comes up on top for simple store creation:
They even put together a benchmarking test that shows the speed of the store creation:
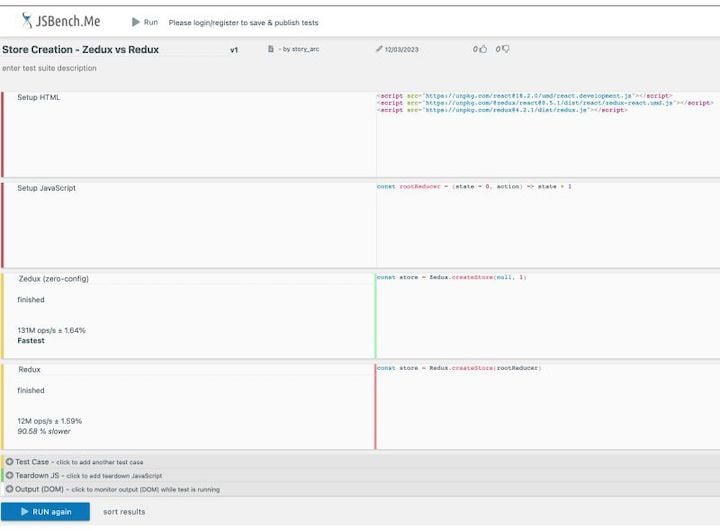
You can learn more about the comparison between Redux and Zedux on the Zedux website, and you can do your own benchmarking yourself by running the test here.
Congratulations, you made it to the end of this tutorial! In this article, we investigated the differences between Zedux and Redux and built a demo app using Zedux.
There are many similarities between Zedux and Redux, but Zedux has a much simpler and more straightforward codebase and syntax, making it perfect for beginners to get started. And, with its zero config option, Zedux does not take much effort to get up and running.
Redux is a great state management library, but it requires a quite lengthy setup with a lot of boilerplate, making the learning curve a bit higher. Nonetheless, both state management libraries have excellent documentation. Whichever library you choose, your project is guaranteed to be in safe hands.
Install LogRocket via npm or script tag. LogRocket.init() must be called client-side, not
server-side
$ npm i --save logrocket

// Code:

import LogRocket from 'logrocket';
LogRocket.init('app/id');
// Add to your HTML:

<script src="https://cdn.lr-ingest.com/LogRocket.min.js"></script>
<script>window.LogRocket && window.LogRocket.init('app/id');</script>

Russ Miles, a software development expert and educator, joins the show to unpack why “developer productivity” platforms so often disappoint.

Discover what’s new in The Replay, LogRocket’s newsletter for dev and engineering leaders, in the February 18th issue.

Learn how to recreate Claude Skills–style workflows in GitHub Copilot using custom instruction files and smarter context management.

Claude Code is deceptively capable. Point it at a codebase, describe what you need, and it’ll autonomously navigate files, write […]
Would you be interested in joining LogRocket's developer community?
Join LogRocket’s Content Advisory Board. You’ll help inform the type of content we create and get access to exclusive meetups, social accreditation, and swag.
Sign up now