GraphQL is a data query language that provides a flexible approach for querying APIs. Unlike REST APIs, the GraphQL API provides one single endpoint for performing CRUD operations on the data store.

A big benefit of using GraphQL over the REST approach is flexibility. With GraphQL, frontend developers can be more specific about what data the API should send back, thereby ensuring the app only receives the needed data.
For a smooth GraphQL-frontend integration, the Apollo client library is used to fetch, cache, modify, and manage state data locally in a frontend application.
It includes the in-memory cache, local state management, error handling capabilities, and a React-based view layer called Apollo Provider.
In this tutorial, we’ll learn how to set up a GraphQL API in Node.js and how to manage data from the API locally in a React app with Apollo Client.
You’re required to first install Node.js on your computer if you have not already done so.
If installed, create a folder for your project, then make a server subfolder within it. After creating the subfolder, cd into it and initialize a Node project with the following terminal commands:
cd graphql-apollo/server
npm init -y
This will generate a package.json file in your project’s server folder.
Now run the following command to install the packages:
npm install express express graphql express-graphql
Alternatively, you can get the code from this GitHub repository to follow along.
We’ll build our application around some fake user data stored in the graphql-apollo/server/users.json file. Each user has an ID, a first name, last name, gender, and an address:
[{
  "id": 1,
  "firstName": "Ellene",
  "lastName": "Clausen-Thue",
  "email": "[email protected]",
  "gender": "Female",
  "address": "Omboué"
}, {
  "id": 2,
  "firstName": "Dani",
  "lastName": "Padley",
  "email": "[email protected]",
  "gender": "Male",
  "address": "Pogwizdów"
}, {
  "id": 3,
  "firstName": "Svend",
  "lastName": "Cathenod",
  "email": "[email protected]",
  "gender": "Male",
  "address": "Changqing"
}
...
]
Note that you can quickly generate your own data from Mockaroo.
Now in GraphQL, we can use a schema to specify the data type and structure of the database and see if it’s comprised of mutations and queries.
Queries are statements containing rules that specify how to retrieve data and what fields to retrieve for each record. Whereas mutations are statements that specify how to mutate data on the API (that is, create, update, and delete).
To keep our project organized, create a new folder named Schemas inside of the graphql-apollo/server folder.
Inside the Schemas folder, create a new folder named Types and create a User.js file in it where we’ll create the type definition for a user entity:
const graphql = require("graphql");
const { GraphQLObjectType, GraphQLInt, GraphQLString } = graphql;

const User = new GraphQLObjectType({
  name: "User",
  fields: () => ({
    id: { type: GraphQLInt },
    firstName: { type: GraphQLString },
    lastName: { type: GraphQLString },
    email: { type: GraphQLString },
    gender: { type: GraphQLString },
    address: { type: GraphQLString },
  }),
});

module.exports = User;
The User type has an id of type integer, a name of type string, and so on. We also imported the various schema types from graphql. Finally, we exported the User object to use the schema where required.
Next, we need to create all the queries and mutations for our API.
So, create an index.js file in the graphql-apollo/server/Schemas folder. We’ll start by importing the GraphQL types, the fake users data, and the User type:
const graphql = require("graphql");
const {
  GraphQLObjectType,
  GraphQLSchema,
  GraphQLInt,
  GraphQLString,
  GraphQLList,
} = graphql;

const usersData = require("../users.json");

const UserType = require("./Types/User");
Next, below the imports, let’s create our query:
const RootQuery = new GraphQLObjectType({
  name: "RootQueryType",
  fields: {
    getAllUsers: {
      type: new GraphQLList(UserType),
      args: { id: { type: GraphQLInt } },
      resolve(parent, args) {
        return userData;
      },
    },
  },
});
Inside RootQuery, we define the query for getting all users (getAllUsers). In this query, we specify that we want to get a list of users (specified by type: new GraphQLList(UserType)).
The args property specifies the arguments to pass in query (id), and the resolve function returns our actual data source. userData will be substituted with the URL of an actual database in a real production environment.
Next, we create our mutations:
const Mutation = new GraphQLObjectType({
  name: "Mutation",
  fields: {
    createUser: {
      type: User,
      args: {
        firstName: { type: GraphQLString },
        lastName: { type: GraphQLString },
        email: { type: GraphQLString },
        gender: { type: GraphQLString },
        address: { type: GraphQLString },
      },
      resolve(parent, args) {
        userData.push({
          id: userData.length + 1,
          firstName: args.firstName,
          lastName: args.lastName,
          email: args.email,
          gender: args.gender,
          address: args.address,
        });
        return args;
      },
    },
  },
});
Here, similar to the previous query, we created a mutation query for creating a user (createUser) and pass in the previous schema as its type.
args contains the data to pass inside the query as an argument. In the resolve function, we push the new user data object into our data store. Note that for the user id, we automatically increment the value based on the list’s length.
Finally, we must export our schema with the query and mutation at the bottom of the file:
module.exports = new GraphQLSchema({ query: RootQuery, mutation: Mutation });
In the next section, we’ll create our GraphQL server.
To start your GraphQL server, go into your graphql-apollo/server/index.js file and use the following code:
const express = require("express");
const app = express();
const PORT = 6969;
const { graphqlHTTP } = require("express-graphql");
const schema = require("./Schemas/index");
const cors = require("cors");

app.use(cors());
app.use(express.json());
app.use(
  "/graphql",
  graphqlHTTP({
    schema,
    graphiql: true,
  })
);

app.listen(PORT, () => {
  console.log("Server running");
});
After importing graphqlHTTP to create our GraphQL HTTP server, note that the GraphQL API only has one endpoint: /graphql.
As an argument to graphqlHTTP, we must pass the imported schema and set the graphiql option to true. The latter gives us access to the GraphQL graphical user interface (GUI) for testing our queries.
Finally, we start serving our GraphQL app at port 6969.
GraphiQL is a built-in GraphQL API testing environment that enables us to visualize our API calls.
While setting up our GraphQL server in the previous section, we did set the graphilql option to true. This enables us to use the Graphiql UI on our browser to run test queries, just like API testers like Postman.
To access qraphiql, run node index.js on your command line and visit the following URL on your web browser’s address bar:
<localhost:6969/graphql>
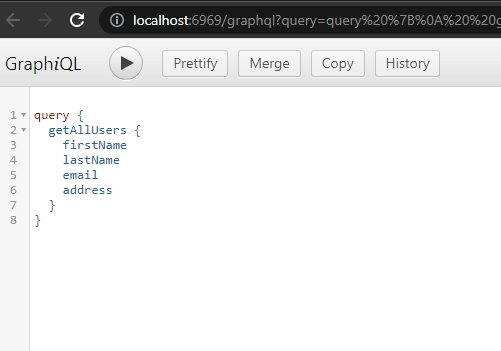
In the left window, you can write and execute test queries. The result of each query will appear on the right window.
For example, the following image shows how we retrieve all users using the getAllUsers query, which we previously created:
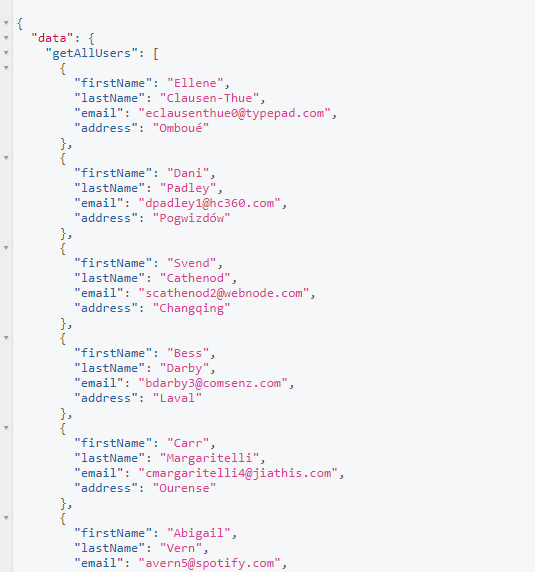
And this is the result:
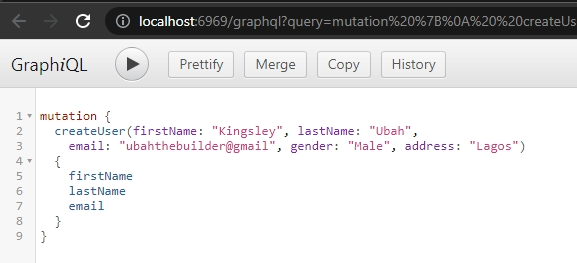
We can also add a new user to the data store by executing the createUser mutation:
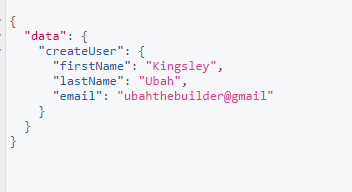
Then, this is the result:
Now that the QraphQL backend is all set, it’s time to create a React frontend to consume our GraphQL API. We’ll use the Apollo Client library to connect with the backend.
First, let’s install React via create-react-app:
npx create-react-app client
This creates a new folder inside the project root called client, which contains the frontend React code and templates.
Next, we’ll install both Apollo Client and GraphQL for the frontend:
npm install @apollo/client
npm install graphql

// For Mac
yard add @apollo/client graphql
After successful installation, we’ll import some dependencies into the root component (graphql-apollo/client/src/App.js):
import "./App.css";
import {
  ApolloClient,
  InMemoryCache,
  ApolloProvider,
  HttpLink,
  from,
} from "@apollo/client";
import { onError } from "@apollo/client/link/error";
import Users from "./Components/GetUsers";
import Form from "./Components/Form";

// [...]
Here, onError provides us with a way to catch errors, inMemoryCache enables page caching and ApolloClient will be used to create the Apollo provider.
We also imported two yet-to-be-created components, Users and Form, to display all users and create a new user respectively.
Now, we’ll create a new client instance from ApolloClient with a link to the GraphQL server, making some other configurations as well:
const link = from([
  errorLink,
  new HttpLink({ uri: "http://localhost:6969/graphql" }),
]);

const client = new ApolloClient({
  cache: new InMemoryCache(),
  link: link,
});
For GraphQL errors, display an alert with the error message(s):
const errorLink = onError(({ graphqlErrors, networkError }) => {
  if (graphqlErrors) {
    graphqlErrors.map(({ message, location, path }) => {
      alert(`Graphql error ${message}`);
    });
  }
});
Now that we have the Apollo Client instance with all the required settings, we can wrap our entire application inside the Apollo Provider:
function App() {
  return (
    <ApolloProvider client={client}>
      {" "}
      <Users />
      <Form />
    </ApolloProvider>
  );
}

export default App;
This will provide both nested components with access to the GraphQL API. Next, we’ll execute our first query to fetch all users.
Now that our frontend has access to the GraphQL API, we can now create the query and mutation statements to use in the client code.
In your graphql-apollo/client/src folder, create Queries.js and Mutations.js for your queries and mutations respectively, then use the following code:
// Queries.js
import { gql } from "@apollo/client";

export const LOAD_USERS = gql`
  query {
    getAllUsers {
      id
      firstName
      email
      gender
      address
    }
  }
`;

// Mutations.js
import { gql } from "@apollo/client";

export const CREATE_USER_MUTATION = gql`
  mutation createUser(
    $firstName: String!
    $lastName: String!
    $email: String!
    $gender: String
    $address: String
  ) {
    createUser(
      firstName: $firstName
      lastName: $lastName
      email: $email
      gender: $gender
      address: $address
    ) {
      id
    }
  }
`;
The CREATE_USER_MUTATION will be used in the Form when adding a new user to the GraphQL API.
Next, we’ll use these to query GraphQL for our users’ data.
Inside the graphql-apollo/client/src/Users.js component, let’s execute the LOAD_USERS query to retrieve all users from the API:
import React, { useEffect, useState } from "react";
import { useQuery, gql } from "@apollo/client";
import { LOAD_USERS } from "../GraphQL/Queries";

function Users() {
  const { error, loading, data } = useQuery(LOAD_USERS);
  const [users, setUsers] = useState([]);
  useEffect(() => {
    if (data) {
      setUsers(data.getAllUsers);
    }
  }, [data]);

  return (
    <div>
      {" "}
      {users.map((val) => {
        return <h1> {val.firstName}</h1>;
      })}
    </div>
  );
}

export default GetUsers;
Here, the useQuery Hook takes in a query statement and returns data from API along with possible error and loading states. Then, inside the useEffect Hook, we check for data and update the component state whenever there is a change.
In the template, we can now display the first name of all users by mapping the data.
Next, we’ll perform mutation on our API by adding a new user through the form input.
Let’s add a new user to our data store by executing the mutation for creating a user. First, we make some imports and initialize our Form component’s state with empty values:
import React, { useState } from "react";
import { CREATE_USER_MUTATION } from "../GraphQL/Mutations";
import { useMutation } from "@apollo/client";

function Form() {
  const [firstName, setFirstName] = useState("");
  const [lastName, setLastName] = useState("");
  const [email, setEmail] = useState("");
  const [gender, setGender] = useState("");
  const [address, setAddress] = useState("");
  // [...]
Then, we pass our mutation query into the useMutation Hook. This returns createUser for adding a new user to the data store and error for possible error states:
const [createUser, { error }] = useMutation(CREATE_USER_MUTATION);

  const addUser = () => {
    createUser({
      variables: {
        firstName: firstName,
        lastName: lastName,
        email: email,
        gender: gender,
        address: address,
      },
    });
Finally, we render the UI for the form:
if (error) {
      console.log(error);
    }
  };
  return (
    <div>
      <input
        type="text"
        placeholder="First Name"
        onChange={(e) => {
          setFirstName(e.target.value);
        }}
      />
      <input
        type="text"
        placeholder="Last Name"
        onChange={(e) => {
          setLastName(e.target.value);
        }}
      />
      <input
        type="text"
        placeholder="Email"
        onChange={(e) => {
          setEmail(e.target.value);
        }}
      />
      <input
        type="text"
        placeholder="Gender"
        onChange={(e) => {
          setPassword(e.target.value);
        }}
      />
      <input
        type="text"
        placeholder="Address"
        onChange={(e) => {
          setPassword(e.target.value);
        }}
      />
      <button onClick={addUser}> Create User</button>
    </div>
  );
}

export default Form;
Here, when an input changes, we called the setter Hook to update the component state with the input value. Then, when the user clicks on the submit button, we execute the addUser function, which in turn adds the user to the database.
I hope this tutorial helped you understand GraphQL better. You should now be able to set up a GraphQL API on a Node server, define a schema for your data store, and make queries to create, read, update, and delete data on the API.
The final section of the article serves as a guide to help you connect a GraphQL backend to a React frontend application using Apollo Client. The core @apollo/client library provides built-in integration with React, making the process of API integration quick and easy.
You can get the source code from this GitHub repository. If you have any questions related to this topic, please let me know in the comments.
While GraphQL has some features for debugging requests and responses, making sure GraphQL reliably serves resources to your production app is where things get tougher. If you’re interested in ensuring network requests to the backend or third party services are successful, try LogRocket.


LogRocket lets you replay user sessions, eliminating guesswork around why bugs happen by showing exactly what users experienced. It captures console logs, errors, network requests, and pixel-perfect DOM recordings — compatible with all frameworks.
LogRocket's Galileo AI watches sessions for you, instantly aggregating and reporting on problematic GraphQL requests to quickly understand the root cause. In addition, you can track Apollo client state and inspect GraphQL queries' key-value pairs.
Would you be interested in joining LogRocket's developer community?
Join LogRocket’s Content Advisory Board. You’ll help inform the type of content we create and get access to exclusive meetups, social accreditation, and swag.
Sign up now
A breakdown of the wrapper and container CSS classes, how they’re used in real-world code, and when it makes sense to use one over the other.

This guide walks you through creating a web UI for an AI agent that browses, clicks, and extracts info from websites powered by Stagehand and Gemini.

This guide explores how to use Anthropic’s Claude 4 models, including Opus 4 and Sonnet 4, to build AI-powered applications.

Which AI frontend dev tool reigns supreme in July 2025? Check out our power rankings and use our interactive comparison tool to find out.


