Frontend engineers spend less time writing component logic and more time configuring build systems and managing dependencies across multiple environments. This is where platform engineering comes in. Platform engineering is the practice of building and maintaining internal systems and tools that make software development easier.

In this tutorial, you’ll learn how frontend engineers can benefit from platform engineering and see practical examples using Backstage.
The Replay is a weekly newsletter for dev and engineering leaders.
Delivered once a week, it's your curated guide to the most important conversations around frontend dev, emerging AI tools, and the state of modern software.
Building a contemporary React application involves decisions about bundlers, testing frameworks, and deployment strategies. Each choice creates a cascade of configuration requirements and maintenance overhead that extends far beyond component development.
Consider the typical workflow for adding a new feature in a microfrontend architecture. You need to scaffold a new service, configure Webpack Module Federation, and complete several other setup steps. The React components themselves might represent only 30 percent of the total development effort.
This complexity multiplies when teams work in isolation. Different projects use conflicting versions of shared UI libraries, which creates integration problems during deployment. The “just writing React code” paradigm breaks down when applications need to communicate with backend services through different parts of the stack. Frontend engineers now spend significant time on infrastructure concerns that used to belong to DevOps teams.
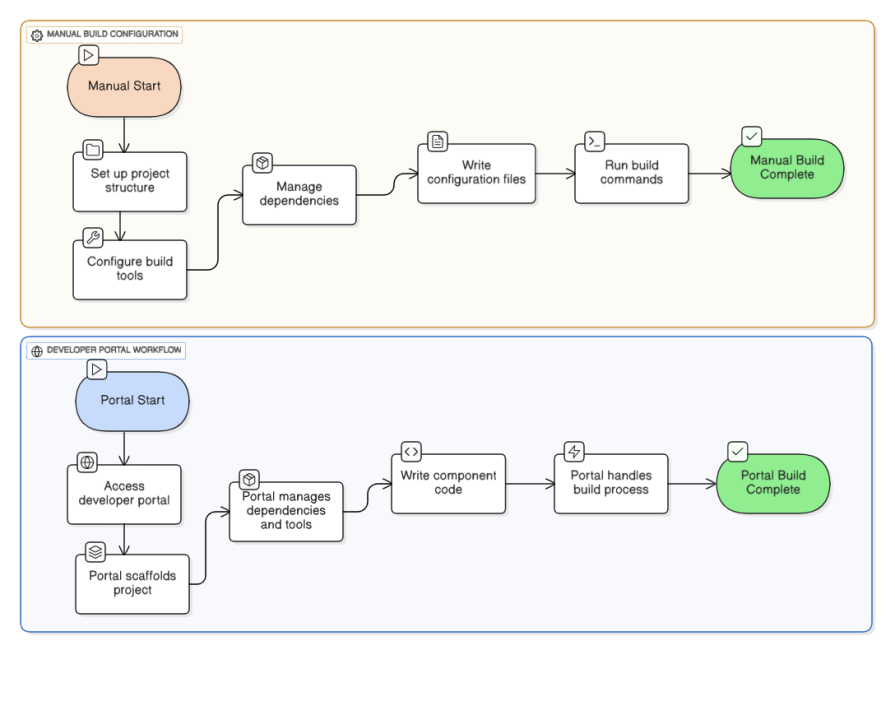
Platform engineering creates internal developer platforms that abstract away repetitive infrastructure tasks while remaining flexible to application requirements. Instead of each frontend team configuring Webpack from scratch, platform engineering provides preconfigured build systems that teams can extend and customize.
This approach turns infrastructure from a barrier into an enabler. Rather than spending time setting up new projects, developers can access features through a standardized interface. You can provision new applications, configure feature flags, and deploy to staging environments without filing tickets or waiting for other teams. The platform provides guardrails and best practices while preserving the autonomy development teams need to move quickly.
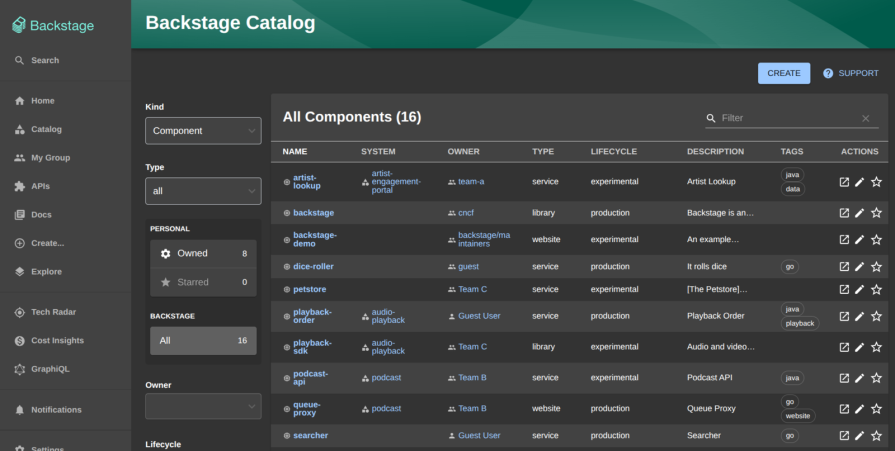
Frontend teams often work across several projects, each with its own setup and repository. It becomes difficult to track where everything lives, who owns what, and which version is running. Backstage simplifies this by serving as a single place to organize, browse, and interact with all your internal projects. Think of it as a unified front door for your development work, bringing your tools, documentation, and projects into one consistent view.
Backstage runs locally on your machine just like any frontend app. Once installed, it opens a web interface at localhost:3000 where you can see and manage your projects. You don’t need containers or deployment servers, only Node.js and Yarn.
The project you create comes with two main parts: a web interface that you’ll use every day, and an optional backend that powers integrations behind the scenes. For most frontend teams, the web interface is where most of the work happens. It’s where you view projects, explore plugins, and connect your tools.
Setting up Backstage locally turns your machine into a unified command center for all your frontend projects, no additional infrastructure required.
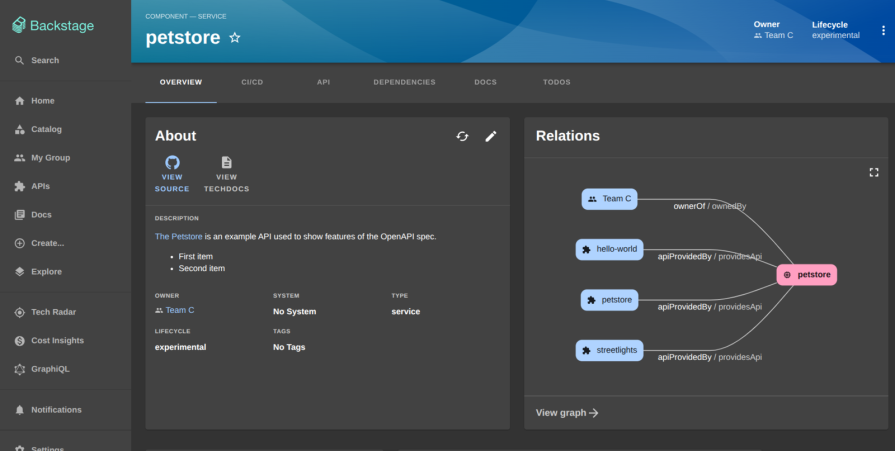
Each application in Backstage is represented by a small file that describes what it is and who maintains it. For a Next.js app, this file might describe it as a production dashboard owned by the frontend team. Once added, it appears inside your Backstage portal like an entry in a library. You can open it, read details, or connect it to other tools later.
This step turns scattered repositories into visible, connected components. Instead of digging through links or version control systems, you can open Backstage and see all your apps listed in one place with their names, descriptions, and ownership details. Cataloging your frontend apps in Backstage replaces scattered repos with a single, discoverable system of record for your projects.
Backstage can display information about your projects directly inside its interface. For example, you can build a simple plugin that reads details from your Next.js project, such as its version number and dependencies, and displays them as a card inside Backstage.
Plugins act like small widgets that show relevant data. They can display project information, test results, documentation, or live build statuses. For a frontend developer, this means you can quickly see the technical state of your apps without leaving the portal. Over time, you can add more panels to track different aspects of your work.
Backstage projects are workspace based, meaning every plugin is managed within a monorepo structure. Ensure you have Node.js 18 or newer and Yarn installed. Then create a new Backstage app using the official CLI:
npx @backstage/create-app@latest
Provide a name such as backstage-portal when prompted. After installation completes, move into the project root:
cd backstage-portal
The directory contains packages for the app, backend, and libraries. Each package operates independently through Yarn workspaces. To verify the setup works, start Backstage locally:
yarn start
You should see the portal running at http://localhost:3000.
Plugins extend Backstage by adding new functionality. They can render pages, widgets, or dashboards. Create a new plugin named project-info using the CLI:
yarn new
When prompted, select frontend-plugin. This generates a folder at plugins/project-info/ containing the React components, routes, and configuration for the new plugin.
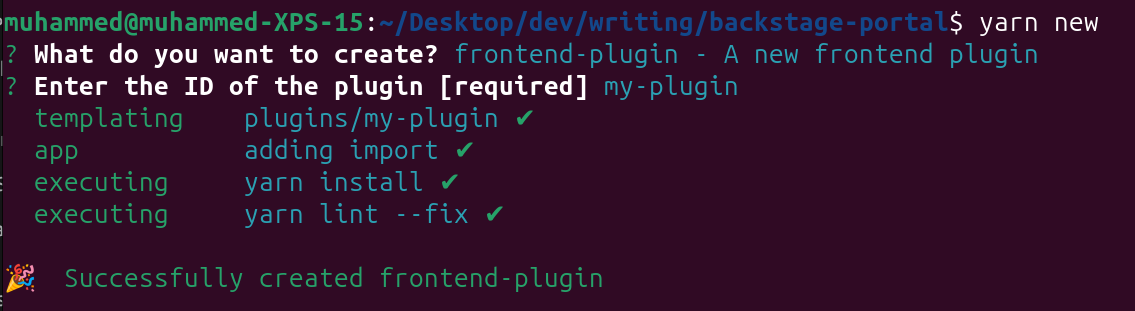
yarn new command. The CLI scaffolds the plugin structure, installs dependencies, and sets up initial configuration files automatically.The scaffolded structure looks like this:
plugins/
  project-info/
    src/
      plugin.ts
      components/
        ExampleComponent.tsx
    dev/
    package.json
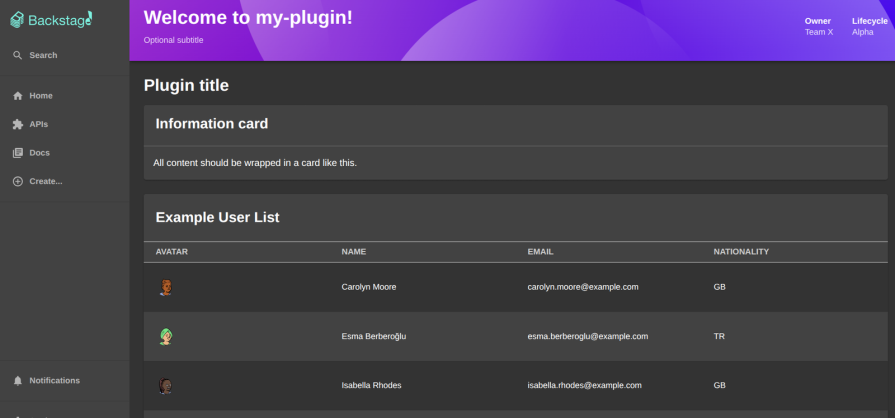
If Backstage is still running, open http://localhost:3000/my-plugin and confirm the plugin page loads with a placeholder component.
Each plugin is a modular piece of your developer portal that lets you tailor Backstage to match your team’s workflow and visibility needs.
Backstage Docs lets you centralize your project documentation directly within the developer portal. You no longer have to search through separate README files, Confluence pages, or Notion docs to find how your app is built or deployed. Everything can live inside Backstage, versioned with your code and automatically updated when the repository changes.
TechDocs is the documentation system in Backstage. It reads Markdown files (often stored in the docs/ folder of a project), converts them into a static site, and displays them inside the portal. You can set it up entirely locally without Docker or cloud storage.
Inside your Backstage project, make sure TechDocs is installed:
yarn add --cwd packages/backend @backstage/plugin-techdocs-backend
yarn add --cwd packages/app @backstage/plugin-techdocs
Then open packages/backend/src/plugins/techdocs.ts and register the TechDocs backend plugin:
import { createRouter } from '@backstage/plugin-techdocs-backend';
import type { Router } from 'express';
import { PluginEnvironment } from '../types';

export default async function createPlugin(env: PluginEnvironment): Promise<Router> {
  return await createRouter({
    logger: env.logger,
    config: env.config,
    discovery: env.discovery,
    cache: env.cache,
  });
}
Finally, wire it up in packages/backend/src/index.ts:
import techdocs from './plugins/techdocs';

const techdocsEnv = useHotMemoize(module, () => createEnv('techdocs'));
apiRouter.use('/techdocs', await techdocs(techdocsEnv));
Once you restart Backstage with yarn dev, the portal automatically recognizes documentation pages from your registered components.
For a Next.js or React project, documentation is stored in a /docs folder alongside your code. Each project that you register in Backstage can include its own documentation source.
nextjs-dashboard/
 ├── pages/
 ├── components/
 ├── docs/
 │   ├── index.md
 │   └── architecture.md
 └── package.json
Inside docs/index.md, add a short overview of your project:
# Next.js Dashboard

This is a Next.js application that powers the internal analytics dashboard.

## Tech Stack
- Next.js for the frontend
- TailwindCSS for styling
- SWR for data fetching
Then include a catalog-info.yaml file at the root of your project so Backstage knows where to find it:
apiVersion: backstage.io/v1alpha1
kind: Component
metadata:
  name: nextjs-dashboard
  description: Internal analytics dashboard for frontend teams
  annotations:
    backstage.io/techdocs-ref: dir:.
spec:
  type: website
  lifecycle: production
  owner: frontend-team
When you add this component to Backstage through the portal (http://localhost:3000/create → “Register Existing Component”), Backstage detects the techdocs-ref annotation and automatically generates documentation pages from your /docs folder.
When a new developer joins your team, they can open your Next.js service inside Backstage, view the Docs tab, and immediately see how the app is structured, which libraries it uses, and how to run it locally. Every push to your repository automatically updates the documentation, so the portal always reflects the current codebase.
Platform engineering helps frontend teams reduce complexity by centralizing project management and tooling through Backstage. In this guide, you saw how to set up a local developer portal, register frontend applications, and create a custom plugin to display project information, all from a single interface.
The biggest challenge is adoption and maintenance as your projects evolve. Start by cataloging your most used applications and adding plugins that solve immediate problems. Over time, your portal can grow into the foundation of your frontend development workflow.

Learn how to use Gemini CLI subagents to delegate frontend, backend, testing, and docs tasks to specialized agents with guardrails and clear ownership.

Learn how next-browser gives AI agents runtime context for debugging Next.js apps, including React props, hydration, PPR, forms, and performance.

Build dynamic LLM routing in Next.js with OpenRouter, TanStack AI, task classification, model fallbacks, and cost-aware routing.

TSRX adds first-class control flow, conditional hooks, and scoped styles to React via a TypeScript compiler extension — no new framework required.
Would you be interested in joining LogRocket's developer community?
Join LogRocket’s Content Advisory Board. You’ll help inform the type of content we create and get access to exclusive meetups, social accreditation, and swag.
Sign up now

