The HTML5 canvas has the potential to become a staple of the web, enjoying ubiquitous browser and platform support in addition to widespread webpage support, as nearly 90% of websites have ported to HTML5. So, why hasn’t the canvas become a staple of the web?
The canvas tag on StackOverflow accounts for fewer than two percent of all questions, and Google Trends shows searches for “canvas” have no more than quadrupled over the past five years. There are a number of possible explanations, but instead of debating its past, we’ll address advantages and seeming disadvantages of the HTML5 canvas — including time-tested solutions for those drawbacks. Below are brief summaries of the various drawing techniques and the main advantages and disadvantages of each:
In sum, the list above offers a spectrum of abstraction layers, where the least abstraction is the most efficient (canvas and WebGL) and the most abstraction is the least efficient (SVG and DOM). However, both the canvas and WebGL options have a few additional advantages, both old and new, that make it more enticing as a middle ground: third-party libraries that increase ease-of-use and support for asynchronous rendering, making it even more efficient:
Third-party libraries: A number of third-party libraries offer abstractions on top of WebGL and canvas, providing a middle ground between the abstractions provided by the DOM and the lack of abstractions provided by the canvas. As our cheat sheet below will discuss, some third-party libraries additionally switch between rendering techniques to maximize efficiency, removing the need for you to pick. Here are a few of the most popular canvas and webGL rendering libraries:
Offscreen canvas: To further enhance canvas performance, utilize the Offscreen Canvas. Granted, it’s only supported by Google Chrome, with experimental support from Opera and Firefox. However, the offscreen canvas can boost performance significantly: the offscreen canvas can be leveraged to pre-render expensive visuals, such as text, more efficiently (jsperf), and using web workers, canvas rendering can be offloaded to an asynchronous thread (discussion, demos).
In short, the canvas and WebGL are more performant than the DOM, and with third-party libraries, its ease-of-use is comparable; furthermore, growing browser support for additional web standards have the potential to further boost canvas performance. Both benefits combined have the potential to further canvas adoption across websites, lowering the barrier to entry and bolstering the benefits of using the canvas. To understand why the canvas is much faster than the DOM, we’ll need to understand rendering styles.
To explain the efficacy of the canvas, we have to distinguish between two rendering styles in computer graphics: immediate mode and retained mode, represented by the Canvas and DOM, respectively.
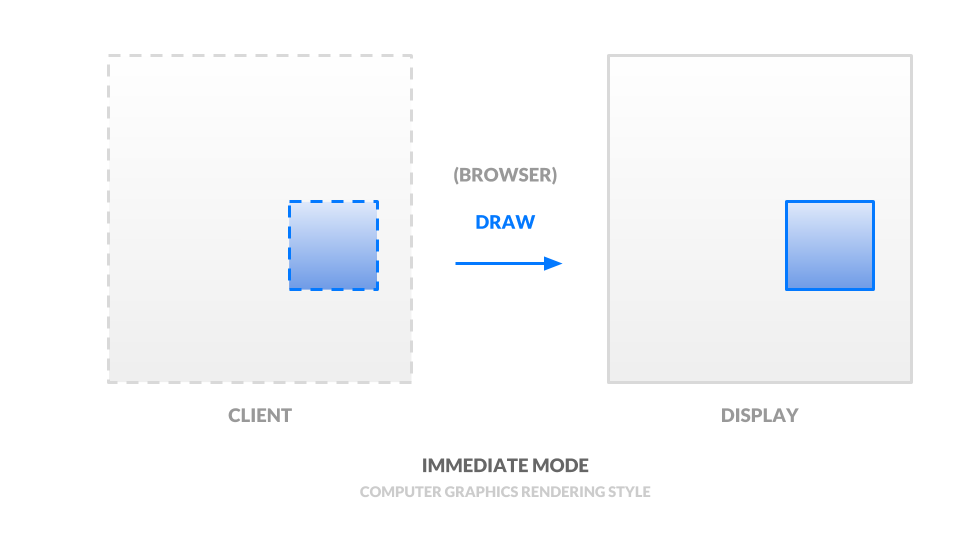
In immediate mode, the client issues calls that results in the immediate display of graphic objects. In our case, every canvas function call results in a graphic object drawn immediately. Regardless of which parts of the canvas are updated, the entire canvas must be redrawn each time, barring optimizations the client may have already made. This means that the client must maintain a model of objects in the canvas. Below, blue represents the pixels and API calls you as the developer directly control.

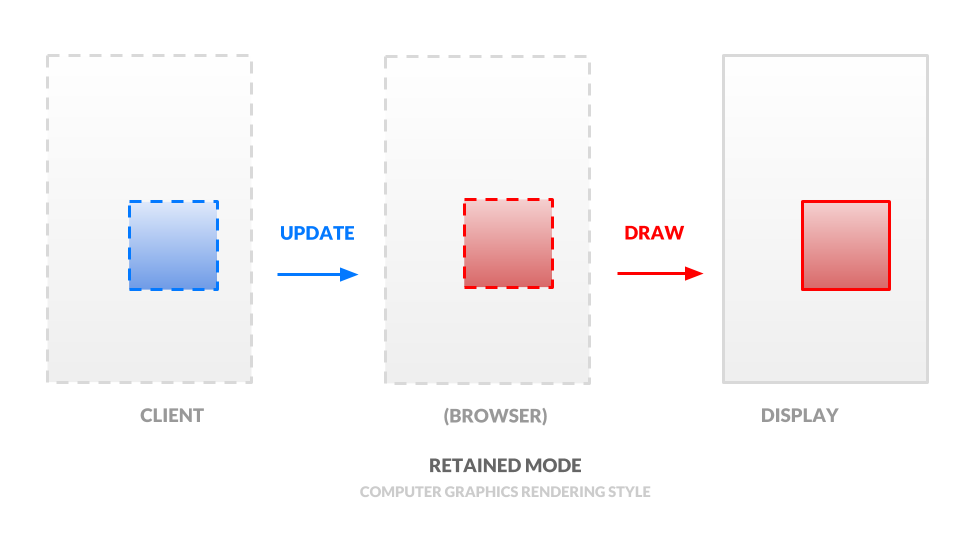
By contrast, in retained mode, client calls do not result in immediate display of graphic objects. Instead, the client calls update an internal model. In our case, developers specify HTML and associated CSS, and the browser handles when and how to display these graphics. This allows the browser to further optimize when and which objects are rendered. For example, calls to requestAnimationFrame benefit from this built-in optimization. Below, blue (again) represents the API calls you as a developer directly control. However, the red represents the abstractions that the browser handles for you, including maintaining an internal model and updating the graphic objects.

The former, immediate mode, offers flexibility but requires meddling in details. And the latter, retained mode, limits flexibility but abstracts away details. These paradigms explain the philosophies behind the canvas and DOM respectively. Below, we outline the implications of these two operating modes in more detail.
Here is a brief cheat sheet outlining the pros and cons of each method listed above. These pros and cons are largely rooted in the aforementioned rendering styles; we’ve only outlined a few of the most pressing implications. For our comparison below, it is worthwhile to combine both the SVG and DOM as contenders, as they share the same benefits and downfalls as well as similar interfaces.
Document Object Model (DOM) and Support Vector Graphics (SVG):
Pros: ease-of-use
Cons: inefficiency
HTML5 canvas
Pros: performant
Cons: less abstraction (but this can be overcome with third-party libraries)
WebGL
Pros: highly-performant
Cons: even less abstraction (but this can, again, be overcome with third-party libraries)
Note that in each of the options above, and as we mentioned in the introduction to canvas, code complexity can be easily ameliorated with a proper library; for example, a popular tool of choice for 3D webGL is three.js and a popular choice for 2D webGL is pixi.js. Each of these libraries abstracts away details and removes the need for prerequisite knowledge. With the right library, you as the developer can interpolate between the three methods above, switching backends where necessary. In fact, a few libraries already switch backends for you automatically. For example, the data visualization library d3.js switches from SVG to webGL when switching from 2D to 3D, and pixi.js uses webGL with a canvas fallback where needed.
Armed with the pros and cons above, you now have guiding principles for when to use which technology, at a coarse level. Here are several scenarios to further illustrate the above list, enumerating a few common scenarios and which technology to use for each.
A game with a static UI, such as a score display and a fixed option menu
A game’s core display, with hundreds or even thousands of animated, moving characters
A website logo with basic animation
Given the above high-level overview, we will now dive into more concrete numbers: the benchmarks below will quantify tradeoffs more precisely and give you numbers to base more fine-grained decisions off of.
In this experimental section, we will answer two questions regarding the tradeoffs between SVG and canvas.
It’s worth mentioning the experimental setup, for those who wish to reproduce these results: The following experiments are run on Google Chrome v73 on a 2018 Macbook Pro with an Intel Iris Plus graphics card. Below each experiment will be the source code.
How many objects is each technology best for?
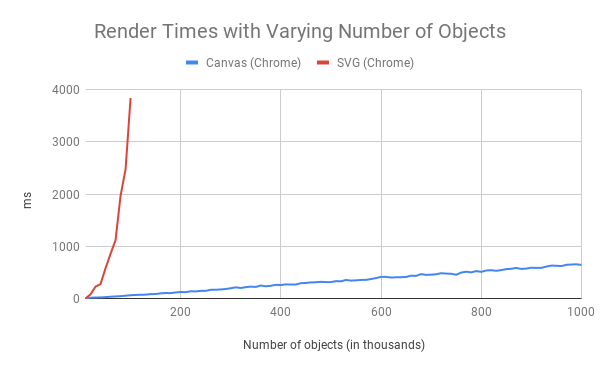
Below, we benchmark speed per number of objects, in the thousands. Note that SVG is no match for canvas at any point. However, note this scale is fairly large, graphing render time for up to 1 million objects. For fewer objects, the differences are minimal but differ by an order of magnitude: to draw 1000 objects, SVG requires ~10 ms whereas canvas requires 1 ms. This difference only magnifies with more and more objects, but even for sizable numbers of objects, it appears the difference is minuscule.

What size objects is each technology best for?
Given the current experimental setup, it appears as though size of the object and size of the canvas do not affect either the canvas or SVG techniques.
In sum, the overhead of DOM rendering is more poignant when juggling hundreds if not thousands of objects; in this scenario, canvas is the clear winner. However, both the canvas and SVG are invariant to object sizes. Given the final tally, the canvas offers a clear win in performance.
This is only the start of a performance discussion surrounding canvas and other graphics techniques for the browser. Even after having decided on SVG, canvas, webGL, or some mixture thereof, there are then efficiency concerns for commonly used operations, such as canvas drawing and polygon fills, how to efficiently redraw, whether multiple canvases is worth the overhead etc. The performance optimizations are endless, and the combinatorial numbers of ways to combine all three techniques only further complicate the issue. However, at the end of the day, simplicity is just as important a factor, and the cheat sheet above should suffice for you to determine whether a further performance investigation is warranted or not; for an animated figure in a blog post, it may not be worth it. For a full-page interactive featuring real-time multiplayer, every ounce may count.
Install LogRocket via npm or script tag. LogRocket.init() must be called client-side, not
server-side
$ npm i --save logrocket

// Code:

import LogRocket from 'logrocket';
LogRocket.init('app/id');
// Add to your HTML:

<script src="https://cdn.lr-ingest.com/LogRocket.min.js"></script>
<script>window.LogRocket && window.LogRocket.init('app/id');</script>
Hey there, want to help make our blog better?
Join LogRocket’s Content Advisory Board. You’ll help inform the type of content we create and get access to exclusive meetups, social accreditation, and swag.
Sign up now
Discover how the Interface Segregation Principle (ISP) keeps your code lean, modular, and maintainable using real-world analogies and practical examples.

<selectedcontent> element improves dropdowns

Learn how to implement an advanced caching layer in a Node.js app using Valkey, a high-performance, Redis-compatible in-memory datastore.

Learn how to properly handle rejected promises in TypeScript using Angular, with tips for retry logic, typed results, and avoiding unhandled exceptions.
3 Replies to "When to use HTML5’s canvas"
EaselJS is no longer maintained – the last release was in 2017
LogRocket doesn’t support HTML Canvas – you just get a blank screen in the recordings 🙁
Hey Tom, we’d like to support canvas someday, but no solid plans yet for when that might happen.
If you really need to capture canvas with LogRocket, you can render it to an image and put it under the canvas, which would be hidden from the user but recorded by LogRocket.
At any rate, we cover a lot of stuff LogRocket doesn’t support because it’s still useful info for the community. Thanks for reading