Code review is the process of analyzing code through a (theoretically) rigorous process of reading and critically peer reviewing its content. Before submitting code for review, programmers usually clean it up with one of a number of automated tools, depending on which language and environment they are using.

In the JavaScript world, simply because of the language’s nature, many developers, especially beginners, can’t see the pitfalls and errors they make when programming. These could be anything from the use of undeclared variables, to null pointer exceptions due to inconsistent null checks, to the misuse — or no use at all — of what a function returns. That’s why something else, automated, can help us before submitting code for review.
Google Closure Compiler does exactly that: it compiles from JavaScript to better JavaScript by analyzing, parsing, minifying, and rewriting it. And, of course, it also warns us of the same pitfalls we mentioned above. It removes what’s unnecessary, it checks syntax — in short, it does a lot.
In this article, we’ll present some common problems that front-end developers face and better understand how Closure Compiler can help us to rapidly double-check what we’re writing to ensure we deliver the best code possible.
You can execute Closure Compiler from the command line into your application (e.g., Node.js) or via freely available web service.

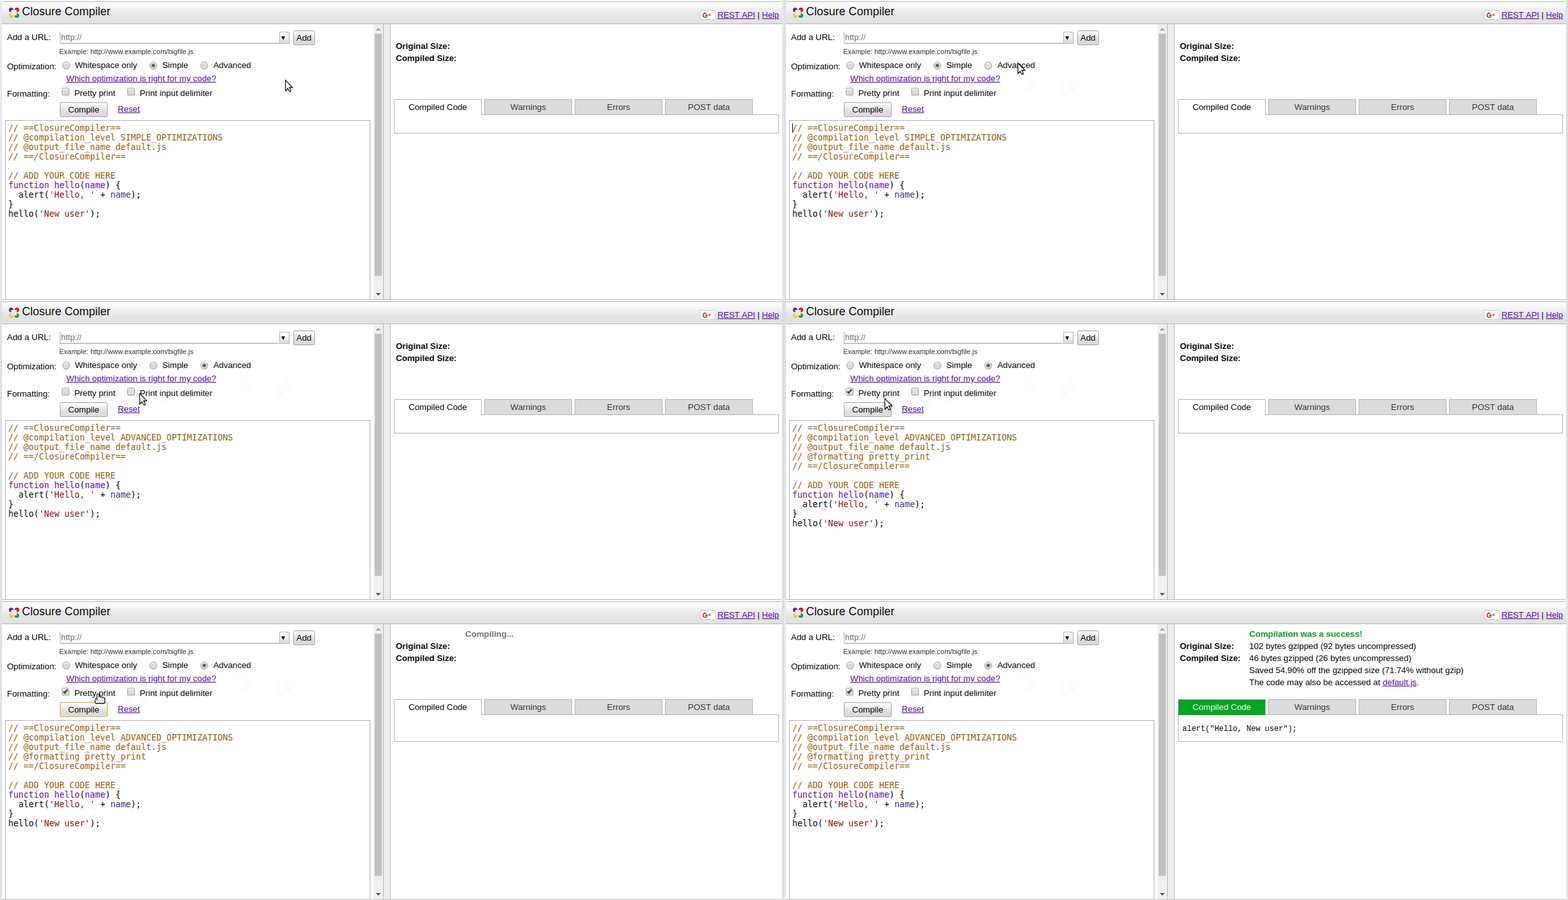
It basically exposes a web page where you can compile your code via either a linked JavaScript file or inline code pasting. The tool then displays the results on the right-hand side of the screen.
Those results, in turn, show the size difference between the original source code and the compiled version (both gzipped and uncompressed) and an autogenerated link for you to download the JavaScript file.
Most importantly, you’ll see a table with four tabs, displaying:
Regarding the optimizations, you can select from Simple and Advanced options (we won’t consider Whitespace only since it doesn’t do much).
Simple will transpile and minify your JS code, as well as warn about syntax and the most dangerous (yet obvious) errors we usually commit. Simple mode is, as the name implies, simple — and, most of the time, safe.
Advanced, on the other hand, is far more aggressive when it comes to removing code, reorganizing the whole structure of your original implementation.
Take the previous image of the default “hello, world” example on the Closure web service page: it shrunk the code and made it simpler, but it lost the hello() function, which means external references to it would break. But don’t worry; we’ll explore how to fix this.
Let’s take another, slightly more complex example, this one extracted from the official Google tutorials:
// Copyright 2009 Google Inc. All Rights Reserved.

/**
 * Creates the DOM structure for the note and adds it to the document.
 */
function makeNoteDom(noteTitle, noteContent, noteContainer) {
  // Create DOM structure to represent the note.
  var headerElement = document.createElement('div');
  var headerText = document.createTextNode(noteTitle);
  headerElement.appendChild(headerText);

  var contentElement = document.createElement('div');
  var contentText = document.createTextNode(noteContent);
  contentElement.appendChild(contentText);

  var newNote = document.createElement('div');
  newNote.appendChild(headerElement);
  newNote.appendChild(contentElement);

  // Add the note's DOM structure to the document.
  noteContainer.appendChild(newNote);
}

/**
 * Iterates over a list of note data objects and creates a DOM
 */
function makeNotes(data, noteContainer) {
  for (var i = 0; i < data.length; i++) {
    makeNoteDom(data[i].title, data[i].content, noteContainer);
  }
}

function main() {
  var noteData = [
      {title: 'Note 1', content: 'Content of Note 1'},
      {title: 'Note 2', content: 'Content of Note 2'}];
  var noteListElement = document.getElementById('notes');
  makeNotes(noteData, noteListElement);
}

main();
Here, we basically create a data structure of notes, each with string attributes of a title and content. The rest is made of utility functions for iterating the list of notes and placing them all into the document via each respective create function. The same code will look like this after being compiled by Closure Compiler:
for (var a = [{title:"Note 1", content:"Content of Note 1"}, {title:"Note 2", content:"Content of Note 2"}], b = document.getElementById("notes"), c = 0; c < a.length; c++) { var d = a[c].content, e = b, f = document.createElement("div"); f.appendChild(document.createTextNode(a[c].title)); var g = document.createElement("div"); g.appendChild(document.createTextNode(d)); var h = document.createElement("div"); h.appendChild(f); h.appendChild(g); e.appendChild(h); } ;
Note that the whole noteData variable list was changed for an inline object declaration, which comes inside the loop. The variables were renamed from their originals to alphabet chars. And you can’t reuse the previous functions in other places; Closure Compiler would probably have pasted the list twice if it was being called from somewhere else.
Yet the readability and understanding of the code are not good — which, of course, couldn’t be used in a development environment.

There are plenty of scenarios in which Closure Compiler could actuate — that is, problems that are common to our daily lives as JavaScript developers. Let’s take a single example of JavaScript code:
'use strict';
const helperModule = require('./helper.js');
var notUsed;
What would happen to the generated output code when we use 'use strict' mode? Or an unused variable, even though you set a value for it later?
It’s common to create many structures (not only variables, but constants, functions, classes, etc.) to be removed later that are easily forgettable — even more so if you’re dealing with a huge amount of source code files. Depending on the complexity of your models, or how you expose your objects to the external world, this can lead to unwanted situations.
Well, that’s the result:
var a = require(“./helper.js”);
Those structures that were unused were automatically identified and removed by Closure Compiler. Plus, local variables (let) and constants (const) are substituted by var declarations.
What about a scenario in which one flow depends on another conditional flow? Let’s say you have one function, check(), that relies on another, getRandomInt(), to generate a random number between 0 and 1, which returns true if it is 1.
Based on that flow, we don’t know what’s going to happen because the function is random — that is, only in runtime will we see if the code enters the if or not:
let abc = 1; if (check()) { abc = "abc"; } console.info(`abc length: ` + abc.length);function check() { return getRandomInt(2) == 1; }function getRandomInt(max) { return Math.floor(Math.random() * Math.floor(max)); }
Here’s the compiled code:
var b = 1;
1 == Math.floor(2 * Math.random()) && (b = "abc");
console.info("abc length: " + b.length);
The conditional flow was analyzed and reprogrammed to one single line. Notice how Closure Compiler checks for the first condition preceded by an && operator. This operator says that only if the first condition is true will the second be executed. Otherwise, if our random number is not equal to 1, then b will never receive "abc" as value.
How about a multi-conditional if?
if(document == null || document == undefined || document == ‘’)
   console.info(`Is not valid`);
Take a look at the result:
null != document && void 0 != document && “” != document || console.info(“Is not valid”);The conditional ifs were nested. That’s the default behavior of Closure Compiler: it’ll always try to shrink as much as possible, keeping the code small yet executable.
It can be potentially dangerous and unproductive to always review the code that was compiled. Also, what happens if you want to keep the check() function globally available to other JavaScript files? There are some tricks here, like Google’s suggestion of attaching the function to the global window object:
window.check = c;Here, we would receive the following output:
var a = require("./helper.js"), b = 1;
c() && (b = "abc");
console.info("abc length: " + b.length);
null != document && void 0 != document && "" != document || console.info("Is not valid");
function c() {
return 1 == Math.floor(2 * Math.random());
}
window.check = c;
The typing system of what Closure Compiler checks is the heart of the whole thing. You can annotate your code to be more typed, which means Compiler will check for wrong usages based on your annotations.
Let’s take the example of the getRandomInt() function. You need your param to be a number in all cases, so you can ask Closure Compiler to check if a caller is passing anything different than that:
function getRandomInt(/** number */ max) {
return Math.floor(Math.random() * Math.floor(max));
}
window['getRandomInt'] = getRandomInt;
getRandomInt('a');
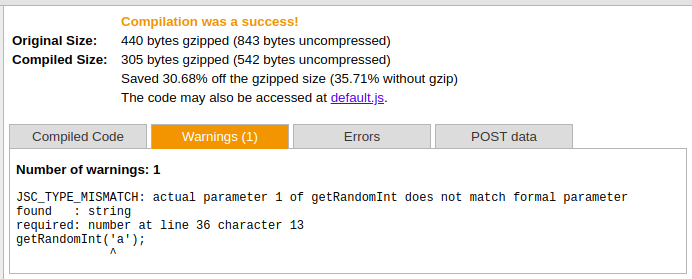
This would return the following:

Even though the file is always compiled for warnings, you can have a taste of what’s going on with your code, mainly for codes that are updated by many people.
Another interesting feature is the export definitions. If you decide you don’t want something renamed through the Advanced option, you can also annotate your code with:
/** @export */In this way, the output code won’t be renamed.
There are so many different scenarios you can use to test the power of this tool. Go ahead, take your own JavaScript code snippets and try them with Closure Compiler. Take notes on what it generates and the differences between each optimization option. You can also get any external JavaScript plugin/file and import it to the web service for testing purposes.
Remember, you can also run it from the command line or even from your building system like Gulp, Webpack, and other available plugins. Google also provides a samples folder at their official GitHub repository, where you can test more of its features. Great studies!
Debugging code is always a tedious task. But the more you understand your errors, the easier it is to fix them.
LogRocket allows you to understand these errors in new and unique ways. Our frontend monitoring solution tracks user engagement with your JavaScript frontends to give you the ability to see exactly what the user did that led to an error.

LogRocket records console logs, page load times, stack traces, slow network requests/responses with headers + bodies, browser metadata, and custom logs. Understanding the impact of your JavaScript code will never be easier!
Hey there, want to help make our blog better?
Join LogRocket’s Content Advisory Board. You’ll help inform the type of content we create and get access to exclusive meetups, social accreditation, and swag.
Sign up now
Discover how the Interface Segregation Principle (ISP) keeps your code lean, modular, and maintainable using real-world analogies and practical examples.

<selectedcontent> element improves dropdowns

Learn how to implement an advanced caching layer in a Node.js app using Valkey, a high-performance, Redis-compatible in-memory datastore.

Learn how to properly handle rejected promises in TypeScript using Angular, with tips for retry logic, typed results, and avoiding unhandled exceptions.