Here’s a quick summary of the differences between a .ts and .tsx file extension:

| Feature | .ts (TypeScript) |
.tsx (TypeScript JSX) |
|---|---|---|
| Purpose | Standard TypeScript code files | TypeScript files that include JSX syntax |
| Use cases | General TypeScript code (logic, data, utilities) | React components, any code needing JSX rendering |
| File content | Pure TypeScript code (classes, interfaces, types) | TypeScript code with embedded JSX elements |
| Compilation | Compiled to .js files |
Compiled to .jsx files after JSX transformation |
| React usage | Typically used for non-component code in React projects | Essential for React component files |
| Syntax | Standard TypeScript syntax only | TypeScript syntax + JSX syntax |
| Example |
|
|
| Type checking | Type checks TypeScript code | Type checks TypeScript code and JSX elements |
TL;DR; If your file is a React component, then use the .tsx extension. Otherwise, use the .ts file type.
In 2012, Microsoft released TypeScript, a programming language that empowers developers to write more robust and maintainable code. Since its introduction, TypeScript’s adoption within the React ecosystem has grown substantially.
However, as newer developers enter the TypeScript and React scene, common questions arise regarding type definitions, component interactions, and, notably, the distinctions between .ts and .tsx file extensions.
In this article, we‘ll cover the differences between React’s .ts and .tsx file extensions in depth. Furthermore, this article will also offer practical code samples to demonstrate where each file type is appropriate.
Here’s what we’ll discuss today:
.ts) files
.tsx files)
For newer and inexperienced developers, answer the common question: what is the difference between ts and .tsx?
.ts) file?As the name suggests, files with the .ts extension contain solely TypeScript-related code. These files can contain types, interfaces, classes, and more.
Here’s a little sample of what a .ts file should look like:
// Function to say hello to a person
export function sayHello(name: string): string {
  return "Hello " + name;
}
//invoke the
sayHello("John");
//since this is TypeScript, we should get an error here.
//this is because the function accepts a string, but we're passing an integer
console.log(sayHello(9));
Here’s a brief explanation of the code:
sayHello, which accepts a string as a parametersayHello twice; the first time with a string as a parameter and the second time with an integer.Thanks to TypeScript, we expect the compiler to report a type error: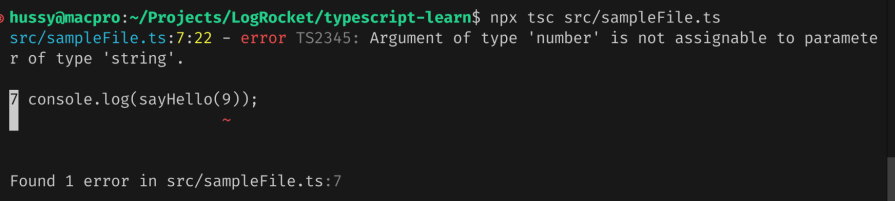
Now that we know the basics of TypeScript files, let’s learn about them in depth!
Enums allow developers to define a set of constants. A great use case for an enum is defining status codes for a certain job. For example: PENDING, COMPLETE, or RUNNING:
enum Status {
  PENDING = "pending",
  COMPLETED = "completed",
  RUNNING = "running",
}
let currentStatus: Status = Status.PENDING;
console.log("current status of job: ", currentStatus);
currentStatus = Status.COMPLETED;
console.log("new status of job: ", currentStatus);
We first declared an enum called Status with three variables: PENDING, COMPLETED, and RUNNING. Later, we initialized a variable called currentStatus and logged out its value to the console.
Let’s test it out! The program should output pending and completed to the terminal:
Classes are another concept in the TypeScript world to enable developers to follow the object-oriented programming (OOP) paradigm. This is ideal for situations where the user has to contain and organize business logic in one module.
Here’s a code sample of a class in the TypeScript language:
class User {
  name: string;
  email: string;
  constructor(name: string) {
    this.name = name;
    this.email = `${name.toLowerCase()}@example.com`;
  }
  greet(): void {
    console.log(`Hello, my name is ${this.name}! My email is ${this.email}`);
  }
}
const user1 = new User("Alice");
user1.greet();
First, we defined a class called User with two properties: name and email. Additionally, it would also have a method called greet, which would log out the user’s email and name.
We then initialized an instance of the User and called it user1.
Finally, we invoked the greet function on user1.
Because of the greet method, we expect the program to return output Alice's name and email address:
React’s powerful built-in Hooks enable developers to tap into core React features. As a result, this simplifies component logic and enhances reusability.
However, in some cases, developers can also build custom Hooks for specific purposes. A great example is building a custom Hook to request data from a server or to track browser storage.
The code sample below builds a custom React Hook in TypeScript:
import { useEffect, useState } from "react";

function useLocalStorage(key: string, initialValue: string = "") {
//declare two states to store and get local storage
  const [storedValue, setStoredValue] = useState<string>();
  const [itemExists, setItemExists] = useState<boolean | undefined>();
  //on first mount, check if the item with the 'key' actually exists
  useEffect(() => {
  //try to get the value from local storage
    const item = window.localStorage.getItem(key);
    //if it exists, set the Hook value to the item
    if (item) {
      setStoredValue(JSON.parse(item));
      setItemExists(true);
    } else {
    //otherwise, set the itemExists boolean value to false
      setItemExists(false);
      setStoredValue(initialValue);
    }
  }, []);
//if invoked, manipulate the key in localStorage
  const setValue = (value: string) => {
    try {
      setStoredValue(value);
      window.localStorage.setItem(key, JSON.stringify(value));
    } catch (error) {
      console.error(error);
    }
  };
  //delete item from local storage
  const deleteItem = () => {
    window.localStorage.removeItem(key);
  };
  return [storedValue, setValue, itemExists, deleteItem] as const;
}
export default useLocalStorage;
The code is explained in the comments. Later on in this article, we will use the useLocalStorage custom Hook in another code example.
Another use case for the .ts file extension is to write code to handle and retrieve data from an API:
import axios from "axios";

export type CoffeeType = {
  title: string;
  description: string;
  ingredients: string[];
};

export const getCoffees = async () => {
  try {
    const response = await axios.get("https://api.sampleapis.com/coffee/hot");
    return response.data as CoffeeType[];
  } catch (error) {
    console.error(error);
  }
};
First, we defined a CoffeeType interface. This will serve as the schema for our API response. Additionally, we’re also exporting it so that we can use it in a React component later on in this article.
We then declared the getCoffees method, which will execute a GET request to SampleAPI
Afterward, we returned the API response and told TypeScript that the response would be an array of CoffeeType objects.
Thanks to TypeScript support, our code editor will automatically detect the return type of the getCoffees function:
As discussed earlier, TypeScript allows developers to declare schemas and types in their code.
In some cases, one might want to reuse certain type declarations across multiple components.
Here’s one code sample that does the job:
//declare a CoffeeType schema:
export type CoffeeType = {
title: string; //each object will have a 'title ' variable of type 'string',
description: string;//a description of type string,
ingredients: string[]; //and an array of strings
};
//declare another interface:
export interface User {
name: string;
email: string;
id: number;
}
//valid type:
const latte: CoffeeType = {
title: "Latte",
description: "A coffee drink made with espresso and steamed milk.",
ingredients: ["espresso", "steamed milk"],
};
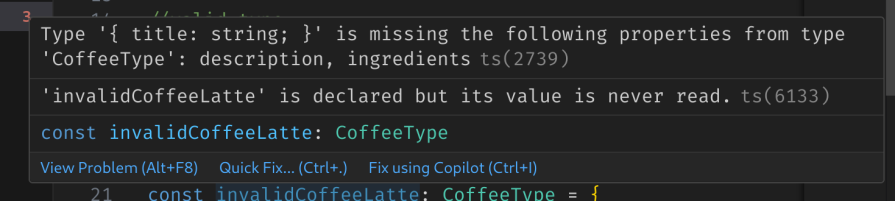
//invalid type: (we're missing 'description' and 'ingredients' )
const invalidCoffeeLatte: CoffeeType = {
title: "Latte",
};
Since invalidCoffeeLatte is missing certain properties from the CoffeeType schema, TypeScript will display an error:
 Now that we’ve learned about the
 .ts file extension, let’s move on to the .tsx file type.
.tsx) files?Unlike the .ts extension, files that end with .tsx are for code that contains JSX instructions. In other words, React components live in this file.
The code below demonstrates a minimal TSX React component with a button and a useState Hook:
import { useState } from "react";

function App() {
  //initialize count state with 0
  const [count, setCount] = useState(0);
  //since count is an integer, TypeScript won't allow you to set it to a string value
  return (
    <>
      {/* Button to increment count */}
      <button onClick={() => setCount(count + 1)}>Increment</button>
      <p>Count value: {count}</p>
    </>
  );
}
export default App;
The program should render a button and increment the count variable when pressed:
As you learned above, TSX files are for writing React components. TypeScript allows developers to enforce type safety to component props like so:
import React from "react";

interface InterfaceExampleProps {
  title: string;
  description: string;
}
const InterfaceExample: React.FC<InterfaceExampleProps> = ({
  title,
  description,
}) => {
  return (
    <div>
      <h1>Title value: {title}</h1>
      <p>Description value: {description}</p>
    </div>
  );
};
export default InterfaceExample;
In the code snippet above, we’re defining an interface that tells React that the InterfaceExample component will require two props of type string:
Earlier in the article, we declared a custom Hook called useLocalStorage. In this section, you’ll learn how to use the Hook in a React component.
To use the useLocalStorage function, write the following code:
 const [nameStorage, setNameStorage, exists, deleteItem] =
    useLocalStorage("name");


    useEffect(() => {
    if (exists === false) {
      console.log("does not exists");
      setNameStorage("Google");
    }
  }, [exists]);
  return (
    <>
      {nameStorage}
      <button onClick={() => setNameStorage("LogRocket")}>
        Change item to LogRocket
      </button>
      <button onClick={() => deleteItem()}>Delete item from storage</button>

    </>
  );
First, we used array destructuring to get the nameStorage, setNameStorage , exists, and deleteItem objects from the useLocalStorage Hook.
Next, via the useEffect function, we checked if an item with the name key exists in local storage. If it doesn’t, React will set the name item to Google.
Then, we rendered two buttons to manipulate and delete browser storage.
This will be the output of the code:
As you can see, React successfully sets and deletes the app’s storage with a button click.
Now that you’ve learned the main differences between the .ts and .tsx file types, you’ll learn about common best practices to enhance the React development experience.
Linters are tools that help developers spot stylistic errors. The use of linters can boost code quality and readability.
Tools like Vite and Next.js already provide support for linting via the ESLint module.
If you’re using Vite, this is how you can run linting on your project:
npm run lint
If your code has issues, ESLint will automatically detect them and report them in the terminal: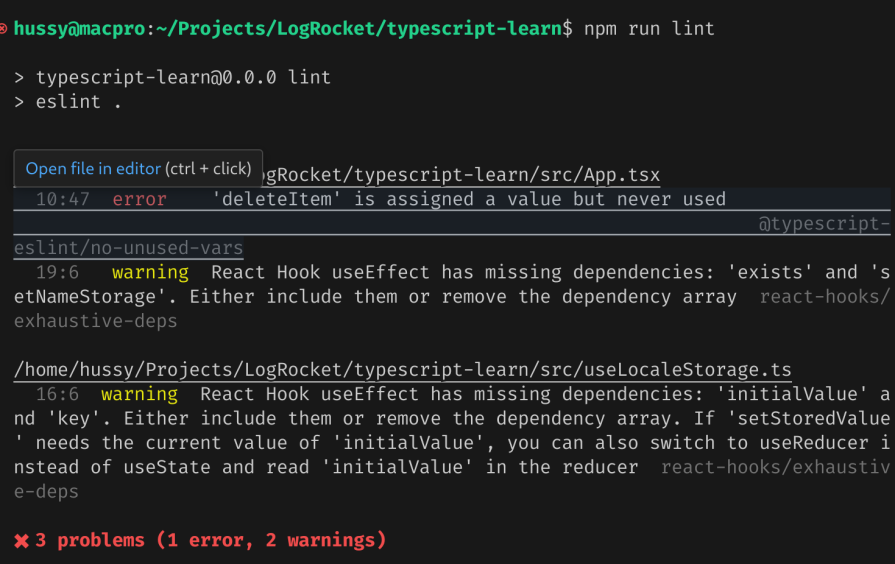
TypeScript supports utilities to let developers modify or compose types without rewriting them.
For example, the Partial utility can mark all the properties in a type as optional:
//create a type for the User object:
type User = { name?: string; email: string; id: number };
type PartialUser = Partial<User>;
As a result, we expect all properties in PartialUser to be optional: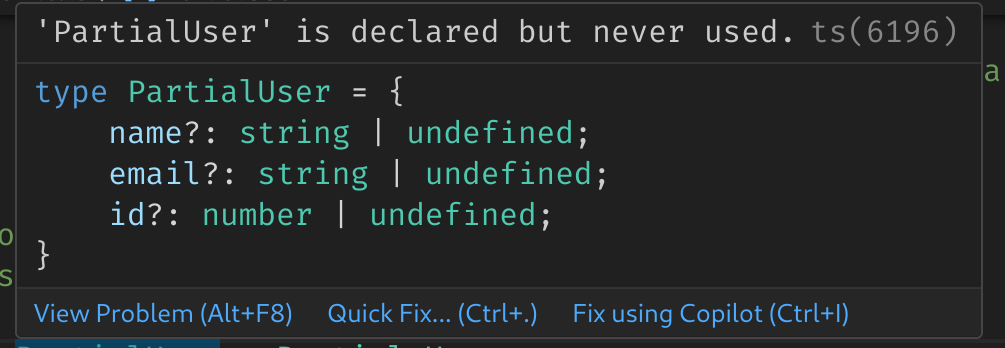
Additionally, the Required Partial will set all properties of our type as required:
type RequiredUser = Required<User>;
As expected, VSCode will set all properties of User as mandatory: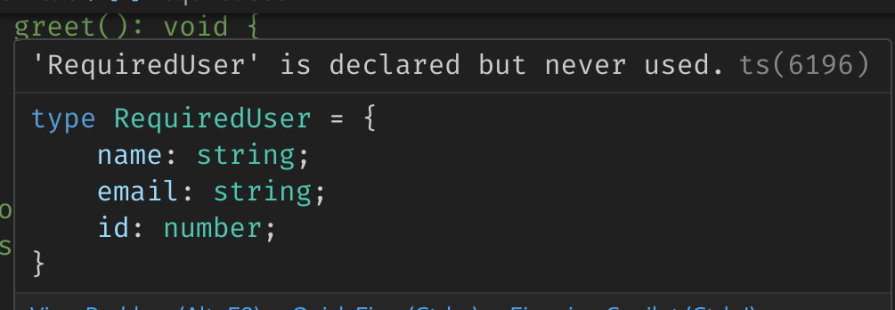
Similarly, the Omitted utility can remove certain properties from a type:
type OmittedUser = Omit<User, "email">; //remove the 'email' property of User
This is how the OmittedUser type appears: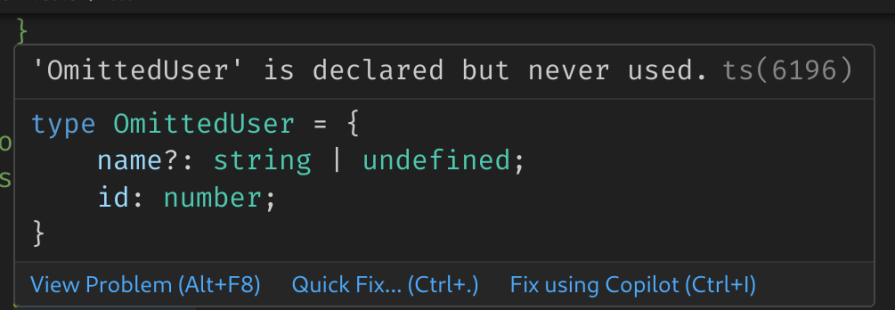
Generics provide type safety by ensuring that the type of data is consistent throughout your code. They also improve code reusability by allowing you to write functions and components that can work with different types, without having to write separate implementations for each type.
Here’s a simple code sample that demonstrates generics in action:
function outputMessage<T>(message: T): T {
  return message;
}
console.log("Using string generic: ", outputMessage("Hello, world!"));
console.log("Using integer generic: ", outputMessage(42));
In the snippet above, we defined a function called outputMessage that uses generics. Later on, we invoked this method with a string and a number type:
TypeScript also lets developers intersect types via the & operation. The code sample below extends the Computer type to create a Laptop type:
//create base type.
type Computer = {
  memory: number;
  processor: string;
};
//Laptop extends Computer and adds an additional property
type Laptop = Computer & {
  batterySize: string;
};
//create an object of type Laptop
const framework13: Laptop = {
  memory: 16,
  processor: "Ryzen 7",
  batterySize: "61Wh",
};
console.log("specs of the Framework Laptop are \n", framework13);
 Refine your project structure
In large production-ready React apps, programmers need to organize their components to prevent a chaotic file structure. Let’s now explore a recommended project structure for React projects.
When it comes to components or pages(.tsx files), it would be sensible to put them under the components or pages directory: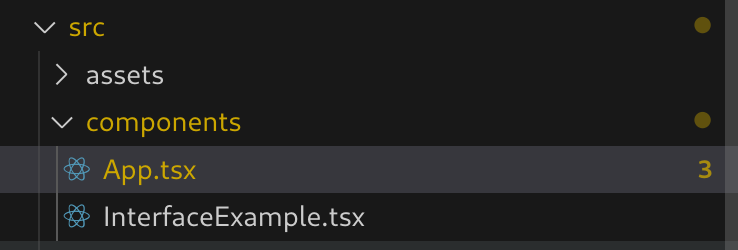
Helper functions, custom Hooks, and other services should go to the utils, hooks, and services folder: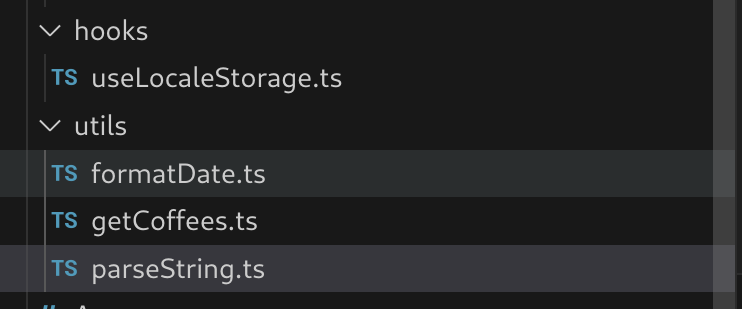
Furthermore, if you want to reuse certain types across your project, it’s better to place them in the types directory:
Here’s a little summary of use cases for the .ts and .tsx file extensions:
| Use case | File extension |
| React components | .tsx |
| Integration with third-party JSX Libraries | .tsx |
| Business logic | .ts |
| Type definitions and interfaces | .ts |
| Hooks | .ts |
| Helper functions | .ts |
In this article, you learned the differences between the .ts and .tsx file types, their use cases, and best practices for a React TypeScript project. In my personal and work projects, I’ve been using TypeScript to help me write robust and more stable React code, and so far, it’s been an absolute joy to use.
Thank you so much for reading! Happy coding!

LogRocket lets you replay user sessions, eliminating guesswork by showing exactly what users experienced. It captures console logs, errors, network requests, and pixel-perfect DOM recordings — compatible with all frameworks, and with plugins to log additional context from Redux, Vuex, and @ngrx/store.
With Galileo AI, you can instantly identify and explain user struggles with automated monitoring of your entire product experience.
Modernize how you understand your web and mobile apps — start monitoring for free.
Install LogRocket via npm or script tag. LogRocket.init() must be called client-side, not
server-side
$ npm i --save logrocket

// Code:

import LogRocket from 'logrocket';
LogRocket.init('app/id');
// Add to your HTML:

<script src="https://cdn.lr-ingest.com/LogRocket.min.js"></script>
<script>window.LogRocket && window.LogRocket.init('app/id');</script>

Learn how to detect unused and ghost dependencies in JavaScript projects using Knip, a project-level linter that keeps your dependency graph accurate.

Learn how Storybook MCP enables AI agents to understand your component library, generate accurate UI, and validate code using documentation, stories, and automated tests.

Debug RSC hydration mismatches in production with Next.js instrumentation, Suspense isolation, HTML diffing, and CI smoke tests.

Explore why npm dependencies are a major supply chain security risk and how to protect JavaScript apps from compromised packages and transitive threats.
Would you be interested in joining LogRocket's developer community?
Join LogRocket’s Content Advisory Board. You’ll help inform the type of content we create and get access to exclusive meetups, social accreditation, and swag.
Sign up now

