Editor’s note: This article was last updated by Muhammed Ali on 12 September 2024 to include updates on compiling TypeScript, setting up ESLint, and integrating Prettier for consistent formatting.

As developers, we usually start a project by adding configurations and scripts for linting, then formatting and type checking for our codebase syntax and style.
This process is even more important when working on a team because everyone needs to be on the same page for codebase syntax and style. Also, to ensure that there are no typos or bugs when our app is in production, we should type check our code along the way.
Having a formatting tool, a linting tool, and TypeScript helps us automate this process. In this article, we’ll use ESLint and TypeScript, and we’ll also see how to add Prettier and additional tooling that will automate this process for us.
N.B., To follow along with this tutorial, you need to have Node version >= 18.18.0.
Typescript is a superset of JavaScript that helps us with static type checking at compile time. TypeScript will give you a better development experience thanks to auto-completion in your editor. TypeScript also helps you maintain the code in your large codebases.
First, we need a compiler to turn TypeScript code into JavaScript so the browser can read it. Let’s install a dependency using your favorite package manager.
Head over to a suitable folder on your computer and run one of the following commands in your terminal:
#npm
npm install --save-dev typescript

#yarn
yarn add typescript --dev
Upon installation, you’ll see a new entry to the devDependencies attribute of your package.json file as:
{
  "name": "Linting TypeScript with ESLint",
  "version": "1.0.0",
  "devDependencies": {
    "typescript": "^5.5.4"
  }
}
If you want to verify that it’s been installed, you can run this to check the version:
npx tsc --version
# Version 5.5.4
In your folder, create an index.ts file in the src directory and add the following TypeScript code:
// src/index.ts
const favoriteFruits: string[] = ["apple", "strawberry", "orange"];

function addFruit(fruit: string) {
  favoriteFruits.push(fruit);
}
We can compile the TypeScript code to JavaScript by running the following command in the terminal:
npx tsc src/index.ts
Right after that, we’ll see a newly generated JavaScript file in the same directory as the TypeScript file:
// src/index.js
var favoriteFruits = ["apple", "strawberry", "orange"];

function addFruit(fruit) {
    favoriteFruits.push(fruit);
}
By default, the compiler will create JavaScript files side-by-side with the TypeScript source file that created it. This is not a good idea because you’ll end up mixing your build results with your source code.
So, let’s change some default compiler settings, starting from where we want to put our compiled code, which JavaScript level is targeted to be transpiled (by default: ECMAScript 3), and which files we want to compile.
There are two ways to create your TypeScript compiler settings:
npx tsc --init. This will generate a default TypeScript configuration filetsconfig.json at the root directory of your project and include your settingsIn this case, I’ll create the TypeScript compiler settings manually. However, I would encourage you to choose the first option. It will create the config file with some recommended options — all options are described with comments explaining what they do.
You can modify these settings as you need to. Check out the full list of supported compiler options, and you can play around in the TypeScript playground:
// tsconfig.json
{
  "compilerOptions": {
    "outDir": "dist", // where to put the compiled JS files
    "target": "ES2020", // which level of JS support to target
    "module": "CommonJS", // which system for the program AMD, UMD, System, CommonJS

    // Recommended: Compiler complains about expressions implicitly typed as 'any'
    "noImplicitAny": true,
  },
  "include": ["src"], // which files to compile
  "exclude": ["node_modules"], // which files to skip
}
Congratulations! Now, you can start writing TypeScript and compiling it to JavaScript by running npx tsc.
You can include the above command in your scripts to make it easier to run. Go to package.json and add the --watch flag to watch the files for changes. Keep in mind that everything that is described in compilerOptions can be passed into the command line using CLI flags:
// package.json
{
  "name": "Linting TypeScript with ESLint",
  "version": "1.0.0",
  "devDependencies": {
    "typescript": "^4.9.4"
  },
  "scripts": {
    "dev": "tsc --watch"
  }
}
Code linting is the automated analysis of source code to find and report programmatic and stylistic errors. It helps reduce errors, thereby improving the quality of code delivered. Code linting has numerous benefits, including error detection, enforcing best practices, and enforcing coding style amongst others.
Linting helps catch errors by performing syntax checks, checking code quality, and ensuring consistency in formatting style. It is advisable to use always in projects to enforce a coding style.
One of the most popular tools for linting is ESLint, which will analyze your code to find potential bugs and improve your code quality by defining coding conventions and then automatically enforcing them. Let’s see how to install ESLint into our TypeScript project.
First, install the following dependencies to your devDependencies:
npm install eslint @typescript-eslint/parser @typescript-eslint/eslint-plugin --save-dev
eslint: ESLint core library@typescript-eslint/parser: A parser that allows ESLint to understand TypeScript code@typescript-eslint/eslint-plugin: Plugin with a set of recommended TypeScript rulesSimilar to Typescript compiler settings, you can either use the command line to generate a configuration file using the --init flag from ESLint or create it manually. Either way, it’s mandatory to have your ESLint configuration file.
Let’s create a configuration file using the CLI. Run the following command in the terminal:
npx eslint --init
Next, you will see a series of questions that allow you to adjust the configuration file based on your preferences:
Based on the options selected, the ESLint CLI will create a eslint.config.mjs configuration JavaScript file in the project’s root directory with some default settings settings specifying configuration information for the entire directory. If you already have your favorite settings, you can replace some of the options in the configuration file.
You can also explore the full list of ESLint settings available for the configuration file.
For this article, replace the default settings in the configuration file with this:
// eslint.config.mjs
import globals from "globals";
import pluginJs from "@eslint/js";
import tseslint from "typescript-eslint";


export default [
  {files: ["**/*.{js,mjs,cjs,ts}"]},
  {files: ["**/*.js"], languageOptions: {sourceType: "commonjs"}},
  {languageOptions: { globals: globals.browser }},
  pluginJs.configs.recommended,
  ...tseslint.configs.recommended,
];
{files: ["**/*.{js,mjs,cjs,ts}"]}: This rule applies to all JavaScript and TypeScript files in the project.{files: ["**/*.js"], languageOptions: {sourceType: "commonjs"}}: This sets the sourceType to “commonjs”, indicating that these files use CommonJS modules (e.g., require, module.exports).{languageOptions: { globals: globals.browser }}: This rule extends the global variables available in the linting environment to include those specific to a browser environment, such as window, document, navigator, etc.pluginJs.configs.recommended: This configuration uses the recommended settings from the @eslint/js plugin. It’s a good starting point for JavaScript projects as it covers a wide range of general linting rules....tseslint.configs.recommended: This contains an array of configurations recommended for TypeScript projects.We can add rules to ESLint.. A rule checks if your code meets a certain expectation, and what to do if it does not. Let’s add a couple of rules to see how it works. You can learn more about it in the docs if you want something different
// eslint.config.mjs
//…
{ languageOptions: { globals: globals.browser } },
  {
    rules: {
      eqeqeq: "off",
      "no-unused-vars": "error",
      "prefer-const": ["error", { ignoreReadBeforeAssign: true }],
    },
  },
// …
In short, the first rule we apply is assigned to a value of off, but off is not the only value we can assign — we have three options:
off or 0: Turn off the rule completelywarn or 1: Treat the rule as a warning, but it won’t fail when running a lintererror or 2: Treat the rule as an error. It will fail when running a linterN.B., In some ESLint rules, like the second rule, you would need to set additional options to use an array literal syntax.
You can tell ESLint to lint your code using the following command: eslint --ext .js,.ts. The ext flag is used to specify which file extensions ESLint should consider when searching for files in the target directory. In this case, we include TypeScript file extensions: .ts (by default, it’s .js)
Now you can add a lint script into your package.json with the command above:
// package.json
{
  "name": "typescript-lint",
  "version": "1.0.0",
  "description": "",
  "main": "index.js",
  "scripts": {
    "test": "echo \"Error: no test specified\" && exit 1"
  },
  "author": "",
  "license": "ISC",
  "devDependencies": {
    "@eslint/js": "^9.10.0",
    "@typescript-eslint/eslint-plugin": "^8.4.0",
    "@typescript-eslint/parser": "^8.4.0",
    "eslint": "^9.10.0",
    "eslint-plugin-react": "^7.35.2",
    "globals": "^15.9.0",
    "typescript": "^5.5.4",
    "typescript-eslint": "^8.4.0"
  }
}
You’ll find that some files don’t need to be linted at all, such as your node_modules folder, so you can prevent linting by using the ignores configuration to the eslint.config.mjs file:
…
  {
    ignores: [".node_modules/*"]
},
…
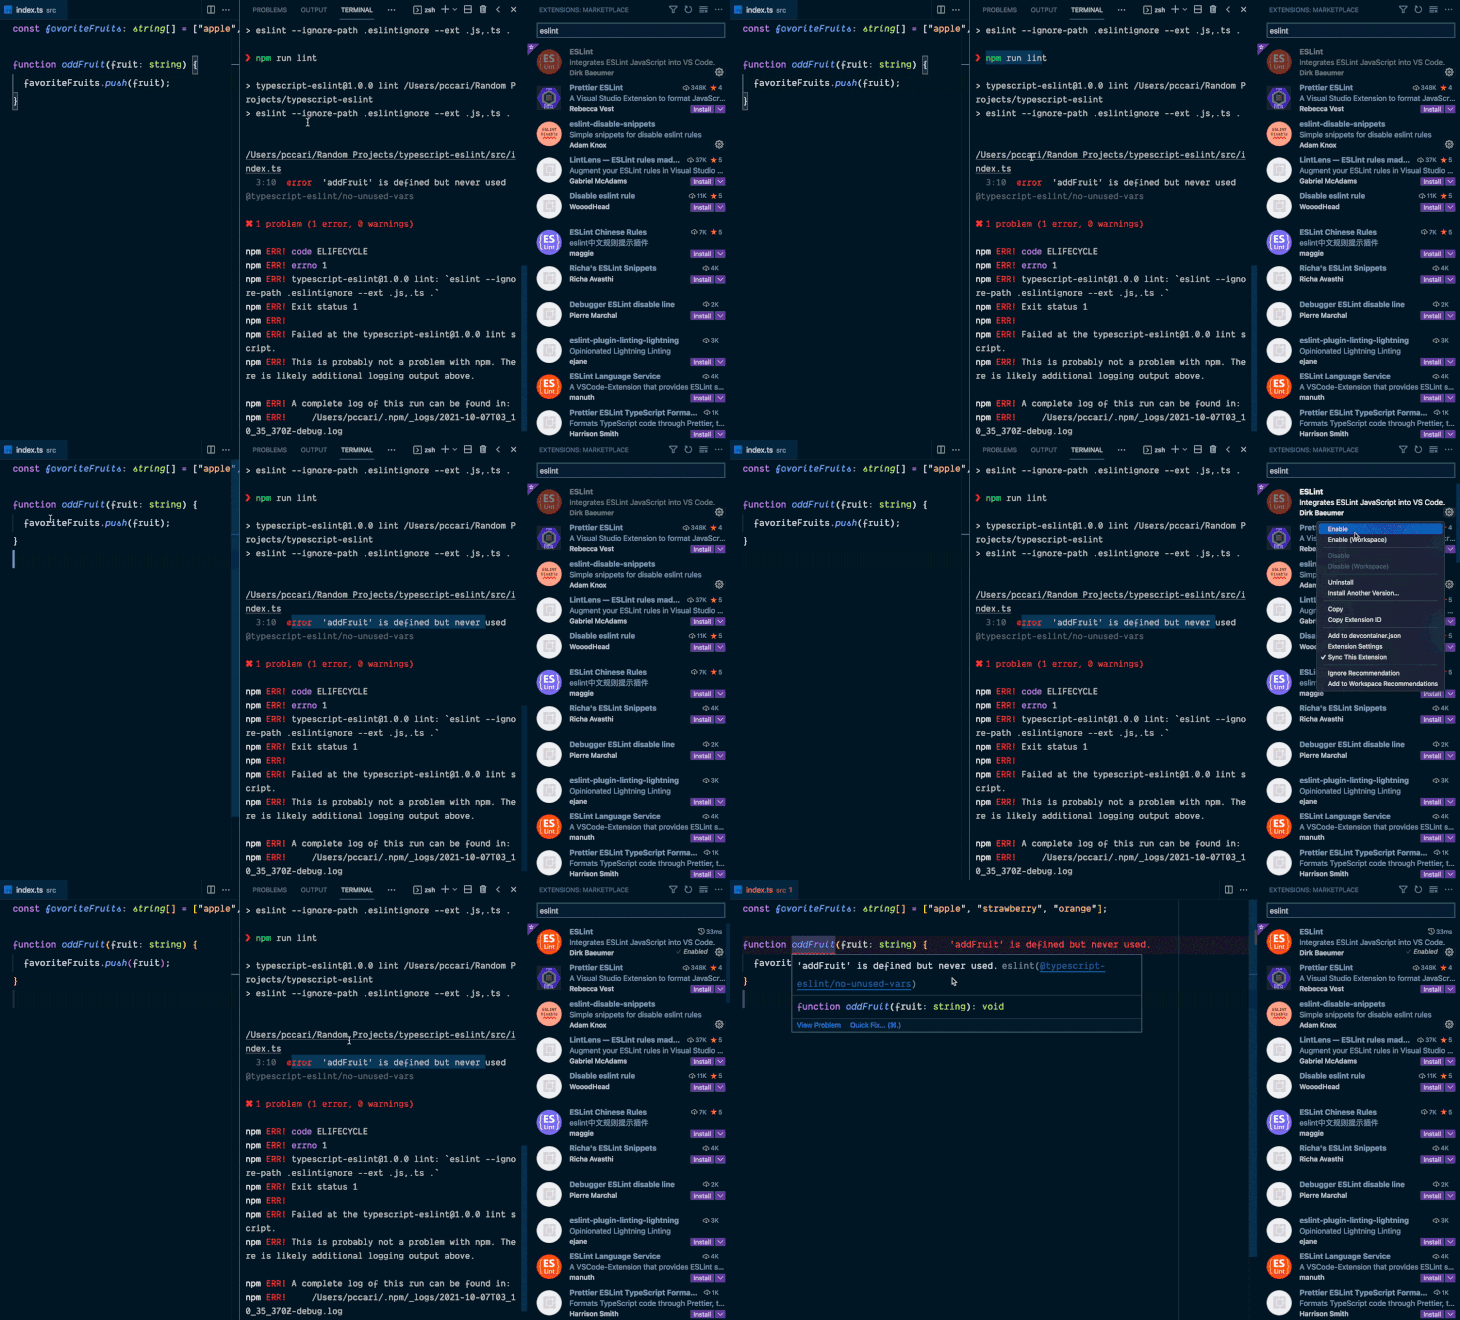
Now you’re ready to go! I suggest you integrate ESLint into whatever editor you use. If that’s VSCode, go to the extension and install the ESLint extension.
Once you’ve installed and enabled it, you’ll see what errors you’ve made in your code without running the script that is underlined with a red line.
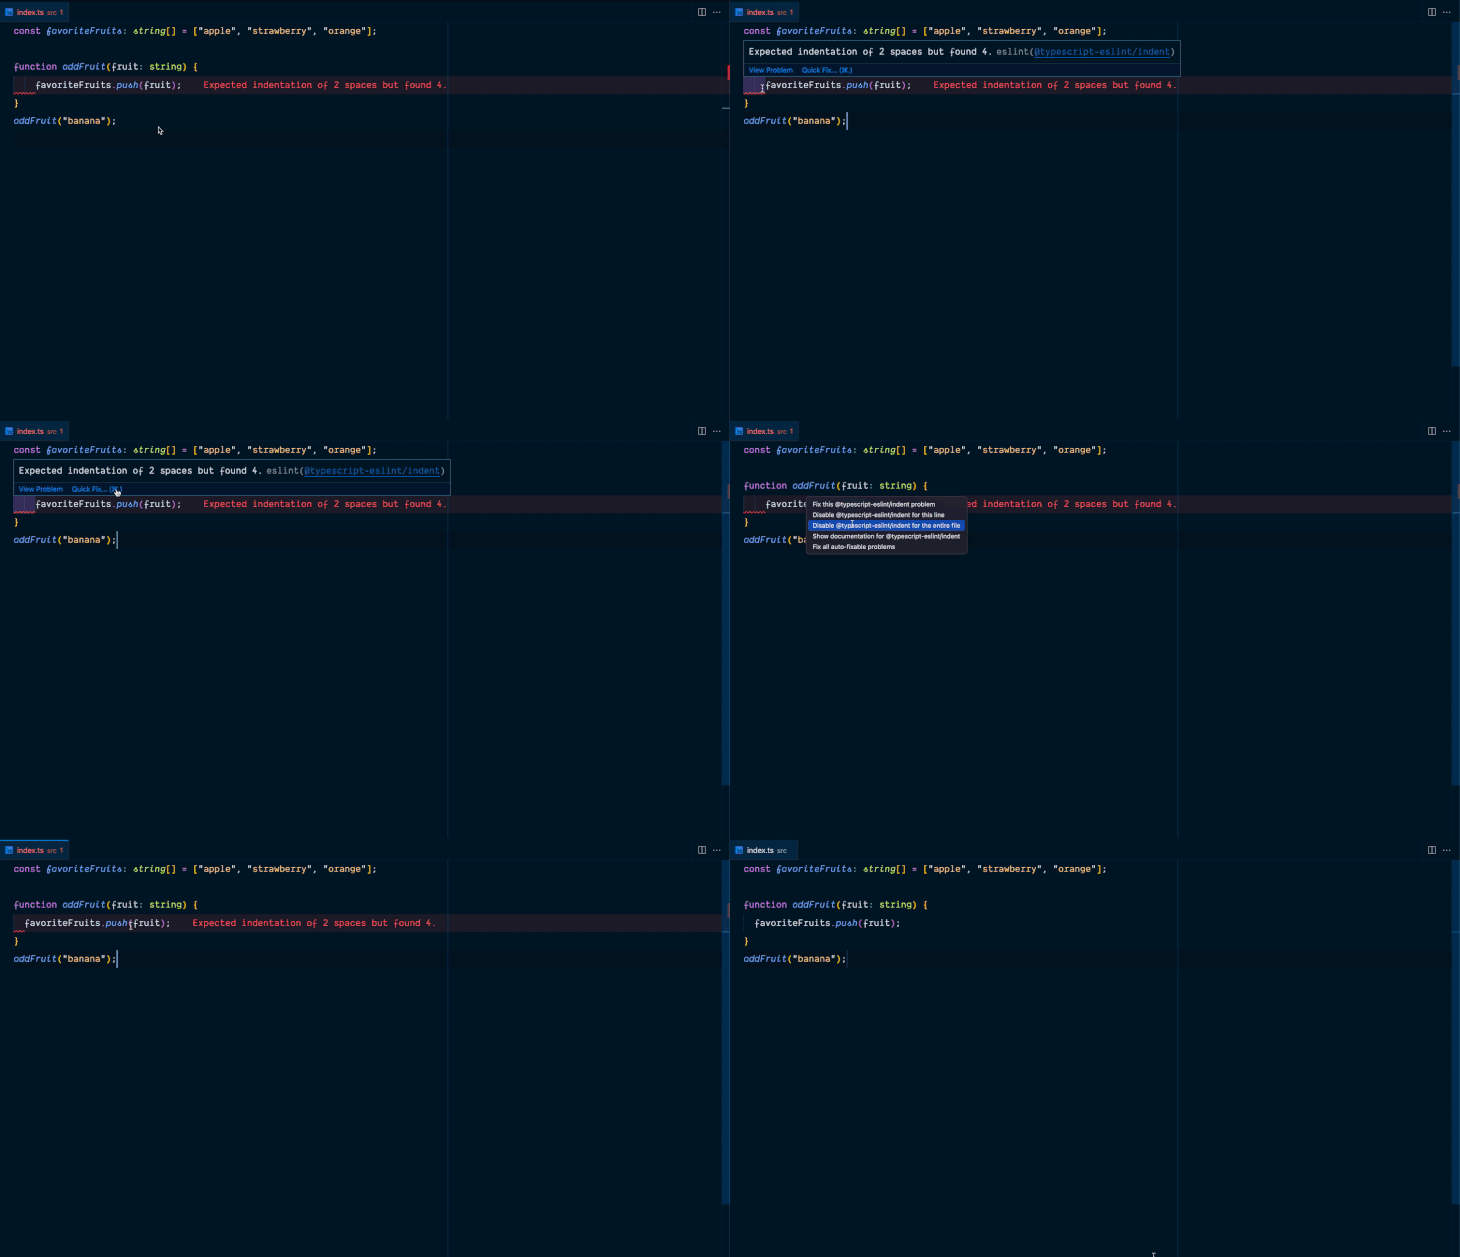
You’ll see that the ESLint error message is printed inline in the editor; that’s another extension called Error Lens, which highlights the entire line and shows the error message immediately instead of hovering with the pointer to see it:

Another feature of ESLint is that it can automatically fix code when you hover and right-click Quick fix, or you can hit command and +:

Manually fixing all of the errors that have broken your rules can be tedious, but you can run the following command that will tell ESLint to fix what it can:
npm run lint --fix
Tip: You can pass parameters using double dashes -- for npm scripts, which will be received as parameters for the script that npm executes:
npm run <command> [-- <args>]
To use plugins in your configuration, you can specify the plugin in a configuration object using the plugin key. The value for the plugin key is an object where the name of the plugin is the property name and the value is the plugin object itself.
You could also specify rules available in the plugin:
// eslint.config.mjs
import jsdoc from "eslint-plugin-jsdoc";

export default [
    {
        files: ["**/*.js"],
        plugins: {
            jsdoc: jsdoc
        },
        rules: {
            "jsdoc/require-description": "error",
            "jsdoc/check-values": "error"
        }
    }
];
In the code above we are configuring ESLint to apply JSDoc-related linting rules to all JavaScript files (**/*.js) using the eslint-plugin-jsdoc plugin. The configuration object includes a plugins key where the plugin is registered by name (jsdoc) and the corresponding imported plugin object (jsdoc). Under the rules key, we specify rules provided by the JSDoc plugin, such as “jsdoc/require-description”: “error”, which makes sure all JSDoc comments include a description, and “jsdoc/check-values”: “error”, which checks for valid values in JSDoc comments.
Prettier is a well-known code formatter that supports a variety of different programming languages. It helps us avoid manually formatting our code by automatically formatting it based on a specified code style.
Nowadays, it’s common to use ESLint and Prettier together, and we will learn how to integrate Prettier with ESLint. First, let’s look at the difference between both and why they can be beneficial together.
The primary function of a linter is to improve your code by analyzing it and alerting you to any potential issues based on customizable or pre-defined rulesets. These rulesets, or rules, allow development teams to maintain a consistent coding style and identify potential bugs caused by inconsistent coding styles.
On the other hand, a code formatter like Prettier ensures a consistent style by parsing your code and re-printing it according to its rules. For example, you can specify a style that all JavaScript statements must end with a semicolon; the code formatter will automatically add the semicolon to all statements without one.
In essence, you can use ESLint to specify rulesets that must be adhered to and then use Prettier to fix cases in your code where these rulesets are broken.
With that covered, let’s add Prettier to our project. Run the following command in the terminal:
npm install --save-dev prettier
Compared to ESLint, Prettier doesn’t need a config file, meaning you can run and use it straight away. However, if you want to set a config, you will need to create a file called .prettierrc.json in the project’s root directory, where you can define your format options.
You can take a look at the full list of format options and play around in the Prettier Playground:
// .prettierrc.json
{
  "semi": false, // Specify if you want to print semicolons at the end of statements
  "singleQuote": true, // If you want to use single quotes
  "arrowParens": "avoid", // Include parenthesis around a sole arrow function parameter
}
Next, we are going to start formatting our code using Prettier in the command line:
npx prettier --write src/index.ts
# src/index.ts 37ms
I added a write flag to overwrite the TypeScript file, otherwise, it won’t overwrite it and will only log the formatted code in your CLI.
Let’s add the Prettier command to our scripts, just as we did for TypeScript and ESLint. Let’s also support all files that end in .ts, .js, and .json, and ignore the same files and directories as gitignore (or you can create a .prettierignore file):
// package.json

{
  // ...
  "scripts": {
    "dev": "tsc --watch",
    "lint": "eslint --ext .js,.ts .",
    "format": "prettier --ignore-path .gitignore --write \"**/*.+(js|ts|json)\""
  },
  // ...
}
Now, you can run the npm run format command to format and fix all your code. But what if we would like to format the code right after saving your files?
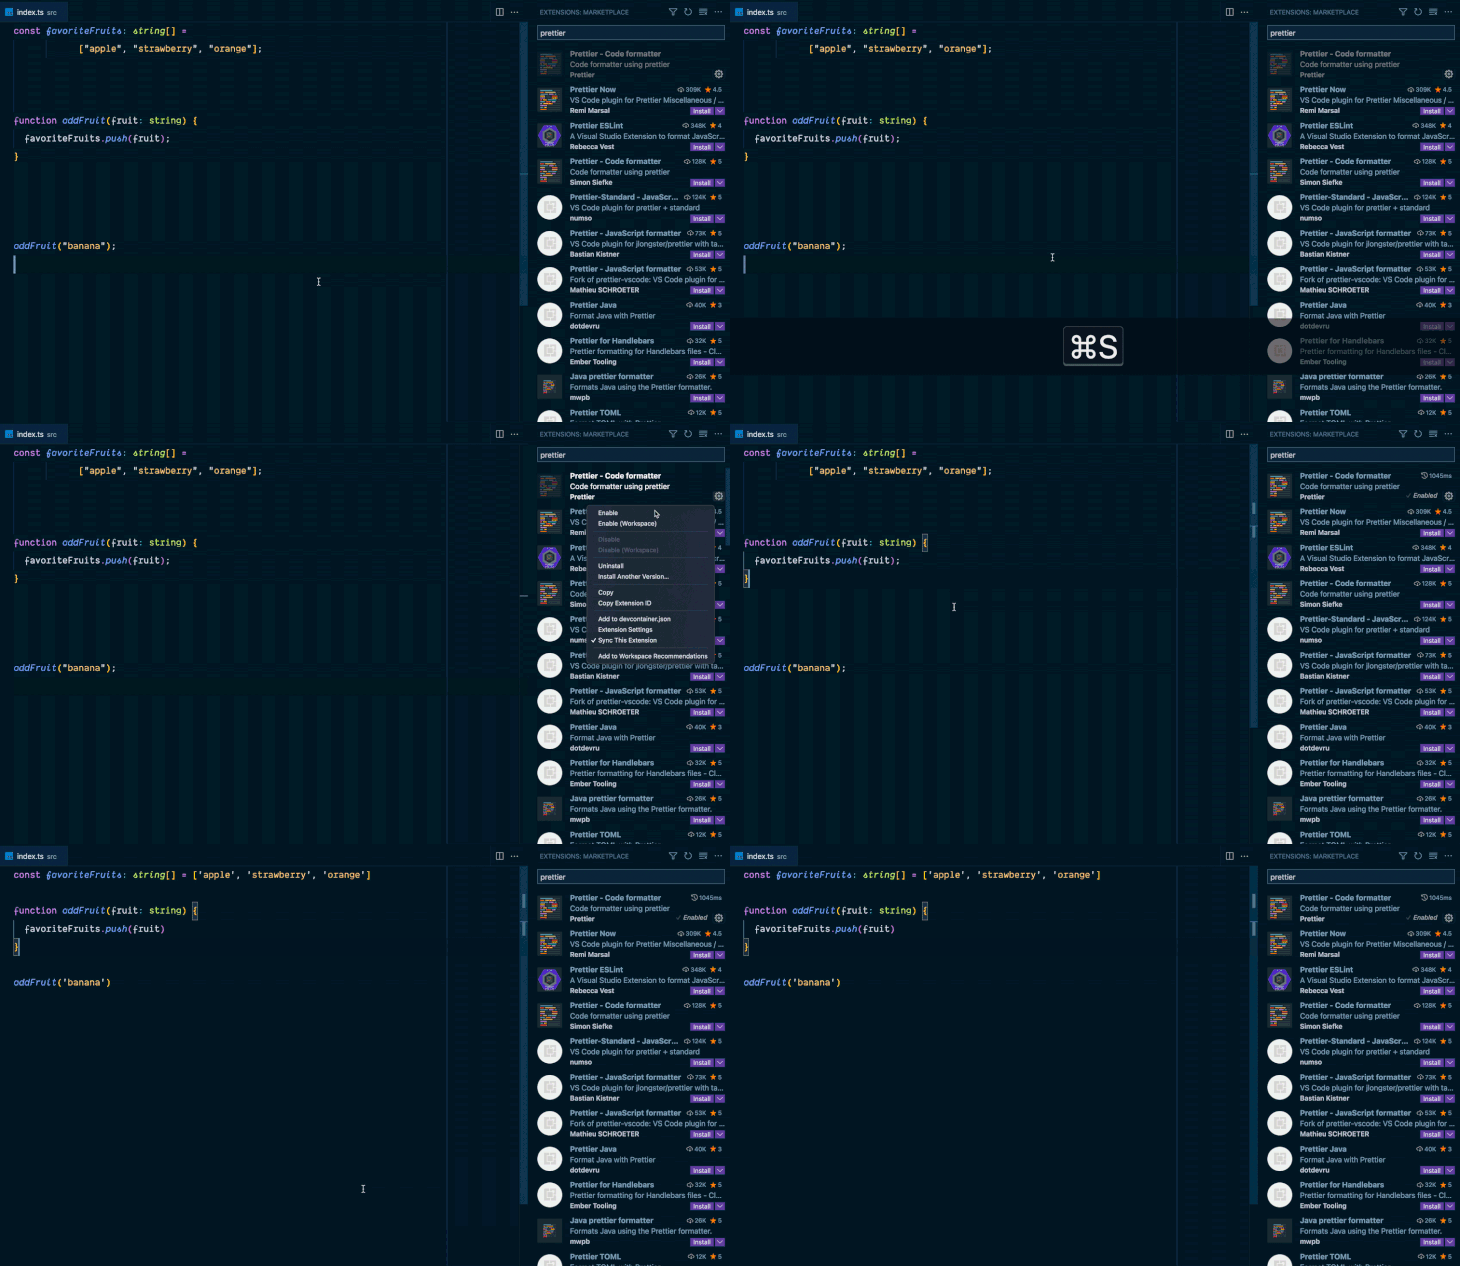
That’s possible! In VSCode, go to the extensions tab, look for the Prettier extension, and ensure it’s enabled. Once enabled, we need to configure a few things in VSCode.
You can open your command palette (Command + Shift + P) and look for Preferences: Open User Settings (JSON). Then you’ll need to change your editor’s default formatter and add an extra config to format code when you save your files:
// settings.json
{
  "editor.defaultFormatter": "esbenp.prettier-vscode",
  "editor.formatOnSave": true,
  ...
}

You’ll likely run into an issue when a Prettier and ESLint rule overlap. You can try to auto-format your code, but it will show you some conflicts with ESLint.
The best solution here is to use the eslint-config-prettier plugin to disable all ESLint rules that are irrelevant to code formatting, as Prettier is already good at it:
npm install --save-dev eslint-config-prettier
With that installed, let’s go to the eslint.config.mjs file, and add prettier at the end of your extends list to disable any other previous rules from other plugins:
// eslint.config.mjs
const eslintPluginPrettierRecommended = require('eslint-plugin-prettier/recommended');

module.exports = [
  // Any other config imports go at the top
  eslintPluginPrettierRecommended,
];
That’s it! Now you know how to use these static testing tools effectively. It’s great to have some automation for specific tasks like linting, formatting, and type checking.
Below is a general comparison of the key differences and purposes that ESLint and Prettier serve:
| ESLint | Prettier | |
|---|---|---|
| Nature | ESLint is a static code analysis tool and linter for JavaScript | Prettier is a code formatter, primarily focused on formatting code to make it more readable and consistent |
| Purpose | Code quality and bug detection | Code formatting |
| Configuration | Highly configurable, rules can be defined in a .eslintrc config file |
Less configurable, as it enforces a specific set of rules without configuration. But you can still configure some options in a .prettierrc.json config file |
| Integration | Can be integrated with popular IDEs to provide realtime feedback and auto-fixing capabilities | Can be integrated with popular IDEs to format files on save to fix formatting issues |
In summary, ESLint and Prettier serve distinct purposes in JavaScript development. While ESLint focuses on enforcing coding standards and patterns, detecting code quality issues, and identifying bugs, Prettier focuses on automatically formatting code to maintain consistency.
To learn more about linting in Typescript, check out this video:
Configuring ESLint and Prettier for TypeScript
Join Josh Goldberg and learn how you can configure ESLint and Prettier for TypeScript compiling. Whether it’s formatting or linting, setting up the plethora of requisite tools for a modern TypeScript project can feel like a never-ending task.
Using TypeScript and ESLint together can boost our confidence in our code. It helps us prevent bugs and can save us time in the long run. I recommend you try using TypeScript and ESLint for an enhanced development experience, benefitting both you and your team in your upcoming projects.

LogRocket lets you replay user sessions, eliminating guesswork by showing exactly what users experienced. It captures console logs, errors, network requests, and pixel-perfect DOM recordings — compatible with all frameworks, and with plugins to log additional context from Redux, Vuex, and @ngrx/store.
With Galileo AI, you can instantly identify and explain user struggles with automated monitoring of your entire product experience.
Modernize how you understand your web and mobile apps — start monitoring for free.
Hey there, want to help make our blog better?
Join LogRocket’s Content Advisory Board. You’ll help inform the type of content we create and get access to exclusive meetups, social accreditation, and swag.
Sign up now
A breakdown of the wrapper and container CSS classes, how they’re used in real-world code, and when it makes sense to use one over the other.

This guide walks you through creating a web UI for an AI agent that browses, clicks, and extracts info from websites powered by Stagehand and Gemini.

This guide explores how to use Anthropic’s Claude 4 models, including Opus 4 and Sonnet 4, to build AI-powered applications.

Which AI frontend dev tool reigns supreme in July 2025? Check out our power rankings and use our interactive comparison tool to find out.
3 Replies to "Linting in TypeScript using ESLint and Prettier"
There seems to be some problems with compatibility between the latest versions of eslint and typescript-eslint, so you won’t be able to run your project with the setup suggested in this article.
Related github issue: https://github.com/eslint/eslint/issues/15149
The compatibility issues should be resolved now!
Note that .eslintrc is now deprecated