Editor’s note: This guide to setting up a Headless Chrome Node.js server in Docker was last updated on 9 January 2023 to update any outdated code, further explain the breakdown of the Dockerfile steps, and include more interactive code examples. To learn more about Docker, visit our archives here.
Headless browsers have become very popular with the rise of automated UI tests in the application development process. There are also countless use cases for website crawlers and HTML-based content analysis.
For 99 percent of these cases, you don’t need a browser GUI because it is fully automated. Running a GUI is more expensive than spinning up a Linux-based server or scaling a simple Docker container across a microservices cluster, such as Kubernetes.
But I digress. It has become increasingly critical to have a Docker container-based headless browser to maximize flexibility and scalability. In this tutorial, we’ll demonstrate how to create a Dockerfile to set up a Headless Chrome browser in Node.js.
Jump ahead:
Node.js is the main language interface used by the Google Chrome development team, and it has an almost native integrated library for communicating with Chrome called Puppeteer. This library uses WebSocket or a system pipe-based protocol over a Chrome DevTools interface, which can take screenshots, and measure page load metrics, connection speeds, downloaded content size, and more.
You can use the Puppeteer library to use Headless Chrome with Node.js. Puppeteer is a Node.js library that provides a high-level API to control Chrome or Chromium over the Chrome DevTools Protocol.
You can test your UI on different device simulations and take screenshots. Most importantly, Puppeteer doesn’t require a running GUI. In fact, it can all be done in a headless mode.
Here’s an implementation to use Puppeteer to control Headless Chrome and navigate to a website:
// Filename: server.js

const express = require('express');
const puppeteer = require('puppeteer');

const app = express();

app.get('/screenshot', async (req, res) => {
    console.log('Taking screenshot');
    const browser = await puppeteer.launch({
        headless: true,
        executablePath: '/usr/bin/google-chrome',
        args: [
            "--no-sandbox",
            "--disable-gpu",
        ]
    });
    const page = await browser.newPage();
    await page.goto('https://www.google.com');
    const imageBuffer = await page.screenshot();
    await browser.close();

    res.set('Content-Type', 'image/png');
    res.send(imageBuffer);
    console.log('Screenshot taken');
});

app.listen(3000, () => {
    console.log('Listening on port 3000');
});
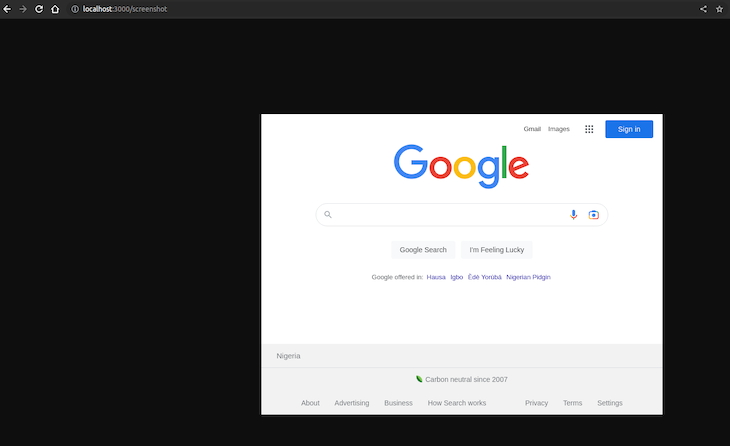
The simple actionable code for taking a screenshot over Headless Chrome is shown above. This script will launch a Headless Chrome instance, navigate to Google, and take a screenshot of the page. The screenshot will be saved to the current directory.
The code also creates an Express.js app with a single route, /screenshot, which uses Headless Chrome to take a screenshot of this, then sends the image data back to the client in the HTTP response.
To use this route, you can make an HTTP request to http://localhost:3000/screenshot, and the server will respond with an image. You can also customize the route to accept query parameters or use other HTTP methods to control the behavior of the screenshot.
Running a browser inside a container seems simple based on the code above, but it’s important not to overlook security. By default, everything inside a container runs under the root user, and the browser executes JavaScript files locally.
To continue with this tutorial, make sure you have Docker v17.03 or later and a working browser (preferably Google Chrome).
Of course, Google Chrome is secure and doesn’t allow users to access local files from the browser-based script, but there are still potential security risks. You can minimize many of these risks by creating a new user for executing the browser itself. Google also has sandbox mode enabled by default, which restricts external scripts from accessing the local environment.
Below is the Dockerfile sample responsible for the Google Chrome setup:
# Filename: Dockerfile

FROM node:slim

# We don't need the standalone Chromium
ENV PUPPETEER_SKIP_CHROMIUM_DOWNLOAD true

# Install Google Chrome Stable and fonts
# Note: this installs the necessary libs to make the browser work with Puppeteer.
RUN apt-get update && apt-get install gnupg wget -y && \
    wget --quiet --output-document=- https://dl-ssl.google.com/linux/linux_signing_key.pub | gpg --dearmor > /etc/apt/trusted.gpg.d/google-archive.gpg && \
    sh -c 'echo "deb [arch=amd64] http://dl.google.com/linux/chrome/deb/ stable main" >> /etc/apt/sources.list.d/google.list' && \
    apt-get update && \
    apt-get install google-chrome-stable -y --no-install-recommends && \
    rm -rf /var/lib/apt/lists/*

# FROM public.ecr.aws/lambda/nodejs:14.2022.09.09.11
# Create working directory
WORKDIR /usr/src/app

# Copy package.json
COPY package.json ./

# Install NPM dependencies for function
RUN npm install

# Copy handler function and tsconfig
COPY server.js ./

# Expose app
EXPOSE 3000

# Run app
CMD ["node", "server.js"]
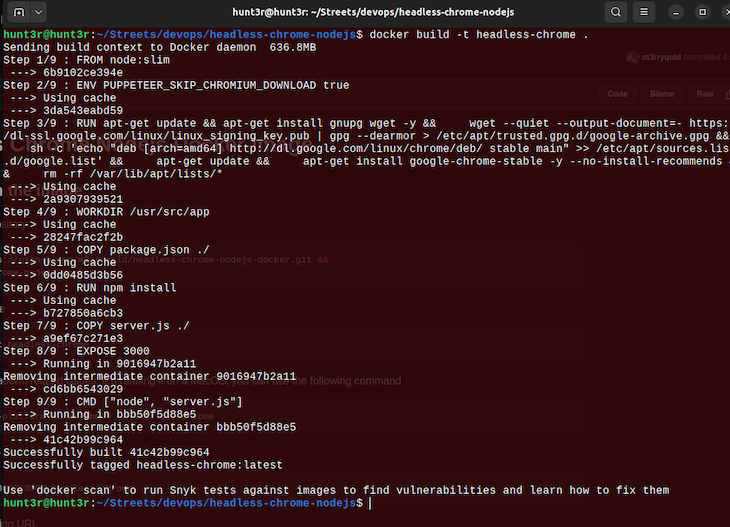
This Dockerfile creates a Docker image that runs a Node.js server using Headless Chrome. Here’s a breakdown of the different steps in the Dockerfile:
FROM node:slim: This specifies the base image for the Docker image. The slim variant of the Node.js image is a smaller version of the official Node.js image that includes only the essential packagesENV PUPPETEER_SKIP_CHROMIUM_DOWNLOAD true: Sets an environment variable that tells Puppeteer to skip downloading ChromiumWORKDIR /usr/src/app: Sets the working directory for the Docker image. This is where the rest of the files and commands in the Dockerfile will be executedCOPY package.json ./: This copies the package.json file to the working directoryRUN npm install: Installs the dependencies listed in the package.json fileCOPY server.js ./: Copies the server.js file to the working directoryEXPOSE 3000: Exposes port 3000 on the Docker container. This allows you to access the server from the host machine on port 3000CMD ["node", "server.js"]: Starts the server by running the server.js script with Node.jsTo build and run the Docker image, you can use the following command:
docker build -t headless-chrome .
If you encounter platform-related issues, for example, running it on a macOS, you can use the following command:
docker build --platform linux/amd64 -t headless-chrome .
To run the built image, use the following:
docker run --rm -p 3000:3000 headless-chrome
![]()
This will build the Docker image and run a new container based on the image. The server will start and listen for requests on port 3000. You can access the server from the host machine by visiting http://localhost:3000 in a web browser. Here’s what it will look like:

As seen in the Docker container logs, you can verify that the screenshot was taken. Below is a video that shows more interactively how the screenshots are taken:
Headless Chrome Demo
No Description
Taking screenshots is fun, but there are countless other use cases. Fortunately, the process described above applies to almost all of them. For the most part, only minor changes to the Node.js code would be required. The rest is pretty standard environmental setup.
Google Chrome eats a lot of memory during execution, so it’s no surprise that Headless Chrome does the same on the server side. If you keep a browser open and reuse the same browser instance many times, your service will eventually crash.
The best solution is to follow the principle of one connection, one browser instance. While this is more expensive than managing multiple pages per browser, sticking to just one page and one browser will make your system more stable. Of course, this depends on personal preference and your particular use case. Depending on your unique needs and goals, you may be able to find a middle ground.
Take, for example, the official website for the performance monitoring tool, Hexometer. The environment includes a remote browser service that contains hundreds of idle browser pools. These are designed to pick up new connections over WebSocket when there is a need for execution, but it strictly follows the principle of one page, one browser. This makes it a stable and efficient way to not only keep running browsers idle but keep them alive.
Puppeteer connection over WebSocket is pretty stable, and you can do something similar by making a custom service like browserless.io (there is an open source version as well).
This will connect to the Headless Chrome DevTools socket using the same browser management protocol:
// Filename: server.js
// ...
// ...

const browser = await puppeteer.launch({
    browserWSEndpoint: `ws://repo.treescale.com:6799`,
});

// ...
// ...
Having a browser running inside a container provides a lot of flexibility and scalability. It’s also a lot cheaper than traditional virtual machine-based instances. Now, we can simply use a container service such as AWS Fargate or Google Cloud Run to trigger container execution only when we need it and scale to thousands of instances within seconds.
The most common use case is still making UI automated tests with Jest and Mocha. But if you consider that you can actually manipulate a full webpage with Node.js inside a container, the use cases are only limited by your imagination.
You can find source codes used in this GitHub repository.
 Monitor failed and slow network requests in production
Deploying a Node-based web app or website is the easy part. Making sure your Node instance continues to serve resources to your app is where things get tougher. If you’re interested in ensuring requests to the backend or third-party services are successful, try LogRocket.

LogRocket lets you replay user sessions, eliminating guesswork around why bugs happen by showing exactly what users experienced. It captures console logs, errors, network requests, and pixel-perfect DOM recordings — compatible with all frameworks.
LogRocket's Galileo AI watches sessions for you, instantly identifying and explaining user struggles with automated monitoring of your entire product experience.
LogRocket instruments your app to record baseline performance timings such as page load time, time to first byte, slow network requests, and also logs Redux, NgRx, and Vuex actions/state. Start monitoring for free.

Learn how to protect full-stack projects from NPM supply chain attacks with a practical security checklist.

Explore 15 essential MCP servers for web developers to enhance AI workflows with tools, data, and automation.

Learn how contrast-color() automatically picks accessible text colors using native CSS, without JavaScript.

Learn how to build a harness-style AI workflow using Claude Code with specialized Dev, QE, and Ops subagents, gated handoffs, MCP telemetry, and LEARNING.md.
Hey there, want to help make our blog better?
Join LogRocket’s Content Advisory Board. You’ll help inform the type of content we create and get access to exclusive meetups, social accreditation, and swag.
Sign up now
