Deploying applications to production gets easier as time goes on. With the increasing number of no-ops platforms, it’s easy to set up complex and relatively expensive cloud infrastructure for small or medium-sized projects. Cloud Run is one of those platforms. Built off Knative, Cloud Run is a fully managed serverless platform for deploying containerized applications with autoscaling configured out of the box. In this tutorial, we will go over how to package a Node API using Docker and deploy it on Cloud Run with CI/CD configured alongside.
The Replay is a weekly newsletter for dev and engineering leaders.
Delivered once a week, it's your curated guide to the most important conversations around frontend dev, emerging AI tools, and the state of modern software.
To follow along with this tutorial, you will need the following:
Run the following commands in any terminal of choice to initialize the project directory:
$ git clone -b boilerplate https://github.com/enkaypeter/cloudrun-node-api-tutorial.git
$ cd cloudrun-node-api-tutorial && yarn
The boilerplate branch contains a simple API and a Dockerfile which we will use to build the API’s docker image.
Cloud Run makes it possible to run applications built with almost any language. This is made possible by application packaging/containerization. For this tutorial, we will be using Google Cloud Builder to package and containerize our API. To do so, we will open up the Dockerfile in the root of our project directory and add the following code:
# Pull in the official lightweight version of Node 12.
FROM node:12-slim

# Create and change to the app directory.
WORKDIR /app

COPY package.json .
COPY yarn.lock .

# Install production dependencies.
RUN yarn install --production

# Copy local codebase into the container image
COPY . .

# Compile down to ES5 with Babel
RUN yarn build-server

# Remove unused src directory
RUN rm -rf src/

# Start the api server
CMD [ "yarn", "start" ]
In the code snippet above, we’re pulling in a lightweight version of Node.js (version 12) which will help us run our Node API. We’re also copying our dependency manifests (package.json and yarn.lock) which will help us install our API dependencies. When we’re done installing dependencies, we will then copy our codebase from our local machine into the container image, compile our code from ES6 to ES5 with babel, do a little housekeeping by removing unused files, and start our API server.
Now we have our image specifications defined in the Dockerfile we will now build our container image by running the following command:
$ gcloud builds submit --tag gcr.io/PROJECT-ID/node-api-tut
Where
PROJECT_IDis your Google cloud project id
If successful, you should see a success message like the image below:

Now we have our API packaged and containerized, we will head over to the Google Cloud Console to create our Cloud Run service.
To deploy our container image, we’ll head over to Cloud Run on the cloud console by visiting this link. When the page fully loads, you should see something that looks like the image below:

Clicking the CREATE SERVICE button will bring up a window where we will specify our service name, its container image from GCR (Google container registry), and make it publicly accessible to the outside world:
When all the required parameters have been fulfilled, clicking CREATE will provide a publicly accessible URL with SSL enabled out of the box as seen in the gif above. In the next section, we will take a look at how we can automatically deploy changes made to our Node API on Cloud Run.
Repeating the steps listed above every single time we want to deploy changes made to our API would make for a hard life. Cloud Build makes our life easier by making it possible to define deployment rules for our project repository each time a branch of our choosing is updated in source control. To configure this, we will do two things:
To create a cloudbuild.yaml file we will run the following command $ touch cloudbuild.yaml. When that is done, we should have a project directory that looks like this:
.
├── Dockerfile
├── README.md
├── cloudbuild.yaml
├── node_modules
├── package.json
├── src
│   ├── app.js
│   ├── config.js
│   ├── controllers
│   ├── helpers
│   ├── middleware
│   ├── models
│   └── routes
└── yarn.lock
We will now define our deployment rules by adding the following code:
steps:
    # build the container image
    - name: 'gcr.io/cloud-builders/docker'
      args: [ 'build', '-t', 'gcr.io/${_PROJECT_ID}/node-api-tut', '.' ]
    # push the container image to gcr
    - name: 'gcr.io/cloud-builders/docker'
      args: [ 'push', 'gcr.io/${_PROJECT_ID}/node-api-tut']
      # Deploy container image to Cloud Run
    - name: "gcr.io/cloud-builders/gcloud"
      args: ['run', 'deploy', 'node-api-tut', '--image', 'gcr.io/${_PROJECT_ID}/node-api-tut', '--region', 'europe-west4', '--platform', 'managed', '--allow-unauthenticated']
_PROJECT_ID is a trigger variable which will be defined when we’re creating our build trigger
The YAML snippet above shows how Cloud Build goes about building, packaging, and deploying our API. Let’s go over those steps below:
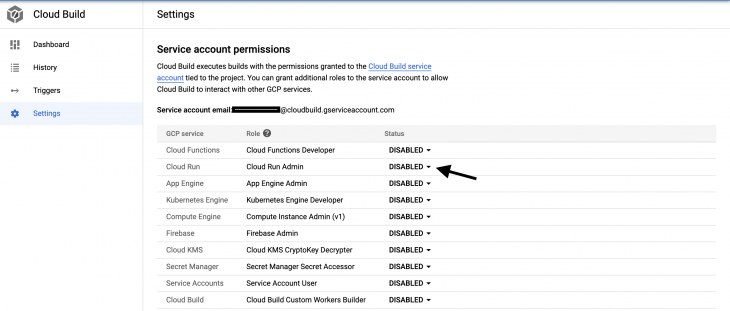
node-api-tut: This is our Cloud Run service name--region europe-west4 : This specifies the compute region that will host our service--platform managed : This tells Cloud Build to deploy our container image to a fully managed platform (Cloud Run)--allow-unauthenticated: This flag makes our Cloud Run service publicly availableBefore we commit the cloudbuild.yaml file to source control, we have to give the Cloud Build service account permissions to trigger a Cloud Run revision. This can be done by navigating to the Cloud Build settings console and enabling the Cloud Run Admin role as seen in the image below:
When that is done, we can now go ahead and commit the cloudbuild.yaml file to source control.
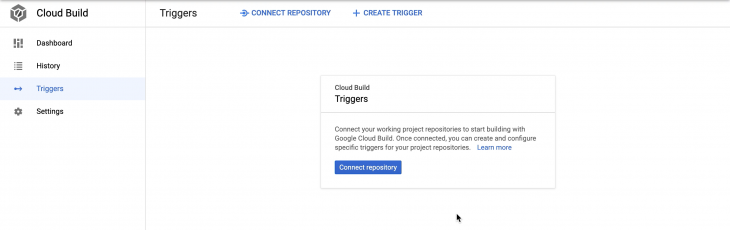
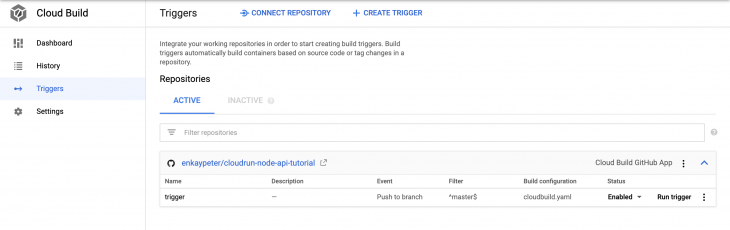
A build trigger makes it possible for Cloud Build to automatically start the build process we defined in our cloudbuild.yaml file whenever a change is made to our Node API in source control. To configure this, we will head over to the triggers page the Google Cloud console and connect our repository:
When we’re done connecting our Node API’s project repository we’ll run the following code in the terminal:
$ gcloud beta builds triggers create github \
--repo-name=[REPO_NAME] \
--repo-owner=[GITHUB_USERNAME] \
--branch-pattern="^master$" \
--substitutions=_PROJECT_ID=[PROJECT-ID] \
--build-config=cloudbuild.yaml \
If successful, you should see a screen that looks like this:
Now we have everything set up, it’s time to test out our build triggers. We can do this by updating the index method in src/controllers/base-controller.js like so:
// src/controllers/base-controller.js
...

  index: (req, res) => {
    return res.status(200).json({
      success: true,
      message: "Hey there :)",
    })
  }

...
After updating the index method, we will then commit the changes to our source repository. If all goes well, and you navigate to {HOST_URL}\api, you should see a screen that looks something like this:
Where {HOST_URL} is the Cloud Run provisioned URL
In the next section, we will take a look at how we can deploy our API with environment variables.
.env variablesAside from hosting infrastructure, environment variables are what differentiates our local development environment from production. In this section, we will look at the two major ways we can deploy our API with environment variables.
The first way is by storing our .env variables in a Google storage bucket (GCS). This can be done by creating a storage bucket called secrets-locker and copying our env variable into the bucket using gsutil ( a utility tool for accessing cloud storage from the command line) like so:
$ gsutil mb gs://secrets-locker/
$ gsutil cp .prod.env gs://secrets-locker/
This package (gsutil) comes installed with the Google Cloud SDK. However, if you can’t run the subsequent commands visit the official documentation to install
gsutilseparately.
Where .prod.env is the file containing your production environment variables which, in our case, is our database connection variable for MongoDB:
//.prod.env
DB_CON_STRING=[MONGO_DB_CONNECTIONSTRING]
[MONGO_DB_CONNECTIONSTRING]is your mongodb connection string.
To add this environment file to our API in Cloud Run, we will add an extra build step to our cloudbuild.yaml file like this:
steps:
    # Download .env file
    - name: "gcr.io/cloud-builders/gsutil"
      args: ["cp", "gs://secrets-locker/.prod.env", ".env"]
    # build the container image
    - name: 'gcr.io/cloud-builders/docker'
      args: [ 'build', '-t', 'gcr.io/${_PROJECT_ID}/node-api-tut', '.' ]
    # push the container image to gcr
    - name: 'gcr.io/cloud-builders/docker'
      args: [ 'push', 'gcr.io/${_PROJECT_ID}/node-api-tut']
      # Deploy container image to Cloud Run
    - name: "gcr.io/cloud-builders/gcloud"
      args: ['run', 'deploy', 'node-api-tut', '--image', 'gcr.io/${_PROJECT_ID}/node-api-tut', '--region', 'europe-west4', '--platform', 'managed', '--allow-unauthenticated']
The snippet above is still the same as the cloudbuild.yaml file created when we were configuring continuous deployment for our Cloud Run service. The only difference here is we’re copying our production environment variable (.prod.env) into our container image .env file.
Before committing our Cloud Build file to source control, we will uncomment the mongoose.connect() method in src/app.js, like this:
// src/app.js

...
// Connect to mongodb
mongoose.connect(
    process.env.DB_CON_STRING,
    {
        useNewUrlParser: true,
        useUnifiedTopology: true
    },
    (err) => {
        if (err) {
            console.log(err);
        } else {
            console.log('Successfully Connected to the database');
        }
    }
);

...
When that is done, we can now commit our changes to source control.
Remember to add
.prod.envto your.gitignorefile or make the conscious effort to keep it untracked by git.
To test our environment variable in CR we will make a POST request to our Node API endpoint using Postman:

The second way to deploy environment variables with Cloud Run is by manual definition on the Cloud Run console as seen in the image below:
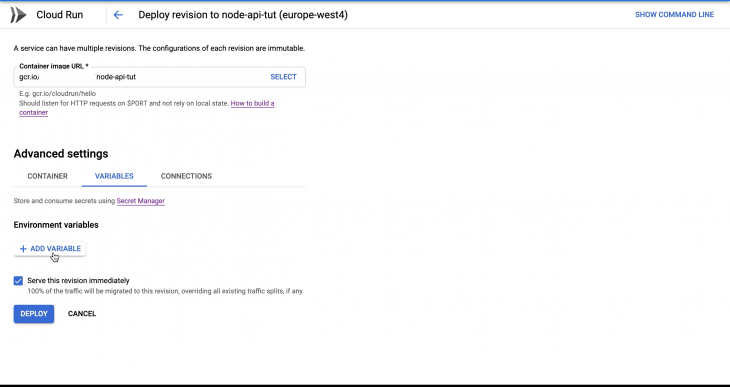
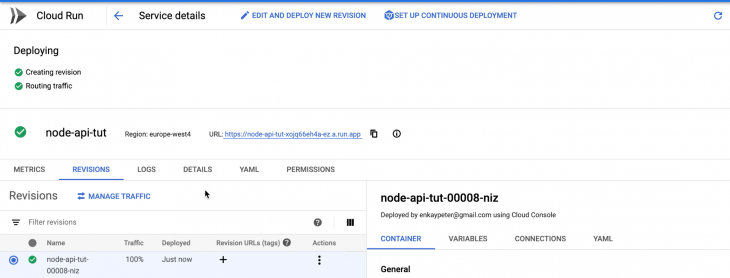
Clicking the DEPLOY button deploys a new Cloud Run revision from our Node API container image. If successful, you should see a screen that looks like this:
In this tutorial, we’ve learned how to deploy a Node API on Google Cloud Run with and without environment variables. We have also learned how to configure continuous delivery for our Cloud Run service. To learn more about Cloud Run and how you can leverage its technology to handle workloads, check out the official documentation.
The source code for this tutorial is available on GitHub as well. Feel free to clone it, fork it, or submit an issue.
 Monitor failed and slow network requests in production
Deploying a Node-based web app or website is the easy part. Making sure your Node instance continues to serve resources to your app is where things get tougher. If you’re interested in ensuring requests to the backend or third-party services are successful, try LogRocket.

LogRocket lets you replay user sessions, eliminating guesswork around why bugs happen by showing exactly what users experienced. It captures console logs, errors, network requests, and pixel-perfect DOM recordings — compatible with all frameworks.
LogRocket's Galileo AI watches sessions for you, instantly identifying and explaining user struggles with automated monitoring of your entire product experience.
LogRocket instruments your app to record baseline performance timings such as page load time, time to first byte, slow network requests, and also logs Redux, NgRx, and Vuex actions/state. Start monitoring for free.

Learn how sibling-index() enables clean, JavaScript-free stagger animations using native CSS.

useEffect breaks AI streaming responses in ReactSee why useEffect breaks AI streaming in React, and how moving stream state outside React fixes flicker and stale updates.

A real-world debugging session using Claude to solve a tricky Next.js UI bug, exploring how AI helps, where it struggles, and what actually fixed the issue.

CSS wasn’t built for dynamic UIs. Pretext flips the model by measuring text before rendering, enabling accurate layouts, faster performance, and better control in React apps.
Would you be interested in joining LogRocket's developer community?
Join LogRocket’s Content Advisory Board. You’ll help inform the type of content we create and get access to exclusive meetups, social accreditation, and swag.
Sign up now
