Editor’s note: This article was last updated on 10 August 2023 to include updates to Server Components since the release of React 18 and Next.js 13.

There have been continuous efforts to deliver a consistent rendering solution for React apps. In May 2023, with the release of React 18, the React team announced better support for the experimental feature React Server Components (RSCs).
RSCs are now enabled by default for the App Router in React 18 and Next.js 13. They pre-render components on the server, which eliminates the work that is typically done by the client, resulting in components with zero bundle size and improved load times for your web pages. All frameworks that are compatible with the latest releases of React 18, including Next.js, Gatsby, and Remix, come with built-in support for RSC.
In this tutorial, we will explore when and how to utilize React Server Components within a Next.js application. We’ll also dive into the modifications made to the traditional React components and how to effectively combine both types of components.
Jump ahead:
The Replay is a weekly newsletter for dev and engineering leaders.
Delivered once a week, it's your curated guide to the most important conversations around frontend dev, emerging AI tools, and the state of modern software.
It’s worth mentioning that RSC is still an experimental feature and is under development. It is recommended to use caution when implementing RSC in production.
Before we continue with the tutorial, it’s important to ensure that you have a fundamental grasp of React and Next.js, as well as a Next.js 13 starter or blank project.
You can choose to either install Next.js on your local machine or use an online platform such as StackBlitz to speed up the process. When using online tools, make sure that they provide a Next.js 13 application rather than an older version.
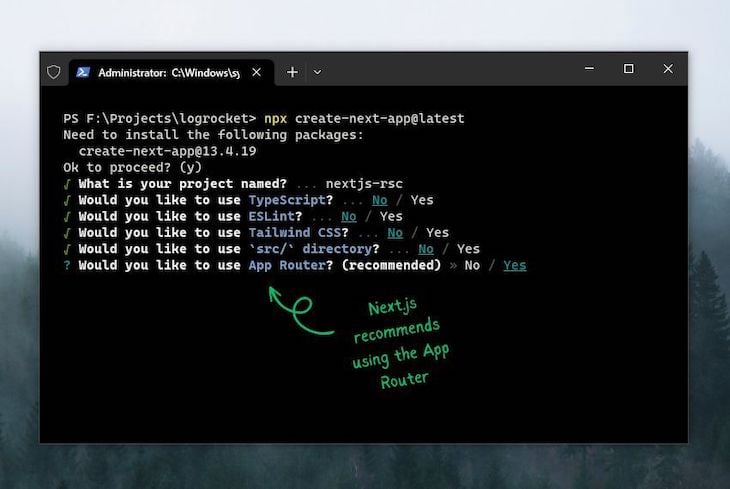
I am using the standard create-next-app utility with npx to create a local Next.js application. If you are using a package manager other than npm, refer to this resource for instructions on how to implement CNA with them:
npx create-next-app@latest
Here is an image to demonstrate the process, where the installer suggests using the App Router. If you choose “No,” you will get the Pages Router, which will give you the traditional Next.js 12 app experience. Make sure to use the App Router to be able to use RSCs:

You can choose other options based on your needs, such as using a traditional src directory, incorporating TypeScript, integrating Tailwind CSS, etc. I’m keeping things minimal for the sake of simplicity.
Server Components are a way of executing React components on the server side and then sending the rendered output to React on the client side. This means that you don’t have to ship all of the dependencies that your project depends on, hence resulting in a faster initial page load.
RSCs are built on top of next-generation tooling and are still in the experimental phase, not yet ready for production. However, it is claimed that they have the potential to significantly improve the security, performance, and efficiency of React applications.
As discussed before, RSCs are components that are stored and guaranteed to render on the server. This way of operating gives them three main advantages:
However, RSCs lack integration with the browser, which means they do not have client-side interactivity or state management capabilities. As a result, React Hooks such as useState, useEffect, and certain other Next.js APIs are not supported by RSCs.
Next.js 13 introduces a number of changes to the way components are created and rendered, including the introduction of React Server Components.
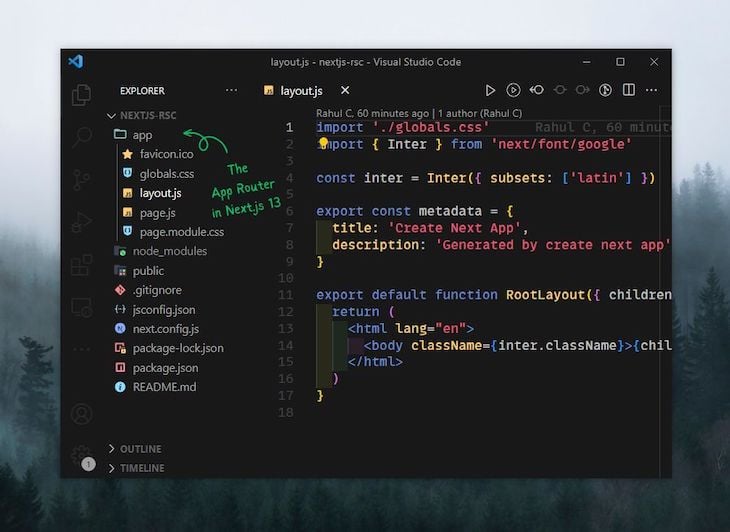
The biggest change is that the Pages Router is now accompanies by the App Router. We can choose between using these two routers when creating our app.
The App Router is a new routing system that is built on top of RSCs and provides support for nested routes, layouts, loading states, error handling, and more:

This change has also affected the way we use components in Next.js. Now, there are two types of React components: Server Components and Client Components. Any component that is placed within the App Router is considered a Server Component by default. Server Components are rendered on the server and then sent to the client as static HTML. Client Components are rendered on the client, as is conventionally done with React.
With the App Router, the getStaticProps and getServerSideProps methods are no longer preferred for passing data as props. Instead, a new native fetch API has been introduced. This API works in both Server and Client Components and supports incremental static regeneration (ISR) as well.
The Suspense feature in React 18 now supports data fetching, which allows you to fetch data asynchronously and render the page as soon as the data is available. This is inherited by Next.js 13, and we will see it in action later.
Before we get into the details of RSCs, let’s take a moment to review the pre-rendering solutions that Next.js uses, the challenges they pose, and how RSCs effectively address those challenges.
Next.js already has some clever ways to pre-render content efficiently. Let’s walk through these techniques one by one and explore the need for React Server Components in comparison.
In server-side rendering (SSR), the data for your app is fetched on the server and HTML pages are generated for each route. These pages are then sent to the user’s browser. When the browser receives the pages, it executes JavaScript code on the client side to add interactivity to the HTML, a process commonly referred to as hydration.
This ensures that users see content as soon as they land on your page, rather than a blank white screen while external data is being fetched, which is often the case with single-page React apps.
In traditional JavaScript-based websites (SPAs mostly), the process of compiling and rendering the website is done at runtime, in the browser. Next.js improves upon this by compiling and rendering the website at build time by default.
The build output is a bunch of static files, including HTML files and assets such as JavaScript and CSS. Similar to SSR, this method pre-renders the website’s content to the user, eliminating the need for them to wait for a significant amount of JavaScript to download and execute in their browser before the website becomes visible.
Despite their success, both SSR and SSG have their drawbacks. SSR websites can be expensive to host, and SSG can drastically increase build time as your application grows larger. It is recommended to go through this SSR vs. SSG guide before making a choice between the two.
RSCs don’t replace the existing rendering methods in Next.js, but they mix up well with both SSR and SSG to pre-render individual components on the server, which can improve performance and reduce the need for client-side JavaScript and high build times.
In the next section, we’ll take a closer look at how React Server Components can be implemented to improve the performance and flexibility of your Next.js application.
Here’s a brief example that demonstrates the parallels between constructing a React Server Component and a conventional React component:
const ServerComponent = () => {
  const data = "I'm a Server Component.";
  /*
   * Since this is a server component, the below message
   * won't be displayed in the browser's dev console.
   */
  console.log(data);

  return <p>{data}</p>;
};

export default ServerComponent;
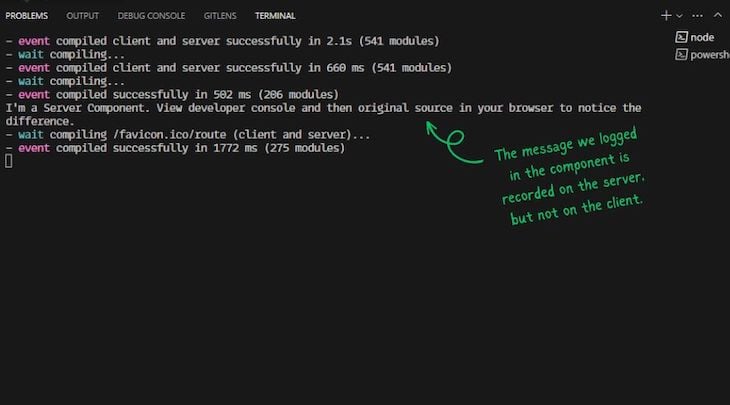
To use this RSC, you would import it into the page.js or page.tsx file for the route that you want to use it on. When you run the app, you will see that the HTML returned by the RSC is not injected or managed by JavaScript. Instead, it is clearly visible in server logs or the original source code, just like on a traditional server-based website:

Here is another example that illustrates the use of React Server Components for data fetching. The built-in Next.js fetch API is still an experimental feature, but it is a strong tool for getting data from a variety of sources like APIs, databases, and files. It works on both the server and client parts and has features like caching and incremental static regeneration (ISR).
Here, I am using a mock JSON API to load specific content, which can then be easily iterated over to structure and then export the component:
import { Suspense } from "react";

// Next.js fetch API in action
async function loadPosts() {
  const res = await fetch("https://jsonplaceholder.typicode.com/posts");
  return res.json();
}

const PostList = async () => {
  const posts = await loadPosts();
  return (
    <div className="post-list">
      {posts.map((post) => (
        <div key={post.id} className="post-listing">
          <h3 className="post-title">{post.title}</h3>
          <p className="post-body">{post.body}</p>
        </div>
      ))}
    </div>
  );
};

export default PostList;
We can now use this Server Component anywhere to display a list of posts that were originally retrieved from the server through an API.
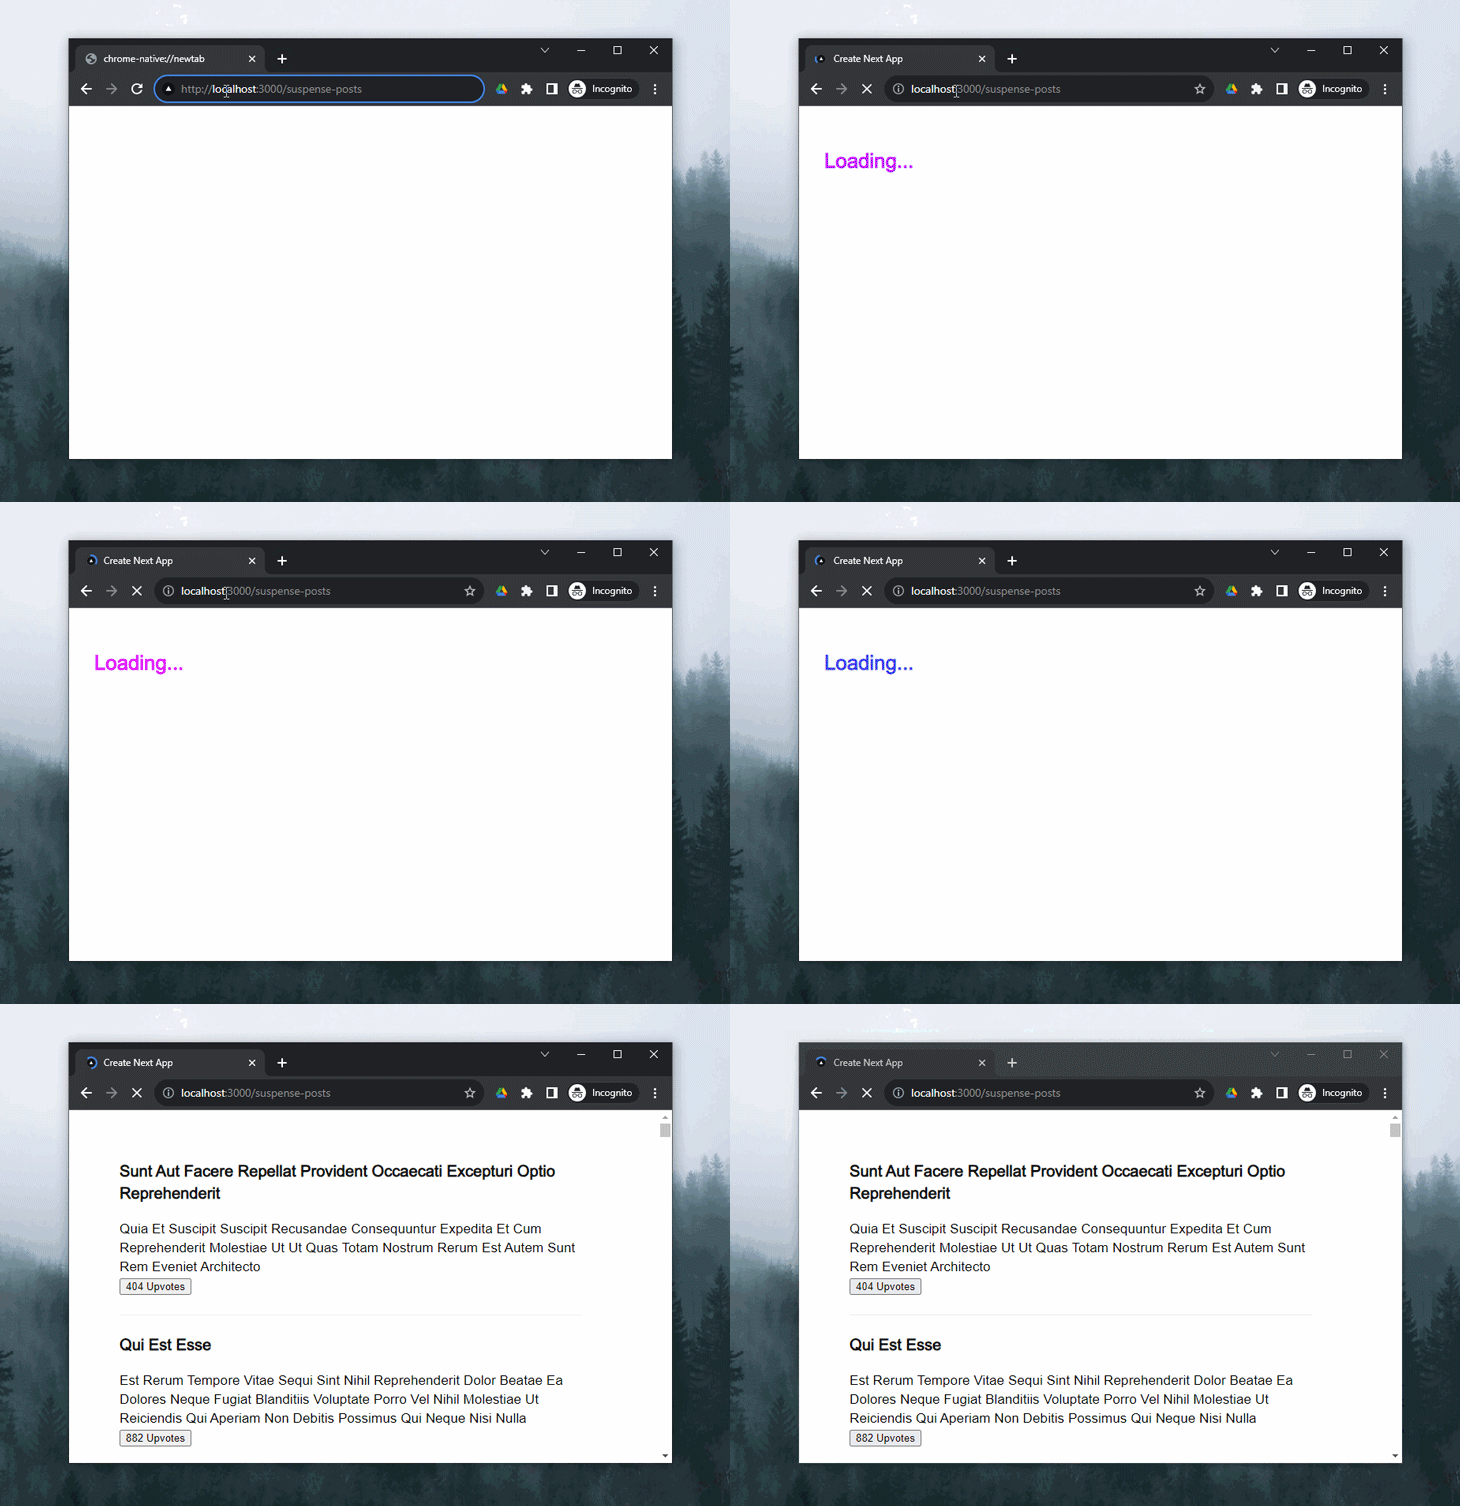
To add a loading state using Suspense, we can wrap the PostList component within a Suspense component, providing a fallback that renders a loading state while the data is being fetched. Once the data retrieval is complete, the Suspense component will render the list of posts:
...

const Index = async () => {
  return (
    <>
      <Suspense fallback={<h2>Loading...</h2>}>
        <PostList />
      </Suspense>
    </>
  );
};

...

If the child component that is wrapped in <Suspense> needs to do extra computation, it will be done in parallel with the asynchronous operation. This will prevent the rest of the app from being blocked while the child component is computing.
Coupled with Client Components and React Suspense, RSCs can pre-render content through HTTP streaming. HTTP streaming is a technique that allows a web server to send data to a client in a continuous stream, rather than in a single large file. This technique is primarily used for transferring dynamic data, such as live video or audio.
The Suspense feature supports data fetching in React 18 and allows you to show a fallback component while a component is loading. This can be useful for showing a loading spinner or a placeholder while a component is fetching data from the server.
Client Components are primarily rendered on the client side, as you might already know from your experience with React. As previously discussed, components placed within the App Router are considered Server Components. To designate a component as a Client Component, React now requires you to use the 'use client' directive, as Client Components are not rendered on the server.
Take a look at the following example to understand how Client Components are designated:
"use client"; // This statement is required to mark a component as a client component
import { useState } from "react";

const PostUpvoteButton = ({ upvotes, children }) => {
  const [upvoteCount, setUpvoteCount] = useState(upvotes);
  return (
    <>
      {children}
      <button onClick={() => setUpvoteCount(upvoteCount + 1)}>
        {upvoteCount} Upvotes
      </button>
    </>
  );
};
export default PostUpvoteButton;
It’s not obligatory to label all Client Components with 'use client', especially if they aren’t meant to be directly employed. You can import them into a Client Component that carries the 'use client' directive, and they will function as intended.
Additionally, it’s important to note that you can’t directly import a Server Component into a Client Component. If you need to nest a Server Component within a Client Component, you can elevate it to a higher-order component and pass it as a prop to the Client Component.
Here’s an example that illustrates the proper usage of Server Components within Client Components:
const ClientComponent = ({ children }) => {
  ...

  return (
    <div className="...">
      {children}
    </div>
  );
};

export default ClientComponent;
We can now import the ClientComponent component into a server or a route component as we normally would and provide it with another Server Component as its child, as shown in the code below:
import ClientComponent from "./ClientComponent";
import NestedServerComponent from "./NestedServerComponent";

const Index = () => {
  ...

  return (
    <ClientComponent>
      <NestedServerComponent/>
    </ClientComponent>
  );
};

export default Index;
All of the code provided above can be found in this GitHub repository. The repository contains separate routes for each demonstration. For example, you can locate the Suspense example under the /suspense-posts route, while the component nesting example is accessible via the /nesting route.
React Server Components offer a considerable number of advantages over traditional React components, with some of the main ones listed below:
Despite the numerous benefits, React Server Components do come with a few drawbacks:
The official release of React Server Components marks a significant shift in how we build React and Next.js applications. RSCs have the potential to revolutionize the way we build these apps by effectively managing rendering and enabling us to build apps that span both the server and client.
While it may initially feel a bit overwhelming and confusing due to the substantial changes, we can look forward to the stabilization of the RSC feature, which is bound to contribute to an improved developer experience in the future. For now, there is no harm in using the Pages Router and sticking to traditional app development methods.
Install LogRocket via npm or script tag. LogRocket.init() must be called client-side, not
server-side
$ npm i --save logrocket

// Code:

import LogRocket from 'logrocket';
LogRocket.init('app/id');
// Add to your HTML:

<script src="https://cdn.lr-ingest.com/LogRocket.min.js"></script>
<script>window.LogRocket && window.LogRocket.init('app/id');</script>

@container scroll-state: Replace JS scroll listeners nowCSS @container scroll-state lets you build sticky headers, snapping carousels, and scroll indicators without JavaScript. Here’s how to replace scroll listeners with clean, declarative state queries.

Russ Miles, a software development expert and educator, joins the show to unpack why “developer productivity” platforms so often disappoint.

Discover what’s new in The Replay, LogRocket’s newsletter for dev and engineering leaders, in the February 18th issue.

Learn how to recreate Claude Skills–style workflows in GitHub Copilot using custom instruction files and smarter context management.
Hey there, want to help make our blog better?
Join LogRocket’s Content Advisory Board. You’ll help inform the type of content we create and get access to exclusive meetups, social accreditation, and swag.
Sign up now