Editor’s note: This article was last updated by David Omotayo on 26 November 2024 to cover how to identify event listeners bound to a component, as well as how to get the ID of a clicked element in the JavaScript click handler.

Interactivity is key to making your applications dynamic and engaging to users, and event handling plays a central role in achieving this functionality. In this article, we’ll deep dive into the core concept of event handling in React, focusing on the onClick event handler as a practical example. By the end, you’ll have a solid understanding of how to capture and respond to events in your React applications.
The Replay is a weekly newsletter for dev and engineering leaders.
Delivered once a week, it's your curated guide to the most important conversations around frontend dev, emerging AI tools, and the state of modern software.
Event handlers are functions that React components use to determine what action will occur whenever an event is fired. This could be a button click or a change in a text input.
Essentially, event handlers allow users to interact with your React app. Handling events with React elements is similar to handling events on DOM elements, with a few minor exceptions.
Some common React event handlers include:
onClick: Handles click events on elements like buttonsonChange: Handles changes in input fields, textareas, and select elementsonSubmit: Handles form submissiononMouseOverand onMouseOut: Handle mouse hover and mouse leave eventsonKeyDownand onKeyUp: Handle key press and key release eventsIf you’re familiar with how events work in standard HTML and JavaScript, it should be easy for you to learn how to handle events in React.
onClick in HTML, JavaScript, and ReactonClick is fundamental in web development, as it allows users to interact with elements on a page. Just as we can use it in React, we can also use it in HTML and traditional JavaScript.
Although there are syntax differences, the underlying concept of handling click events remains consistent across React, HTML, and JavaScript. In all three approaches, a function or action is triggered when a user clicks on a designated element.
Understanding these commonalities can ease the transition between HTML, JavaScript, and React, enabling developers to apply their knowledge across different contexts. Let’s explore the similarities and differences of using the onClick event within them.
onClick attributeIn HTML, the onClick attribute is used to associate a script or action with a click event on an element. This is a basic and direct way to handle user interactions:
<button onclick="handleClick()">Click me</button>
Here, the handleClick function will be executed when the button is clicked. This approach is simple and commonly used in traditional HTML documents.
In plain JavaScript, event listeners are employed to handle click events. The addEventListener method allows developers to attach functions to specific events, including clicks:
const myElement = document.getElementById('myElement');

myElement.addEventListener('click', function() {
  // Handle the click event here
});
This method provides more flexibility and separation of concerns compared to inline HTML attributes.
onClick handlerWhen transitioning to React, the onClick event is a core part of handling user interactions. In JSX, the onClick handler is specified directly in the component, making the code more declarative:
import React from 'react';

const MyComponent = () => {
  const sayHello = () => {
    alert("Hello!")
  };

  return (
    <button onClick={sayHello}>Say Hello</button>
  );
};
React’s onClick handler follows a similar concept to the HTML onClick attribute but is more integrated into the component’s structure.
onClick handler in ReactThe React onClick event handler enables you to call a function and trigger an action when a user clicks an element, such as a button, in your app.
Event names are written in camelCase, so the onclick event is written as onClick in a React app. In addition, React event handlers appear inside curly braces.
Take the following simple example written in HTML:
<button onclick="sayHello()">
  Say Hello
<button>
In a React app, this button onClick event would be written as follows:
<button onClick={sayHello}>
  Say Hello
<button>
Another key difference is that you must explicitly call preventDefault in React, whereas in HTML, you would simply return false to avoid default behavior.
The following example shows how to prevent a link from opening a new page by default:
<a href="#" onclick="console.log('The link was clicked.'); return false">
  Click me
</a>
In React, you would write this as follows:
function ActionLink() {
  const handleClick = (e) => {
    e.preventDefault();
    console.log('The link was clicked.');
  }

  return (
    <button onClick={handleClick}>
      Click me
    </button>
  );
}
Let’s look at a more complex example using the onClick handler. Suppose you have a form with multiple input fields, and you want to ensure that the user provides valid data before submitting the form:
import React, { useState } from "react";

const FormWithValidation = () => {
  const [formData, setFormData] = useState({
    firstName: "",
    lastName: "",
    email: "",
  });

  const [formErrors, setFormErrors] = useState({
    firstName: "",
    lastName: "",
    email: "",
  });

  const handleInputChange = (event) => {
    const { name, value } = event.target;

    // Update form data
    setFormData({
      ...formData,
      [name]: value,
    });

    // Perform validation
    if (name === "firstName" && value === "") {
      setFormErrors({
        ...formErrors,
        firstName: "First name is required.",
      });
    } else if (name === "lastName" && value === "") {
      setFormErrors({
        ...formErrors,
        lastName: "Last name is required.",
      });
    } else if (name === "email" && !/^\S+@\S+\.\S+$/.test(value)) {
      setFormErrors({
        ...formErrors,
        email: "Invalid email address.",
      });
    } else {
      // Clear validation errors if input is valid
      setFormErrors({
        ...formErrors,
        [name]: "",
      });
    }
  };

  const handleSubmit = (event) => {
    event.preventDefault();

    // Perform validation before submitting the form
    const validationErrors = Object.keys(formData).reduce((errors, name) => {
      if (formData[name] === "") {
        errors[name] = `${
          name.charAt(0).toUpperCase() + name.slice(1)
        } is required.`;
      } else if (name === "email" && !/^\S+@\S+\.\S+$/.test(formData[name])) {
        errors[name] = "Invalid email address.";
      }
      return errors;
    }, {});

    // Update form errors
    setFormErrors(validationErrors);

    // Check if there are any validation errors
    if (Object.values(validationErrors).every((error) => error === "")) {
      // Perform custom business logic or submit the form
      console.log("Form submitted successfully!");
      console.log("Form Data:", formData);
    } else {
      console.log("Form validation failed. Please check the errors.");
    }
  };

  return (
    <form>
      <label>
        First Name:
        <input
          type="text"
          name="firstName"
          value={formData.firstName}
          onChange={handleInputChange}
        />
        <span className="error">{formErrors.firstName}</span>
      </label>

      <label>
        Last Name:
        <input
          type="text"
          name="lastName"
          value={formData.lastName}
          onChange={handleInputChange}
        />
        <span className="error">{formErrors.lastName}</span>
      </label>

      <label>
        Email:
        <input
          type="email"
          name="email"
          value={formData.email}
          onChange={handleInputChange}
        />
        <span className="error">{formErrors.email}</span>
      </label>

      <button type="submit" onClick={handleSubmit}>Submit</button>
    </form>
  );
};

export default FormWithValidation;
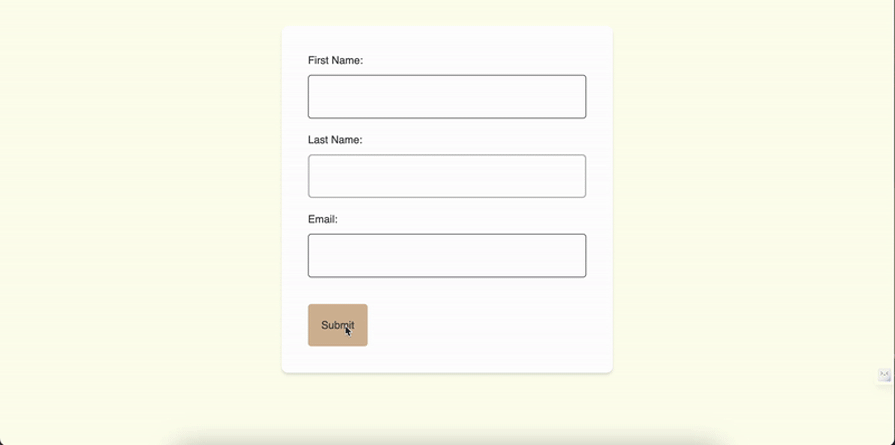
The outcome of the code above will work like so:
In this example, we introduce the formErrors state to keep track of validation errors for each input field.
Meanwhile, the handleInputChange function is responsible for updating the form data, performing validation, and updating the error state accordingly. Also, the handleSubmit function checks if there are any validation errors before submitting the form or performing custom business logic.
This enhanced form demonstrates how to incorporate validation logic into your React components using onClick, ensuring user inputs meet specified criteria before submission.
React implements a synthetic events system that brings consistency and high performance to React apps and interfaces. It achieves consistency by normalizing events so that they have the same properties across different browsers and platforms.
A synthetic event is a cross-browser wrapper around the browser’s native event. It has the same interface as the browser’s native event, including stopPropagation() and preventDefault(), except the events work identically across all browsers.
Meanwhile, synthetic events achieve high performance by automatically using event delegation. In actuality, React doesn’t attach event handlers to the nodes themselves. Instead, a single event listener is attached to the root of the document. When an event is fired, React maps it to the appropriate component element.
To listen to events in React, add the onClick attribute — which is the event handler — to the target element. This specifies the function to be executed when that element is clicked, as shown below:
import React from "react";

const ShowAlertComponent = () => {
  const showAlert = () => {
    alert("I'm an alert");
  }

  return <button onClick={showAlert}>Show alert</button>;
}
export default ShowAlertComponent;
In the example above, the onClick attribute is set to the showAlert function as the event target, which displays the alert message I'm an alert when the button is clicked.
There are several ways to handle events in functional React components. We’ll go over five of them here.
onClick event handlerInline functions allow you to write code for event handling directly in JSX. See the example below:
import React from "react";

const App = () => {
  return (
    <button onClick={() => alert("Hello!")}>Say Hello</button>
  );
};

export default App;
This is commonly used to avoid the extra function declaration outside the JSX. However, it can be less readable and harder to maintain if the content of the inline function is too much.
onClick event handlerLet’s say your React application requires you to update the local state in an onClick event handler. Here’s how to do that:
import React, { useState } from "react";

const App = () => {
  const [count, setCount] = useState(0);
  return (
    <div>
      <p>{count}</p>
      <button onClick={() => setCount(count + 1)}>Increment</button>
      <button onClick={() => setCount(count - 1)}>Decrement</button>
    </div>
  );
};

export default App;
In the example above, the value of useState is modified by the Increment and Decrement buttons, which have the setCount updater function inside the onClick event handler.
onClick event handlerThe onClick event handler also allows you to call multiple functions:
import React, { useState } from "react";

const App = () => {
  const [count, setCount] = useState(0);
  const sayHello = () => {
    alert("Hello!");
  };

  return (
    <div>
      <p>{count}</p>
      <button
        onClick={() => {
          sayHello();
          setCount(count + 1);
        }}
      >
        Say Hello and Increment
      </button>
    </div>
  );
};

export default App;
In the code block above, clicking the button increments the local state and alerts a message. Both actions are executed by separate functions in the onClick event handler.
onClick event handlerAnother common use case for event handlers is passing a parameter to a function so it can be used later. For example:
import React from "react";

const App = () => {
  const sayHello = (name) => {
    alert(`Hello, ${name}!`);
  };

  return (
    <button
      onClick={() => {
        sayHello("Yomi");
      }}
    >
      Say Hello
    </button>
  );
};

export default App;
Here, the sayHello function accepts a name as a parameter, which is then used to customize the alert message. In this case, the function accepts the name Yomi so that when clicked, the button displays Hello, Yomi! as its message.
onClick event handlerYou can also use synthetic events directly inside an onClick event handler. In the example below, the button’s value is retrieved via e.target.value and then used to alert a message:
import React from "react";

const App = () => {
  return (
    <button value="Hello!" onClick={(e) => alert(e.target.value)}>
      Say Hello
    </button>
  );
};

export default App;
Event delegation is a powerful technique in React that allows you to manage events efficiently, particularly in applications with a large number of dynamic elements. Instead of attaching event listeners to each element, you can delegate the handling of events to a common ancestor.
This approach not only optimizes performance but also simplifies event management, especially in scenarios where elements are added or removed dynamically.
Consider the following example where a list of items is rendered dynamically, and you want to handle a click event on any list item:
import React from "react";

const ItemList = () => {
  const handleClick = (event) => {
    const itemId = event.target.dataset.itemId;
    console.log(`Clicked item with ID: ${itemId}`);
  };

  const items = [
    { id: 1, text: "Item 1" },
    { id: 2, text: "Item 2" },
    { id: 3, text: "Item 3" },
  ];

  return (
    <ul onClick={handleClick}>
      {items.map((item) => (
        <li key={item.id}>{item.text}</li>
      ))}
    </ul>
  );
};

export default ItemList;
In this example, a single-click event listener is attached to the <ul> element, the common ancestor of all list items.
Event delegation is especially beneficial when dealing with dynamically generated content or when you want to avoid attaching multiple listeners to individual elements, contributing to a more efficient and scalable React application.
When it comes to events in React, only DOM elements are allowed to have event handlers. Take the example of a component called CustomButton with an onClick event. This button wouldn’t respond to clicks because of the reason above.
So how do we handle event handling for custom components in React? By rendering a DOM element inside the CustomButton component and passing the onClick prop into it.
Our CustomButton is essentially a pass-through for the click event:
import React from "react";

const CustomButton = ({ onPress }) => {
  return (
    <button type="button" onClick={onPress}>
      Click on me
    </button>
  );
};

const App = () => {
  const handleEvent = () => {
    alert("I was clicked");
  };
  return <CustomButton onPress={handleEvent} />;
};

export default App;
In the example above, the CustomButton component is passed a prop of onPress, which then gets passed into the onClick of the button.
In the event (no pun intended) that you need to check the event listener bound to a component or attached to an element — particularly with event delegation, where events are attached indirectly — there are several techniques to consider.
The most common and straightforward approach is to use the browser’s DevTools methods. However, due to React’s use of synthetic events, these methods might produce slightly different results. This leaves us with the option of using an event inspection approach that combines inline event handlers, such as onClick and onMouseEnter, with programmatic logging of the event details.
Suppose we want to inspect the events of a button element within a component. We can use any of the event handlers mentioned above or, better still, the onContextMenu event to trigger a method such as the following:
  const handleEventLog = (event) => {
    const eventInfo = {
      type: event.type,
      // React synthetic event properties
      nativeEvent: {
        type: event.nativeEvent.type,
        target: event.nativeEvent.target?.tagName,
        currentTarget: event.nativeEvent.currentTarget?.tagName
      },
      // React event properties
      target: event.target.tagName,
      currentTarget: event.currentTarget.tagName
    };

    console.log('Event Details:', eventInfo);
  };


  // Button element
  <button onContextMenu={handleDetailedEvent} >
    Inspect Events
  </button>
The handleEventLog function will extract properties from both React synthetic events and native browser events and create an eventInfo object containing nested details such as the event type, the target element’s tag, and the current target element’s tag.
The button’s event details log will look similar to this:
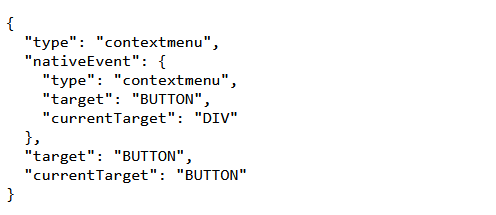
Because this captures any event attached to the element, the results will be consistent for other events:
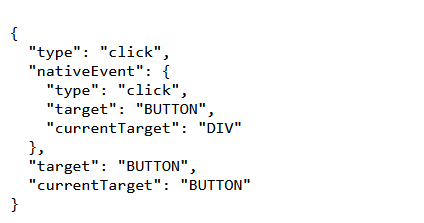
This approach is particularly useful when events are delegated to a common ancestor that isn’t directly visible, or in the case of event bubbling.
The event inspection function is so versatile that we can also use it to check additional information about the element being inspected.
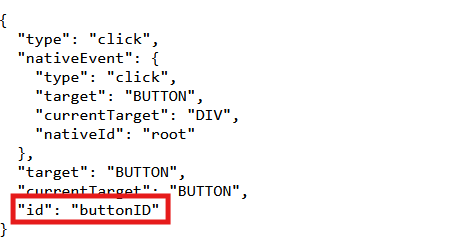
For example, say you want to get the ID of a clicked element with an onClick handler or another event. You’d simply add an id property to the eventInfo object, and set its value to event.target.id like so:
const eventInfo = {
      ...
      // React synthetic event properties
      nativeEvent: {
        ...
      },
      // React event properties
      ...
      id: event.target.id,
    };
This will log the button’s id alongside other relevant event information:
TypeScript’s static typing brings an extra layer of confidence to React development by catching potential issues during compile time. With event handlers, we can define precise types, ensuring a more robust codebase.
Let’s change our ItemList component into a TypeScript component:
import React, { MouseEvent } from "react";

interface ListItem {
  id: number;
  text: string;
}

const ItemList = () => {
  const handleClick = (event: MouseEvent<HTMLUListElement>) => {
    const target = event.target as HTMLLIElement;
    const itemId = target.dataset.itemId;
    console.log(`Clicked item with ID: ${itemId}`);
  };

  const items: ListItem[] = [
    { id: 1, text: "Item 1" },
    { id: 2, text: "Item 2" },
    { id: 3, text: "Item 3" },
  ];

  return (
    <ul onClick={handleClick}>
      {items.map((item) => (
        <li key={item.id}>{item.text}</li>
      ))}
    </ul>
  );
};

export default ItemList;
In this example, TypeScript’s MouseEvent<HTMLUListElement> type annotation ensures that the event parameter in handleClick is of the correct type. This type safety extends to accessing properties like dataset.itemId on the target element.
By employing TypeScript for type checking, you can catch potential issues related to event handling at compile time, leading to a more maintainable and robust React application.
This approach enhances code readability and reduces the likelihood of runtime errors, contributing to a smoother development experience.
onClick event handler type with TypeScriptIn React, event handling is important for building interactive user interfaces. When it comes to handling events, TypeScript improves the development experience by introducing static typing, allowing developers to catch potential issues during compile time.
However, React uses its own event system, which means you can’t directly use standard DOM events. Instead, TypeScript provides a set of predefined event types tailored specifically for React.
These types mirror their DOM counterparts but are designed to seamlessly integrate with React components. For onClick events in React, the event handler type is MouseEvent.
onClick in ReactA mouse event is a type of user interaction that occurs when a user interacts with a webpage using a mouse. In web development, mouse events include actions such as clicking, hovering, moving, and releasing mouse buttons.
MouseEvent is a generic mouse event type, while MouseEvent<HTMLButtonElement> is a mouse event specific to a <button> element.
Here’s an example:
import React, { MouseEvent } from "react";

const handleClick = (event: MouseEvent<HTMLButtonElement>) => {
  // Handle the click event for the button
  console.log(event.clientX, event.clientY);
};

const MyButton = () => {
  return (
    <button onClick={handleClick}>
      Click me
    </button>
  );
};
There are additional predefined event types in TypeScript for various React events, such as ChangeEvent, KeyboardEvent, and more. However, the MouseEvent type is the event type that is primarily utilized with the onClick event.
By leveraging TypeScript’s static typing, developers can precisely define the expected event structure and properties for the onClick handler, ensuring a more robust and error-resistant codebase.
onClick in ReactWhile the onClick event in React is a fundamental aspect of handling user interactions, developers often encounter common issues that can lead to errors and unexpected behavior. Let’s explore some of these issues and provide potential solutions:
When you have nested elements with their own onClick handlers, the events may bubble up, triggering multiple handlers unintentionally.
As a solution, you can use the stopPropagation method to prevent the event from propagating to parent elements:
const handleClick = (event) => {
  event.stopPropagation();
  // Your click handling logic
};
this binding issuesIf this is not properly bound in class components or when using functions, it can lead to undefined method errors. You can ensure proper binding using arrow functions or explicitly binding this in class components:
// Using arrow function in class component
class MyComponent extends React.Component {
  handleClick = () => {
    // Your click handling logic
  };
}

// Explicitly binding `this` in class component
class MyComponent extends React.Component {
  constructor() {
    super();
    this.handleClick = this.handleClick.bind(this);
  }

  handleClick() {
    // Your click handling logic
  }
}
Updating state asynchronously within an onClick handler may lead to unexpected state values. To resolve this, use the functional form of setState when the new state depends on the previous state:
const handleClick = () => {
  // Async state update
  // Incorrect way:
  // setState({ count: count + 1 });

  // Correct way:
  setState((prevState) => ({ count: prevState.count + 1 }));
};
Not cleaning up event listeners or subscriptions in components can lead to memory leaks. Use cleanup mechanisms like the useEffect cleanup function or componentWillUnmount in class components to unsubscribe or remove event listeners:
useEffect(() => {
  const handleClick = () => {
    // Your click handling logic
  };

  document.addEventListener('click', handleClick);

  return () => {
    // Cleanup: Remove the event listener
    document.removeEventListener('click', handleClick);
  };
}, []);
onClick performance issuesHaving complex or unnecessary operations within an onClick handler can impact performance. Mitigate performance issues by optimizing your click handlers, and consider debouncing or throttling when necessary:
const handleClick = () => {
// Optimize and perform necessary operations
};
// Debouncing example with lodash
import { debounce } from 'lodash';
const debouncedClickHandler = debounce(handleClick, 300);
<button onClick={debouncedClickHandler}>Click me</button>
Addressing these common issues ensures a smoother onClick handling experience in your React applications. By understanding these challenges and applying appropriate solutions, developers can enhance the reliability and performance of their user interfaces.
Event handlers determine what action should be taken when an event occurs. The onClick event is used to listen for click events on DOM elements.
In this guide, we reviewed some common use cases of the onClick event handler in functional components, such as updating the state, calling multiple functions, and using synthetic events.
We also addressed how the onClick event handler works in custom components, and some common issues developers may face, like event bubbling, this binding problems, async state updates, memory leaks, and performance concerns.
Lastly, we looked at how to specify and add event handler types with TypeScript to event handlers.
Whether you’re a beginner or an experienced developer, this guide serves as a valuable resource for navigating the intricacies of React’s onClick event handling.
Install LogRocket via npm or script tag. LogRocket.init() must be called client-side, not
server-side
$ npm i --save logrocket

// Code:

import LogRocket from 'logrocket';
LogRocket.init('app/id');
// Add to your HTML:

<script src="https://cdn.lr-ingest.com/LogRocket.min.js"></script>
<script>window.LogRocket && window.LogRocket.init('app/id');</script>

Learn how to build a full React Native auth system using Better Auth and Expo — with email/password login, Google OAuth, session persistence, and protected routes.

Compare the top AI development tools and models of June 2026. View updated rankings, feature breakdowns, and find the best fit for you.

Learn how Bloom filters reduce database lookups for username availability checks while preserving correctness at scale.

Learn how to test Nuxt apps with Vitest, @nuxt/test-utils, runtime mocks, server route mocks, and Playwright e2e tests.
Would you be interested in joining LogRocket's developer community?
Join LogRocket’s Content Advisory Board. You’ll help inform the type of content we create and get access to exclusive meetups, social accreditation, and swag.
Sign up now