While building forms in React can be straightforward, managing them can become complex. For example, without relying on a form library, a developer has to:

onChange or onSubmit event, we have to tell React to check if a certain field matches the given criteriaTo mitigate challenges like these, we can use a form library to handle most of the heavy lifting for us. In this article, we will cover a few popular form libraries in the React ecosystem:
Now that we have briefly introduced some React form libraries, let’s explore them!
Before writing code, we first have to scaffold our React project. To do so, run the following command in the terminal:
#initialize React project with Typescript:
npm create vite@latest form-libraries --template react-ts
cd form-libraries
npm install #install the needed packages to run the project.
As stated earlier, SurveyJS is a library geared towards building multi-page forms and surveys. It supports a variety of features, including:
To include SurveyJS in our project, install it via npm:
npm install survey-react-ui --save
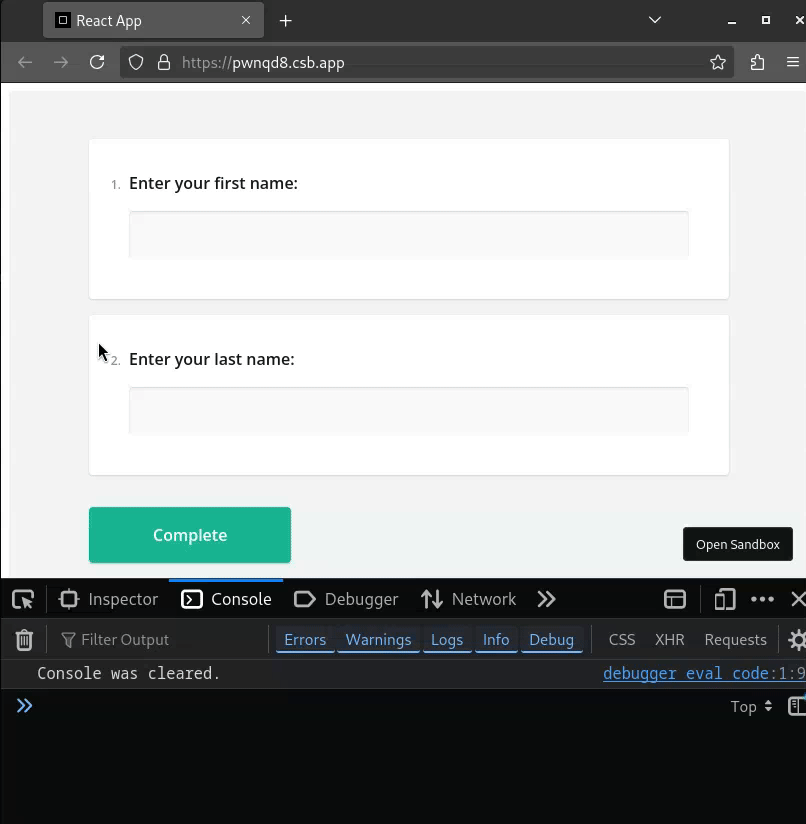
This block of code showcases the SurveyJS library in action:
import "survey-core/defaultV2.min.css";
import { Model, SurveyModel } from "survey-core";
import { Survey } from "survey-react-ui";
import { useCallback } from "react";

export function SurveyExample() {
  //create our schema for our form:
  const surveyJson = {
    elements: [
      //configure our fields
      {
        name: "FirstName",
        title: "Enter your first name:",
        type: "text",
      },
      {
        name: "LastName",
        title: "Enter your last name:",
        type: "text",
      },
    ],
  };
  //feed the schema into the model
  const survey = new Model(surveyJson);
  //handler function that runs when the user submits the form
  const surveyComplete = useCallback((survey: SurveyModel) => {
    const userOutput = survey.data;
    console.log(userOutput);
  }, []);
  //attach this handler to the form
  survey.onComplete.add(surveyComplete);
  return (
    <div>
      {/*Finally, pass our model and render the form*/}
      <Survey model={survey} />
    </div>
  );
}
//don't forget to render this component in App.tsx!
In the code snippet above:
surveyJson variable, which will be the schema for our form. The schema will pass the data needed to render our formsurveyComplete handler. This function will run whenever the user submits the form. In this case, we are just logging out the user’s input to the consoleSurvey component to render our form to the DOMLet’s test it out! To run the project, type this command:
npm run dev
React Hook Form is a dependency-free library that enables efficient form validation. It boasts the following features:
As always, the first step is to install React Hook Form in your project:
npm install react-hook-form
Here is a piece of code that demonstrates validation in React Hook Form:
import { useState } from "react";
import { useForm, SubmitHandler } from "react-hook-form";
type Inputs = {
twice: boolean;
newjeans: boolean;
name: string;
};
export default function ReactHookForm() {
const {
register,
handleSubmit,
watch,
formState: { errors },
} = useForm<Inputs>({ defaultValues: { twice: true, name: "LogRocket" } });
const [output, setOutput] = useState<Inputs>();
const onSubmit: SubmitHandler<Inputs> = (data) => setOutput(data);
return (
<div>
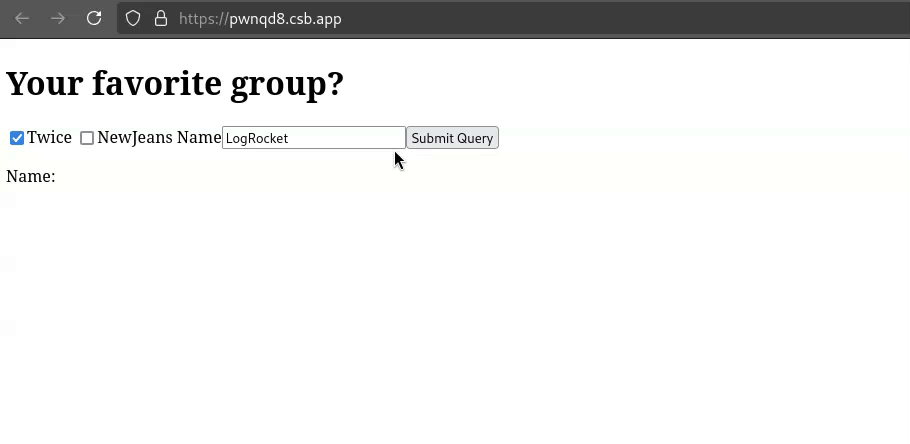
<h1>Your favorite group?</h1>
<form onSubmit={handleSubmit(onSubmit)}>
{/* register your input into the hook by invoking the "register" function */}
<label>
<input type="checkbox" {...register("twice")} />
Twice
</label>
<label>
{" "}
<input type="checkbox" {...register("newjeans")} />
NewJeans
</label>
<label>
{" "}
Name
<input type="text" {...register("name")} />
</label>
{/* include validation with required or other standard HTML validation rules */}
{/* errors will return when field validation fails */}
<input type="submit" />
</form>
<p>{output?.newjeans && "newjeans was selected"}</p>
<p> {output?.twice && "twice was selected"}</p>
<p> Name: {output?.name} </p>
</div>
);
}
Let’s break down this code piece by piece:
Inputs type, which contains the fields that we want to populateuseForm Hook and passed in our fields and default values via the defaultValues propertyonSubmit handler, which will update a Hook called output. We will render the output Hook to the DOM later in this coderegister function on our input components. This tells React that we want to connect our inputs with the useForm Hookoutput Hook depending on the user’s inputThat’s it! Let’s test React Hook Form out:
Similar to React Hook Form, rc-field-form is another React form library that focuses on performance and ease of use.
To get started, simply install the dependencies like so:
npm install rc-field-form
This snippet shows how you can implement asynchronous validation on a text field via the rc-field-form library:
import Form, { Field } from "rc-field-form";

const Input = ({ value = "", ...props }) => <input value={value} {...props} />;
export const RCFieldFormExample = () => {
  return (
    <Form
      onFinish={(values) => {
        console.log("Finish:", values);
      }}
    >
      <Field
        name="username"
        validateTrigger={["onSubmit"]}
        rules={[
          { required: true },
          {
            validator(rule, value) {
              if (value === "Log") {
                return Promise.reject(alert("Not allowed!"));
              }
              return Promise.resolve();
            },
          },
        ]}
      >
        <Input placeholder="Username" />
      </Field>
      <Field name="password">
        <Input placeholder="Password" />
      </Field>
      <button>Submit</button>
    </Form>
  );
};
Here’s a brief explanation of our program:
Form component and defined the onFinish handler. This will tell React that it should output the user’s input to the console after submissionField components: one for username and the other for passwordrules prop in the username field. Here, we instructed the library that if the username field is set to Log, it has to display an error messageHere’s the output of the code:
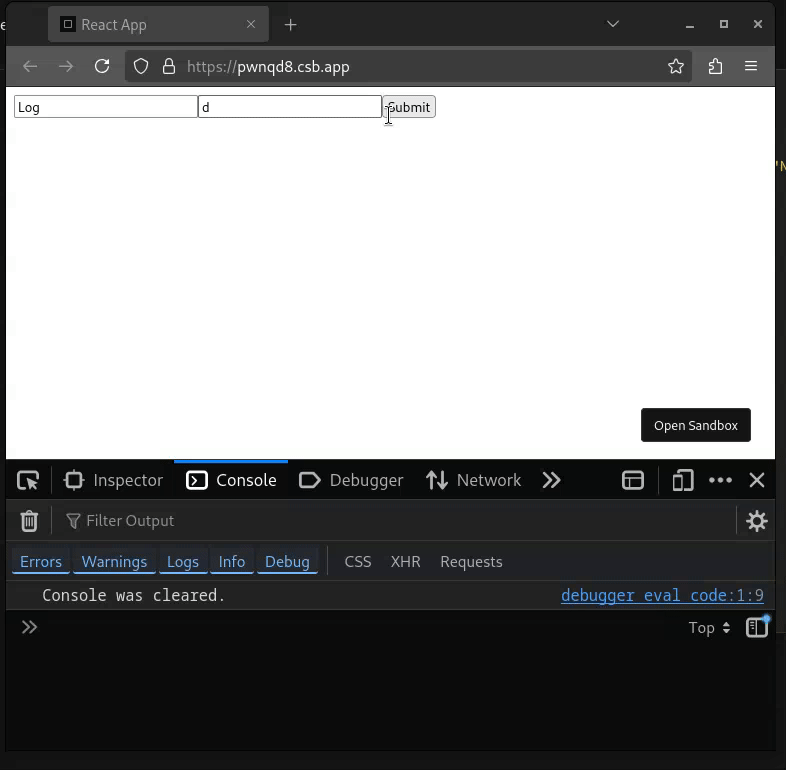
Nice! As you can see, our code works!
The Tanstack team needs no introduction. Recently, they introduced TanStack Form to their arsenal of high-quality utilities. Though still in beta, the library consists of an exhaustive list of features, including:
As always, the first step to use a library is to install it:
#react-form: to render and build forms
#zod-form-adapter and zod: For validation purposes.
npm i @tanstack/react-form @tanstack/zod-form-adapter zod
Next, let’s build a component that informs the user in case a validation error occurs:
import type { FieldApi } from "@tanstack/react-form";

function FieldInfo({ field }: { field: FieldApi<any, any, any, any> }) {
  return (
    <>
      {/*If error occurs, display it. */}
      {field.state.meta.isTouched && field.state.meta.errors.length ? (
        <em>{field.state.meta.errors.join(",")}</em>
      ) : null}
      {field.state.meta.isValidating ? "Validating..." : null}
    </>
  );
}
Here, we created a component called FieldInfo, which will check if the user has failed any validation checks. If this condition is met, it will display an error on the page.
Finally, write this block of code for form rendering and validation using Tanstack Form:
import { useForm } from "@tanstack/react-form";
import { zodValidator } from "@tanstack/zod-form-adapter";
import { z } from "zod";
//step 1: define our schema and each field's requirements
const userSchema = z.object({
//if the user's name is Log, display an error.
firstName: z.string().refine((val) => val !== "Log", {
message: "[Form] First name cannot be Log!",
}),
//the user's age should be atleast 18.
age: z.coerce.number().min(18, "Need to be an adult!"),
});
type User = z.infer<typeof userSchema>;
export default function TanstackFormExample() {
//use the useForm hook and define our default values.
const form = useForm({
defaultValues: {
firstName: "",
age: 0,
} as User,
onSubmit: async ({ value }) => {
console.log(value);
},
//configure our validation
validatorAdapter: zodValidator(),
validators: {
onSubmit: userSchema,
},
});
return (
<div>
<form
onSubmit={(e) => {
e.preventDefault();
e.stopPropagation();
form.handleSubmit();
}}
>
<div>
{/*Create our fields and inputs*/}
<form.Field
name="firstName"
children={(field) => {
return (
<>
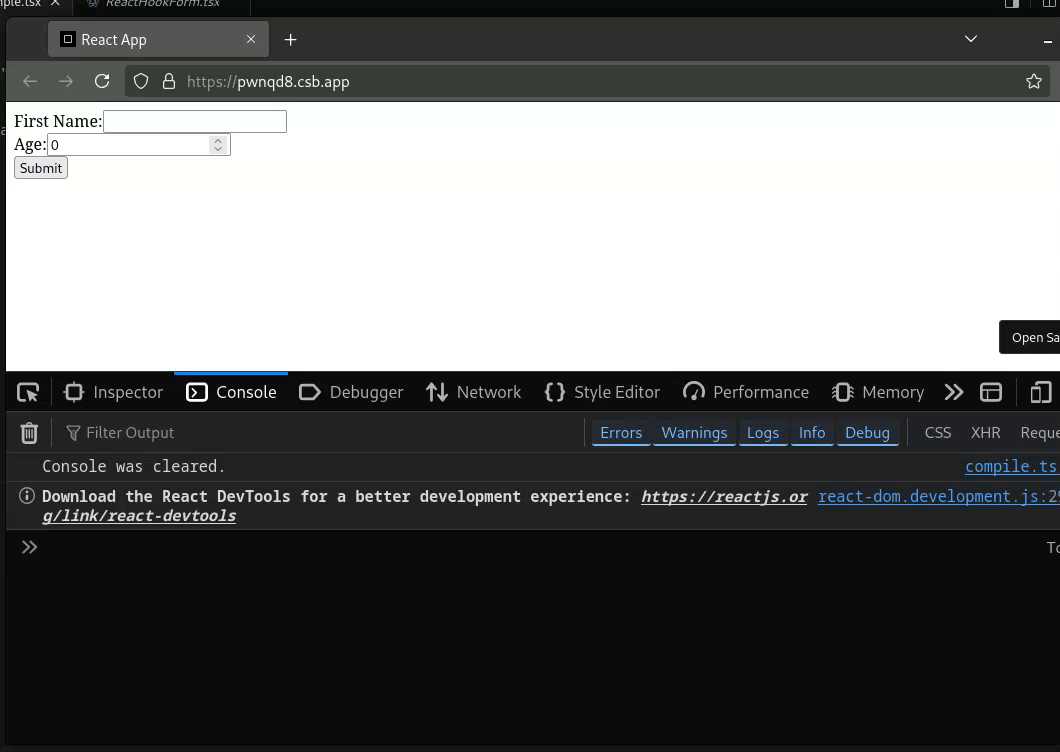
<label htmlFor={field.name}>First Name:</label>
<input
id={field.name}
name={field.name}
value={field.state.value}
onBlur={field.handleBlur}
onChange={(e) => field.handleChange(e.target.value)}
/>
<FieldInfo field={field} />
</>
);
}}
/>
</div>
<div>
{/*Second input for the user's age*/}
<form.Field
name="age"
children={(field) => (
<>
<label htmlFor={field.name}>Age:</label>
<input
id={field.name}
name={field.name}
value={field.state.value}
onBlur={field.handleBlur}
onChange={(e) => field.handleChange(e.target.valueAsNumber)}
/>
<FieldInfo field={field} />
</>
)}
/>
</div>
<div></div>
{/*This component will run when the form's state changes*/}
<form.Subscribe
selector={(state) => {
return state;
}}
children={(state) => {
return (
//check if the user can submit the form:
<button type="submit" disabled={!state.canSubmit}>
{state.isSubmitting ? "..." : "Submit"}
</button>
);
}}
/>
</form>
</div>
);
}
This code might seem daunting at first, but most of it is boilerplate needed for the library to run. The explanation is in the code comments.
When run, the TanStack Form output should look like so:
Here is a table that compares the libraries we covered in this guide:
| Library | Documentation | Community | Updates | Performance-focused | Notes |
|---|---|---|---|---|---|
| SurveyJS | Easy to follow and concise | Large and growing | Updates frequently | No | Paid tier for large projects, part of a form library ecosystem |
| React Hook Form | Easy to follow and concise | Extremely large and rapidly growing | Updates frequently | Yes | |
| rc-field-form | A bit hard to follow. Not as easy as other libraries | Small but growing | Updates frequently | Yes | Built by the Ant Design team, well-funded and unlikely to be abandoned. |
| Tanstack Form | Easy to follow | Large and growing | Updates extremely frequently | Yes | Currently in beta, API breakages possible |
In this article, we learned about a few form-building libraries in React. Additionally, we also covered how we can perform rendering and validation on our forms in these libraries. In my hobby projects, I use React Hook Form because it offers a reliable and performant solution with a user-friendly developer experience. Here is the source code of the article.
Of course, depending on a project’s needs, users can also opt for libraries like Formik or Ant Design for form management.
Thank you for reading!
Install LogRocket via npm or script tag. LogRocket.init() must be called client-side, not
server-side
$ npm i --save logrocket

// Code:

import LogRocket from 'logrocket';
LogRocket.init('app/id');
// Add to your HTML:

<script src="https://cdn.lr-ingest.com/LogRocket.min.js"></script>
<script>window.LogRocket && window.LogRocket.init('app/id');</script>

I migrated 20 production-style components from Tailwind to StyleX. Here’s what the data showed about LOC, CSS bundle size, build time, and type safety.

A guide for using JWT authentication to prevent basic security issues while understanding the shortcomings of JWTs.

Discover how to build, render, and automate product demo videos with Remotion, replacing traditional screen recordings with reusable React code.

Chrome’s Modern Web Guidance embeds modern web platform skills into AI coding agents, helping them choose native HTML, CSS, and browser APIs over legacy patterns.
Hey there, want to help make our blog better?
Join LogRocket’s Content Advisory Board. You’ll help inform the type of content we create and get access to exclusive meetups, social accreditation, and swag.
Sign up now
