Higher-order components (HOCs) powerful patterns in React that allow developers to enhance components by wrapping them with additional functionality. They provide a reusable way to manage cross-cutting concerns, such as authentication, logging, or global state management, without modifying the original component directly.

While Hooks have largely replaced HOCs for logic reuse, HOCs still offer unique advantages in certain scenarios, particularly when working with legacy codebases or performing complex component transformations.
Update history:
When structuring a React application, developers often need to reuse logic across multiple components. Hooks have become the go-to solution for state management and logic encapsulation since their introduction in React 16.8. However, HOCs remain useful in specific scenarios, particularly for complex component transformations and cross-cutting concerns.
A higher-order component is a function that takes a component as an argument and returns a new, enhanced component.
Both HOCs and Hooks encapsulate stateful logic, but they do so differently and are suited for different use cases.
To illustrate the difference, let’s compare two implementations of a simple counter feature—one using a HOC and another using a custom Hook.
// HOC that adds counter functionality to a component
const withCounter = (WrappedComponent) => {
  return function CounterWrapper(props) {
    const [count, setCount] = useState(0);
    return (
      <WrappedComponent
        count={count}
        increment={() => setCount(prev => prev + 1)}
        {...props}
      />
    );
  };
};
// Custom Hook that provides counter functionality
const useCounter = () => {
  const [count, setCount] = useState(0);
  return {
    count,
    increment: () => setCount(prev => prev + 1)
  };
};

// Usage

const Counter = () => {
  const {count, increment} = useCounter();
  return (
      <>
        <button>Increment</button>
        <p>Clicked:{count}</p>
      </>
)
}
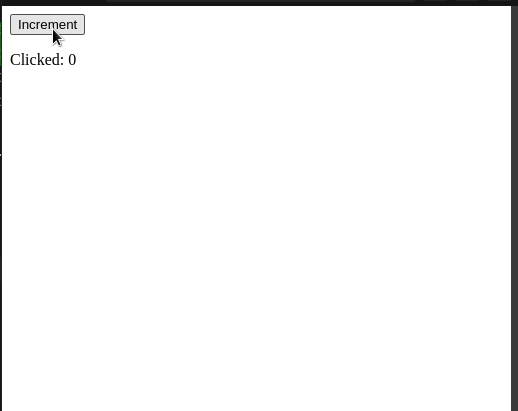
Notice that while both approaches achieve similar functionality, the HOC pattern wraps an existing component to enhance it, whereas a custom Hook extracts reusable logic without altering the component hierarchy.
Overall, while both approaches manage state similarly, the HOC is ideal for wrapping and enhancing an existing component without directly modifying it, whereas a custom Hook offers a cleaner solution for sharing stateful logic across multiple components without adding an extra layer.
According to React’s documentation, a typical React HOC has the following definition:
“A higher-order component is a function that takes in a component and returns a new component.”
Using code, we can rewrite the above statement like so:
const newComponent = higherFunction(WrappedComponent);
In this line:
newComponent — The enhanced componenthigherFunction — A function that enhances WrappedComponentWrappedComponent — The base component whose functionality we want to extendFirst, create a function that takes the base component as an argument and returns a new component with added functionality. In a functional HOC, you can use Hooks for state and side effects:
import React, { useState, useEffect } from 'react';

const withEnhancement = (BaseComponent) => {
  return function EnhancedComponent(props) {
    // HOC-specific logic using hooks
    return <BaseComponent {...props} />;
  };
};
Inside the EnhancedComponent function, you can use Hooks to manage state and perform side effects. Hooks like useState, useEffect, and useRef can be used to implement additional behavior:
const withEnhancement = (BaseComponent) => {
  return function EnhancedComponent(props) {
    const [count, setCount] = useState(0);

    useEffect(() => {
      // Perform side effects here
    }, [count]);

    return <BaseComponent count={count} setCount={setCount} {...props} />;
  };
};
To use your functional HOC, wrap a component by passing it as an argument to your HOC function. The result will be a new component with the enhanced functionality:
const EnhancedComponent = withEnhancement(BaseComponent);
You can use EnhancedComponent in your application just like any other React component, with the added functionality from the HOC:
function App() {
  return <EnhancedComponent />;
}
In the next segment of the article, we will see React’s HOC concept in action.
Let’s dive into a practical use case for HOCs.
We first need to create a blank React project. To do so, execute the following commands:
npx create-react-app hoc-tutorial
cd hoc-tutorial #navigate to the project folder.
cd src #go to codebase
mkdir components #will hold all our custom components
For this article, we will build two custom components to demonstrate HOC usage:
ClickIncrease.js — This component will render a button and a piece of text. When the user clicks the button (an onClick event), the fontSize property of the text will increaseHoverIncrease.js — Similar to ClickIncrease, but it will listen for onMouseOver events insteadIn your project, navigate to the components folder and create these two files. Once done, your file structure should look like this:
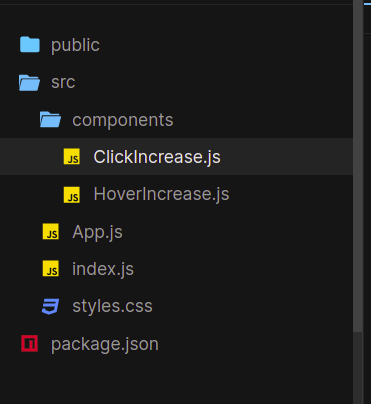
Now that we have laid out the groundwork for the project, let’s build our custom components.
In ClickIncrease.js, write the following code:
// File: components/ClickIncrease.js
import React, { useState } from 'react';
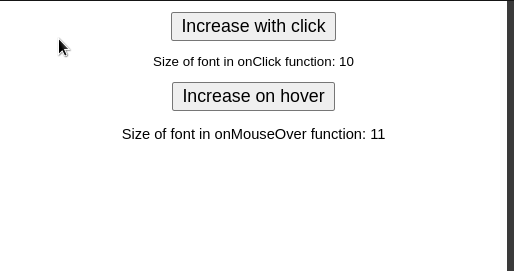
function ClickIncrease() {
const [fontSize, setFontSize] = useState(10); // Set initial value to 10.
return (
<button onClick={() => setFontSize(size => size + 1)}>
Increase with click
</button>
<p style={{ fontSize: `${fontSize}px` }}>
Size of font: {fontSize}px
</p>
);
}
export default ClickIncrease;
Next, in HoverIncrease.js, use the following code:
// File: components/HoverIncrease.js
import React, { useState } from 'react';

function HoverIncrease() {
  const [fontSize, setFontSize] = useState(10);

  return (
    <div onMouseOver={() => setFontSize(size => size + 1)}>
      <p style={{ fontSize: `${fontSize}px` }}>
        Size of font: {fontSize}px
      </p>
    </div>
  );
}

export default HoverIncrease;
Finally, render these components in the main App.js file:
// File: App.js
import React from 'react';
import ClickIncrease from './components/ClickIncrease';
import HoverIncrease from './components/HoverIncrease';

function App() {
  return (
    <div>
      <ClickIncrease />
      <HoverIncrease />
    </div>
  );
}

export default App;
Let’s test it out! This is the expected result:
Within the components folder, create a file called withCounter.js. Here, start by writing the following code:
import React from "react";
const UpdatedComponent = (OriginalComponent) => {
function NewComponent(props) {
//render OriginalComponent and pass on its props.
return ;
}
return NewComponent;
};
export default UpdatedComponent;
Let’s deconstruct this code piece by piece. In the start, we created a function called UpdatedComponent that takes in an argument called OriginalComponent. In this case, the OriginalComponent will be the React element, which will be wrapped.
Then, we told React to render OriginalComponent to the UI. We will implement enhancement functionality later in this article.
When that’s done, it’s time to use the UpdatedComponent function in our app. To do so, first go to the HoverIncrease.js file and write the following lines:
import withCounter from "./withCounter.js" //import the withCounter function
//..further code ..
function HoverIncrease() {
//..further code
}
//replace your 'export' statement with:
export default withCounter(HoverIncrease);
//We have now converted HoverIncrease to an HOC function.
Next, do the same process with the ClickIncrease module:
//file name: components/ClickIncrease.js
import withCounter from "./withCounter";
function ClickIncrease() {
//...further code
}
export default withCounter(ClickIncrease);
//ClickIncrease is now a wrapped component of the withCounter method.
This will be the result:

Notice that our result is unchanged. This is because we haven’t made changes to our HOC yet. In the next section, you will learn how to share props between our components.
Using higher-order components, React allows developers to share props among wrapped components.
First, add a name prop in withCounter.js as follows:
// File: components/withCounter.js
const UpdatedComponent = (OriginalComponent) => {
  function NewComponent(props) {
    return <OriginalComponent name="LogRocket" {...props} />;
  }
  return NewComponent;
};
export default UpdatedComponent;
Next, modify the child components to read this prop:
// File: components/HoverIncrease.js
function HoverIncrease(props) {
  return (
    <div>
      Value of 'name' in HoverIncrease: {props.name}
    </div>
  );
}
export default withCounter(HoverIncrease);
// File: components/ClickIncrease.js
function ClickIncrease(props) {
  return (
    <div>
      Value of 'name' in ClickIncrease: {props.name}
    </div>
  );
}
export default withCounter(ClickIncrease);
As shown above, HOCs allow developers to efficiently share props across multiple components.
Just like with props, we can share state variables using Hooks within HOCs. This enables us to encapsulate and reuse logic across multiple components.
In components/withCounter.js, define an HOC that manages a counter state and an incrementCounter function:
// File: components/withCounter.js
import React, { useState } from 'react';

const withCounter = (OriginalComponent) => {
  function NewComponent(props) {
    const [counter, setCounter] = useState(10) // Initialize counter state

    return (
      <OriginalComponent
        counter={counter}
        incrementCounter={() => setCounter(counter + 1)}
        {...props}
      />
    )
  }
  return NewComponent
};

export default withCounter;
counter state is initialized with a value of 10incrementCounter function updates the counter valuecounter and incrementCounter as props to the wrapped componentModify the HoverIncrease and ClickIncrease components to use the shared state and function:
// File: components/HoverIncrease.js
import withCounter from './withCounter'

function HoverIncrease(props) {
  return (
    <div onMouseOver={props.incrementCounter}>
      <p>Value of 'counter' in HoverIncrease: {props.counter}</p>
    </div>
  )
}

export default withCounter(HoverIncrease)
// File: components/ClickIncrease.js
import withCounter from './withCounter'

function ClickIncrease(props) {
  return (
    <button onClick={props.incrementCounter}>
      Increment counter
    </button>
    <p>Value of 'counter' in ClickIncrease: {props.counter}</p>
  )
}

export default withCounter(ClickIncrease)
Here is the expected result:

While HOCs are useful for sharing logic across multiple components, they do not share state between different instances of wrapped components. If a shared state is required across multiple components, consider using React’s Context API, which provides an efficient way to manage global state.
Even though our code works, consider the following situation: what if we want to increment the value of counter with a custom value? Via HOCs, we can even tell React to pass specific data to certain child components. This is made possible with parameters.
Modify components/withCounter.js to accept an increaseCount parameter:
//This function will now accept an 'increaseCount' parameter.
const UpdatedComponent = (OriginalComponent, increaseCount) => {
function NewComponent(props) {
return (
//this time, increment the 'size' variable by 'increaseCount'
incrementCounter={() => setCounter((size) => size + increaseCount)}
/>
);
//further code..
In this piece of code, we informed React that our function will now take in an additional parameter called increaseCount.
Modify the HoverIncrease and ClickIncrease components to use this parameter:
//In HoverIncrease, change the 'export' statement:
export default withCounter(HoverIncrease, 10); //value of increaseCount is 10.
//this will increment the 'counter' Hook by 10.
//In ClickIncrease:
export default withCounter(ClickIncrease, 3); //value of increaseCount is 3.
//will increment the 'counter' state by 3 steps.
By passing a custom value (increaseCount) to the HOC, we can dynamically control the increment behavior in each wrapped component.
Here is the expected result:

In the end, the withCounter.js file should look like this:
import React from "react";
import { useState } from "react";
const UpdatedComponent = (OriginalComponent, increaseCount) => {
function NewComponent(props) {
const [counter, setCounter] = useState(10);
return (
name="LogRocket"
counter={counter}
incrementCounter={() => setCounter((size) => size + increaseCount)}
/>
);
}
return NewComponent;
};
export default UpdatedComponent;
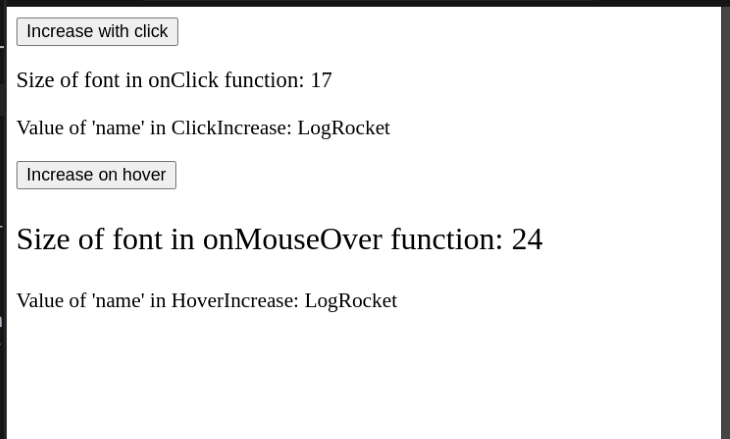
HoverIncrease.js should look like this:
import { useState } from "react";
import withCounter from "./withCounter";
function HoverIncrease(props) {
const [fontSize, setFontSize] = useState(10);
const { counter, incrementCounter } = props;
return (
setFontSize((size) => size + 1)}>
Increase on hover
Size of font in onMouseOver function: {fontSize}
Value of 'name' in HoverIncrease: {props.name}
incrementCounter()}>Increment counter
Value of 'counter' in HoverIncrease: {counter}
);
}
export default withCounter(HoverIncrease, 10);
And finally, your ClickIncrease component should have the following code:
import { useEffect, useState } from "react";
import withCounter from "./withCounter";
function ClickIncrease(props) {
const { counter, incrementCounter } = props;
const [fontSize, setFontSize] = useState(10);
return (
setFontSize((size) => size + 1)}>
Increase with click
Size of font in onClick function: {fontSize}
Value of 'name' in ClickIncrease: {props.name}
incrementCounter()}>Increment counter
Value of 'counter' in ClickIncrease: {counter}
);
}
export default withCounter(ClickIncrease, 3);
Choosing between higher-order components (HOCs) and Hooks depends on two key factors: component transformation and code organization.

HOCs and Hooks can complement each other to create robust solutions. Below is a real-world authentication example:
// Authentication HOC
const withAuth = (WrappedComponent, requiredRole) => {
  return function AuthWrapper(props) {
    const { isAuthenticated, userRole } = useAuth(); // Custom hook for auth state
    const navigate = useNavigate();

    useEffect(() => {
      if (!isAuthenticated) {
        navigate('/login');
      } else if (requiredRole && userRole !== requiredRole) {
        navigate('/unauthorized');
      }
    }, [isAuthenticated, userRole, navigate]);

    if (!isAuthenticated) {
      return null; // Optionally return a loader while determining authentication
    }

    return <WrappedComponent {...props} />;
  };
};

// Usage with a protected component
const AdminDashboard = ({ data }) => {
  return <div>Admin Dashboard Content</div>;
};

export default withAuth(AdminDashboard, 'admin');
Here’s another example demonstrating performance optimization using Hooks within an HOC:
// Performance optimization HOC using hooks
const withDataFetching = (WrappedComponent, fetchConfig) => {
  return function DataFetchingWrapper(props) {
    const [data, setData] = useState(null);
    const [error, setError] = useState(null);
    const [loading, setLoading] = useState(true);

    const { cache } = useCacheContext();
    const { notify } = useNotification();

    useEffect(() => {
      const fetchData = async () => {
        try {
          const cachedData = cache.get(fetchConfig.key);
          if (cachedData) {
            setData(cachedData);
            setLoading(false);
            return;
          }

          const response = await fetch(fetchConfig.url);
          const result = await response.json();

          cache.set(fetchConfig.key, result);
          setData(result);
        } catch (err) {
          setError(err);
          notify({
            type: 'error',
            message: 'Failed to fetch data',
          });
        } finally {
          setLoading(false);
        }
      };

      fetchData();
    }, [fetchConfig.url, fetchConfig.key]);

    return <WrappedComponent {...props} data={data} loading={loading} error={error} />;
  };
};
For a broader perspective on advanced React logic reuse, see “The modern guide to React state patterns.”
If your HOC involves expensive computations, consider performance optimization techniques like memoization to prevent unnecessary re-renders. Below is an example using useMemo and React.memo:
// Assume expensiveDataProcessing is an expensive function that processes props.data

const expensiveDataProcessing = (data) => {
    // ...expensive computations...
    return data; // Replace with the actual processed result
};

const withOptimizedData = (WrappedComponent) => {
    function OptimizedDataWrapper(props) {
      const memoizedProps = useMemo(() => ({
          ...props,
          processedData: expensiveDataProcessing(props.data),
      }), [props.data]);
      return <WrappedComponent {...memoizedProps} />;
  }
  return React.memo(OptimizedDataWrapper);
};
export default withOptimizedData;
When enhancing a base component with several cross-cutting concerns (such as authentication, data fetching, error handling, and analytics), you can compose multiple HOCs into one.
To compose multiple HOCs directly:
const composedComponent = withAuth(withData(withLogging(BaseComponent)));
Alternatively, use a compose utility to combine multiple functions from right to left:
// Utility
const compose = (...functions) => x =>
  functions.reduceRight((acc, fn) => fn(acc), x);

// Usage
const composedComponent = compose(withAuth, withData, withLogging)(BaseComponent);

// These will behave differently:
const enhance1 = compose(withAuth, withDataFetching);
const enhance2 = compose(withDataFetching, withAuth);
// Props flow through each HOC in the chain
const withProps = compose(
  withAuth,        // Adds isAuthenticated
  withDataFetching // Adds data, loading
);
// Final component receives: { isAuthenticated, data, loading, ...originalProps }
Avoid excessive composition:
const tooManyHOCs = compose(
  withAuth,
  withData,
  withLogging,
  withTheme,
  withTranslation,
  withRouter,
  withRedux
);
// Each layer adds complexity and potential performance impact
A better approach is to combine related concerns:
const withDataFeatures = compose(
  withData,
  withLoading,
  withError
);

const withAppFeatures = compose(
  withAuth,
  withAnalytics
);
const withDebug = (WrappedComponent) => {
  return function DebugWrapper(props) {
    console.log('Component:', WrappedComponent.name);
    console.log('Props:', props);
    return <WrappedComponent {...props} />;
  };
};

const enhance = compose(
  withDebug, // Add at different positions to debug specific layers
  withAuth,
  withDebug,
  withDataFetching
);
const withDataProtection = compose(
  withAuth,
  withErrorBoundary,
  withLoading
);

const withAnalytics = compose(
  withTracking,
  withMetrics,
  withLogging
);

// Use them together or separately
const EnhancedComponent = compose(
  withDataProtection,
  withAnalytics
)(BaseComponent);
Ensuring type safety for HOCs improves maintainability. Below is an example of a type-safe HOC in TypeScript:
import React, { useState, useEffect } from 'react';

interface WithDataProps<T> {
  data: T | null;
  loading: boolean;
  error: Error | null;
}

interface FetchConfig {
  url: string;
}

function withData<T, P extends object>(
  WrappedComponent: React.ComponentType<P & WithDataProps<T>>,
  fetchConfig: FetchConfig
): React.FC<P> {
  return function WithDataComponent(props: P) {
    const [data, setData] = useState<T | null>(null);
    const [loading, setLoading] = useState<boolean>(true);
    const [error, setError] = useState<Error | null>(null);

    useEffect(() => {
      fetch(fetchConfig.url)
        .then((response) => response.json())
        .then((result: T) => {
          setData(result);
          setLoading(false);
        })
        .catch((err: Error) => {
          setError(err);
          setLoading(false);
        });
    }, [fetchConfig.url]);

    return (
      <WrappedComponent {...props} data={data} loading={loading} error={error} />
    );
  };
}

export default withData;
One important thing to note is that the process of passing down props to an HOC’s child component is different than that of a non-HOC component.
For example, look at the following code:
function App() {
return (
{/*Pass in a 'secretWord' prop*/}

);
}
function HoverIncrease(props) {
//read prop value:
console.log("Value of secretWord: " + props.secretWord);
//further code..
}
In theory, we should get the message Value of secretWord: pineapple in the console. However, that’s not the case here:
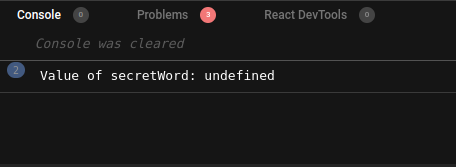
In this case, the secretWord prop is actually being passed to the withCounter function and not to the HoverIncrease component.
To solve this issue, we have to make a simple change to withCounter.js:
const UpdatedComponent = (OriginalComponent, increaseCount) => {
function NewComponent(props) {
return (
//Pass down all incoming props to the HOC's children:
{...props}
/>
);
}
return NewComponent;
};
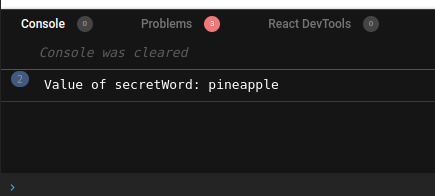
This minor fix solves our problem:
This article covered the fundamentals of React’s higher-order components, including best practices, performance optimizations, debugging strategies, and type safety. Experimenting with the provided code samples will help solidify your understanding. Happy coding!
Install LogRocket via npm or script tag. LogRocket.init() must be called client-side, not
server-side
$ npm i --save logrocket

// Code:

import LogRocket from 'logrocket';
LogRocket.init('app/id');
// Add to your HTML:

<script src="https://cdn.lr-ingest.com/LogRocket.min.js"></script>
<script>window.LogRocket && window.LogRocket.init('app/id');</script>

We built the same app in TanStack Start RSC and Next.js RSC. TanStack shipped 40% less JS and built 4x faster — but Next.js is still the safer production bet.

From RSC vulnerabilities and the Vercel breach to TypeScript 7.0 Beta and AI agents — the nine frontend storylines that defined H1 2026, ranked.

AI tools generate working React code fast, but miss race conditions, empty states, debouncing, and accessibility. Here’s how to catch bugs before production.

Learn how to use Gemini CLI subagents to delegate frontend, backend, testing, and docs tasks to specialized agents with guardrails and clear ownership.
Hey there, want to help make our blog better?
Join LogRocket’s Content Advisory Board. You’ll help inform the type of content we create and get access to exclusive meetups, social accreditation, and swag.
Sign up now

