When working with customers, businesses use reports to deliver information. The workflow to deliver these reports can potentially be difficult. There are several tools and software packages that can be used to achieve reporting, but using them for a streamlined workflow can be difficult.
In this post, I’ll discuss a method that I used in my professional role as tech lead of a software team. I’ll walk through a high-level process for delivering PDFs with React and .NET, and then show an example implementation.
Then, we’ll discuss the solution my team developed using React and .NET, and close with alternatives and offerings from the various cloud providers. Feel free to follow along with my sample project on GitHub.
Before diving into implementations, it helps to understand a PDF workflow through an example.
Let’s consider a vehicle repair shop. Customers go to this company to get their vehicles serviced for things like car body damage or engine repair. As part of this company’s normal workflow, they’ll need to show the customer a report of the vehicle’s current status, and then another report after the repairs.
Obviously, the vehicle status reports could be printouts. The company could just manually print the report from their software system of choice and then hand-deliver it to the customer.
What if the customer is unable to stay while the repairs are being done? Or what if the customer wants to have an electronic copy of the report saved for later review? Creating a PDF is an easy solution that provides more options for the customer and could potentially be easier for the business as well.
In order to use a PDF report, the company would need to build something to:
Since this is all an example, we can assume the company would leverage a service like Twilio for text messaging and SendGrid for email to deliver the report to customers. One could also consider sending the reports directly to Google Drive or some other shared location.
A very simple workflow would be:
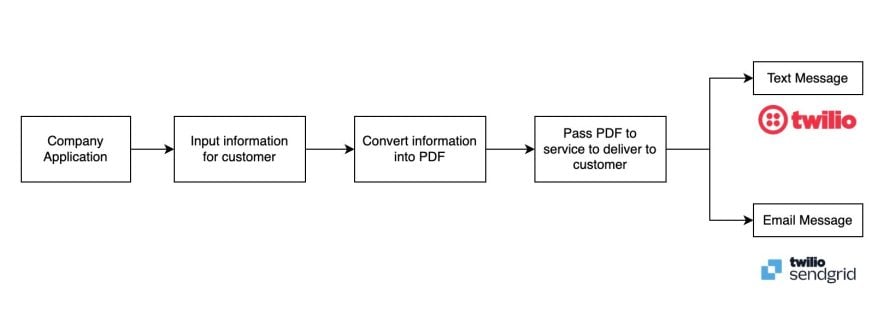
Obviously this is just using broad strokes, but the point is to consider a workflow around which to build a technical solution.
You could consider the following tools for each stage:
Let’s now discuss how you could use QuestPDF to package data into a PDF for output.
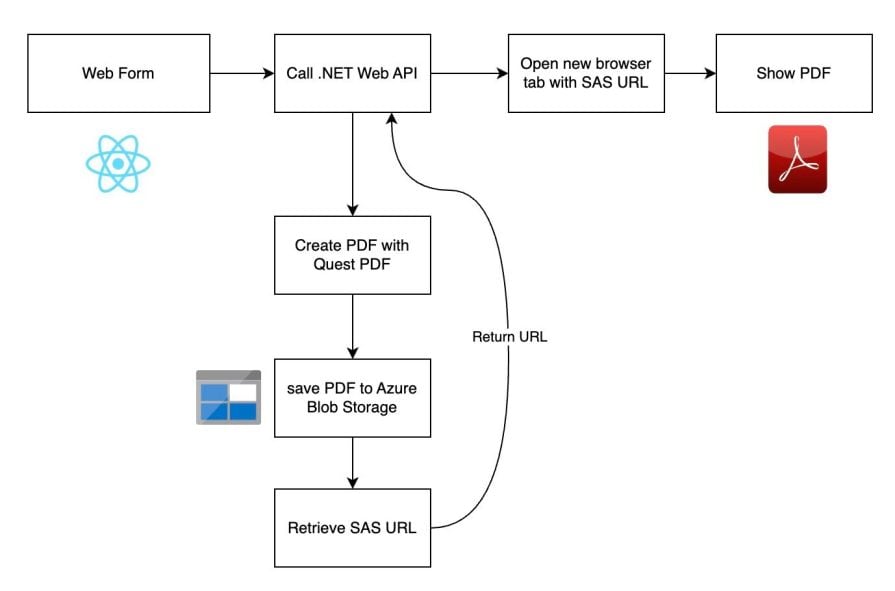
If you follow along with my sample project, you’ll note that I have created all the pieces of this workflow for you to see. This workflow is very similar to the broad strokes workflow that I described above:
In the folder frontend, there is a React project that demonstrates a web page with a button that calls a Web API. This same type of action could be done with a mobile application, desktop app, or different frontend framework. When run locally, you should see this web form:
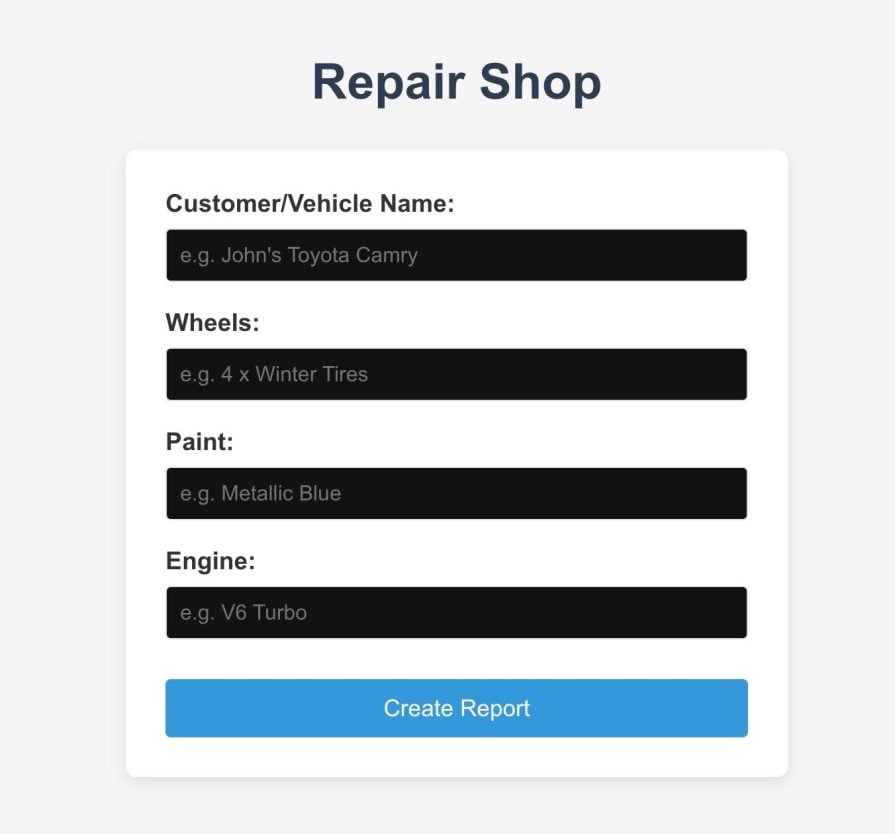
This example project’s frontend takes the inputs in a web form, then sends them as a POST request and gets a URL where the PDF can be viewed:
  const handleSubmit = async (e) => {
    e.preventDefault();
    setIsLoading(true);
    setError(null);
    setSuccess(false);

    try {
      // Replace with your actual API endpoint
      const response = await axios.post('http://localhost:5039/api/Report/create-report', formData);

      // Check if we're using the displayUrl or the direct url
      const reportUrl = response.data.displayUrl || response.data.url;

      // Open the URL in a new tab
      window.open(reportUrl, '_blank');
      setSuccess(true);

      // Reset the form
      setFormData({
        name: '',
        wheels: '',
        paint: '',
        engine: ''
      });
    } catch (err) {
      console.error('Error creating report:', err);
      setError('Failed to create report. Please try again.');
    } finally {
      setIsLoading(false);
    }
  };
In the backend folder, I have a .NET web API that receives the web request POST, gathers data, and generates a PDF with QuestPDF. The controller takes the PDF and uploads it to Blob Storage. It then retrieves a Shared Access Signature (SAS) link, which can be opened in a new tab. The SAS link is returned in the payload of the API:
[HttpPost("create-report")]
public async Task<IActionResult> CreateReport([FromBody] ReportRequest request)
{
    try
    {
        // 1. Generate PDF using QuestPDF
        var pdfBytes = GeneratePdf(request);

        // 2. Upload to Azure Blob Storage
        var blobName = $"report-{Guid.NewGuid()}.pdf";
        var sasUrl = await UploadToBlobStorageAndGetSasUrl(pdfBytes, blobName);

        // 3. Return the SAS URL
        return Ok(new { url = sasUrl });
    }
    catch (Exception ex)
    {
        return StatusCode(500, $"Error creating report: {ex.Message}");
    }
}
In this example, we’re using QuestPDF to generate the PDF:
private byte[] GeneratePdf(ReportRequest request)
{
    // Configure QuestPDF license (Free for personal and small business use)
    QuestPDF.Settings.License = LicenseType.Community;

    using (var stream = new MemoryStream())
    {
        Document.Create(container =>
        {
            container.Page(page =>
            {
                page.Size(PageSizes.A4);
                page.Margin(50);
                page.Header().Element(ComposeHeader);
                page.Content().Element(content => ComposeContent(content, request));
                page.Footer().AlignCenter().Text(text =>
                {
                    text.CurrentPageNumber();
                    text.Span(" / ");
                    text.TotalPages();
                });
            });
        }).GeneratePdf(stream);

        return stream.ToArray();
    }
}
Please note that this example is very simple by design. QuestPDF has many more features that can be showcased with PDF output, and I encourage you to review their documentation for more information.
To upload the file and get the PDF URL, I use a connection string in my app’s config. I then make sure to set the ContentDisposition header so that when the URL is returned, it can be opened directly in a new tab:
  private async Task<string> UploadToBlobStorageAndGetSasUrl(byte[] content, string blobName)
  {
      // Get the container client
      var containerClient = _blobServiceClient.GetBlobContainerClient(_containerName);

      // Ensure container exists (create if it doesn't)
      await containerClient.CreateIfNotExistsAsync(Azure.Storage.Blobs.Models.PublicAccessType.None);

      // Get blob client and upload the file with properties to set content disposition
      var blobClient = containerClient.GetBlobClient(blobName);

      // Create blob upload options with content disposition to open in browser
      var options = new Azure.Storage.Blobs.Models.BlobUploadOptions
      {
          HttpHeaders = new Azure.Storage.Blobs.Models.BlobHttpHeaders
          {
              ContentType = "application/pdf",
              ContentDisposition = "inline; filename=\"report.pdf\""
          }
      };

      using (var stream = new MemoryStream(content))
      {
          await blobClient.UploadAsync(stream, options);
      }

      // Generate a SAS token for the blob that expires in 1 hour
      var sasBuilder = new BlobSasBuilder
      {
          BlobContainerName = _containerName,
          BlobName = blobName,
          Resource = "b", // b for blob
          ExpiresOn = DateTimeOffset.UtcNow.AddHours(1)
      };

      sasBuilder.SetPermissions(BlobSasPermissions.Read);

      // Get the SAS URI
      var sasUri = blobClient.GenerateSasUri(sasBuilder);

      return sasUri.ToString();
  }
}
From the web form, you should have returned a PDF:

In order to get all of this to work, you’ll need to:
This example project runs everything locally. In a production environment, you would have something like Azure App Service to host your API. Your frontend would also be hosted or served on something like Azure Static Web Apps.
I know that this example uses a web API, but it could just as easily be done with a serverless option like Azure Functions. You could still get an HTTP URL that calls a serverless function to do the same process.
The nice part about this implementation is that it generates a PDF file that can be easily sent somewhere. This can accommodate situations where you may want to deliver reports asynchronously, or at least electronically. This also provides many options, as you can easily customize the report in code.
As I mentioned in the intro, the team I lead in my professional role was faced with a situation similar to the repair shop example I outlined in the above section. We needed a way to generate PDFs with our .NET API and deliver them to customers. The workflow that my team used on our project was as follows:
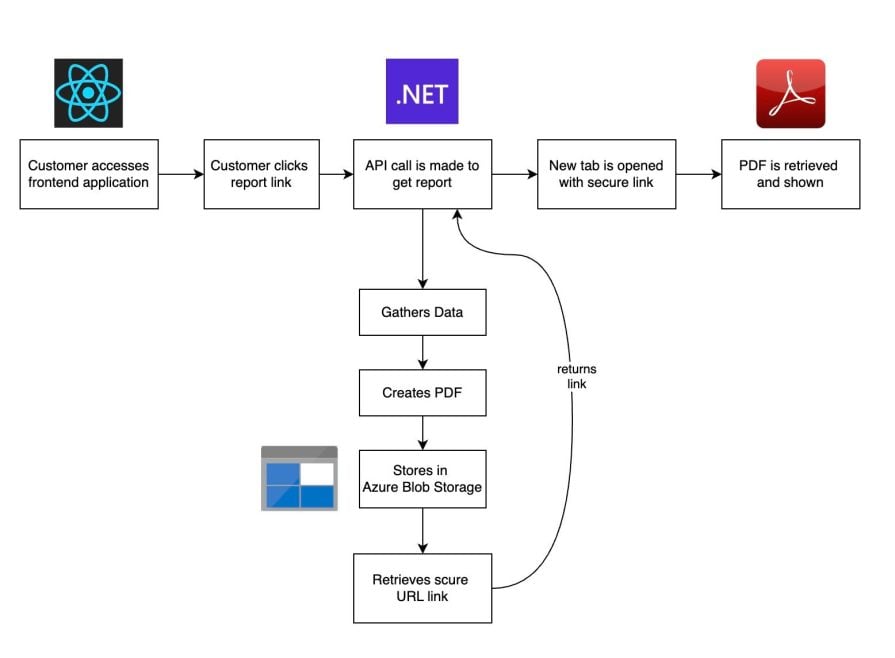
Our customer goes to our application and navigates to a place where they click a button to get their PDF report. Similar to my earlier example, the button then triggers a web request to a .NET Web API that:
My team uses Azure. There are similar offerings for this workflow with both AWS and Google Cloud.
Similarly, even though my project starts with a React frontend, we could just as easily have something with Angular, Vue, or something else entirely. The only important requirement is the ability to make a web request.
A few points of note with this workflow:
One question that you may also be asking is, do we need to store the PDFs at all?
You can stream results directly to your browser to open in a new tab. One main reason to use this PDF solution with the Azure Blob Storage is that it allows you to keep a copy of what is generated. The copies could serve as a history or be presented to a customer if needed.
Modern browsers also have security restrictions around what can be downloaded. Having a secure URL simplifies the interaction with the browser, as it only has to handle downloading the content with the PDF MIME type. There are several options with streaming downloads directly, and I encourage you to review the article here on downloading files in the browser for more information.
My team found that this solution made integration much easier. Since everything is server-side, we are able to just move this solution anywhere we want in the customer application. We have also built services and typed properties for our reports, which makes them easier to maintain and debug.
If this solution had been more client-based (JavaScript), you would have had to go through iterations of deployments. You’d also be forced to deal with various discrepancies between the way different browsers handle downloads.
Some modern browsers add additional security checks when downloading content to a computer. Having this solution fully server-side gives my team the flexibility to own the process without relying on a browser. It also makes it easily portable if we wanted to move the API call to another portion of a website or application.
In my team’s solution, we were using a .NET Web API. As such, we used a NuGet package to create the PDF for output.
Let’s quickly highlight some other options you could use for PDF generation with .NET. I‘m focusing on the .NET packages, because that’s what my team considered and where our focus was for our solution. Here are some offerings in the .NET world that could also be used:
I spent the most time with QuestPDF and DynamicPDF solutions. Both are solid options and provide great documentation, in my experience. DynamicPDF provides a solid support plan and a large array of services outside of just generating a PDF. QuestPDF provides a simple solution that can easily be integrated into smaller applications as well.
The above options are all just a sampling of what is potentially out there. If your team is not in the .NET world, you can find a solution in languages like JavaScript, Python, Java, PHP, Ruby, and Go.
In this article, I presented:
I hope this post has shown a simple solution that can scale and be used for your team’s projects. Every team is different, but hopefully, the core of this workflow can help your team create a solid solution for your reporting needs. Thanks for reading my post!
Install LogRocket via npm or script tag. LogRocket.init() must be called client-side, not
server-side
$ npm i --save logrocket

// Code:

import LogRocket from 'logrocket';
LogRocket.init('app/id');
// Add to your HTML:

<script src="https://cdn.lr-ingest.com/LogRocket.min.js"></script>
<script>window.LogRocket && window.LogRocket.init('app/id');</script>

I migrated 20 production-style components from Tailwind to StyleX. Here’s what the data showed about LOC, CSS bundle size, build time, and type safety.

A guide for using JWT authentication to prevent basic security issues while understanding the shortcomings of JWTs.

Discover how to build, render, and automate product demo videos with Remotion, replacing traditional screen recordings with reusable React code.

Chrome’s Modern Web Guidance embeds modern web platform skills into AI coding agents, helping them choose native HTML, CSS, and browser APIs over legacy patterns.
Would you be interested in joining LogRocket's developer community?
Join LogRocket’s Content Advisory Board. You’ll help inform the type of content we create and get access to exclusive meetups, social accreditation, and swag.
Sign up now

