Editor’s note: This article was last updated by Jude Miracle on 3 December 2024 to cover how changes in Next.js 13 and React 18 affect developer changes, such as concurrent rendering, automatic batching, the App Router, and more.

A lot is taken into consideration when selecting a library or a framework. Among the React community, Next.js has become a popular choice for developers who want to get started quickly. Next.js builds on top of React to provide a streamlined development experience, although there is a slight learning curve.
This article will compare both technologies. But before we dive into a detailed comparison of both technologies, let’s review the differences we will cover:
getStaticProps, getServerSideProps) with automatic server-side rendering![]()
React was originally created by Facebook and has become one of the most popular libraries in the frontend world today. React is easily extendable and can include features like routing as well as state management patterns with libraries like Redux. React is minimal in its footprint but can be customized for almost any project. For more about React on a high level, check out the official React documentation:
![]()
Next.js was created on top of React in an effort to build an easy-to-use development framework. It was developed by Vercel (formerly Zeit) and makes use of many of React’s popular features. Right out of the box, Next.js provides things like pre-rendering, routing, code splitting, and webpack support. For more on Next.js, check out the official Next.js documentation.
With React, you can get up and running by installing Node.js on your machine and running npx create-react-app my-app. This will create a basic project structure with the src/App.js file as the entry point for the application.
You’ll also have a public folder where you can store assets, and the initial scaffold includes a service worker and a method to pull in Jest for testing. The initial scaffold looks like this:
├── README.md
├── package.json
├── node_modules
├── public
│   ├── favicon.ico
│   ├── index.html
│   ├── logo192.png
│   ├── logo512.png
│   ├── manifest.json
│   └── robots.txt
├── src
│   ├── App.css
│   ├── App.js
│   ├── App.test.js
│   ├── index.css
│   ├── index.js
│   ├── logo.svg
│   ├── reportWebVitals.js
│   └── setupTests.js
└── yarn.lock (or package-lock.json)
With Next.js, you can get started by running npx create-next-app. This will scaffold out a project that already has a pages folder for the pages or routes and a public directory that hosts your assets. The initial scaffold looks like this:
.
├── pages/
│   ├── api/       # API routes
│   ├── _app.js    # Custom App component
│   ├── _document.js  # Custom Document component
│   ├── index.js   # Home page
│   └── ...        # Other pages
├── public/         # Static assets
├── styles/         # Global styles
│   ├── globals.css
│   ├── theme.css
│   └── ...
├── components/     # Reusable components
├── lib/            # Utility functions and server-side code
├── test/           # Test files
├── .babelrc        # Babel configuration
├── .eslintrc       # ESLint configuration
├── next.config.js  # Next.js configuration
├── package.json    # Dependencies and scripts
└── README.md
N.B., the latest Next.js releases offer two different routers: the App Router and the Pages Router. The folder structure above is used if you choose to use the Pages Router.
The files in the pages directory correlate to the routes in your application. The public directory holds your static files or images you want to serve, and it can be directly accessed — no need to use require or other traditional React methods to import pictures into components.
Within the pages directory, you’ll see an index.js file, which is the entry point of your application. If you want to navigate to other pages, you can use the router with Link, as you see here:
<pre class="language-javascript">
  <div className="header__links">
     <Link href="/">
            <a className="header__anchor">Home</a>
        </Link>
        <Link href="/about">
            <a className="header__anchor">About</a>
        </Link>
  </div>
</pre>
With regards to the developer experience, the initial scaffolding process is pretty straightforward for both Next.js and React. React, however, does require you to add libraries like React Router for routing, whereas Next.js offers that functionality out of the box with the Link component.
Additionally, the overall structure of your application is already guided by Next.js by having the pages directory to hold your containers, etc.
React primarily uses client-side rendering. This means it loads a simple HTML framework and uses JavaScript to fill in the content directly in the browser. This approach makes the user experience very interactive, but it can slow down the initial load time because the browser must download and run JavaScript before rendering the page.
To enable server-side rendering with React, developers often use libraries like ReactDOMServer or frameworks like Express. This setup is flexible but needs more configuration to support server-side rendering or static site generation.
Here’s a typical React implementation:
function ProductPage() {
  const [products, setProducts] = useState([]);
  const [isLoading, setIsLoading] = useState(true);
  const [error, setError] = useState(null);

  useEffect(() => {
    async function fetchProducts() {
      try {
        const response = await fetch('/api/products');
        const data = await response.json();
        setProducts(data);
      } catch (err) {
        setError(err.message);
      } finally {
        setIsLoading(false);
      }
    }

    fetchProducts();
  }, []);

  if (isLoading) return <LoadingSpinner />;
  if (error) return <ErrorMessage message={error} />;

  return (
    <div className="products-grid">
      {products.map(product => (
        <ProductCard key={product.id} {...product} />
      ))}
    </div>
  );
}
While this approach offers excellent interactivity after the initial load, it comes with specific trade-offs:
// Initial HTML sent to browser
<!DOCTYPE html>
<html>
  <head><title>Product Page</title></head>
  <body>
    <div id="root"></div>
    <script src="/bundle.js"></script>
  </body>
</html>
Server-side rendering (SSR) creates the HTML for a page every time a request is made. This means the content is always current but can lead to slightly slower response times. SSR is helpful when the content is dynamic and needs to show the latest information, like dashboards or user-specific content. It is also important for SEO when the content cannot be generated in advance:
// pages/product/[id].js
import React from 'react';

export async function getServerSideProps({ params }) {
  const res = await fetch(`https://api.example.com/products/${params.id}`);
  const product = await res.json();

  return { props: { product } };
}

export default function ProductPage({ product }) {
  return (
    <div>
      <h1>{product.name}</h1>
      <p>{product.description}</p>
      <p>Price: ${product.price}</p>
    </div>
  );
}
The server generates complete HTML, improving initial page load and SEO.
Although less common in Next.js, CSR can still be implemented for highly interactive components or pages. In CSR, the browser receives minimal HTML content, and JavaScript loads the data to display the page. CSR allows for rich user interaction but can create challenges for SEO since search engines can’t see the content until it is rendered on the client side. This method is useful for dynamic and personalized content where user interaction is key, such as in web applications, even if SEO is not a priority.
With static site generation (SSG), your website pages are created as HTML files during the build process. This means they load quickly for users. SSG works best for content that doesn’t change often, like blogs, marketing pages, or documentation:
// pages/blog/[slug].tsx
export async function getStaticProps({ params }) {
  const post = await getPostBySlug(params.slug);

  return {
    props: { post },
    // Page will be rebuilt at most once every hour
    revalidate: 3600
  };
}

export async function getStaticPaths() {
  const posts = await getAllPosts();

  return {
    paths: posts.map(post => ({
      params: { slug: post.slug }
    })),
    // Show 404 for non-existent slugs
    fallback: false
  };
}

export default function BlogPost({ post }) {
  return (
    <article>
      <h1>{post.title}</h1>
      <div dangerouslySetInnerHTML={{ __html: post.content }} />
    </article>
  );
}
Incremental static regeneration (ISR) allows you to update static web pages while they are running. It combines the advantages of static site generation (SSG) and server-side rendering (SSR). ISR automatically refreshes static content in the background after a set time or when an API triggers an update. This is helpful when you need the speed of static pages with regular updates, like for ecommerce product pages:
// pages/products/[id].tsx
export async function getStaticProps({ params }) {
  const product = await fetchProduct(params.id);

  return {
    props: {
      product,
      lastUpdated: new Date().toISOString(),
    },
    // Page regenerates after 60 seconds
    revalidate: 60
  };
}

function ProductPage({ product, lastUpdated }) {
  return (
    <div>
      <ProductDetails {...product} />
      <small>Last updated: {formatDate(lastUpdated)}</small>
    </div>
  );
}
Modern applications often require a mix of rendering strategies. Both React 18 and Next.js 13 enable hybrid rendering within the same application.
You can combine SSR and CSR in a React application without using Next.js. However, this requires a manual setup. You will need to use frameworks like Express or Koa, along with ReactDOMServer and Hydration for the CSR part:
// server.js
import express from 'express';
import React from 'react';
import ReactDOMServer from 'react-dom/server';
import App from './App';
import fetch from 'node-fetch';

const app = express();

app.get('*', async (req, res) => {
  const initialData = await fetch('https://jsonplaceholder.typicode.com/posts/1')
    .then(response => response.json());

  const appHtml = ReactDOMServer.renderToString(<App initialData={initialData} />);

  res.send(`
    <!DOCTYPE html>
    <html lang="en">
      <head><title>SSR + CSR Example</title></head>
      <body>
        <div id="root">${appHtml}</div>
        <script>
          window.__INITIAL_DATA__ = ${JSON.stringify(initialData)};
        </script>
        <script src="/bundle.js"></script>
      </body>
    </html>
  `);
});

app.listen(3000, () => console.log('Server is running on port 3000'));

// Client component
// App.js
import React, { useState, useEffect } from 'react';

export default function App({ initialData }) {
  const [data, setData] = useState(initialData);

  useEffect(() => {
    if (!initialData) {
      // Fetch additional data client-side
      fetch('https://jsonplaceholder.typicode.com/posts/1')
        .then(response => response.json())
        .then(data => setData(data));
    }
  }, [initialData]);

  return <div>{data ? data.title : 'Loading...'}</div>;
}

// Client entry point
import React from 'react';
import ReactDOM from 'react-dom';
import App from './App';

const initialData = window.__INITIAL_DATA__;

ReactDOM.hydrate(<App initialData={initialData} />, document.getElementById('root'));
Next.js 13 allows for detailed control over how components are rendered:
// pages/mixed.js in Next.js for SSR + CSR
import { useEffect, useState } from 'react';

export async function getServerSideProps() {
  const res = await fetch('https://jsonplaceholder.typicode.com/posts/1');
  const initialPost = await res.json();
  return { props: { initialPost } };
}

export default function Mixed({ initialPost }) {
  const [post, setPost] = useState(initialPost);

  useEffect(() => {
    // Fetch updated data on the client
    fetch('https://jsonplaceholder.typicode.com/posts/1')
      .then(response => response.json())
      .then(data => setPost(data));
  }, []);

  return <div>{post.title}</div>;
}
The choice of rendering strategy should be based on your application’s specific needs:
Next.js’s ability to mix these rendering strategies within a single application offers significant advantages over traditional React applications, which typically require additional setup and configuration to achieve similar functionality.
Now we can begin to discuss real examples of React vs. Next.js with the sample application I mentioned at the beginning. Again, you can find it in the repo.
Building pages with React requires you to create a component and then pull in React Router to orchestrate transitions in your site. If you look in the react folder in the sample application, you’ll see what you would likely expect from a traditional React application:
import { BrowserRouter as Router, Routes, Route } from 'react-router-dom';

export default function App() {
  return (
    <Router>
      <section>
        <Header />
        <Routes>
          <Route path="/" element={<HomePage />} />
          <Route path="/episodes" element={<EpisodesPage />} />
          <Route path="/season2" element={<Season2Page />} />
          <Route path="/quotes" element={<QuotesPage />} />
        </Routes>
      </section>
    </Router>
  );
}
Here, the Header, EpisodesPage, Season2Page2, QuotesPage, and HomePage are all components that React Router is routing the URL path to render.
If you look at the Next.js folder of the project, you’ll notice that the project is much leaner because the routes are all built into the pages folder. The Header component uses Link to route to the different pages, as you see here:
import Link from "next/link";

const Header = () => {
    return (
        <nav className="header">
            <span>
                <Link href="/">Home</Link>
            </span>
            <span>
                <Link href="/episodes">Episodes</Link>
            </span>
            <span>
                <Link href="/season2">Season 2</Link>
            </span>
            <span>
                <Link href="/quotes">Quotes</Link>
            </span>
        </nav>
    );
};
export default Header;
A high-level view of the Next.js project shows how easy it is to follow as well:
.
├── README.md
├── package-lock.json
├── package.json
├── components
│   └── Header.js
├── pages
│   ├── _app.js
│   ├── _document.js
│   ├── episodes.js
│   ├── index.js
│   ├── quotes.js
│   ├── season2.js
├── styles
│    ├── _contact.scss
│    ├── _episodes.scss
│    ├── _header.scss
│    ├── _home.scss
│    ├── _quotes.scss
│    ├── _season2.scss
│     └── styles.scss
├── public
│   ├── HomePage.jpg
│   └── favicon.ico
└── yarn.lock
When you want to build out pages for the React project, you must build the component and then add it to the router. When you want to build pages for the Next.js project, you just add the page to the pages folder and the necessary Link to the Header component. This makes your life easier because you’re writing less code, and the project is easy to follow.
Routing is an essential feature of React applications that lets users move between pages without reloading. React Router and Next.js are two tools for routing, and each has its own benefits and drawbacks.
React Router is a popular library for client-side routing in React applications, offering a declarative API for defining routes and navigating without reloading the page. In its v6 release, React Router introduced features like nested routes, relative routing, and a simplified API.
Key features include nested layouts, dynamic routes, and relative routing, which improve maintainability and readability. However, React Router requires additional setup for server-side rendering and SEO, as it’s designed primarily for client-side routing. Here is how React Router works:
import { createBrowserRouter, Outlet, RouterProvider } from 'react-router-dom';

const router = createBrowserRouter([
  {
    path: '/',
    element: (
      <Layout>
        <Outlet />
      </Layout>
    ),
    children: [
      {
        path: '',
        element: <HomePage />,
        loader: () => fetchHomeData(),
      },
      {
        path: 'products',
        children: [
          {
            path: '',
            element: <ProductList />,
            loader: () => fetchProducts(),
          },
          {
            path: ':id',
            element: <ProductDetail />,
            loader: ({ params }) => fetchProduct(params.id),
          },
        ],
      },
    ],
  },
]);

function App() {
  return <RouterProvider router={router} />;
}
Next.js offers a simple and native file-based routing system. Each page in a Next.js app is defined as a file within the pages directory, and the file name automatically becomes the route path. This means you don’t need an extra routing library.
Next.js allows for server-side rendering (SSR), dynamic routing, and API routes, which helps developers manage both the frontend and backend in one codebase. This makes Next.js a great choice for applications that need SSR, static site generation, and SEO optimizations:
// app/layout.tsx
export default function RootLayout({ children }) {
  return (
    <html>
      <body>
        <nav>
          <Link href="/">Home</Link>
          <Link href="/products">Products</Link>
        </nav>
        {children}
      </body>
    </html>
  );
}

// app/products/page.tsx
async function ProductsPage() {
  const products = await fetchProducts();
  return (
    <section>
      {products.map(product => (
        <ProductCard key={product.id} product={product} />
      ))}
    </section>
  );
}

// app/products/[id]/page.tsx
async function ProductPage({ params }) {
  const product = await fetchProduct(params.id);
  return <ProductDetail product={product} />;
}
Let’s look at how both React Router and Next.js handle common routing scenarios.
Here’s a dynamic routing example:
// React router
{
  path: 'products/:id',
  element: <ProductDetail />,
  loader: ({ params }) => fetchProduct(params.id),
}


// Next.js 13

// app/products/[id]/page.tsx
export default async function Page({ params }) {
  const product = await fetchProduct(params.id);
  return <ProductDetail product={product} />;
}
Here’s an error handling example:
// React router
{
  path: 'products/:id',
  element: <ProductDetail />,
  errorElement: <ProductErrorBoundary />,
}


// Next.js 13

// app/products/[id]/error.tsx
'use client'
export default function Error({ error, reset }) {
  return (
    <div>
      <h2>Something went wrong!</h2>
      <button onClick={reset}>Try again</button>
    </div>
  );
}
Deciding whether to use React Router or Next.js’ built-in functionality for routing depends on the particular needs of your application. React Router is more versatile and provides a wider range of options for complex routing behavior. Additionally, it has a larger community and more online resources to assist in its implementation. On the other hand, Next.js built-in functionality offers a simpler and more straightforward approach to routing that integrates well with server-side rendering and SEO optimization.
With any application, you’ll always have a need to retrieve data. Whether it’s a static site or a site that leverages multiple APIs, data is an important component.
If you look in the react folder in my sample project, you’ll see the EpisodesPage component uses a Redux action to retrieve the episodes data, as you see here:
    const dispatch = useDispatch();
    // first read in the values from the store through a selector here
    const episodes = useSelector((state) => state.Episodes.episodes);
    useEffect(() => {
        // if the value is empty, send a dispatch action to the store to load the episodes correctly
        if (episodes.length === 0) {
            dispatch(EpisodesActions.retrieveEpisodes());
        }
    });
    return (
        <section className="episodes">
            <h1>Episodes</h1>
            {episodes !== null &&
                episodes.map((episodesItem) => (
                    <article key={episodesItem.key}>
                        <h2>
                            <a href={episodesItem.link}>{episodesItem.key}</a>
                        </h2>
                        <p>{episodesItem.value}</p>
                    </article>
                ))}
            <div className="episodes__source">
                <p>
                    original content copied from
                    <a href="https://www.vulture.com/tv/the-mandalorian/">
                        here
                    </a>
                </p>
            </div>
        </section>
    );
The Redux action retrieves the values from a local file:
import episodes from '../../config/episodes';

// here we introduce a side effect
// best practice is to have these alongside actions rather than an "effects" folder
export function retrieveEpisodes() {
    return function (dispatch) {
        // first call get about to clear values
        dispatch(getEpisodes());
        // return a dispatch of set while pulling in the about information (this is considered a "side effect")
        return dispatch(setEpisodes(episodes));
    };
}
With Next.js, you can leverage its built-in data fetching APIs to format your data and pre-render your site. You can also do all of the things you would normally do with React Hooks and API calls. The added advantage of pulling in data with Next.js is that the resulting bundle is prerendered, which makes it easier for consumers of your site.
In my sample project, if you go to the nextjs folder and the episodes.js page, you’ll see that the information on The Mandalorian episodes is actually constructed by the call to getStaticProps, so the actual retrieval of the data only happens when the site is first built:
function EpisodesPage({ episodes }) {
    return (
        <>
            <section className="episodes">
                <h1>Episodes</h1>
                {episodes !== null &&
                    episodes.map((episodesItem) => (
                        <article key={episodesItem.key}>
                            <h2>
                                <a href={episodesItem.link}>{episodesItem.key}</a>
                            </h2>
                            <p>{episodesItem.value}</p>
                        </article>
                    ))}
                <div className="episodes__source">
                    <p>
                        original content copied from
                        <a href="https://www.vulture.com/tv/the-mandalorian/">here</a>
                    </p>
                </div>
            </section>
        </>
    );
}
export default EpisodesPage;
export async function getStaticProps(context) {
    const episodes= [...];
    return {
        props: { episodes }, // will be passed to the page component as props
    };
}
Beyond the basic functions we’ve covered here, you also eventually will need to do something more complex.
One of the more common patterns you see with React applications at scale is to use Redux Toolkit. Redux Toolkit is great because it scales a common method for working with your application’s state. RTK simplifies state management by offering built-in tools for creating actions, reducers, and managing side effects, which helps minimize the amount of extra code needed. It includes useful functions like createSlice and configureStore, allowing for quicker setup of actions and reducers. Additionally, it integrates smoothly with Redux Thunk and other middleware, making it easier to handle asynchronous actions.
With React, this is a matter of defining a store and then building flows throughout your application. One of the first things I did was see if I could do this in my project with Next.js.
After some googling (and a few failed attempts), I found that because of the way that Next.js pre- and re-renders each page, using a store is very difficult. There are a few folks who have made implementations of Redux with Next.js, but it’s not as straightforward as what you’d see with a vanilla React app.
Instead of using Redux, Next.js uses data-fetching APIs that enable pre-rendering. These are great because your site becomes a set of static pieces that can be easily read by web crawlers, thus improving your site’s SEO.
This is a huge win because JS bundles have typically been difficult for crawlers to understand. Additionally, you can be more crafty with some of these APIs and generated assets at build time like RSS feeds.
My personal blog site is written with Next.js. I actually built my own RSS feed by using the getStaticProps API that comes with Next.js:
export async function getStaticProps() {
  const allPosts = getAllPosts(["title", "date", "slug", "content", "snippet"]);

  allPosts.forEach(async (post) => {
    unified()
      .use(markdown)
      .use(html)
      .process(post.content, function (err, file) {
        if (err) throw err;
        post.content = file;
      });
  });

  const XMLPosts = getRssXml(allPosts);
  saveRSSXMLPosts(XMLPosts);

  return {
    props: { XMLPosts },
  };
}
The getAllPosts and getRssXml functions convert the Markdown into the RSS standard. This can then be deployed with my site, enabling an RSS feed.
When it comes to more advanced features like Redux or pre-rendering, both React and Next.js have tradeoffs. Patterns that work for React don’t necessarily work for Next.js, which isn’t a bad thing because Next.js has its own strengths.
Overall, in implementing more advanced actions, the developer experience with Next.js sometimes can be more guided than you’d normally see with a React project.
With React 18 and Next.js 13, developers can use new features that improve performance for both the client and server. Each framework offers unique ways to boost application speed and user experience. The choice between them depends on the specific performance goals of a project. Let’s assess how they perform in typical situations, using Lighthouse metrics from a product listing app as key measures:

We’ll evaluate performance using the following metrics:
Here’s the Lighthouse score comparison for a product listing app that was implemented in both React and Next.js:
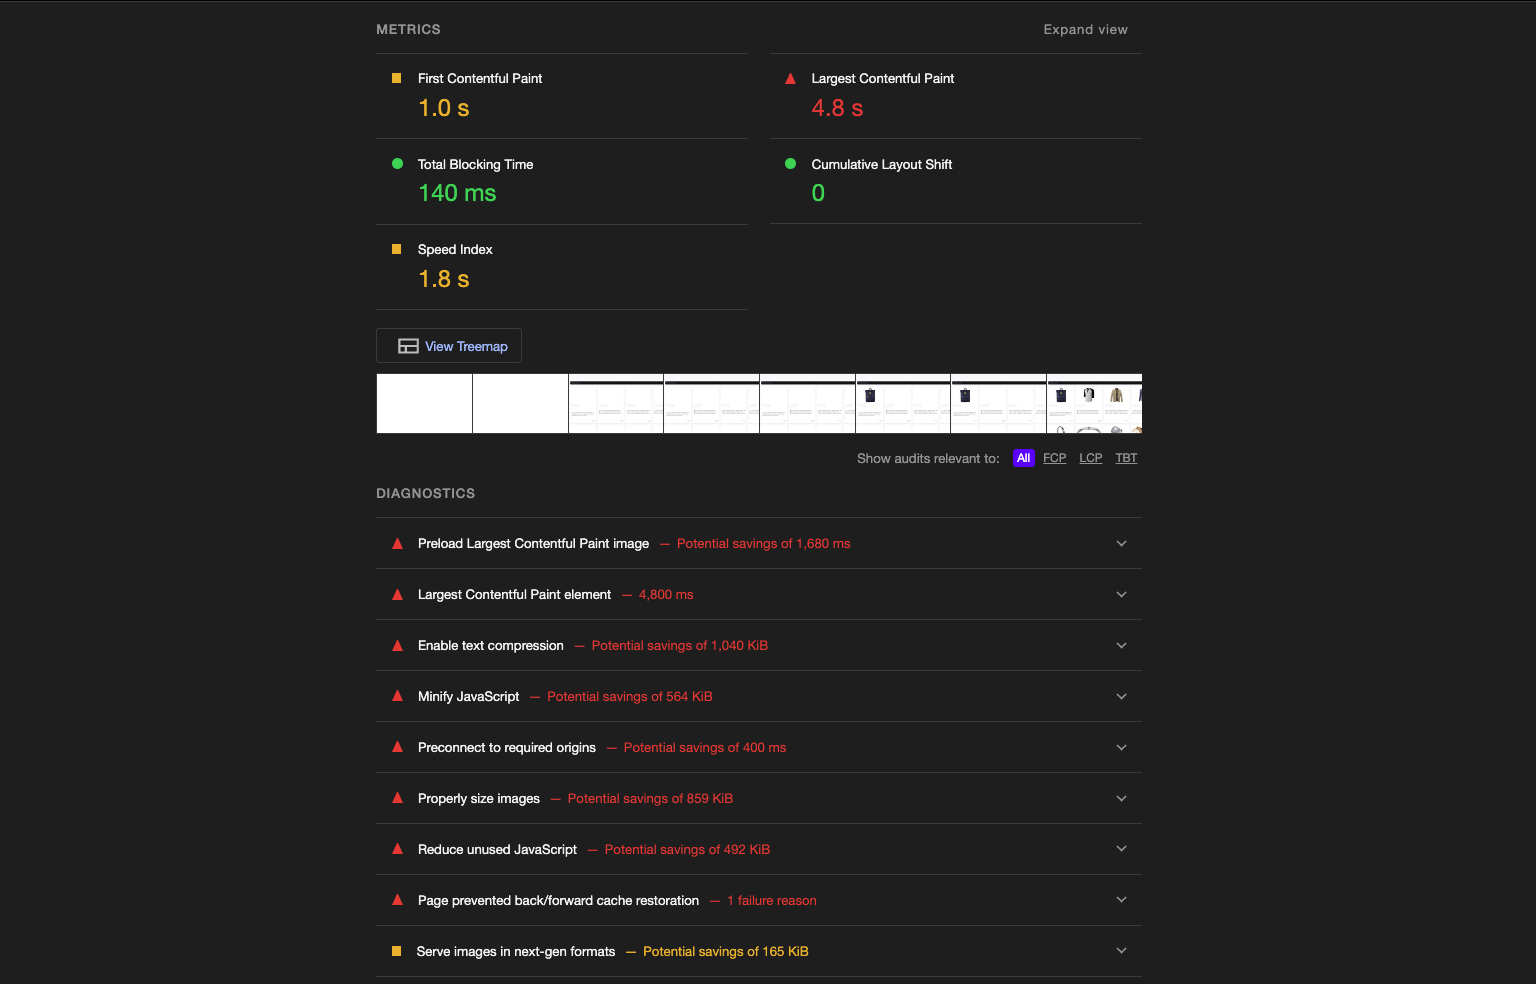
Next.js lighthouse score:
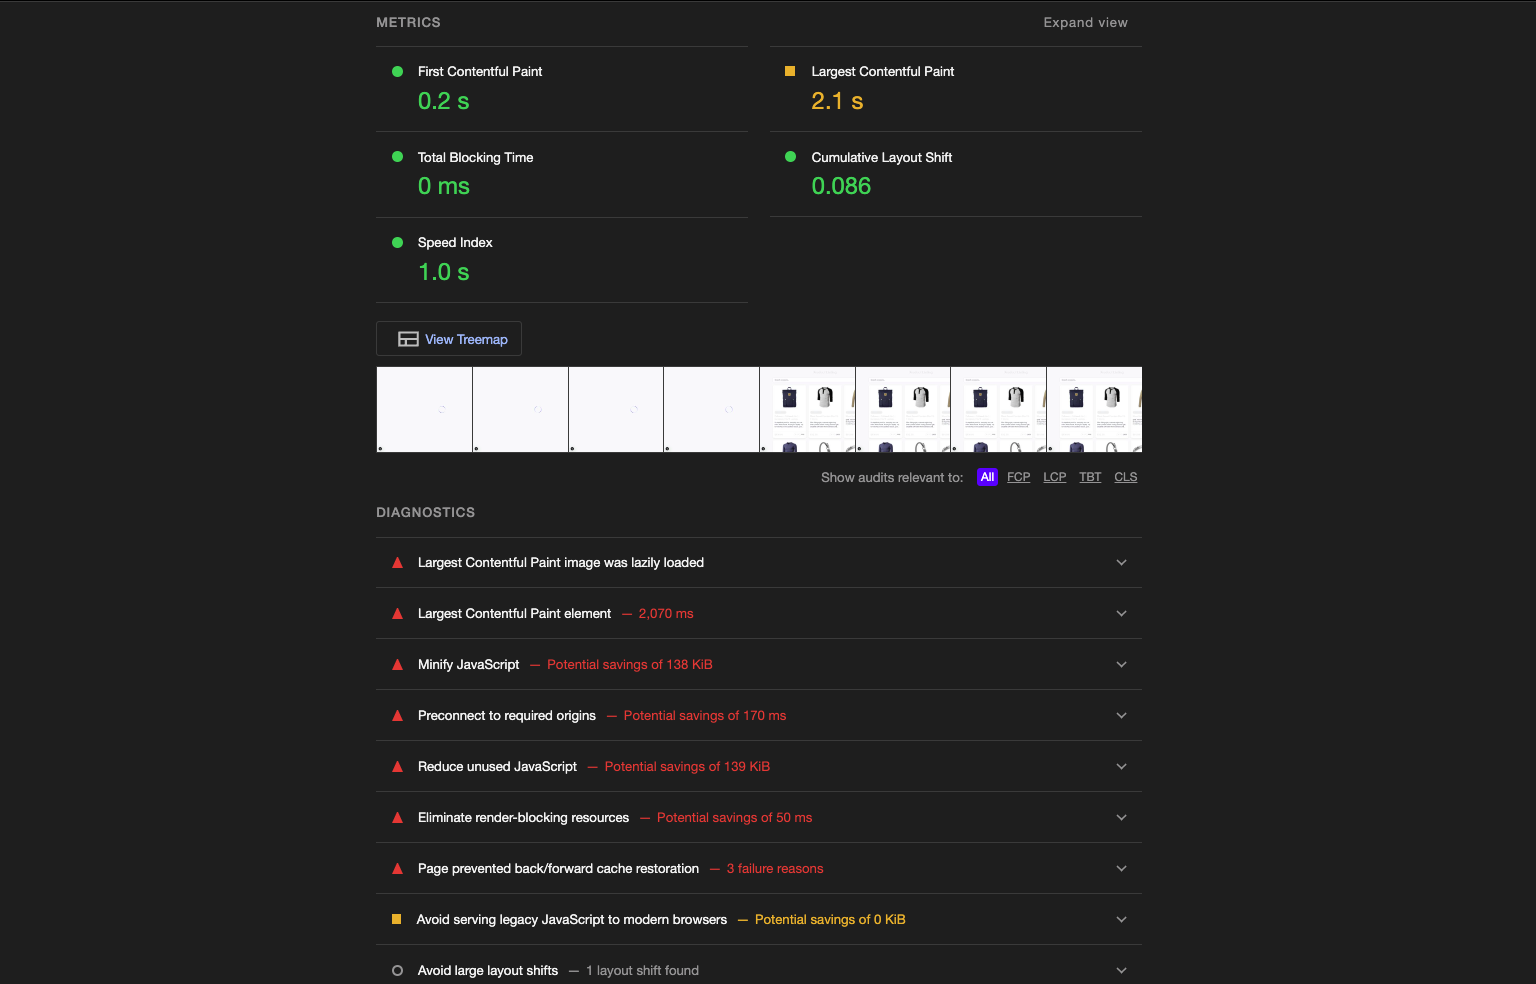
| Metric | React 18 | Next.js 13 |
| First Contentful Paint | 1.0s | 0.2s |
| Largest Contentful Paint | 4.8s | 2.1s |
| Total Blocking Time | 140ms | 0ms |
| Speed Index | 1.8s | 1.0s |
| Cumulative Layout Shift | 0.0 | 0.086 |
React 18 excels in applications requiring high interactivity, such as dashboards, product filtering, product searching, forms, or shopping carts. Its concurrent features ensure that complex client-side interactions remain smooth and responsive:
Here’s the implementation:
Import React, {useTransistion, useCallback} from "react";

export function ProductFilters({
  categories,
  filterAction
}: ProductFiltersProps) {
  const [isPending, startTransition] = useTransition();

  const handleSubmit = useCallback((e: React.FormEvent<HTMLFormElement>) => {
    e.preventDefault();
    const formData = new FormData(e.currentTarget);
    startTransition(() => {
      filterAction(formData);
    });
  }, [filterAction]);

  return (
    <form onSubmit={handleSubmit}>
      <select
        name="category"
        onChange={(e) => {
          startTransition(() => {
            filterAction(new FormData(e.target.form!));
          });
        }}
      >
        {categories.map(category => (
          <option key={category} value={category}>{category}</option>
        ))}
      </select>
      <button disabled={isPending}>
        {isPending ? 'Filtering...' : 'Apply'}
      </button>
    </form>
  );
}
Next.js 13 improves on React 18’s features for handling multiple tasks at once. It also adds its own improvements for SSR and creating static pages. These features make it a great choice for websites focused on content, SEO, and applications like ecommerce shops or blogs:
getStaticProps: For static pages, Next.js pre-renders content at build time, delivering near-instant load times and boosting SEO. On the product listing app, this approach brought the LCP down to 2.1s compared to React 18’s 4.8snext/image component, offering a seamless way to handle image loading, resizing, and performance improvements. It supports features like lazy loading, automatic resizing, and modern formats like WebP, all out of the box. This approach also helps bring the LCP down to 2.1s compared to React 18’s 4.8sHere is the implementation of server component data loading:
import { fetchProducts } from '../lib/api';

export default async function ProductsPage() {
  const products = await  fetchProducts();

  return (
    <div className='p-10'>
      <h1 className="text-3xl font-bold mb-8">Products</h1>
      <Suspense fallback={<ProductGridSkeleton />}>
        <ProductGrid
          products={products}
        />
      </Suspense>
    </div>
 );
}
Here’s an implementation of the image optimization:
export function ProductImage({
  src,
  alt,
  priority = false
}: ProductImageProps) {
  return (
    <div className="relative w-full pt-[100%]">
      <Image
        src={src}
        alt={alt}
        fill
        sizes="(max-width: 640px) 100vw,
 (max-width: 1024px) 50vw,
 33vw"
        priority={priority}
        className="absolute inset-0 w-full h-full object-contain p-4"
      />
    </div>
 );
}
While React 18 provides the flexibility for manual optimization, Next.js 13’s built-in features delivered better performance metrics with less configuration. The choice between the two frameworks should consider both the performance requirements and the development team’s expertise.
With any software project, good documentation can help you easily use tools, understand what libraries to use, etc. There are fantastic documentation options available for both React and Next.js.
As I mentioned in the intro, Next.js has a “learn-by-doing” set of documentation that walks you through how to do things like routing and building components. React also has a similar setup, with multiple tutorials that explain the basics.
With React, you can also rely upon a great community of developers who have created content in blog posts, YouTube videos, Stack Overflow, and even the React docs themselves. This has been built over years of development as the library has matured.
With Next.js, there is less in the way of formal tutorials and more in the way of GitHub issues and conversations. As I built my personal blog site, there were times when I had to do significant googling to resolve Next.js issues. However, Next.js team members themselves are very accessible in the open source world.
Tim Neutkens, one of the Next.js team members, responded to me directly on Twitter when I wrote a post on Next.js. He helped me work on an issue and was really great to work with. Having community members be so accessible is a great strength.
Within the React community, many key members are also just as accessible. In both React and Next.js, the active community provides a very positive developer experience.
Since the release of React 18, there have been some updates to the developer experience in React. Here are some of the changes:
The new Root API is now the recommended way to render applications in React 18. It’s a new way of rendering applications that allow for better performance and flexibility. With the new API, you create a root, identify the DOM container as the root, and then render JSX to it:
import ReactDOM from 'react-dom';

function App() {
  return (
    <div>
      <h1>Hello, World!</h1>
    </div>
  );
}

const container = document.getElementById('root');

// Create a root
const root = ReactDOM.createRoot(container);

// Render the App component to the root
root.render(<App />);
The New Root API allows for more flexibility in rendering components and can improve performance by reducing the amount of work done during rendering. It can also be used in conjunction with other new features in React 18, such as automatic batching and Suspense, to create even more performant applications.
Concurrent rendering, introduced in React 18, allows React to prepare multiple UI updates simultaneously without blocking the main thread. This approach results in smoother transitions and faster responses to user actions, even in highly interactive applications. This simplifies performance optimization in complex interfaces as React effectively manages rendering priority.
Next.js 13 uses concurrent rendering to improve server-side rendering (SSR) and client-side rendering (CSR). By enabling partial updates, Next.js can prioritize critical content, ensuring users see and interact with essential elements faster. This leads to improved load times and an overall more engaging user experience:
// Using startTransition for non-urgent updates
const [isPending, startTransition] = useTransition();
const [filterTerm, setFilterTerm] = useState('');

const handleFilter = (term) => {
  startTransition(() => {
    setFilterTerm(term); // Non-urgent update
  });
};
In React 18, a new feature called automatic batching was introduced, which aims to enhance performance by minimizing the number of updates that require rendering. Unlike previous versions of React, which only batched updates initiated by user events, such as clicks or keypresses, automatic batching batches all updates, including those caused by asynchronous code or other sources.
The primary purpose of automatic batching is to consolidate several updates into a single batch, resulting in a substantial reduction in the number of updates that need to be rendered. This can improve performance and decrease the rendering workload.
In Next.js 13, automatic batching integrates well with Next.js data fetching and rendering techniques. This feature is useful in large-scale applications with multiple concurrent interactions, as it minimizes re-renders across server and client environments:
// Before React 18
setTimeout(() => {
  setCount(c => c + 1); // Causes a render
  setFlag(f => !f);     // Causes a render
}, 1000);

// After React 18
setTimeout(() => {
  setCount(c => c + 1); // Batched
  setFlag(f => !f);     // Batched
}, 1000);               // Results in only one render
React 18 and Next.js 13 made numerous enhancements to the Suspense API, which is used to manage asynchronous rendering and data retrieval in React applications. Suspense can be used with server-side rendering to allow your application to load and display data more efficiently. By suspending rendering until data is available, your application can provide a better user experience and improve performance:
import { Suspense } from 'react';

function MyComponent() {
  const data = fetch('/api/data').then((response) => response.json());

  return (
    <div>
      <h1>My Data:</h1>
      <Suspense fallback={<div>Loading data...</div>}>
        <DataDisplay data={data} />
      </Suspense>
    </div>
  );
}

function DataDisplay({ data }) {
  return (
    <div>
      {data.map((item) => (
        <div key={item.id}>{item.name}</div>
      ))}
    </div>
  );
}

export default MyComponent;
In the example, when MyComponent is first rendered, the fetch request will be initiated and the fallback UI will be displayed until the data is available. Once the data is available, the DataDisplay component will be rendered with the fetched data.
React Server Components (RSC) represents a fundamental shift in React application architecture. This powerful feature combines the best of server-side rendering with client-side interactivity, creating a seamless development experience while significantly improving application performance.
Server Components shine in their ability to render on the server, sending only the necessary HTML to the client. This approach eliminates unnecessary JavaScript from the client bundle and enables direct backend access without API layers. The result is faster initial page loads, improved SEO, and enhanced data security since sensitive information like API keys can remain server-side.
React 18 introduced a new way to build server components. Here’s how to create a component that shows article details:
// Message.server.jsx
import { db } from './db.server';

async function ArticleDetails({ id }) {
  // Direct database access without API calls
  const article = await db.articles.get(id);

  return (
    <article className="article">
      <h1 className="article-title">{article.title}</h1>
      <div className="article-content">
        <p>{article.body}</p>
      </div>
      {/* Server components can contain client components */}
      <LikeButton articleId={id} />
    </article>
  );
}

export default ArticleDetails;
Next.js 13 and later versions improve on React’s server components. They offer a clear and straightforward way to use these components:
// app/page.tsx
import { LikeButton } from './components/LikeButton';
import { fetchArticles } from './lib/data';

export default async function Page() {
  const articles = await fetchArticles();

  return (
    <main className="articles-container">
      {articles.map(article => (
        <article key={article.id} className="article">
          <h2>{article.title}</h2>
          <p>{article.excerpt}</p>
          <LikeButton articleId={article.id} />
        </article>
      ))}
    </main>
  );
}
The main difference between React 18 and Next.js 13+ is how they handle server components. React 18 uses the .server.jsx file extension to identify server components. In contrast, Next.js 13+ treats all components in the app directory as server components by default. To specify client components in Next.js, you need to add the `use client` directive. This creates a clear separation between server and client code.
Data fetching in server components becomes straightforward and efficient. Here’s how you might implement it:
// lib/data.ts
export async function fetchArticles() {
  const res = await fetch('https://api.example.com/articles', {
    next: { revalidate: 3600 } // Cache for 1 hour
  });

  if (!res.ok) throw new Error('Failed to fetch articles');
  return res.json();
}
Next.js 13 introduced a new feature, App Router, which represents a complete rethinking of application routing and layout management. Its features include nested layouts and routes, a server-first approach, simplified data fetching, improved error boundaries, and built-in loading states:
app/
├── layout.js
├── page.js
├── blog/
│   ├── layout.js
│   ├── page.js
│   └── [slug]/
│       └── page.js
└── shop/
    ├── layout.js
    └── page.js
React 18 has implemented better error handling, which simplifies the process of identifying and addressing issues in your React apps. In the past, when a component encountered an error, React would cease rendering and present an error message in the browser console. Yet, in React 18, error boundaries have been enhanced to offer improved error handling and diagnostic details.
Finally, React 18 brings some architectural changes to how it handles server-side rendering of applications, which will bring speed improvements to meta frameworks like Next.js, Remix, and Gatsby. Instead of the entire application having to complete server-side rendering before it can hydrate in the user’s browser, using streaming HTML, the completed parts can be partially hydrated, giving the user a load time that feels faster. You can read more about these updates to SSR here.
The bottom line is that React 18 will bring many improvements to the developer experience for React and Next.js.
Companies choose between React and Next.js based on their needs. Let’s look at top applications built with these technologies
For a quick overview of these technologies, check out the comparison table below:
| Feature | React | Next.js |
| Type | JavaScript library | Full-stack framework |
| Rendering | Client-side only | Client-side, server-side, static |
| Routing | Requires React Router | Built-in file-based routing |
| SEO | Limited (CSR only) | Better (SSR support) |
| Setup | Manual configuration needed | Zero configuration |
| Build size | Lighter | Heavier (more features) |
| Learning curve | Moderate | Steeper (more concepts) |
| Use case | Single-page applications | Production-ready applications |
React and Next.js are both great choices for building web applications, but they each have their own strengths and weaknesses. By understanding what these are, you can choose the right tool for your project and create a better developer experience for yourself and your team.
When to use React:
When to use Next.js:
At the end of the day, React and Next.js provide solid developer experiences. I hope the comparisons and discussions I’ve included here give insight into how you could use them with your projects. I encourage you to check them out and check out my sample projects as well.
Thanks for reading my post! Follow me on andrewevans.dev and connect with me on X at @AndrewEvans0102.
Install LogRocket via npm or script tag. LogRocket.init() must be called client-side, not
server-side
$ npm i --save logrocket

// Code:

import LogRocket from 'logrocket';
LogRocket.init('app/id');
// Add to your HTML:

<script src="https://cdn.lr-ingest.com/LogRocket.min.js"></script>
<script>window.LogRocket && window.LogRocket.init('app/id');</script>

Learn how to protect full-stack projects from NPM supply chain attacks with a practical security checklist.

Explore 15 essential MCP servers for web developers to enhance AI workflows with tools, data, and automation.

Learn how contrast-color() automatically picks accessible text colors using native CSS, without JavaScript.

Learn how to build a harness-style AI workflow using Claude Code with specialized Dev, QE, and Ops subagents, gated handoffs, MCP telemetry, and LEARNING.md.
Hey there, want to help make our blog better?
Join LogRocket’s Content Advisory Board. You’ll help inform the type of content we create and get access to exclusive meetups, social accreditation, and swag.
Sign up now

