routeChangeStart and router eventsEditor’s note: This article was last updated by Taofiq Aiyelabegan on 11 March 2024 to include information about using router.reload() to refresh pages in Next.js, and when to opt for a full page reload versus updating data client-side.

One of the many features of modern, full-stack React frameworks like Next.js is an impressive built-in routing system. While React is great for single-page applications on its own, we can use it with frameworks like Next.js to build complex, multi-page applications.
These frameworks also provide a way to handle navigation across the app with the router. For example, routing in Next.js is as simple as creating a set of pages for the app and uniquely handling moving from one page to another.
Next.js makes it possible for us to listen to events regarding navigations from one page to another. For example, the routeChangeStart event fires up when a route starts to change, or in other words, when a user navigates to a new page.
In this article, we‘ll take a look at the routeChangeStart event, as well as the other router events in Next.js. All of the code examples used in this article are part of a simple Next.js project and can be found in this repository. You can also view the project demo here. Let’s get started!
Before we jump into router events in Next.js, let’s recap how routing works in Next.js and explore some of the routing concepts we’ll use in this article.
Routing in Next.js is based on the concept of pages. A page is any file with a .ts, .js, .tsx, or .jsx extension in the pages directory. So, any React file that is in the pages directory is a page and is automatically available as a route. See the diagram below:
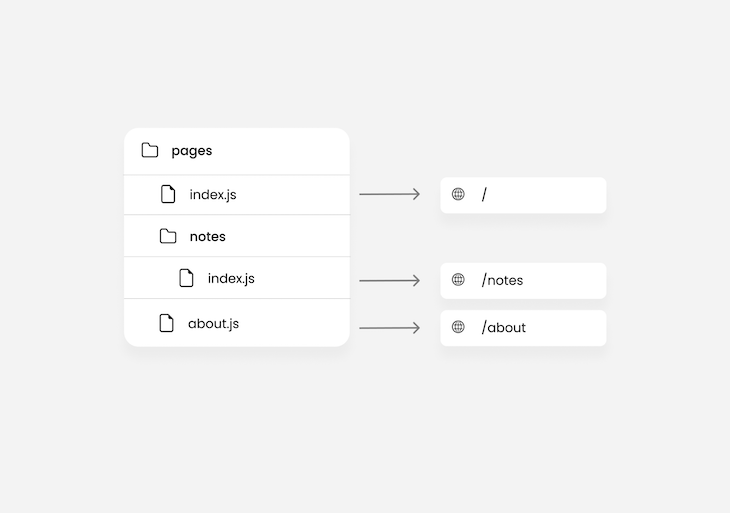
From the image above, we know that our Next.js project’s route will have three pages, including the index.js page, which represents the page for the current directory, / and /notes.
Nested routes help you to structure your routes better. In the pages directory, not only can you create nested files, but you can nest folders as well. Files created in nested folders are also considered both pages and nested routes.
For example, let’s say we have four sets of notes that we would like to make available as a page in a project. We can simply create four pages, like so:
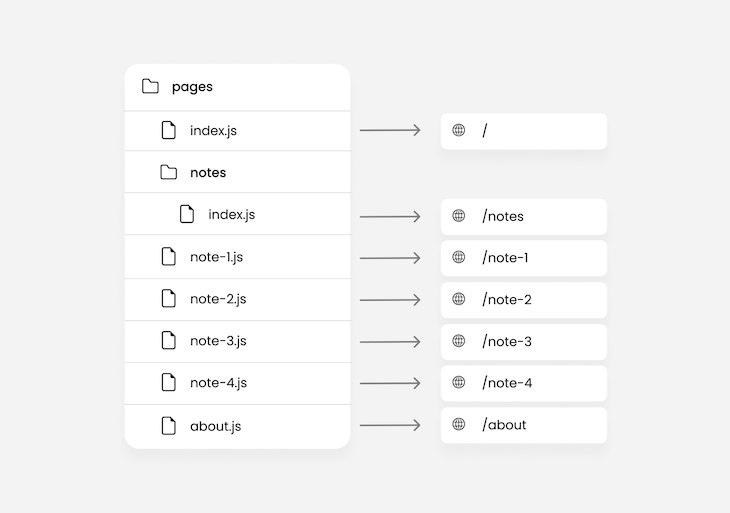
As seen in the image above, we’d wind up with a naming convention that looks like /note-1, /note-2, and so on for each note’s page URL.
This may seem a little strange and not quite intuitive. The naming convention we’re used to for related pages on the web these days looks like /notes/1, /notes/2, and so on.
Here, nested routing comes into play. The Next.js router will automatically route nested folders to the structure of the folder and its files. So, for example:
pages/notes/1 file structure will yield a /notes/1 routepages/notes/drafts/1 file structure will yield a /notes/drafts/1 routeAs a result, we would have the following:
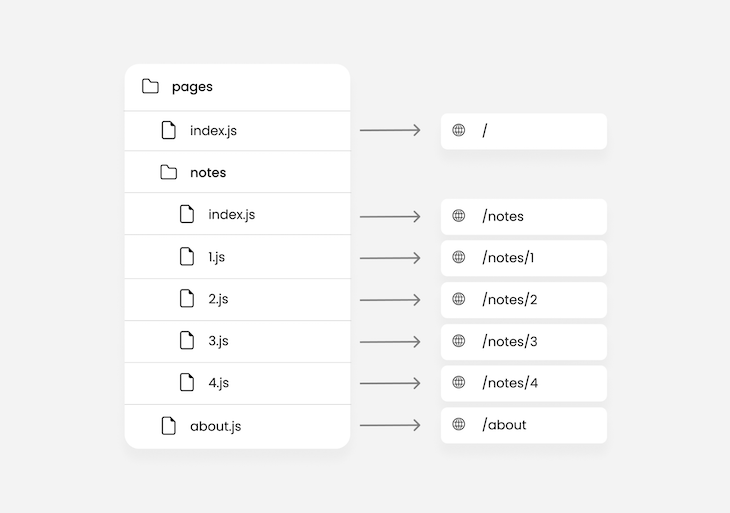
For now, ignore the weird naming structure in the image above. We’ll fix that in the next section.
Dynamic routing involves creating a single dynamic file that represents an indefinite amount of similar pages.
For example, if we have 15 different notes, and we want to have a separate page for each of them, we’ll wind up creating 15 files. The more notes we want, the more files we‘ll have, which is ultimately inconvenient and unnecessary.
This is where dynamic routing comes in. Because all the notes will have similar page layouts, we can create a single file that represents an infinite amount of notes rather than creating a file for each individual note:

The square braces [] in the code below represents a dynamic route. Whatever is used as a placeholder in those braces will be pushed by the router as a property of the query object:
// pages/notes/[id].js
import { useRouter } from 'next/router';

const Sam = () => {
  const router = useRouter();

  useEffect(() => {
    console.log(router.query); // route /notes/1 -> { id: 1 }
  }, [router.query]);

  return (
    <div>
      <h1>Note - {router.query?.id}</h1>
    </div>
  );
};
Next.js makes it possible to extend dynamic routing to catch all routes by adding three dots along with the placeholder, i.e., [...slug].js. This is useful for paths that require more than one path to return a value for the primary page.
For example, for a blog where articles are fetched by both the date and the title of the article making up the slug, you’d have a path like /posts/2021/1/10/reactjs:
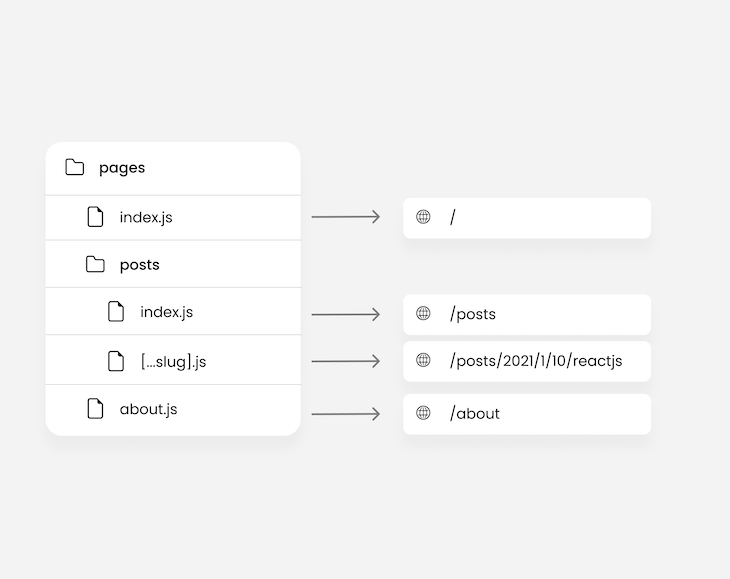
Here, router.query will return [2021, 1, 10, reactjs]. Therefore, you can say something like “Get me an article from 2022, on the 10th of the first month that has React.js as the title.”
If you’re using a class-based component, or perhaps you don’t want to use the useRouter Hook to access the router object, you can use the withRouter function instead:
const Note = ({ router }) => {

  useEffect(() => {
    console.log(router.query); // route /notes/1 -> { id: 1 }
  }, [router.query]);

  return (
    <div>
      <h1>Note - {router.query?.id}</h1>
    </div>
  );
};
export default withRouter(Note);
With shallow routing, we can make changes to the path of a page without running data-fetching methods again. Shallow routing helps retain the state of the page even after changing the URL.
The router object will also have access to the updated pathname. Changing the URL could mean adding a new query so we could have the following code:
// pages/notes/[id].js
const Note = () => {
  const router = useRouter();

  useEffect(() => {
    router.push('?id=4', '', { shallow: true });
  }, []);

  useEffect(() => {
    console.log(router.query);
  }, [router.query]);

  return (
     <div>
      <h1>Note - {router.query?.id}</h1>
    </div>
  );
};
export default Note;

export const getServerSideProps = async () => {
  console.log('called');
  return { props: {} };
};
The getServerSideProps function should be called when the router.push method changes the page’s URL. In this case, however, because the routing is shallow, neither getServerSideProps nor any other data fetching methods will be called.
The router.push method is an alternative to the Next.js Link component, which is used for navigating between pages. In this example, rather than navigating to a new page, we navigate to the current page, /about, but with a new query, username.
Notice that the router.push method takes an object of options as the last argument, with which we specify if the routing is shallow or not, for example, shallow: true.
Meanwhile, the Link component uses the shallow props to specify if the routing is shallow or not. In both cases, router.push and Link default to false.
next/link vs. next/routerAs mentioned before, router.push, which is from next/router, is an alternative to the Link component, which is from next/link. Although next/link and next/router are completely different modules from Next.js, you can use both for navigation.
I won’t explicitly tell you when you should and shouldn’t use one over the other, but I’ll try to help you understand how both work so you can choose the best fit for each scenario.
Routing with next/link is done declaratively, meaning you can tell Next.js where you want to go, and it’ll handle the rest. The Link component from next/link works like HTML’s simple <a> tag. In fact, when you use the Link component, Next.js pushes an <a> tag into the DOM. This is beneficial for SEO because crawlers will be able to detect your links.
On the other hand, routing with next/router is done imperatively, meaning you tell Next.js how it should navigate to the next page.
Declaratively, you can state what you want without being bothered about the details of how it’ll be done. Meanwhile, imperatively, you state exactly what should be done to achieve the end result.
router.push behaves similarly to window.location. It doesn’t create an <a> tag, meaning it doesn’t get detected by crawlers, which can be bad for SEO.
One popular and very resourceful use for next/router is in navigating programmatically. Let’s say you need to check that a user is signed in before they access the page or get bounced back to the login page. For this, you could use next/router as follows:
useEffect(() => {
 (async () => {
   const res = await fetch() // fetch request

   if (res.ok) {
     setUser(res.user);
   } else {
     router.push('/login')
   }
 })()
}, []);
The router object has several different properties and methods. One of these is the events property, which provides methods that allow you to listen to router events. For example:
Let’s explore each of these in more detail below.
routeChangeStart eventThe routeChangeStart event is triggered when a route is about to change. In other words, when a user clicks a link to navigate to a new page, an event is triggered. Take a look at the example below:
function MyApp({ Component, pageProps }) {
  const router = useRouter();

  useEffect(() => {
    router.events.on('routeChangeStart', (url, { shallow }) => {
      console.log(`routing to ${url}`, `is shallow routing: ${shallow}`);
    });
  }, []);

  return <Component {...pageProps} />;
}
export default MyApp;
In this case, we’re subscribing to the event inside the MyApp component in the pages/_app.js file. Although this isn’t the only option for subscribing to the event, it is the most convenient one. We’ll talk more about this shortly, but in the meantime, let’s focus on what exactly the routeChangeStart event does.
The Next.js router provides two methods for subscribing and unsubscribing to the events property: on and off, respectively.
In the example above, we used the on method to subscribe to the routeChangeStart event. Then, the second argument is a callback that returns the URL that the user is navigating to and an object with a shallow property that indicates whether the routing is shallow or not.
The routeChangeStart event is triggered by the Next.js router, not the browser. As a result, routing outside of the Next.js router won’t trigger the event.
For example, using the default <a> tag for navigation or manually changing the URL in the browser will not trigger the router events. This doesn’t just apply to the routeChangeStart event; it applies to all Next.js router events.
routeChangeComplete eventThe routeChangeComplete event is triggered when a route changes completely:
function MyApp({ Component, pageProps }) {
  const router = useRouter();

  useEffect(() => {
    router.events.on('routeChangeComplete', (url) => {
      console.log(`completely routed to ${url}`);
    });
  }, []);

  return <Component {...pageProps} />;
}
export default MyApp;
The routeChangeComplete event can be useful to terminate anything that was initiated with the routeChangeStart event.
For example, let’s say that you want to get the total amount of time it takes for a page to load, so you initiated a timer when the routeChangeStart event was triggered. With routeChangeComplete, you can terminate and round up the timer.
beforeHistoryChange eventIn action, the beforeHistoryChange event can almost look similar to the routeChangeStart event. However, when there is a delay on the destination page, the difference between these events is clear.
The beforeHistoryChange event is nothing like routeChangeStart. It’s only triggered at the exact moment the history of the browser is about to change.
Consider an example case of server-side rendering where the delay on the destination page is caused by the volume of data being prefetched before routing to that page.
When a user clicks a link to a page, the routeChangeStart event is triggered, and the fetching of data on that page begins. Subsequently, when the server-side function is executed completely, this means the new page is fully ready.
Next, you’ll move the user to that new page, at which point the beforeHistoryChange event is triggered.
The beforeHistoryChange event can appear similar to routeChangeComplete because after the browser’s history has changed, the routing will be indicated as completed. There is no afterHistoryChange event because routeChangeComplete already serves that purpose.
Take a look at the code below:
function MyApp({ Component, pageProps }) {
  const router = useRouter();

  useEffect(() => {
    router.events.on('beforeHistoryChange', (url) => {
      console.log(`appending ${url} to history`);
    });
  }, []);

  return <Component {...pageProps} />;
}
export default MyApp;
The beforeHistoryChange alerts you when the URL is appended to history.
hashChangeStart and hashChangeComplete eventsThe hashChangeStart event is triggered when the hash of a URL starts to change, but not the page. In comparison, the hashChangeComplete event is triggered when the hash of a URL has completely changed.
Hashes are often used for navigating a page within documents and articles. The set of elements in the viewport always changes, but the page remains the same.
For example, try revisiting the table of contents at the beginning of this article and click on the title of this section. It will automatically navigate you back here.
These two events are triggered when hashes change. You can use them to handle what happens when the user is navigating within a page with hashes:
function MyApp({ Component, pageProps }) {
  const router = useRouter();

  useEffect(() => {
    router.events.on('hashChangeStart', (url) => {
      console.log(`navigating to ${url}`);
    });

    router.events.on('hashChangeComplete', (url) => {
      console.log(`navigated to ${url}`);
    });

  }, []);

  return <Component {...pageProps} />;
}
export default MyApp;
In addition to adding a hash to the URL, removing a hash from the URL also triggers these events.
routeChangeError eventThe routeChangeError event is triggered when a route fails to change. There could be several reasons a route fails to change, but one common reason is that the user has canceled navigation to the destination link.
When a user clicks on a link and immediately clicks another, navigation to the first link is canceled, thereby triggering the routeChangeError event:
function MyApp({ Component, pageProps }) {
  const router = useRouter();

  useEffect(() => {
    router.events.on('routeChangeError', (err, url) => {
      console.log(err.cancelled ? 'you cancelled the navigation' : err);
    });
  }, []);

  return <Component {...pageProps} />;
}
export default MyApp;
The callback returns an err variable with a cancelled property to determine if it was canceled by the user or not.
As mentioned before, you can use on to subscribe to an event in Next.js, while the off method is for unsubscribing.
Unsubscribing from any event in React is mostly done when a component unmounts. In functional components, we would have the following:
function MyApp({ Component, pageProps }) {
  const router = useRouter();

  useEffect(() => {
router.events.on('routeChangeStart', (url, { shallow }) => {
      console.log(`routing to ${url}`, `is shallow routing: ${shallow}`);
    });

    return () => {
      router.events.off('routeChangeStart', () => {
        console.log('unsubscribed');
      });
    };
  }, []);


  return <Component {...pageProps} />;
}
export default MyApp;
In class-based components, you would use componentWillUnmount instead.
You can unsubscribe from as many events as you subscribed to, but you must unsubscribe from each one independently. For example, if you subscribed to routeChangeStart and routeChangeComplete, you should unsubscribe from both separately.
All of the examples we’ve considered so far have been on the pages/_app.js page. However, the use cases for events in Next.js are not limited to just that page. You can subscribe to router events on any page or component.
You’re also not limited to remaining inside a component. For example, you could have the following:
import Router from 'next/router';

Router.events.on('routeChangeStart', (url, { shallow }) => {
    console.log(`Navigating to ${url}`);
});

function MyApp({ Component, pageProps }) {
  return <Component {...pageProps} />;
}
export default MyApp;
The Router variable also has the same properties and methods as the variable returned by useRouter. Therefore, we can listen to the router events outside the MyApp component.
Some example use cases for Next.js router events include, but are not limited to:
With custom monitoring, you can determine things like the most visited page, broken links, and more without requiring any additional library or tool.
Earlier, we mentioned how data fetching can affect router events. Note that any loading indicator triggered by these router events will mostly only have a noticeable effect when you’re using server-side rendering in Next.js.
Server-side rendering tends to be the only data-fetching method that will cause any delay during routing because it executes at runtime, unlike static site generation, which executes at build time. In other words, with server-side rendering, the data-fetching method getServerSideProps will only execute when the page is requested.
The moment a user clicks a link to a page that uses server-side rendering, the getServerSideProps function is executed before the router navigates to that page. As a result, no matter how long it takes to execute the getServerSideProps function, the router will not move to the next page.
Here, router events play a very vital role in informing the user with a loading indicator, as well as determining the load time of the page.
Whenever you’re routing to a server-side rendered page, you should use the router events to display an indicator. You never know how long a page will take to load, so it’s safer for the user to be informed that loading is in progress rather than being left to wonder if the link is broken or if it’s not a link at all.
In Next.js 14, usePathname is a client component hook (from next/navigation) that can retrieve the current URL pathname or the current route, providing the path to the current page. In the previous version of Next.js, we used the pathName property from the useRouter Hook to get the current page.
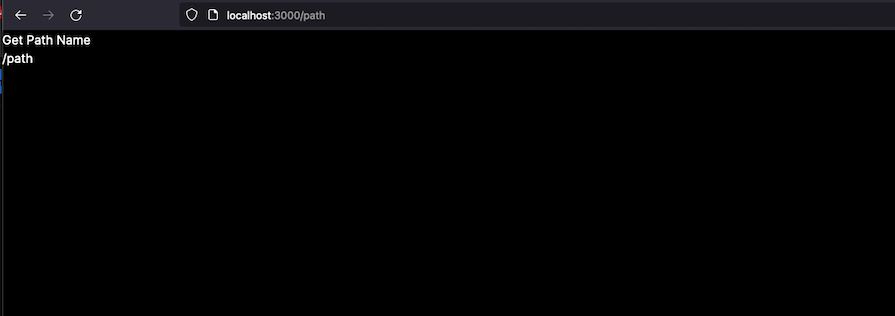
Create a folder path in your app directory with a pages.tsx file inside it. Then, paste this simple component that gets the current path and renders it on the UI:
"use client";
import { usePathname } from "next/navigation";
import React from "react";
const Page = () => {
  const pathname = usePathname();
  return (
    <div>
      <h1>Get Path Name</h1>
      <p>{pathname}</p>
    </div>
  );
};
export default Page;
You can use usePathname several different ways, depending on your use case. For example, on mobile website versions, you could use it to construct breadcrumbs that allow users to see each segment of the URL path as they navigate through pages.
Additionally, if you are working with navigations, usePathname can help designate the active link by highlighting the current route with a distinct color, aiding users in identifying their exact location within the website.
usePathname also triggers animations and transitions while navigating between targeted routes. So applying the current route in Next.js 14 varies and depends on your use case.
router.refresh() methodAlso introduced in Next.js 14 was the router.refresh() method (from the useRouter Hook). This method is used to manually refresh a route. This will completely clear the router cache and send a new request to the server for the current route.
When you use the refresh method, it only updates the current page by re-fetching the necessary data for rendering the page from the server. It does not clear stored/cached data:
// app/refresh/pages.tsx

"use client";
import { useRouter } from "next/navigation";
import { useState } from "react";
import data from "../data/data";
const Page = () => {
  const router = useRouter();
  const [loading, setLoading] = useState(false);
  const pageRefresh = () => {
    setLoading(true);
    router.refresh();
    setTimeout(() => setLoading(false), 1000);
  };
  return (
    <div>
      <h1>Page</h1>
      {loading && <p>Loading...</p>}
      <ul>
        {data.countries.map((country: any, index) => (
          <li key={index}>
            {country.name} is in {country.continent}
          </li>
        ))}
      </ul>
      <button
        onClick={pageRefresh}
        className="text-violet-400  rounded-md border-violet-400 border px-4 py-2"
      >
        Refresh
      </button>
    </div>
  );
};
export default Page;
We have a page file inside a refresh folder to demonstrate how the refresh method works. A list of countries is rendered on the UI, coming from the data object, as well as a refresh button. When the button is clicked, there’s a loading state that is set to true to indicate that our page is being refreshed and the page’s data is being revalidated without a full page reload. After a one second delay, the loading state is then set back to false.
In Next.js 14, you can listen for page changes by using the client component hooks such as usePathName and useSearchParams, as shown below:
'use client'

import { useEffect } from 'react'
import { usePathname, useSearchParams } from 'next/navigation'

export function NavigationEvents() {
  const pathname = usePathname()
  const searchParams = useSearchParams()

  useEffect(() => {
    const url = `${pathname}?${searchParams}`
    console.log(url)
    // You can now use the current URL
    // ...
  }, [pathname, searchParams])

  return null
}
This will then be used in the layout file:
import { Suspense } from 'react'
import { NavigationEvents } from './components/navigation-events'

export default function Layout({ children }) {
  return (
    <html lang="en">
      <body>
        {children}

        <Suspense fallback={null}>
          <NavigationEvents />
        </Suspense>
      </body>
    </html>
  )
}
In this article, we explored what Next.js router events are, how to use them, and when and where to use them.
Next.js router events can be very useful for applications that rely on server-side rendering, or as a means to trigger animation during navigation.
Check out the GitHub repository containing the examples in this article. The code contains a loading indicator animation that is triggered by a custom delay in a server-side-rendered page.
Thanks for reading, and happy hacking!
Debugging Next applications can be difficult, especially when users experience issues that are difficult to reproduce. If you’re interested in monitoring and tracking state, automatically surfacing JavaScript errors, and tracking slow network requests and component load time, try LogRocket.
LogRocket captures console logs, errors, network requests, and pixel-perfect DOM recordings from user sessions and lets you replay them as users saw it, eliminating guesswork around why bugs happen — compatible with all frameworks.
LogRocket's Galileo AI watches sessions for you, instantly identifying and explaining user struggles with automated monitoring of your entire product experience.
The LogRocket Redux middleware package adds an extra layer of visibility into your user sessions. LogRocket logs all actions and state from your Redux stores.


Modernize how you debug your Next.js apps — start monitoring for free.
Hey there, want to help make our blog better?
Join LogRocket’s Content Advisory Board. You’ll help inform the type of content we create and get access to exclusive meetups, social accreditation, and swag.
Sign up now
Which AI frontend dev tool reigns supreme in July 2025? Check out our power rankings and use our interactive comparison tool to find out.

Learn how OpenAPI can automate API client generation to save time, reduce bugs, and streamline how your frontend app talks to backend APIs.

Discover how the Interface Segregation Principle (ISP) keeps your code lean, modular, and maintainable using real-world analogies and practical examples.

<selectedcontent> element improves dropdowns


One Reply to "Understanding Next.js <code>routeChangeStart</code> and router events"
With next/navigation, how do I detect route changes before they happen now that router.events no longer exist?
Needing to surface prompts from certain pages, asking the user if they are sure they want to navigate away. I don’t want to do this after the route changes.