Since its inception in 2016, Next.js has always been opinionated about its routing. Its page-based approach allowed developers to specify when they wanted those pages to be rendered (server, client, or pre-rendered for static pages).

However, this approach did not come without some inconveniences. Thankfully, Vercel, the company behind the hosting platform and the creator of Next.js, has heard those concerns. After teasing a major upgrade on May 4, a blog post dropped two weeks later explaining some major changes to the Next.js router:
Lee Robinson on Twitter: “📣 The Next.js router is getting a major upgrade!◆ Nested routes / layouts◆ Client and server routing◆ React 18 features – startTransition, Suspense◆ Designed for Server Components◆ 100% incrementally adoptable 🤯Expect an RFC very soon 👀 / Twitter”
📣 The Next.js router is getting a major upgrade!◆ Nested routes / layouts◆ Client and server routing◆ React 18 features – startTransition, Suspense◆ Designed for Server Components◆ 100% incrementally adoptable 🤯Expect an RFC very soon 👀
In this article, if you are not already familiar with Next.js’s router, you will learn how it currently works. Then, you will discover what kind of issues occur as a result and how this update plans to address them.
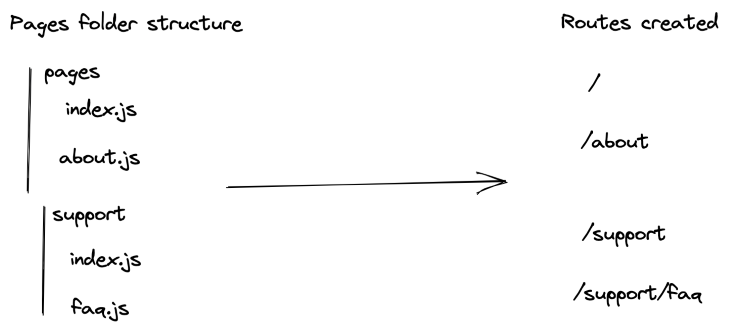
As mentioned above, Next.js uses a page-based approach to create routes. Concretely, this means that in every Next.js project, there exists a pages folder. Inside this special folder, every file and folder constitutes a new route.
In the pages folder, the first root route is index.js, which renders the homepage at the / URL. You can also name your file and create a static route (i.e., about.js for the /about route).
Similarly, folders can also be used to create nested routes. For example, creating a folder named support and a file inside faq.js will create the route /support/faq.
Here is a diagram to better illustrate this:

Dynamic routes are also supported. By putting square brackets in your file or folder name, you can create a dynamic route. For example, /blog/[article-id].js will support multiple routes such as /blog/1, /blog/nextjs-dynamic-routing, and so on.
Unfortunately, this approach has a major limitation. Namely, despite nested routes sharing a parent route, you cannot share state or layout between them.
For example, take authentication. In React, using the react-router library, you can create custom routes. For example, you could create a protected route to verify whether the user is logged in. If the user is not logged in, the route would then redirect them, say to the login or sign-up page. Then, you can assign this protected route to any paths under /authentication in your router. By doing this, nested routes don’t have to worry about authentication as the parent route will handle it for them.
Unfortunately, this scenario is not possible with Next.js. You can create a custom route component, but you will have to wrap it around each protected page individually.
The same issue applies to layouts. If your application has a dashboard, multiple pages will then share a similar layout (navigation, footer, etc.). As it stands, the only way to apply a layout to multiple pages at once is to do so at the app level. This layout would then be applied to your entire application. Unfortunately, if you have multiple layouts, you have to define them on a per-page basis.
Knowing all of this, the team at Vercel decided to fix these limitations.
To begin with, similarly to the pages folder, there will be a new folder called app. This is to provide backward compatibility and allow developers to slowly migrate to the new router.
Then, the folder structure will still determine new routes. This means that a dashboard folder inside app would be linked to the /dashboard routes. However, where it gets interesting is the files inside those routes.
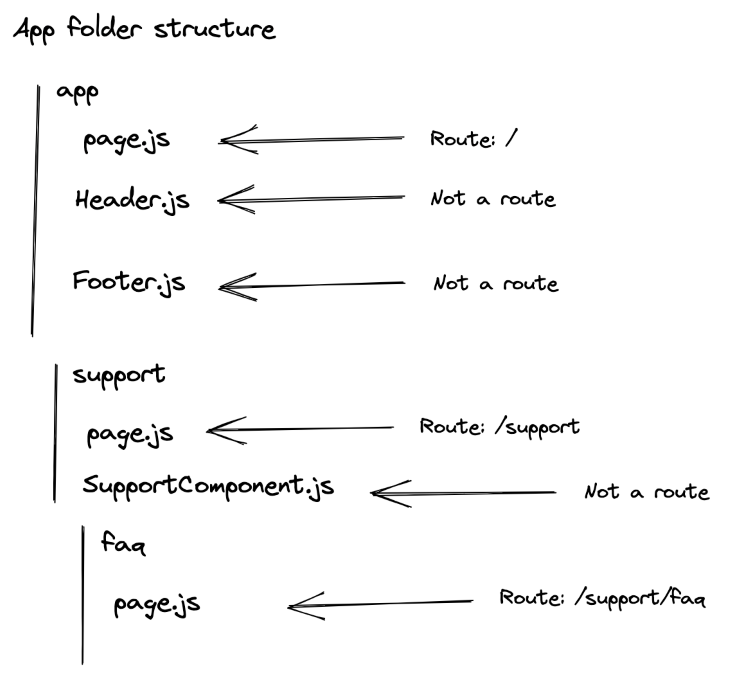
The previous router assumed that every file inside the /pages was a new route. This, by the way, caused developers to separate their pages and non-pages React components (i.e., Navbar, Header, Footer). Putting a file like Navbar.js with the homepage aka /pages/index.js would have caused the router to believe Navbar is a new route and not a simple child component. As a result, many developers had to create a components folder and separate their different components.
However, the new router assumes every file is NOT a route unless explicitly stated. To create a new route, you, therefore, have to create a page.js inside the folder.
Our previous project example would therefore look like this with the new router:

Dynamic routes are also supported. With this new format, to have a /blog/[article-id] URL for example, you would need a /app/blog/[article-id]/page.js folder structure.
In brief, here are some folder structure and their corresponding routes:
/app/blog/[article-id]/page.js → /blog/[article-id]/app/blog/[category-id]/page.js → /blog/[category-id]/app/blog/[category-id]/[article-id]/page.js → /blog/[category-id]/[article-id]Layouts also got an update.
Previously, you could create layouts in a separate file and then import the layout to your page. For example, here is a dashboard page:
    import DashboardLayout from '../components/DashboardLayout'

    export default function DashboardPage() {
      /* The content for your dashboard page */
    }

    DashboardPage.getLayout = function getLayout(page) {
      return (
        <DashboardLayout>
          {page}
        </DashboardLayout>
      )
    }
You could import multiple layouts to your page if you needed to nest them. However, since this is done on a per-page basis, every page nested in your dashboard would have to import the layouts and nest them.
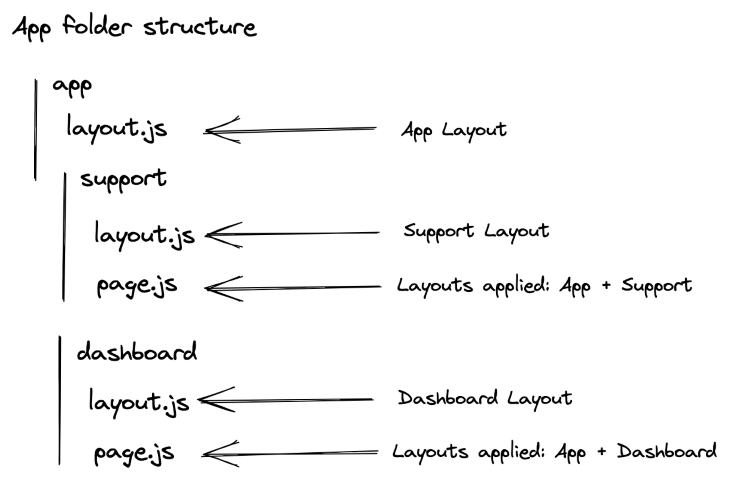
Thankfully, this is changing! With the new router, you will be able to specify a layout for your dashboard page and any pages nested will automatically receive this layout. All you have to do is create a layout.js file in the folder for this layout to be applied to all the routes in this folder.
More concretely, here is an example:

In this example, a layout.js file was created at the root level, aka in the app folder. This layout is automatically applied to any routes in the application.
This application also has two sections: dashboard and support. Since each of these possesses its styling, a layout.js file is created to apply the specific styling for their routes. On top of the root layout, this means that any route under /dashboard will receive the app’s layout and the dashboard’s one.
As a result, pages.js no longer has to specify which layout it uses since it is done automatically by the layout.js files.
Contrary to Next.js’s current router, which only allowed you to fetch data at the page level, you will also be able to fetch data from the layouts. You will be able to use getStaticProps and getServerProps to retrieve data and build your layout.
As a result, your /dashboard pages would then be able to fetch data from multiple components (the app’s layout, dashboard’s layout, and the page itself).
We’ve quickly gone over how Next.js’s current router works and its limitations. Then, we discovered some of the biggest changes coming up with Next.js’s new router, including nested layouts and its new subtree navigation.
There is far more coming up. This RFC includes changes to take into consideration React 18’s new features and server components. Therefore, I highly recommend you check the RFC to get the full gist: https://github.com/vercel/next.js/discussions/37136.
The Next.js team has also planned a future blog post covering more advanced routing. So, stay tuned!
Debugging Next applications can be difficult, especially when users experience issues that are difficult to reproduce. If you’re interested in monitoring and tracking state, automatically surfacing JavaScript errors, and tracking slow network requests and component load time, try LogRocket.


LogRocket is like a DVR for web and mobile apps, recording literally everything that happens on your Next.js app. Instead of guessing why problems happen, you can aggregate and report on what state your application was in when an issue occurred. LogRocket also monitors your app's performance, reporting with metrics like client CPU load, client memory usage, and more.
The LogRocket Redux middleware package adds an extra layer of visibility into your user sessions. LogRocket logs all actions and state from your Redux stores.
Modernize how you debug your Next.js apps — start monitoring for free.
Hey there, want to help make our blog better?
Join LogRocket’s Content Advisory Board. You’ll help inform the type of content we create and get access to exclusive meetups, social accreditation, and swag.
Sign up now
Get to know RxJS features, benefits, and more to help you understand what it is, how it works, and why you should use it.

Explore how to effectively break down a monolithic application into microservices using feature flags and Flagsmith.

Native dialog and popover elements have their own well-defined roles in modern-day frontend web development. Dialog elements are known to […]

LlamaIndex provides tools for ingesting, processing, and implementing complex query workflows that combine data access with LLM prompting.