A crucial part of application development is gracefully handling network requests. Responses returned by a network may consist of unexpected results, and in order to have a good user experience, you need to take care of edge cases in advance.

In this article, we will take a look at how to handle REST API requests in Flutter using the Dio package.
Dio is a powerful HTTP client for Dart. It has support for interceptors, global configuration, FormData, request cancellation, file downloading, and timeout, among others. Flutter offers an http package that’s nice for performing basic network tasks but is pretty daunting to use when handling some advanced features. By comparison, Dio provides an intuitive API for performing advanced network tasks with ease.
Let’s get started by creating a new Flutter project. Use the following command:
flutter create dio_networking
You can open the project using your favorite IDE, but for this example, I’ll be using VS Code:
code dio_networking
Add the Dio package to your pubspec.yaml file:
dependencies:
  dio: ^4.0.0
Replace the content of your main.dart file with the following:
import 'package:flutter/material.dart';

void main() {
  runApp(MyApp());
}

class MyApp extends StatelessWidget {
  @override
  Widget build(BuildContext context) {
    return MaterialApp(
      title: 'Dio Networking',
      theme: ThemeData(
        primarySwatch: Colors.blue,
      ),
      debugShowCheckedModeBanner: false,
      home: HomePage(),
    );
  }
}
We will define the HomePage class after fetching the network data.
Now, let’s take a look at the network data that we’ll use for the demonstration.
We will use REQ | RES to test our network data because it provides you with a hosted REST API consisting of sample user data and allows you to perform a variety of network operation tests.
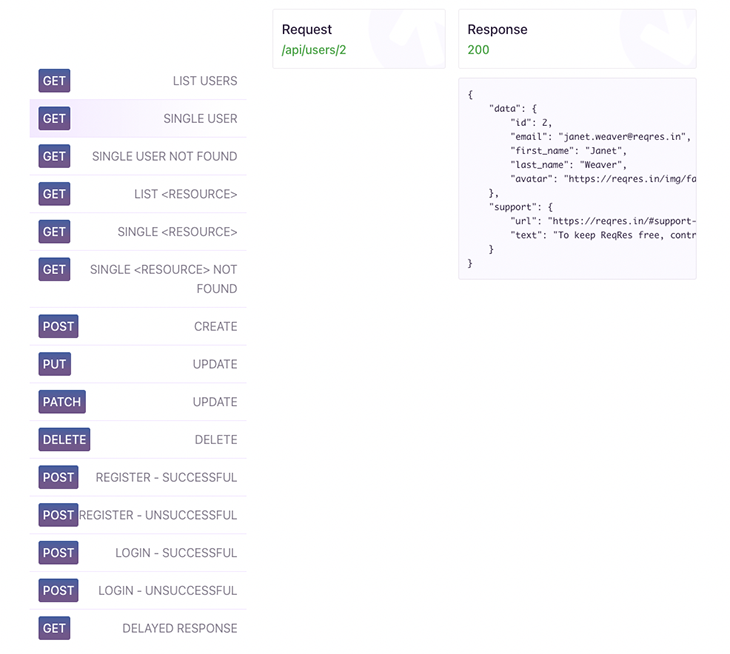
We will start by doing a simple GET request for fetching Single User data. The endpoint required for that is:
GET https://reqres.in/api/users/<id>
Note here that <id> has to be replaced with an integer value that corresponds with and is used to find a specific user.
Below is what a sample JSON response should look like when the request is successful:
{
    "data": {
        "id": 2,
        "email": "[email protected]",
        "first_name": "Janet",
        "last_name": "Weaver",
        "avatar": "https://reqres.in/img/faces/2-image.jpg"
    }
}
If you want to easily handle the data returned from a REST API request, you’ll want to define a model class.
For now, we’ll just define a simple class for storing single user data. You can use either pure Dart code or a library interchangeably without making any other changes in the same example app. We’ll define a model class manually like this:
class User {
  User({
    required this.data,
  });

  Data data;

  factory User.fromJson(Map<String, dynamic> json) => User(
        data: Data.fromJson(json["data"]),
      );

  Map<String, dynamic> toJson() => {
        "data": data.toJson(),
      };
}


class Data {
  Data({
    required this.id,
    required this.email,
    required this.firstName,
    required this.lastName,
    required this.avatar,
  });

  int id;
  String email;
  String firstName;
  String lastName;
  String avatar;

  factory Data.fromJson(Map<String, dynamic> json) => Data(
        id: json["id"],
        email: json["email"],
        firstName: json["first_name"],
        lastName: json["last_name"],
        avatar: json["avatar"],
      );

  Map<String, dynamic> toJson() => {
        "id": id,
        "email": email,
        "first_name": firstName,
        "last_name": lastName,
        "avatar": avatar,
      };
}
To prevent any unnoticed errors that might occur while defining manually, you can use JSON serialization and generate the factory methods automatically.
For this, you will need the following packages:
Add them to your pubspec.yaml file:
dependencies:
  json_annotation: ^4.0.1

dev_dependencies:
  json_serializable: ^4.1.3
  build_runner: ^2.0.4
Separate the user and data classes into two Dart files — user.dart and data.dart, respectively — and modify their content.
The User class content will be as follows:
import 'package:json_annotation/json_annotation.dart';

import 'data.dart';

part 'user.g.dart';

@JsonSerializable()
class User {
  User({
    required this.data,
  });

  Data data;

  factory User.fromJson(Map<String, dynamic> json) => _$UserFromJson(json);
  Map<String, dynamic> toJson() => _$UserToJson(this);
}
The Data class content will be as follows:
import 'package:json_annotation/json_annotation.dart';

part 'data.g.dart';

@JsonSerializable()
class Data {
  Data({
    required this.id,
    required this.email,
    required this.firstName,
    required this.lastName,
    required this.avatar,
  });

  int id;
  String email;
  @JsonKey(name: 'first_name')
  String firstName;
  @JsonKey(name: 'last_name')
  String lastName;
  String avatar;

  factory Data.fromJson(Map<String, dynamic> json) => _$DataFromJson(json);
  Map<String, dynamic> toJson() => _$DataToJson(this);
}
The fromJson and toJson methods will be generated by the json_serializable package. Some of the class attributes are annotated with @JsonKey because the name defined in the Map (and returned by the API request) is different than their attribute name.
You can trigger the code generation using the following command:
flutter pub run build_runner build
Keep the code generator running in a server so that any new changes to the class automatically trigger the code generation. Use the following command to do this:
flutter pub run build_runner serve --delete-conflicting-outputs
The --delete-conflicting-outputs flag helps to regenerate a part of the generated class if any conflicts are found.
You can create a separate class containing the methods for performing the network operations. This helps to separate the functional logic from the user interface code.
To do this, create a new file dio_client.dart containing the DioClient class:
class DioClient {
  // TODO: Set up and define the methods for network operations
}
You can initialize Dio using the following:
import 'package:dio/dio.dart';

class DioClient {
  final Dio _dio = Dio();
}
Define the base URL of the API server:
import 'package:dio/dio.dart';

class DioClient {
  final Dio _dio = Dio();

  final _baseUrl = 'https://reqres.in/api';

  // TODO: Add methods
}
Now, we can define the methods required for performing the network requests.
We will define a method for retrieving a single user data from the API by passing an id:
Future<User> getUser({required String id}) async {
    // Perform GET request to the endpoint "/users/<id>"
    Response userData = await _dio.get(_baseUrl + '/users/$id');

    // Prints the raw data returned by the server
    print('User Info: ${userData.data}');

    // Parsing the raw JSON data to the User class
    User user = User.fromJson(userData.data);

    return user;
}
The above method works, but if there are any coding errors here, the app will crash when you run it.
A better and more functional way to do this is to wrap the get() method with a try-catch block:
Future<User?> getUser({required String id}) async {
  User? user;
  try {
    Response userData = await _dio.get(_baseUrl + '/users/$id');
    print('User Info: ${userData.data}');
    user = User.fromJson(userData.data);
  } on DioError catch (e) {
    // The request was made and the server responded with a status code
    // that falls out of the range of 2xx and is also not 304.
    if (e.response != null) {
      print('Dio error!');
      print('STATUS: ${e.response?.statusCode}');
      print('DATA: ${e.response?.data}');
      print('HEADERS: ${e.response?.headers}');
    } else {
      // Error due to setting up or sending the request
      print('Error sending request!');
      print(e.message);
    }
  }
  return user;
}
In this example, we have also made the User nullable so that, in case of any error, the server will return null instead of any actual user data.
In order to display the user data, we have to build the HomePage class. Create a new file called home_page.dart and add the following to it:
class HomePage extends StatefulWidget {
  @override
  _HomePageState createState() => _HomePageState();
}

class _HomePageState extends State<HomePage> {
  final DioClient _client = DioClient();

  @override
  Widget build(BuildContext context) {
    return Scaffold(
      appBar: AppBar(
        title: Text('User Info'),
      ),
      body: Center(
        child: FutureBuilder<User?>(
          future: _client.getUser(id: '1'),
          builder: (context, snapshot) {
            if (snapshot.hasData) {
              User? userInfo = snapshot.data;
              if (userInfo != null) {
                Data userData = userInfo.data;
                return Column(
                  mainAxisSize: MainAxisSize.min,
                  children: [
                    Image.network(userData.avatar),
                    SizedBox(height: 8.0),
                    Text(
                      '${userInfo.data.firstName} ${userInfo.data.lastName}',
                      style: TextStyle(fontSize: 16.0),
                    ),
                    Text(
                      userData.email,
                      style: TextStyle(fontSize: 16.0),
                    ),
                  ],
                );
              }
            }
            return CircularProgressIndicator();
          },
        ),
      ),
    );
  }
}
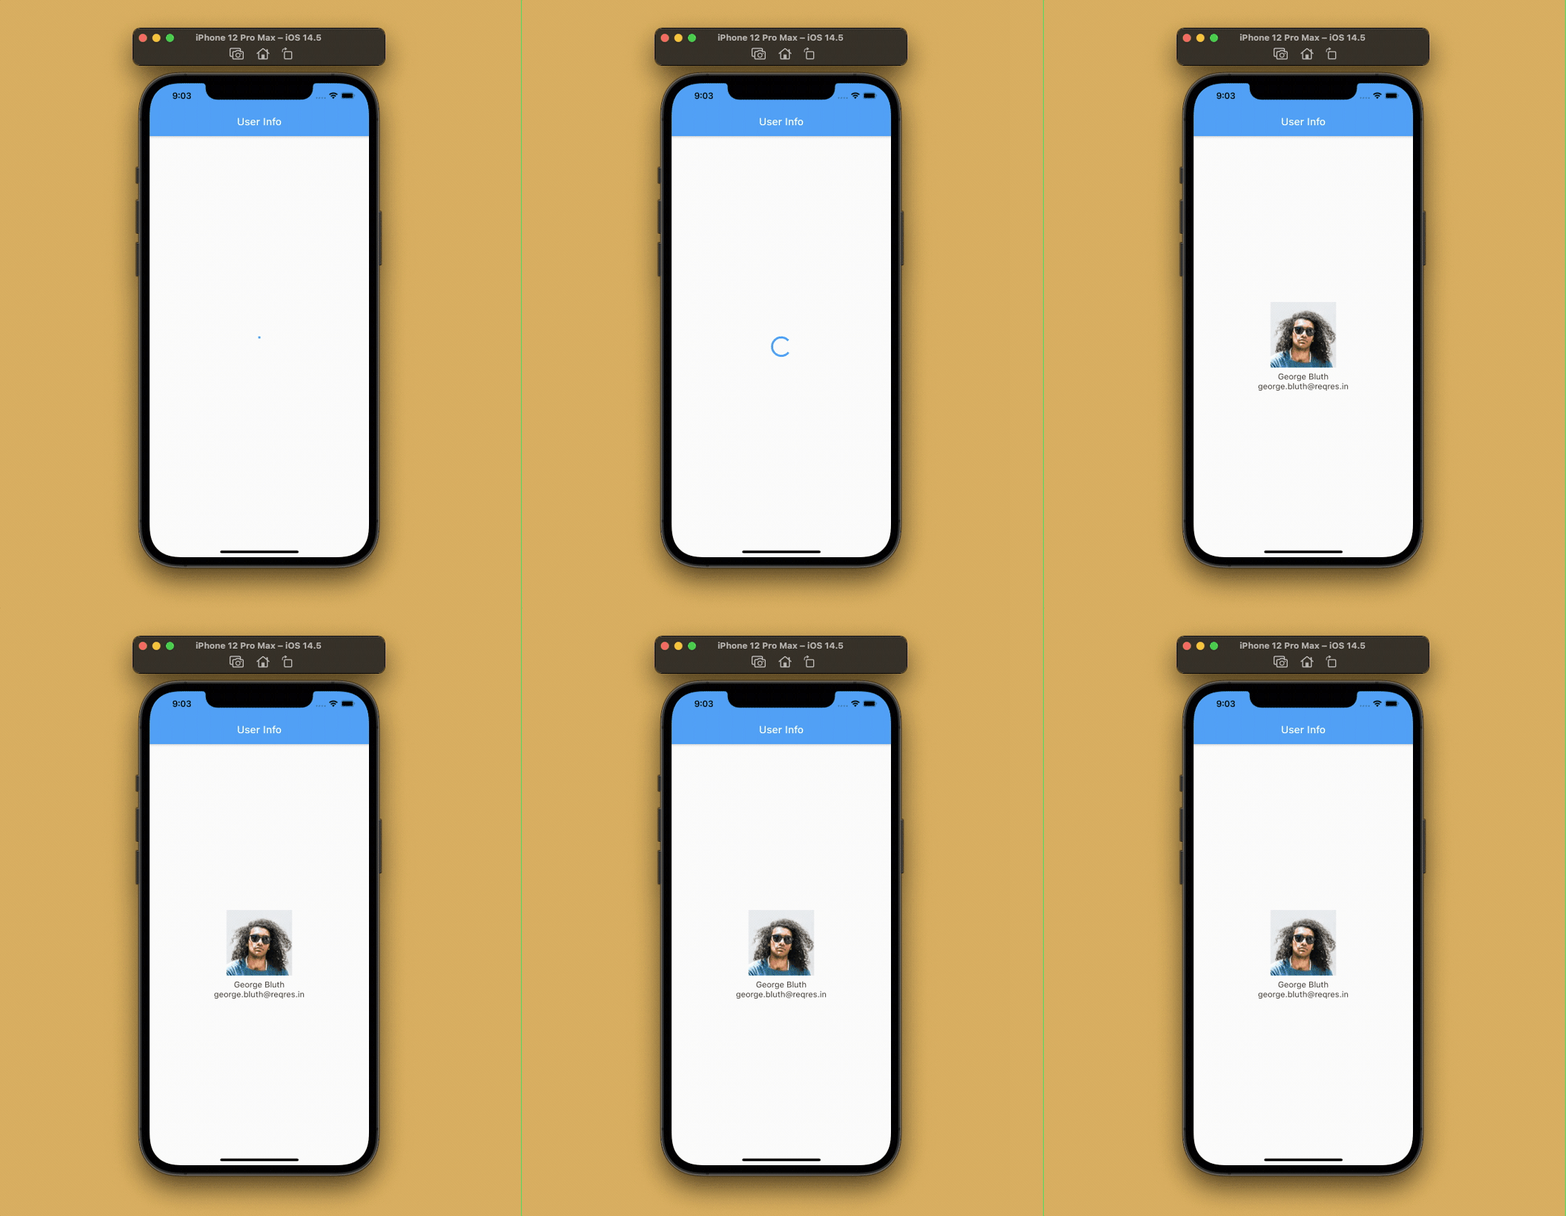
Inside the _HomePageState class, the DioClient is instantiated first. Then, inside the build method, a FutureBuilder is used to retrieve and show the user data. A CircularProgressIndicator will be displayed while the result is being fetched.
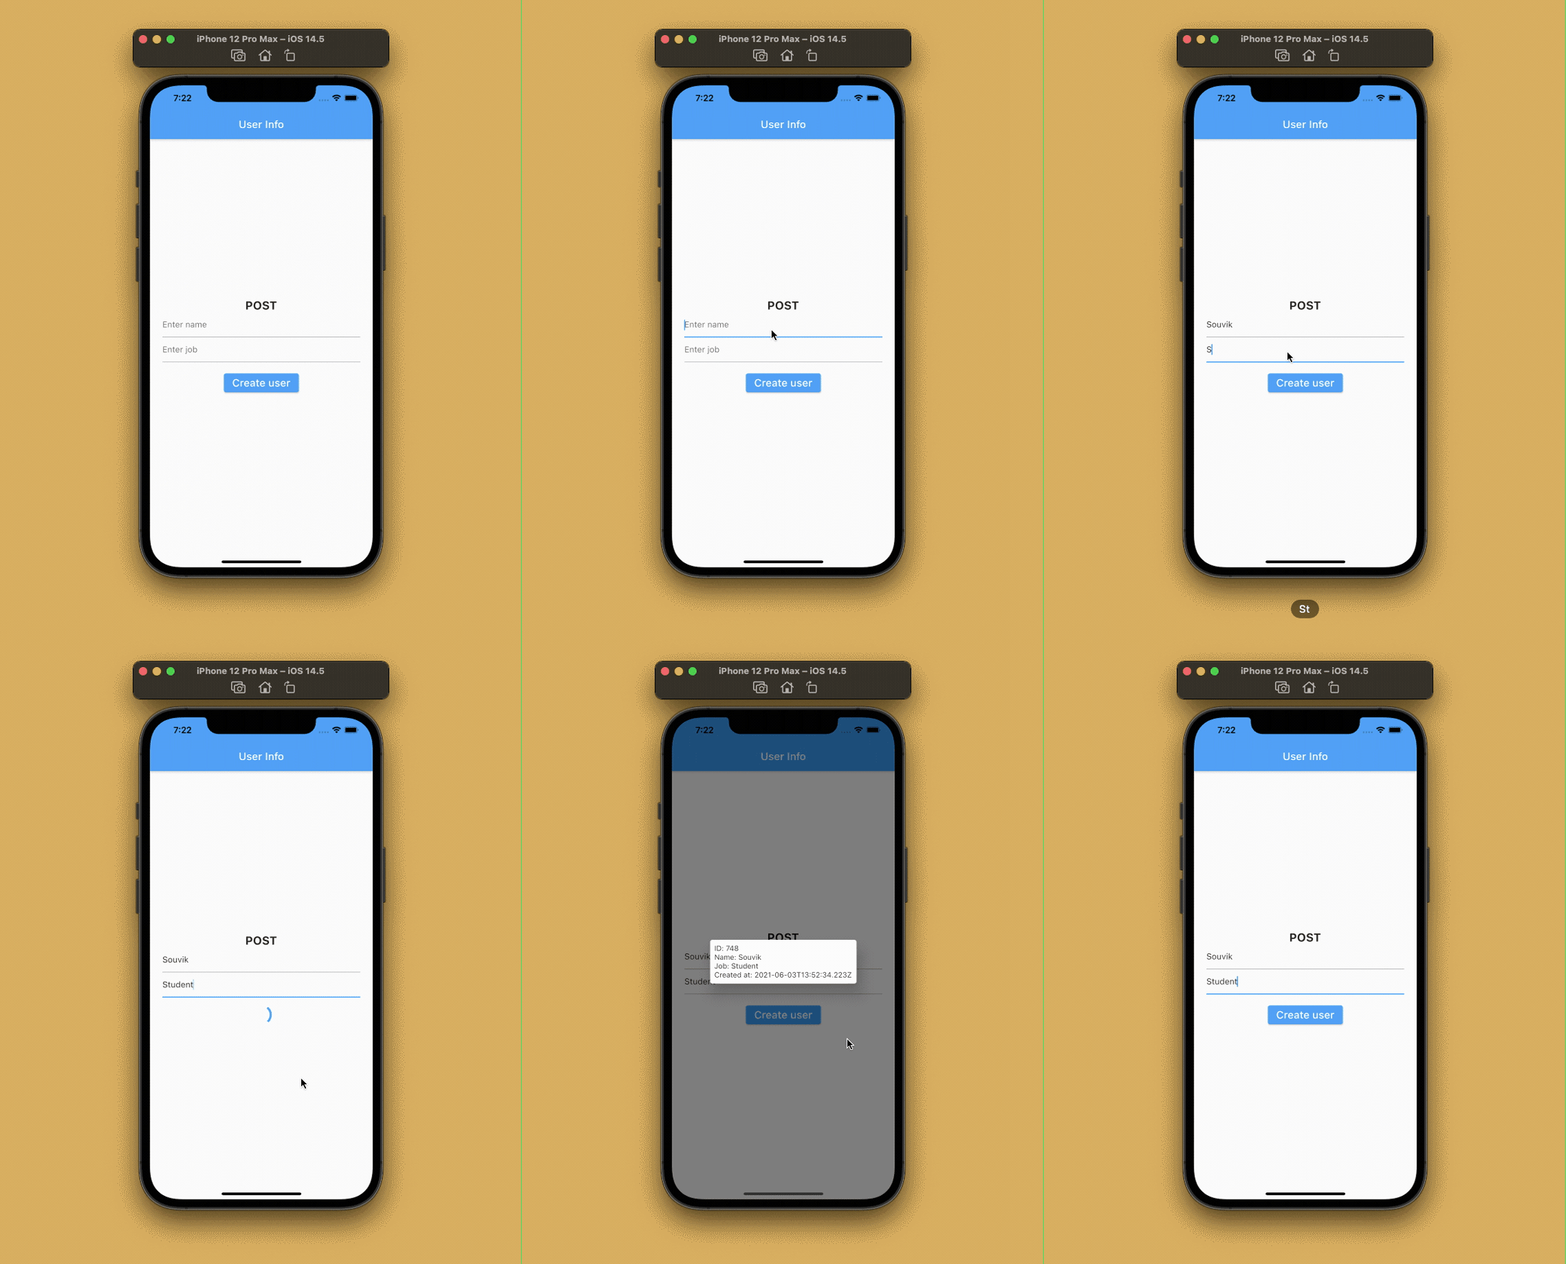
You can use a POST request for sending data to the API. Let’s try sending a request and creating a new user.
First, I’ll define another model class, because the properties of this JSON data will be different from the earlier defined User model class, for handling the user information that we have to send:
import 'package:json_annotation/json_annotation.dart';

part 'user_info.g.dart';

@JsonSerializable()
class UserInfo {
  String name;
  String job;
  String? id;
  String? createdAt;
  String? updatedAt;

  UserInfo({
    required this.name,
    required this.job,
    this.id,
    this.createdAt,
    this.updatedAt,
  });

  factory UserInfo.fromJson(Map<String, dynamic> json) => _$UserInfoFromJson(json);
  Map<String, dynamic> toJson() => _$UserInfoToJson(this);
}
Specify a method inside the DioClient class for creating a new user:
Future<UserInfo?> createUser({required UserInfo userInfo}) async {
  UserInfo? retrievedUser;

  try {
    Response response = await _dio.post(
      _baseUrl + '/users',
      data: userInfo.toJson(),
    );

    print('User created: ${response.data}');

    retrievedUser = UserInfo.fromJson(response.data);
  } catch (e) {
    print('Error creating user: $e');
  }

  return retrievedUser;
}
This takes a UserInfo object as the parameter, which it then sends to the /users endpoint of the API. It returns a response with the newly created user information and the creation date and time.
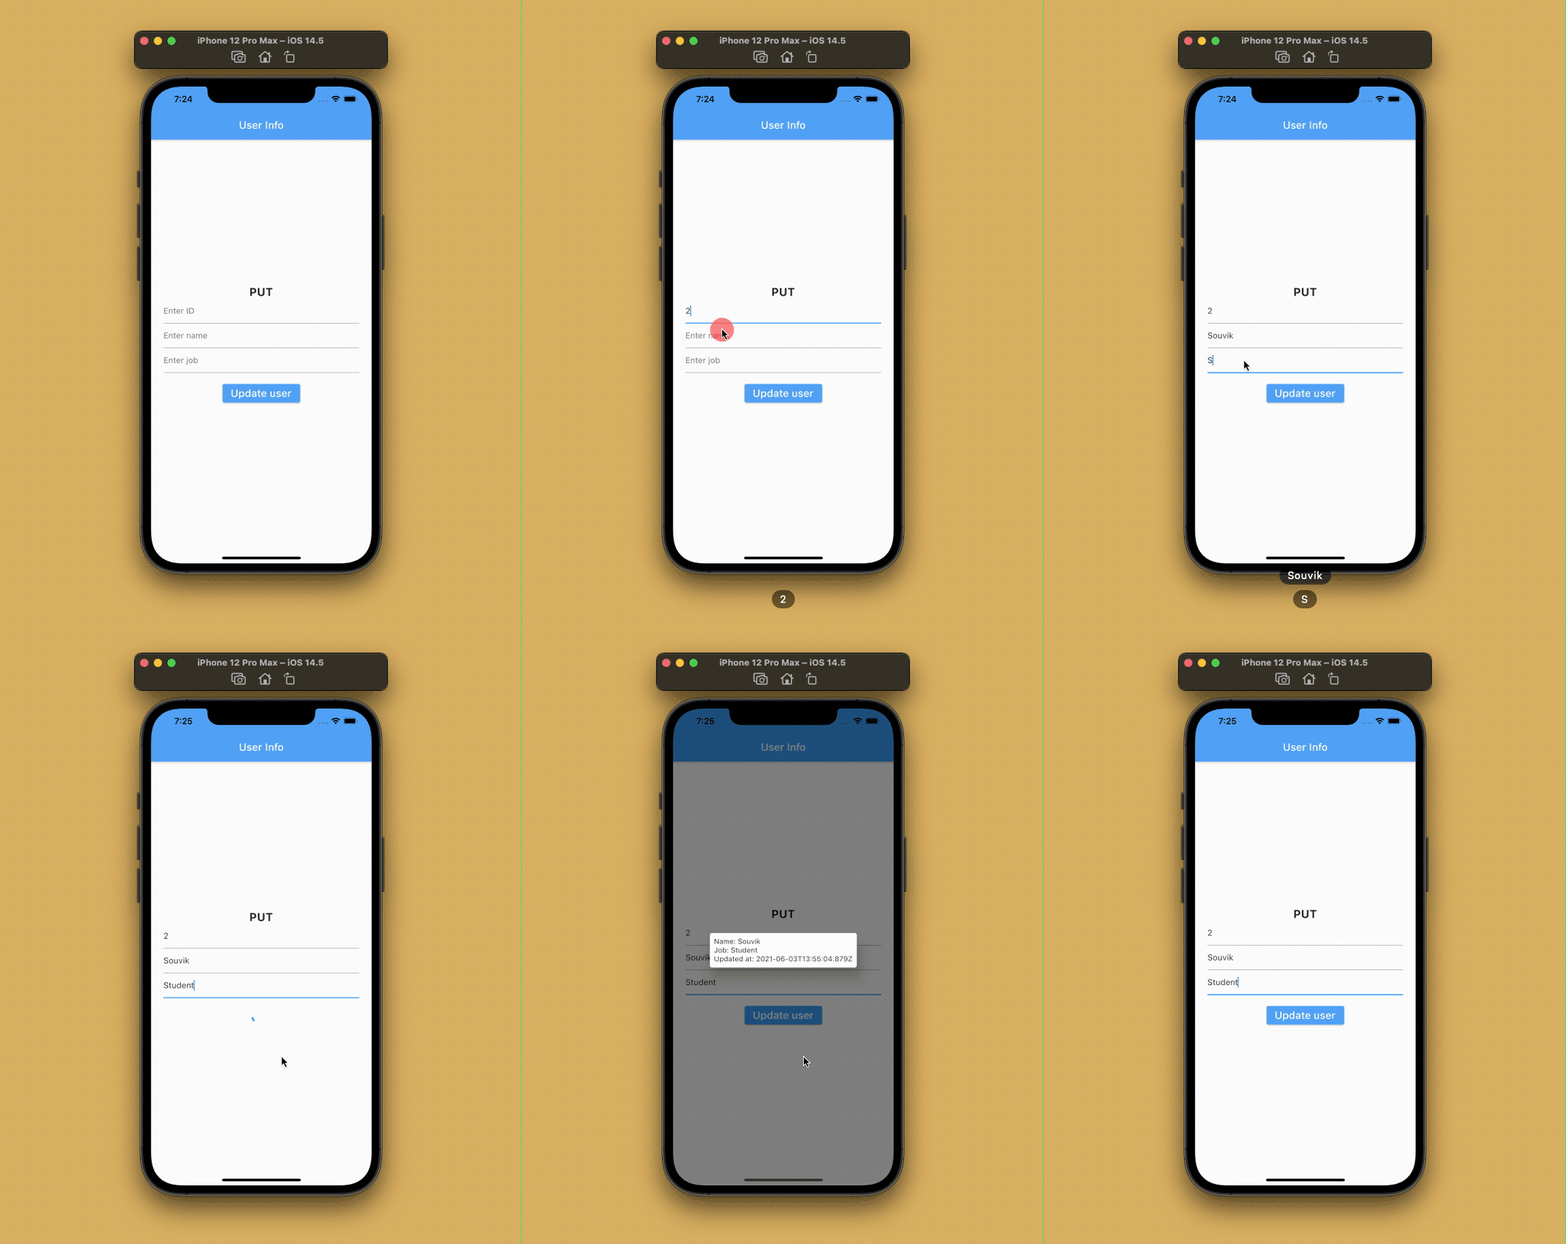
You can update the data present in the API server by using a PUT request.
To define a new method for updating a user within the DioClient class, we have to pass the updated UserInfo object along with the id of the user to whom we want to apply the update.
Future<UserInfo?> updateUser({
  required UserInfo userInfo,
  required String id,
}) async {
  UserInfo? updatedUser;

  try {
    Response response = await _dio.put(
      _baseUrl + '/users/$id',
      data: userInfo.toJson(),
    );

    print('User updated: ${response.data}');

    updatedUser = UserInfo.fromJson(response.data);
  } catch (e) {
    print('Error updating user: $e');
  }

  return updatedUser;
}
The above code will send a PUT request to the endpoint /users/<id> along with the UserInfo data. It then returns the updated user information and the date and time of the update.
You can delete some data from the server by using a DELETE request.
Define a new method inside the DioClient class for deleting a user from the API server by passing the id of the user.
Future<void> deleteUser({required String id}) async {
  try {
    await _dio.delete(_baseUrl + '/users/$id');
    print('User deleted!');
  } catch (e) {
    print('Error deleting user: $e');
  }
}
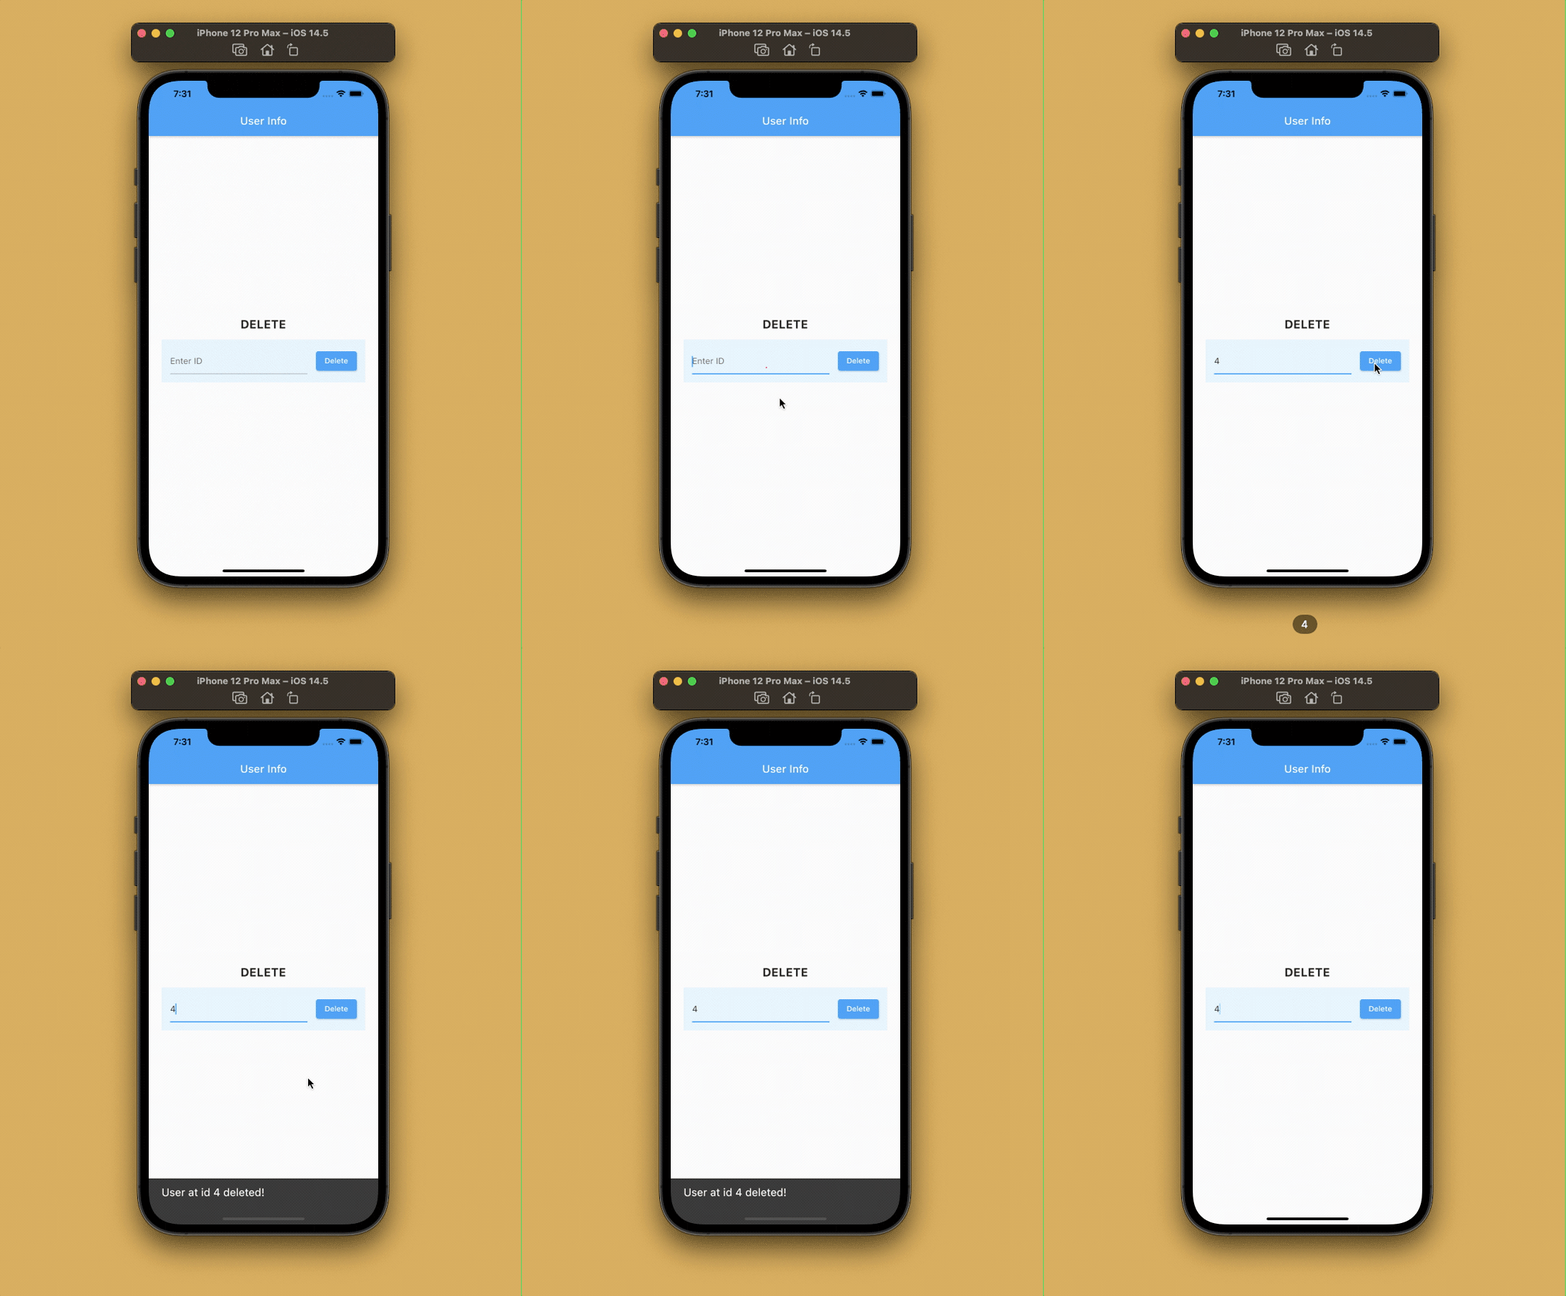
Instead of passing the endpoint with baseUrl every time, you can just define it inside BaseOptions and pass it once while instantiating Dio.
To do this, you’ll want to initialize Dio as follows:
final Dio _dio = Dio(
  BaseOptions(
    baseUrl: 'https://reqres.in/api',
    connectTimeout: 5000,
    receiveTimeout: 3000,
  ),
);
This method provides various other customizations as well — in this same example, we have defined the connectTimeout and receiveTimeout for the requests.
Dio makes the process of uploading files to a server much simpler. It can process multiple simultaneous file uploads and has a simple callback for tracking their progress, which makes it much easier to use than the http package.
You can easily upload files to a server using FormData and Dio. Here’s an example of what sending an image file to the API would look like:
String imagePath;

FormData formData = FormData.fromMap({
  "image": await MultipartFile.fromFile(
    imagePath,
    filename: "upload.jpeg",
  ),
});

Response response = await _dio.post(
  '/search',
  data: formData,
  onSendProgress: (int sent, int total) {
    print('$sent $total');
  },
);
You can intercept Dio requests, responses, and errors before they are handled by using then or catchError. In a practical scenario, interceptors are useful for authorization using JSON Web Tokens (JWT), parsing JSON, handling errors, and easily debugging Dio network requests.
You can run the interceptor by overriding the callbacks at three places: onRequest, onResponse, and onError.
For our example, we will define a simple interceptor for logging different types of requests. Create a new class called Logging that extends from Interceptor:
import 'package:dio/dio.dart';

class Logging extends Interceptor {
  @override
  void onRequest(RequestOptions options, RequestInterceptorHandler handler) {
    print('REQUEST[${options.method}] => PATH: ${options.path}');
    return super.onRequest(options, handler);
  }

  @override
  void onResponse(Response response, ResponseInterceptorHandler handler) {
    print(
      'RESPONSE[${response.statusCode}] => PATH: ${response.requestOptions.path}',
    );
    return super.onResponse(response, handler);
  }

  @override
  void onError(DioError err, ErrorInterceptorHandler handler) {
    print(
      'ERROR[${err.response?.statusCode}] => PATH: ${err.requestOptions.path}',
    );
    return super.onError(err, handler);
  }
}
Here, we have overridden various callbacks that get triggered by Dio requests and added a print statement to each of them for logging the requests in the console.
Add the interceptor to Dio during initialization:
final Dio _dio = Dio(
    BaseOptions(
      baseUrl: 'https://reqres.in/api',
      connectTimeout: 5000,
      receiveTimeout: 3000,
    ),
  )..interceptors.add(Logging());
The logged results in the Debug console will look like this:

Networking in Flutter using Dio feels like a breeze and it gracefully handles many edge cases. Dio makes it easier to handle multiple simultaneous network requests, all with the safety of an advanced error handling technique. It also allows you to avoid the boilerplate code you’d need to use the http package for tracking any file upload progress. And there are various other advanced customizations that you can pull off using the Dio package that go beyond what we’ve covered here.
Thank you for reading the article! If you have any suggestions or questions about the article or examples, feel free to connect with me on Twitter or LinkedIn. You can also find the repository of the sample app on my GitHub.
Install LogRocket via npm or script tag. LogRocket.init() must be called client-side, not
server-side
$ npm i --save logrocket

// Code:

import LogRocket from 'logrocket';
LogRocket.init('app/id');
// Add to your HTML:

<script src="https://cdn.lr-ingest.com/LogRocket.min.js"></script>
<script>window.LogRocket && window.LogRocket.init('app/id');</script>
Would you be interested in joining LogRocket's developer community?
Join LogRocket’s Content Advisory Board. You’ll help inform the type of content we create and get access to exclusive meetups, social accreditation, and swag.
Sign up now
Discover how the Interface Segregation Principle (ISP) keeps your code lean, modular, and maintainable using real-world analogies and practical examples.

<selectedcontent> element improves dropdowns

Learn how to implement an advanced caching layer in a Node.js app using Valkey, a high-performance, Redis-compatible in-memory datastore.

Learn how to properly handle rejected promises in TypeScript using Angular, with tips for retry logic, typed results, and avoiding unhandled exceptions.