Editor’s note: This article was last updated 16 June 2023 to include an example of navigating between tabs using Expo Router.

A decade ago, if anyone told you that you could build native mobile applications using JavaScript without compromising UX, you wouldn’t believe it, right? Then, React Native came along and made it possible. Similarly, a few years ago, if someone told you that you could build cross-platform apps using JavaScript without heavy emulator or developer environments, like Android Studio or Xcode, you wouldn’t believe it either, right? Then, Expo was created.
In this article, we’ll review some pros and cons of Expo Router, which is in v1 at the time of writing. To demonstrate its core concepts, we’ll build a React Native application using Expo Router for navigation. Let’s get started!
Jump ahead:
Expo is an open source platform and set of tools that simplifies the process of building, deploying, and maintaining React Native applications. It provides a development environment, build infrastructure, and a collection of libraries and APIs that enhance the development experience.
With Expo, developers can create cross-platform mobile applications using JavaScript and React Native without needing extensive native code development or configuration. It abstracts away the complexities of setting up and managing native projects, allowing developers to focus on writing code and building features.
Expo and React Native are often interchanged for one another. Although they have similar features, there are a few important differences between them:
However, Expo and React Native share one major feature, navigation. In React Native applications, routing is implemented using React Navigation, which wraps your app with a navigator component that manages the navigation history and presentation of screens in the app.
Although this worked well, it had some issues. For example, you had to install peer dependencies like react-native-screens and react-native-safe-area-context, which add extra weight to your app.
We all know that JavaScript developers love file-based routing. Next.js’s file-based routing style works well and has quickly become the current standard for routing in JavaScript applications. This led Evan Bacon, the creator of Expo, to build a new library called Expo Router, which works similarly to the Next.js router. Both generate nested navigation and deep links based entirely on a project’s file structure.
Expo Router is a routing concept that extends the functionality of the React Navigation suite. If you’re already familiar with how navigation works in Next.js, understanding Expo Router should be pretty straightforward. Essentially, every file in your app directory becomes a route in your application, making it easy to manage navigation within your app.
Let’s review the core features of Expo Router:
app directoryLink componentimport { Link } from "expo-router";
export default function Page() {
return (
Home
);
}
So far, the only major tradeoff with the new Expo Router is that it is limited and opinionated. Some developers may like the Expo Router features but want to rearrange the file directory structure. Unfortunately, due to its limitations, you might not be able to customize your Expo Router instance to fit your preferred structure just yet.
React Native Navigation and Expo Navigation are two popular navigation solutions for React Native applications. While they serve a similar purpose of handling navigation within an app, there are some noteworthy differences between them.
React Native Navigation provides a rich set of features, including support for bottom tabs, side menu drawers, stack-based navigation, and deep linking. It also offers advanced customization options, allowing you to finely control the navigation stack and perform custom transitions. However, it requires some native setup and configuration, making the initial setup a bit more complex compared to other solutions.
Expo Navigation offers a declarative API and a set of configurable navigators, including Stack Navigator, Tab Navigator, Drawer Navigator, and Switch Navigator. It provides a simple and intuitive way to define navigation flows and screens using components and props. Designed to work out of the box with Expo-managed projects, Expo Navigation eliminates the need for complex native configurations.
Expo Router, in general, makes app development faster and more intuitive for developers. Deep linking works right out of the box, and Expo Router is naturally URL-based, making it simple to target webpages.
React Navigation is unquestionably primitive, and you must create your own patterns for deeplinks, stack nesting, etc. Expo Router provides thoughtful APIs, but they may be too limiting. Expo Router is easier to use due to its simpler DX.
We’ll build a contacts directory app that uses the Expo Router to navigate between screens. To follow along with this tutorial, you’ll need the following:
npm install -g @aws-amplify/cliamplify configurenpm install -g expo-cliFeel free to check out the GitHub repo with the complete code for the demo.
Let’s get started by scaffolding a new Expo app. Run the command below in your terminal:
npx create-expo-app@latest --example with-router
The code above will create a new React Native application with Expo Router configured. Change the directory, initialize Amplify, and install peer dependencies using the following commands in your terminal:
cd ReactNativeContactExpoApp
npx amplify-app@latest
npm install aws-amplify @react-native-community/netinfo @react-native-async-storage/async-storage
To run the app, run yarn start or npm run start:
Starting Metro Bundler
▄▄▄▄▄▄▄▄▄▄▄▄▄▄▄▄▄▄▄▄▄▄▄▄▄▄▄
█ ▄▄▄▄▄ █▄▄███▀ ███ ▄▄▄▄▄ █
█ █   █ █ ▀█ ▄ █▄██ █   █ █
█ █▄▄▄█ █▄ ▄▄▀▀█▄██ █▄▄▄█ █
█▄▄▄▄▄▄▄█▄▀▄▀▄█ █ █▄▄▄▄▄▄▄█
█▄▄▄ ▀▀▄█ ▀████▀██▄██▄ ▄▀▄█
█▀▄▀▄▄▄▄▀▄██▀▀▀▄█▄█ ▀██▀███
█▄▀█▀ ▄▄▀▄▄▀ ▄ █ ▄█ ▄ █ █▀█
█▀▄▀██▀▄█ ▀ █▀███ ▀▀█▀▀█ ▀█
███▄▄▄▄▄█ ▄▀ ▄  ▄ ▄▄▄ ▀▄█▀█
█ ▄▄▄▄▄ ███ ▀▄███ █▄█ █▄  █
█ █   █ █▀▀█▀ ▀▀▀▄▄   █▀▀ █
█ █▄▄▄█ █  ▄▄█▀ ▀▄▀▄█▄▄ ▄██
█▄▄▄▄▄▄▄█▄█▄██▄█▄██████▄▄▄█

› Metro waiting on exp://192.168.55.200:19000
› Scan the QR code above with Expo Go (Android) or the Camera app (iOS)

› Web is waiting on http://localhost:19000

› Press a │ open Android
› Press i │ open iOS simulator
› Press w │ open web

› Press j │ open debugger
› Press r │ reload app
› Press m │ toggle menu

› Press ? │ show all commands
Scan the QR code on your mobile Expo Go app, and it’ll compile.
Just like with every other database, DataStore requires a model. To generate this model, head to the Amplify Directory > Backend > API > (Amplify project name) > schema.graphql. Modify schema.graphql with the following code:
type Contact @model {
  id: ID!
  name: String!
  phone: String!
  email: String!
  address: String
  message: String
}
The contact model has id, name, title, phone, and email fields. Let’s go ahead and generate the model with the following command in your terminal:
npm run amplify-modelgen
The code above will create a src/models folder with the model and GraphQL schema.
We need to initialize an Amplify backend environment for the application. To do this, run the following command in your terminal:
amplify init
? Enter a name for the environment dev
? Choose your default editor: Visual Studio Code
Using default provider  awscloudformation
? Select the authentication method you want to use: AWS profile
This will create a configuration file in src/aws-config.js. Next, we’ll deploy the backend and create AWS resources using the following command:
amplify push
...
Do you want to generate code for your newly created GraphQL API? No
...
Depending on the quality of your internet connection, this might take some time to deploy.
Let’s go ahead and configure the Expo app to work with Amplify. Create an app/index.js file and add the code below:
import config from '../src/aws-exports';
import { DataStore, Amplify } from 'aws-amplify';

Amplify.configure(config)
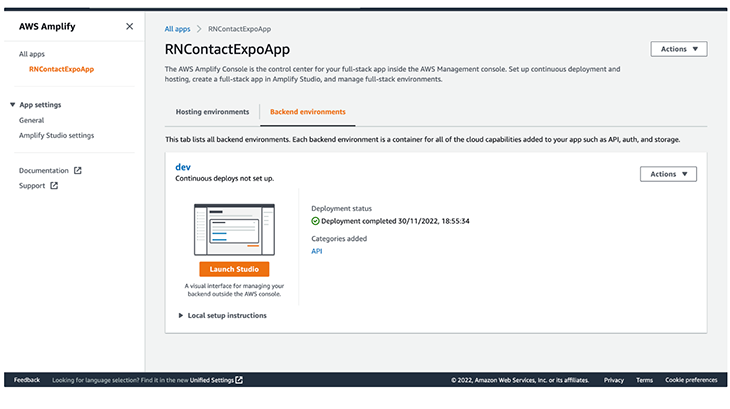
Now, let’s add some contacts to our DataStore. Head to the AWS Amplify console in your browser. As a shortcut, you can run amplify console in your terminal and select AWS Console. To create contacts with Amplify Studio, go to the Amplify dashboard and click Launch Studio:
You should see something like the following:
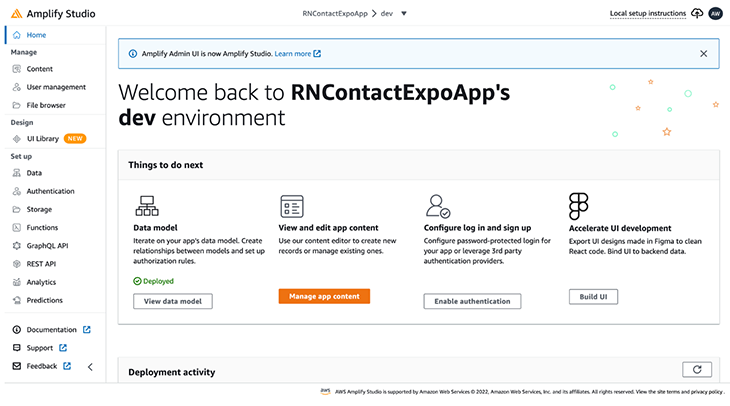
Click the Data menu by the left sidebar of the dashboard, then click Save and Deploy:
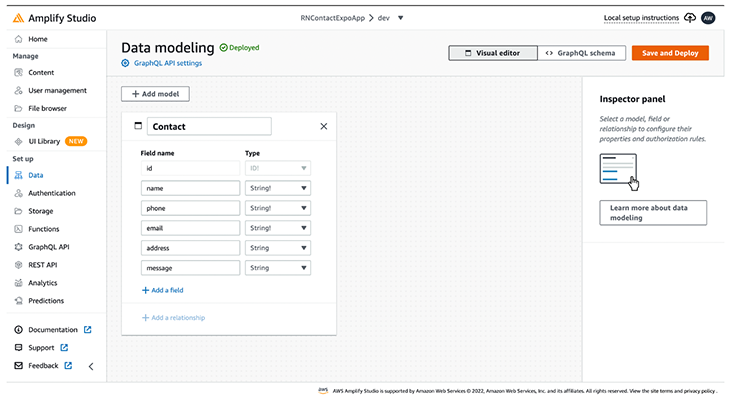
You can see the schema that we created and edit it using the UI. Deploying the data model might take few minutes, depending on your internet connection:
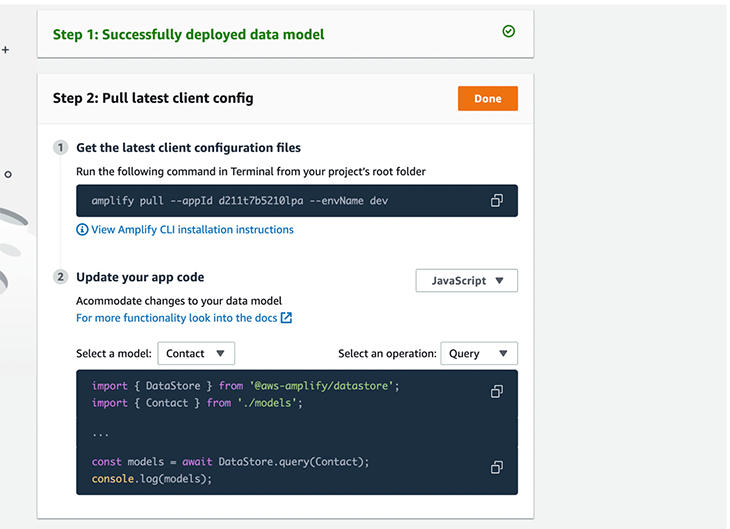
When it’s done deploying, open the Content menu:
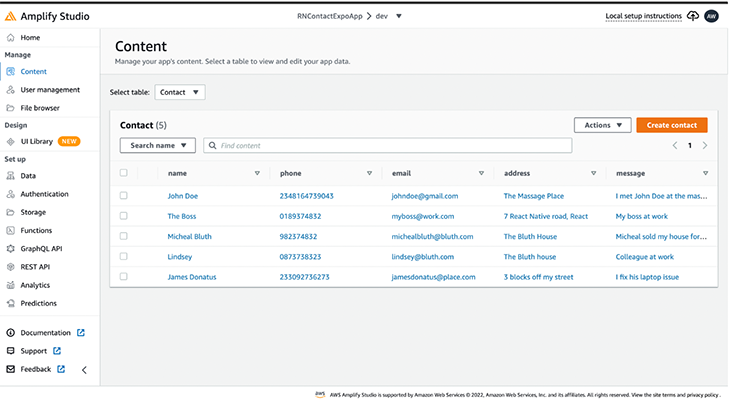
To create a new contact, click the Create contact button. You can also auto-generate seed data by clicking the Actions dropdown and selecting Auto-generate data. That’s it! We’ve successfully created contacts for the application.
Now, let’s render the contacts. Update the app/index.js file with the following code:
import { View, Text, Button } from "react-native";
import { Link, Stack } from "expo-router";
import config from '../src/aws-exports';
import { DataStore, Amplify } from 'aws-amplify';
import { Contact } from '../src/models'
import { useState } from "react";

Amplify.configure(config)

export default function Home() {
    const [contacts, setContacts] = useState([])

    async function fetchContacts() {
        const allContacts = await DataStore.query(Contact)
        setContacts(allContacts)
    }

    fetchContacts()

    return (
        <View style={container}>
            <Stack.Screen options={{ title: "Contacts" }} />
            {
                contacts.map(contact => (
                    <View key={contact.id} style={contactBox}>

                        <View>
                            <Text style={textStyleName}>{contact.name}</Text>
                            <Text style={textStyle}>{contact.phone}</Text>

                        </View>
                        <Link href={`contacts/${contact.id}`}>
                            <Button
                                title="View contact"
                                color="#841584"
                            />
                        </Link>
                    </View>
                ))
            }
        </View>
    );
}
In the code above, we query the contacts from the DataStore by passing the model to the DataStore .query() method:
DataStore.query(Contact)
To get more details for each contact, we used the new Expo Router link component and passed the \[contact.id\](<http://contact.id>) to the href attribute. The dynamic route will be contacts/[contactId].
Let’s create the screen for contact details. In the app directory, create a contacts folder and an [id].js file:
import { Text, View } from "react-native";
import { Stack } from "expo-router";
import { useEffect, useState } from "react";
import { Contact } from "../../src/models";
import { DataStore } from "aws-amplify";

export default function SingleContact({ route }) {
    const [contact, setContact] = useState('')
    useEffect(() => {
        if (!route.params?.id) {
            return
        }
        DataStore.query(Contact, route.params.id).then(setContact)
    }, [route.params?.id])
    return (
        <View style={container}>
            <Stack.Screen options={{ title: contact.name }} />
            <View style={contactBox}>
                <Text style={textStyleName}>{contact.name}</Text>
                <Text style={textStyle}>{contact.phone}</Text>
                <Text style={textStyle}>{contact.email}</Text>
                <Text style={textStyle}>{contact.address}</Text>
                <Text style={textStyle}>{contact.message}</Text>
            </View>
        </View>
    );
}
If you’ve worked with Next.js, this code should look familiar. The major difference is that the Expo Router makes the route object available without importing it.
In DataStore, to query a single item by its ID, you pass the model and ID you want to query. In our case, we pass the params ID. Run your app, and you should get something like the following:
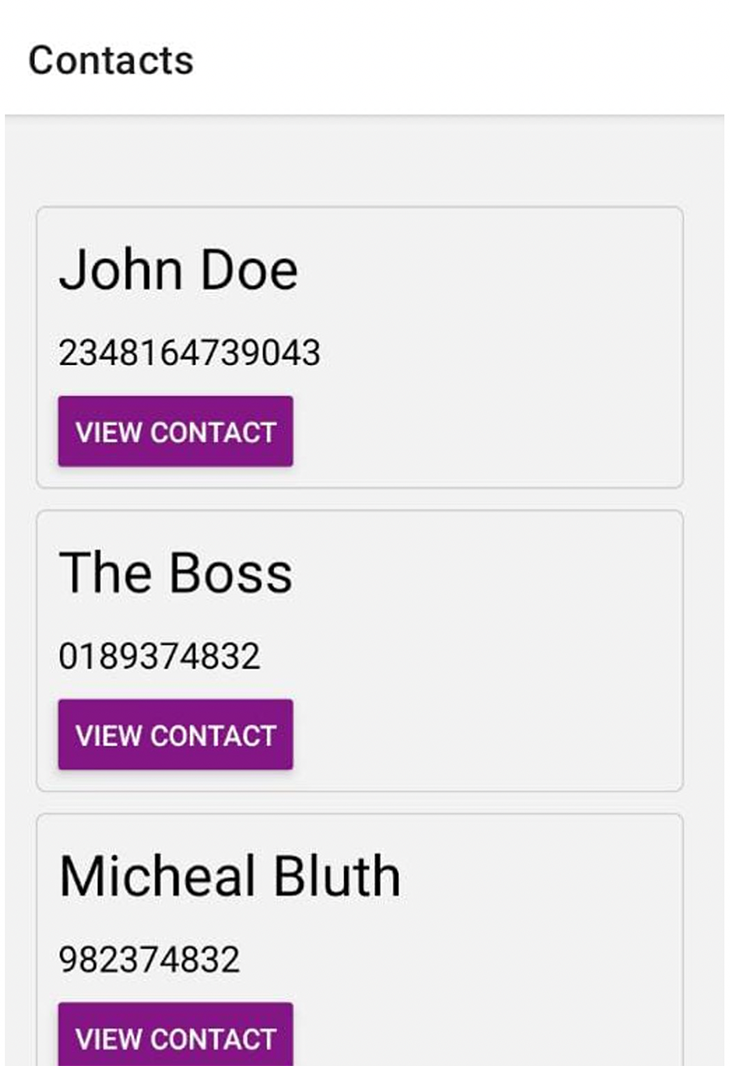
Our final contacts app, built with the new Expo Router
To achieve navigation between tabs using Expo Router, first, run the following code to create a project with expo-router set up:
npx create-expo-app@latest --example with-router
The command above initializes and creates our application with routing functionality. Next, run the following command to start your Expo app:
npm start
Click on the touch app/index.js button on the bottom screen of your emulator to create the app directory with the index.js file. Update the index.js file as follows:
import { Redirect } from "expo-router";
export default function Page() {
  return <Redirect href={'/home'}/>
}
In the app directory, create _layout.js and add the following code:
import { Stack } from "expo-router";
export default () => {
    return <Stack
        screenOptions={{
            headerStyle: {
                backgroundColor: "green"
            },
            headerTintColor: "#1E2632",
            headerTitleStyle: {
                fontWeight: "bold"
            }
        }}
    />
};
In the example above, we use Stack from Expo Router to create a stack navigator. We set the screenOptions prop to customize the header styles for all screens in the stack. In the app directory, create home/feed.js and add the following code:
import { View, Text } from "react-native";
const Home = () => {
  return (
    <View>
      <Text>Home</Text>
    </View>
  );
};
export default Home;
In the home directory, create inbox.js and add the following:
import { View, Text } from "react-native";
const Inbox = () => {
return (
<View>
<Text>Inbox</Text>
</View>
);
};
export default Inbox;
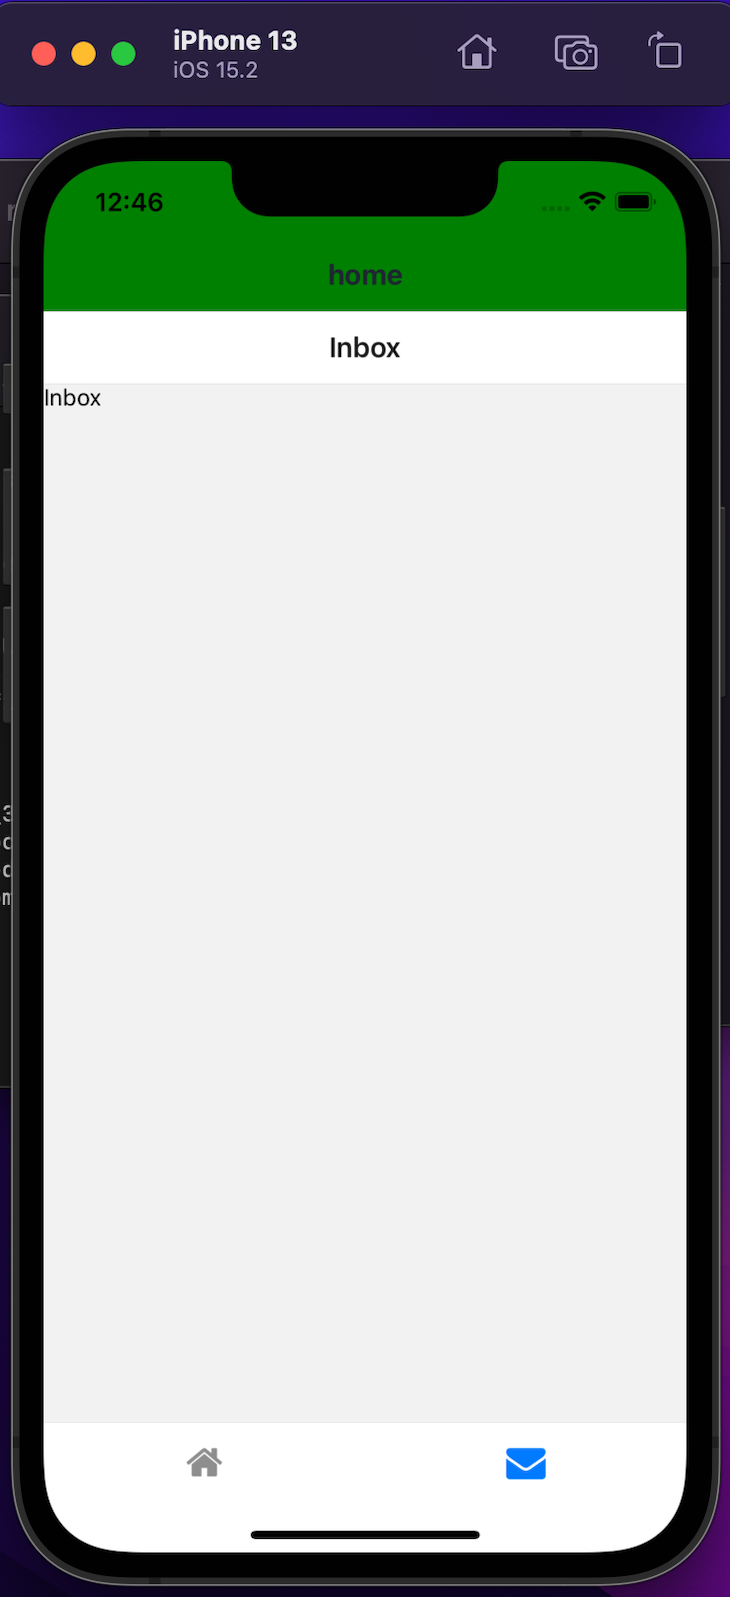
In the app directory, create home/_layout.js and add the following:
import { Tabs } from "expo-router";
import { FontAwesome } from "@expo/vector-icons";
export default () => {
  return (
    <Tabs screenOptions={{ tabBarShowLabel: false }}>
      <Tabs.Screen
        name="feed"
        options={{
          tabBarIcon: ({ color }) => (
            <FontAwesome name="home" size={24} color={color} />
          ),
          title: "Feed",
        }}
      />
      <Tabs.Screen
        name="inbox"
        options={{
          tabBarIcon: ({ color }) => (
            <FontAwesome name="envelope" size={24} color={color} />
          ),
          title: "Inbox",
        }}
      />
    </Tabs>
  );
  // return <Tabs/>
};
In the code above, we use Tabs from Expo Router to create a bottom tab navigator. We set the screenOptions prop to customize the tab icons based on the route name using the FontAwesome icon library. Additionally, we use color props to specify the colors for active and inactive tabs. Now, you should see the following result:
In this article, we learned about Expo Router, how it works, its core features, and its tradeoffs. We built a React Native app with Expo and data from Amplify DataStore. We also built a tab navigator to achieve navigation between tabs using Expo Router.
File-based routing is the future of smooth navigation experience for mobile applications, and Expo Router implements this solution into its library. I hope you enjoyed this article, and be sure to leave a comment if you have any questions. Happy coding!

LogRocket's Galileo AI watches sessions for you and and surfaces the technical and usability issues holding back your React Native apps.
LogRocket also helps you increase conversion rates and product usage by showing you exactly how users are interacting with your app. LogRocket's product analytics features surface the reasons why users don't complete a particular flow or don't adopt a new feature.
Start proactively monitoring your React Native apps — try LogRocket for free.
Would you be interested in joining LogRocket's developer community?
Join LogRocket’s Content Advisory Board. You’ll help inform the type of content we create and get access to exclusive meetups, social accreditation, and swag.
Sign up now
Discover how to use Gemini CLI, Google’s new open-source AI agent that brings Gemini directly to your terminal.

This article explores several proven patterns for writing safer, cleaner, and more readable code in React and TypeScript.

A breakdown of the wrapper and container CSS classes, how they’re used in real-world code, and when it makes sense to use one over the other.

This guide walks you through creating a web UI for an AI agent that browses, clicks, and extracts info from websites powered by Stagehand and Gemini.


