One of the key entities in the software-as-a-service (SaaS) model is the tenant — that is, any customer that signs up to use the given service.

The term tenant is taken from the concept of renting physical property. Tenants pay rent to occupy a space, but they do not own the property. Similarly, with SaaS products, customers pay to get access to the service, but they don’t own the software that offers the service.
There are various tenancy models available, namely:
Using the principles I covered in two previous posts (linked below), we will focus on the multi-tenant model and use AWS to set up up a multi-tenant SaaS application with a single multi-tenant database. We’ll use the following AWS resources:
Looking at a code repository while trying to figure out how an app works is a tedious task regardless of your experience level. And since humans relate much more easily with visual content, I drafted the following architecture diagram to show how our to-do application will work:
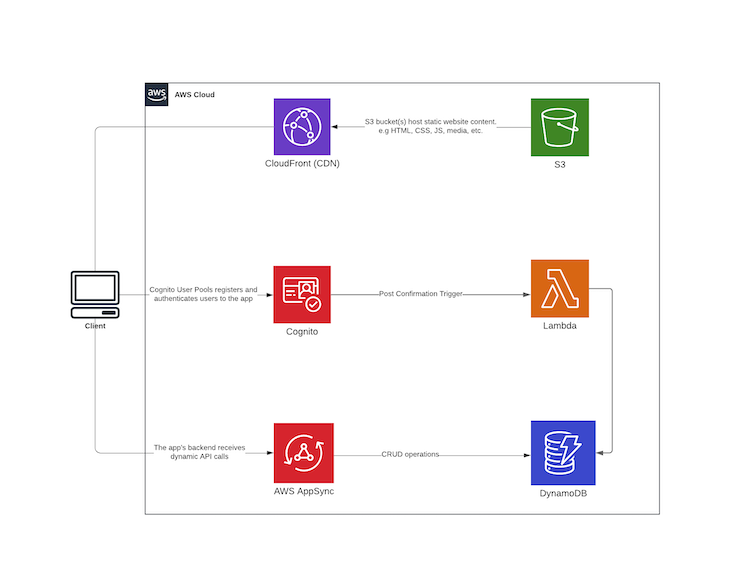
In theory, the React client contains login functionality that is executed using the Amplify library. Once a user has been successfully registered, the Cognito post confirmation trigger executes a Lambda function that receives a payload containing the information about the newly signed-up user.
The Lambda code saves the newly created user to DynamoDB, thus allowing us to store all newly created user profiles under DynamoDB while using Cognito for authorization. The DynamoDB item will have the following structure:
Item: {
    createdAt: {
        S: "timestamp here",
    },
    updatedAt: {
        S: "timestamp here",
    },
    typeName: { S: "USER" },
    id: { S: "unique id" },
    cognitoId: { S: "cognito id gotten from the post confirmation trigger payload" },
    email: { S: "user email"},
    phoneNumber: { S: "user phone number" },
}
When the new user logs in, they’ll have access to the AppSync GraphQL API on the React frontend, which allows for CRUD operations on to-do items. The created items are saved to DynamoDB using mapping templates created in AppSync. These enable mapping of the payload from the method request to the corresponding integration request, and from an integration response to the corresponding method response.
The schema of a multi-tenant database must have one or more tenant identifier columns so that the data from any given tenant can be selectively retrieved. To that end, we can use the single table design that DynamoDB offers in order to achieve our goal of setting up a multi-tenant database with a composite primary key as the unique identifier.
DynamoDB has two different kinds of primary keys, namely partition key and composite primary key (partition key and sort key). We will define a composite primary key with id as the partition key and typeName as the sort key.
DynamoDB isn’t exactly the go-to solution for handling relational data, but as described Alex DeBrie’s article on modeling one-to-many relationships in DynamoDB:
DynamoDB is sometimes considered just a simple key-value store, but nothing could be further from the truth. DynamoDB can handle complex access patterns, from highly relational data models to time series data or even geospatial data.
In our case, there is a one-to-many relationship where one User can own many ToDo items.
Now that we’ve covered the theory part of the article, we can proceed to the code.
As mentioned in the introduction, we will use what we learned from my previous two articles to come up with a real-world example for our application. To avoid duplication, I included only new functionality that we’ll add in this article and omitted some parts that have already been covered in the previous articles.
Add a new folder for our project in your preferred destination, and create a new serverless project called backend. Then, bootstrap a React app using Create React App within the same directory and call it client. This results in the following directory structure:
$ tree . -L 2 -a
.
├── backend
└── client
Navigate to the serverless folder and install these dependencies:
$ yarn add serverless-appsync-plugin serverless-stack-output serverless-pseudo-parameters serverless-webpack
While still inside the backend folder, create a schema.yml file and add the following schema:
type ToDo {
  id: ID
  description: String!
  completed: Boolean
  createdAt: AWSDateTime
  updatedAt: AWSDateTime
  user: User
}

type User {
  id: ID
  cognitoId: ID!
  firstName: String
  lastName: String
  email: AWSEmail
  phoneNumber: AWSPhone
  createdAt: AWSDateTime
  updatedAt: AWSDateTime
}

input ToDoUpdateInput {
  id: ID!
  description: String
  completed: Boolean
}

type Mutation {
  createTodo(input: ToDoCreateInput): ToDo
  updateTodo(input: ToDoUpdateInput): ToDo
  deleteTodo(id: ID!): ToDo
}

type Query {
  listToDos: [ToDo!]
  listUserTodos(id: ID): [ToDo!]
  getToDo(id: ID): ToDo
  profile: User!
}

schema {
  query: Query
  mutation: Mutation
}
Create a new file inside a folder called resources:
$ mkdir resources && touch resources/dynamo-table.yml
Open the file and add the following CloudFormation Template, which defines our DynamoDB configuration:
Resources:
  PrimaryDynamoDBTable:
    Type: AWS::DynamoDB::Table
    Properties:
      AttributeDefinitions:
        - AttributeName: typeName
          AttributeType: S
        - AttributeName: id
          AttributeType: S
      KeySchema: # Hash Range key
        - AttributeName: typeName
          KeyType: HASH
        - AttributeName: id
          KeyType: RANGE
      BillingMode: PAY_PER_REQUEST
      TableName: ${self:custom.resources.PRIMARY_TABLE}
      TimeToLiveSpecification:
        AttributeName: TimeToLive,
        Enabled: True
      GlobalSecondaryIndexes:
        - IndexName: GSI1
          KeySchema:
            - AttributeName: typeName
              KeyType: HASH
          Projection:
            ProjectionType: ALL
Create a new configuration file for the Cognito user pool inside the resources folder:
$ mkdir resources && touch resources/cognito-userpool.yml
Open the file and add the following CloudFormation Template, which defines the user pool config:
Resources:
  CognitoUserPoolToDoUserPool:
    Type: AWS::Cognito::UserPool
    Properties:
      AdminCreateUserConfig:
        AllowAdminCreateUserOnly: FALSE
      AutoVerifiedAttributes:
        - email
      Policies:
        PasswordPolicy:
          MinimumLength: 7
          RequireLowercase: True
          RequireNumbers: True
          RequireSymbols: True
          RequireUppercase: True
      Schema:
        - Name: email
          AttributeDataType: String
          Mutable: false
          Required: true
        - Name: phone_number
          Mutable: true
          Required: true
      UserPoolName: ${self:service}-${self:provider.stage}-user-pool
  CognitoUserPoolClient:
    Type: "AWS::Cognito::UserPoolClient"
    Properties:
      ClientName: ${self:service}-${self:provider.stage}-user-pool-client
      GenerateSecret: false
      UserPoolId:
        Ref: CognitoUserPoolToDoUserPool
Outputs:
  UserPoolId:
    Value:
      Ref: CognitoUserPoolToDoUserPool
  UserPoolClientId:
    Value:
      Ref: CognitoUserPoolClient
Below, I’ll break down the new functionality that comes with adding authorization to the previously built to-do app. You can check out the rest of the mapping templates here since they are pretty self-explanatory.
create_todo.vtlLooking back at our schema, the to-do item has a field called user, which will contain the Cognito ID of the user that owns the item. We get the id from the identity object, which is the user’s Cognito profile.
Create the mapping template file:
$ mkdir mapping-templates/create_todo && touch mapping-templates/create_todo/request.vtl
Add the following code:
$util.qr($ctx.args.input.put("createdAt", $util.time.nowISO8601()))
$util.qr($ctx.args.input.put("updatedAt", $util.time.nowISO8601()))
{
  "version" : "2017-02-28",
  "operation" : "PutItem",
  "key" : {
    "id": $util.dynamodb.toDynamoDBJson($util.autoId()),
    "typeName": $util.dynamodb.toDynamoDBJson("TODO"),
    "user" : { "S" : "${context.identity.sub}" }
  },
  "attributeValues" : $util.dynamodb.toMapValuesJson($ctx.args.input)
}
get_user_todos.vtlCreate the mapping template file:
$ mkdir mapping-templates/get_user_todos && touch mapping-templates/get_user_todos/request.vtl
Add the following code:
{
  "version" : "2017-02-28",
  "operation" : "GetItem",
  "key" : {
    "id" : { "S" : "${context.source.user}" },
    "typeName": $util.dynamodb.toDynamoDBJson("USER")
  },
}
list_user_todos.vtlOnce again, create the mapping template file:
$ mkdir mapping-templates/list_user_todos && touch mapping-templates/list_user_todos/request.vtl
And add the following code:
{
  "version" : "2017-02-28",
  "operation" : "Query",
  "query" : {
    "expression": "#typeName = :typeName",
    "expressionNames": {
      "#typeName": "typeName"
    },
    "expressionValues" : {
      ":typeName" : $util.dynamodb.toDynamoDBJson("TODO")
    }
  },
  "filter": {
    "expression": "#user = :user",
    "expressionNames": {
      "#user": "user"
    },
    "expressionValues": {
      ":user" : { "S" : "${context.identity.sub}" }
    }
  },
}
Because we have a one-to-many relationship between a User and ToDo items, in order to get all to-do items that have been created by a specific user, we get all the items in the database using the Query method and then filter through the items and return to-do items that contain the same user attribute as the user’s Cognito ID.
Next, we will set up the Lambda function responsible for saving a newly signed-up user to DynamoDB. The function is executed when the Cognito post confirmation trigger is called once the user has confirmed their email.
Create the file:
$ touch handler.ts
Add the following code:
import * as moment from "moment";
import { v4 as uuidv4 } from "uuid";
import { DynamoDB } from "aws-sdk";

const ddb = new DynamoDB({ apiVersion: "2012-10-08" });

export const cognitoPostConfirmation = async (event, context, callback) => {
  try {
    const userParams = {
      TableName: process.env.PRIMARY_TABLE, // gotten from serverless deployment
      Item: {
        createdAt: {
          S: moment().format("YYYY-MM-DDThh:mm:ssZ"),
        },
        updatedAt: {
          S: moment().format("YYYY-MM-DDThh:mm:ssZ"),
        },
        typeName: { S: "USER" },
        id: { S: uuidv4() },
        cognitoId: { S: event.request.userAttributes.sub },
        email: { S: event.request.userAttributes.email },
        phoneNumber: { S: event.request.userAttributes.phone_number },
      },
    };
    // @ts-ignore
    await ddb.putItem(userParams).promise();
    return callback(null, event);
  } catch (error) {
    return callback(error);
  }
};
Since we create a .ts file for our Lambda function, we need to add TypeScript support to the serverless project by creating a tsconfig.json file and a webpack.config.js file:
$ touch tsconfig.json webpack.config.js
//tsconfig.json

{
  "compilerOptions": {
    "allowSyntheticDefaultImports": true,
    "module": "commonjs",
    "removeComments": false,
    "preserveConstEnums": true,
    "sourceMap": true,
    "skipLibCheck": true,
    "resolveJsonModule": true,
    "lib": ["esnext"]
  }
}
//webpack.config.js

const slsw = require("serverless-webpack");
const nodeExternals = require("webpack-node-externals");
module.exports = {
  entry: slsw.lib.entries,
  target: "node",
  // Generate sourcemaps for proper error messages
  devtool: "source-map",
  // Since "aws-sdk" is not compatible with webpack,
  // we exclude all node dependencies
  externals: [nodeExternals()],
  mode: slsw.lib.webpack.isLocal ? "development" : "production",
  optimization: {
    // We no not want to minimize our code.
    minimize: false,
  },
  performance: {
    // Turn off size warnings for entry points
    hints: false,
  },
  resolve: {
    extensions: [".ts"],
  },
  // Run babel on all .js files and skip those in node_modules
  module: {
    rules: [
      {
        test: /\.ts(x?)$/,
        exclude: /node_modules/,
        use: [
          {
            loader: "ts-loader",
          },
        ],
      },
    ],
  },
};
Now that we are done creating all the resources, we will bring everything together and add it to the serverless.yml file as follows:
service: react-amplify-multi-tenant
app: amplify-multi-tenant
frameworkVersion: "2"
provider:
  name: aws
  runtime: nodejs12.x
  lambdaHashingVersion: 20201221
  region: eu-west-1
  stage: ${opt:stage, 'dev'}
  environment:
    PRIMARY_TABLE: ${self:custom.resources.PRIMARY_TABLE}
plugins:
  - serverless-appsync-plugin
  - serverless-stack-output
  - serverless-pseudo-parameters
  - serverless-webpack
custom:
  webpack:
    webpackConfig: ./webpack.config.js # typescript support
    includeModules: true
  resources:
    PRIMARY_TABLE: ${self:service}-dynamo-table-${self:provider.stage}
    PRIMARY_BUCKET: ${self:service}-primary-bucket-${self:provider.stage}
    WEB_HOSTING_BUCKET: ${self:service}-web-hosting-bucket-${self:provider.stage}
  output:
    handler: ./scripts/output.handler
    file: ../client/src/aws-exports.json
  appSync: # appsync plugin configuration
    name: ${self:service}-appsync-${self:provider.stage}
    authenticationType: AMAZON_COGNITO_USER_POOLS
    additionalAuthenticationProviders:
      - authenticationType: API_KEY
    dataSources:
      - type: AMAZON_DYNAMODB
        name: PrimaryTable
        description: "Primary Table"
        config:
          tableName: ${self:custom.resources.PRIMARY_TABLE}
          serviceRoleArn: { Fn::GetAtt: [AppSyncDynamoDBServiceRole, Arn] }
    userPoolConfig:
      awsRegion: ${self:provider.region}
      defaultAction: ALLOW
      userPoolId: { Ref: CognitoUserPoolToDoUserPool } # name of the resource
    logConfig:
      loggingRoleArn: { Fn::GetAtt: [AppSyncLoggingServiceRole, Arn] }
      level: ALL
    mappingTemplates:
      - dataSource: PrimaryTable
        type: Mutation
        field: createTodo
        request: "create_todo/request.vtl"
        response: "common-item-response.vtl"
      - dataSource: PrimaryTable
        type: Mutation
        field: updateTodo
        request: "update_todo/request.vtl"
        response: "common-item-response.vtl"
      - dataSource: PrimaryTable
        type: Mutation
        field: deleteTodo
        request: "delete_todo/request.vtl"
        response: "common-item-response.vtl"
      - dataSource: PrimaryTable
        type: Query
        field: getToDo
        request: "get_todo/request.vtl"
        response: "common-item-response.vtl"
      - dataSource: PrimaryTable
        type: Query
        field: getUser
        request: "get_user/request.vtl"
        response: "common-item-response.vtl"
      - dataSource: PrimaryTable
        type: Query
        field: listUserTodos
        request: "list_user_todos/request.vtl"
        response: "common-items-response.vtl"
      - dataSource: PrimaryTable
        type: ToDo
        field: user
        request: "get_todo_user/request.vtl"
        response: "common-item-response.vtl"
functions:
  cognitoPostConfirmation:
    handler: handler.cognitoPostConfirmation
    events: # cognito post confirmation trigger
      - cognitoUserPool:
          pool: CognitoUserPoolToDoUserPool
          trigger: PostConfirmation
resources:
  - ${file(./resources/appsync-dynamo-role.yml)}
  - ${file(./resources/dynamo-table.yml)}
  - ${file(./resources/web-hosting-bucket.yml)}
  - ${file(./resources/cognito-userpool.yml)}
And then we deploy:
$ sls deploy --stage=dev
Now that our backend is all set and deployed, we will proceed to the frontend client to demonstrate how the above logic is pieced together.
We will be using Ant Design for UI components, and in order to validate the user password, we will use a password validator. We added password requirements while setting up our user pool, which should be as follows:
After successful validation of all the required user details, we send the payload to the Cognito API, which sends out a verification code to the user’s email and creates a new user in the UserPool:
  const onFinish = (values: any) => {
    const { firstName, lastName, email, phoneNumber, password } = values;
    // hide loader
    toggleLoading(false);
    Auth.signUp({
      username: email,
      password,
      attributes: {
        email,
        name: `${firstName} ${lastName}`,
        phone_number: phoneNumber,
      },
    })
      .then(() => {
        notification.success({
          message: "Successfully signed up user!",
          description:
            "Account created successfully, Redirecting you in a few!",
          placement: "topRight",
          duration: 1.5,
          onClose: () => {
            updateUsername(email);
            toggleRedirect(true);
          },
        });
      })
      .catch((err) => {
        notification.error({
          message: "Error",
          description: "Error signing up user",
          placement: "topRight",
          duration: 1.5,
        });
        toggleLoading(false);
      });
  };
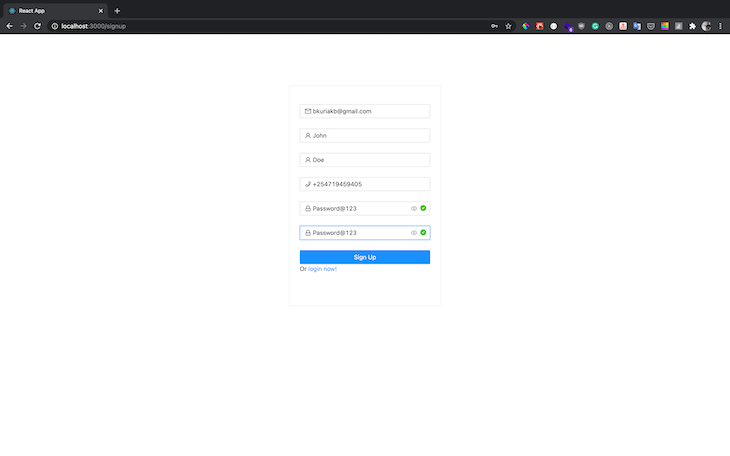
Navigate to the sign-up route and create a new user:
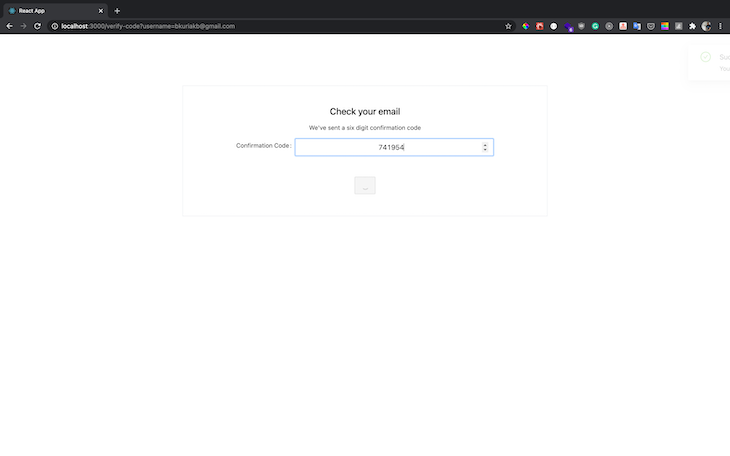
Check your email for a new confirmation code and add it as follows:
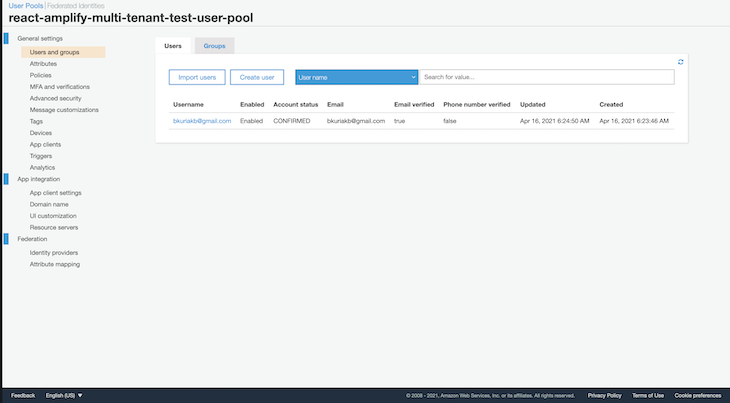
After verification, your user pool should now have a list of new users under users and groups:
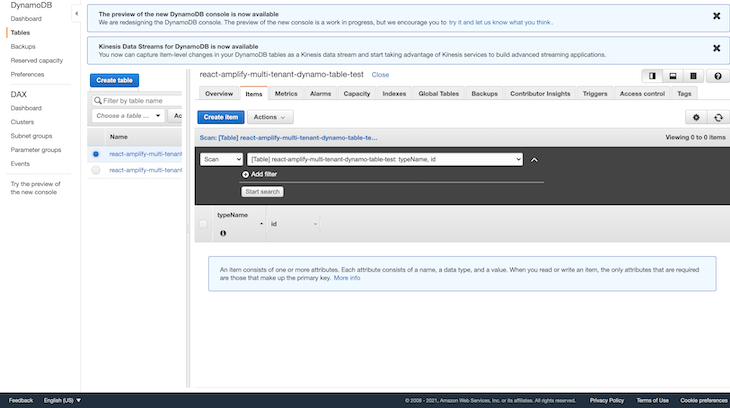
When a new user is signed up, the post confirmation trigger that we set up receives a payload containing user sign-up data, which we then save to DynamoDB as a user record. Open your AWS console, navigate to DynamoDB, and select the newly created table. You should have a new user record saved with details from the sign-up process:
Next, you can now log in using the new credentials, after which you will be redirected to the dashboard page where you can create, edit, and delete new to-do items. Because this article is for demo purposes, we will add one component file that contains all the CRUD logic:
const DataList = () => {
  const [description, updateDescription] = React.useState("");
  const [updateToDoMutation] = useMutation(updateToDo);
  const [createToDoMutation] = useMutation(createToDo);
  const [deleteToDoMutation] = useMutation(deleteToDo);
  const { loading, error, data } = useQuery(listUserToDos);

  function handleCheck(event: CheckboxChangeEvent, item: ToDo) {
    updateToDoMutation({
      variables: { input: { completed, id: item.id } },
      refetchQueries: [
        {
          query: listUserToDos,
        },
      ],
    })
      .then((res) => message.success("Item updated successfully"))
      .catch((err) => {
        message.error("Error occurred while updating item");
      });
  }

  function handleSubmit(event: React.FormEvent) {
    event.preventDefault();
    createToDoMutation({
      variables: { input: { description } },
      refetchQueries: [
        {
          query: listUserToDos,
        },
      ],
    })
      .then((res) => message.success("Item created successfully"))
      .catch((err) => {
        message.error("Error occurred while creating item");
      });
  }

  function handleKeyPress(event: React.KeyboardEvent) {
    if (event.key === "Enter") {
      // user pressed enter
      createToDoMutation({
        variables: { input: { description } },
        refetchQueries: [
          {
            query: listUserToDos,
          },
        ],
      })
        .then((res) => {
          message.success("Item created successfully");
        })
        .catch((err) => {
          message.error("Error occurred while creating item");
        });
    }
  }

  function handleDelete(item: ToDo) {
    deleteToDoMutation({
      variables: { id: item.id },
      refetchQueries: [
        {
          query: listUserToDos,
        },
      ],
    })
      .then((res) => {
        message.success("Deleted successfully");
      })
      .catch((err) => {
        message.error("Error occurred while deleting item");
      });
  }

  if (loading) {
    return (
      <CenterContent>
        <LoadingOutlined style={{ fontSize: 50 }} spin />
      </CenterContent>
    );
  }

  if (error) {
    return <div>{`Error! ${error.message}`}</div>;
  }

  return (
    <ListContainer>
      <List
        header={
          <div style={{ display: "flex" }}>
            <Input
              placeholder="Enter todo name"
              value={description}
              onChange={(event) => updateDescription(event.target.value)}
              style={{ marginRight: "10px" }}
              onKeyDown={handleKeyPress}
            />
            <Button name="add" onClick={handleSubmit}>
              add
            </Button>
          </div>
        }
        bordered
        dataSource={data.listUserTodos}
        renderItem={(item: ToDo) => (
          <List.Item>
            <Checkbox
              checked={item.completed}
              onChange={(event: CheckboxChangeEvent) =>
                handleCheck(event, item)
              }
            >
              {item.description}
            </Checkbox>
            <Popconfirm
              title="Are you sure to delete this item?"
              onConfirm={() => handleDelete(item)}
              okText="Yes"
              cancelText="No"
            >
              <DeleteAction>Delete</DeleteAction>
            </Popconfirm>
          </List.Item>
        )}
      />
    </ListContainer>
  );
};
Now, add a new item:

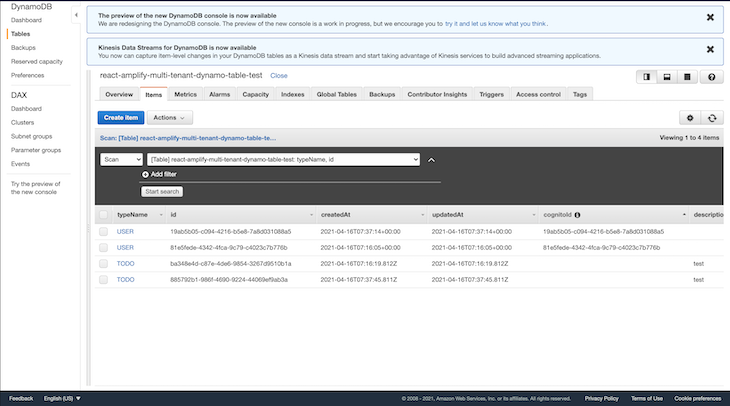
Navigate to the DynamoDB dashboard to view the newly created to-do items. Because we are using the single-table design for our database, the user and to-do records are all stored in the same table, as seen below:
In order to test out the multi-tenancy model for the above application, navigate to your terminal and deploy a new instance with a different stage name. The deployment will provision new resources that are independent, with a new database and Cognito user pool.
$ sls deploy --stage=new_stage_name
I hope you enjoyed the article and that you’ve learned something new. As demonstrated, building a multi-tenant app can be quite challenging since there is no one-size-fits-all approach; it requires a lot of pre-planning and choosing what works best for your solution.
I had to omit some of the code in order to keep the article short and readable, but you can view the repo here, and in case anything doesn’t work as you expect it, kindly raise an issue and I will take time to look into it. Happy coding!
Install LogRocket via npm or script tag. LogRocket.init() must be called client-side, not
server-side
$ npm i --save logrocket

// Code:

import LogRocket from 'logrocket';
LogRocket.init('app/id');
// Add to your HTML:

<script src="https://cdn.lr-ingest.com/LogRocket.min.js"></script>
<script>window.LogRocket && window.LogRocket.init('app/id');</script>

I migrated 20 production-style components from Tailwind to StyleX. Here’s what the data showed about LOC, CSS bundle size, build time, and type safety.

A guide for using JWT authentication to prevent basic security issues while understanding the shortcomings of JWTs.

Discover how to build, render, and automate product demo videos with Remotion, replacing traditional screen recordings with reusable React code.

Chrome’s Modern Web Guidance embeds modern web platform skills into AI coding agents, helping them choose native HTML, CSS, and browser APIs over legacy patterns.
Would you be interested in joining LogRocket's developer community?
Join LogRocket’s Content Advisory Board. You’ll help inform the type of content we create and get access to exclusive meetups, social accreditation, and swag.
Sign up now

