The microservices architecture is an increasingly popular architecture pattern that follows the SOA (Service Oriented Architecture) concept. It has several advantages and disadvantages, but one of its most significant benefits is that it allows for easier scalability compared to other architectures.

This guide will demonstrate how to build microservices using NestJS with Kafka and TypeScript.
Jump ahead:
Let’s start by setting up the project workspace for our demo. Before proceeding, ensure that you have Apache Kafka installed and running on your local machine. You can check out this guide for setting up Kafka locally.
You will create an authentication microservice to create and save user details. Along with the auth microservice, you’ll also need an API gateway to emit events from an HTTP API endpoint to the microservice.
Since you’ll be creating multiple backend services, it’s best to have a monorepo to enable code sharing. A monorepo is a single version-controlled code repository that includes various applications and libraries.
Nx is a popular tool for managing monorepos. This framework allows you to architect and scale web applications and services in your monorepo.
Create an Nx workspace by running the following command:
> npx create-nx-workspace@latest
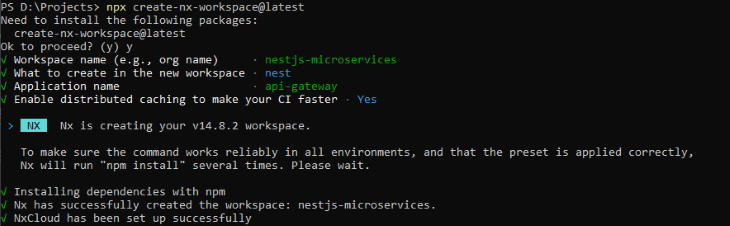
Specify the nest option while creating the workspace and name the application api-gateway.
Once the workspace is created, install the project dependencies by running the following commands:
> cd nestjs-microservices
> npm i @nestjs/microservices kafkajs class-validator class-transformer
The API gateway is one of the services in a microservices architecture that connects the client-side and external applications to the internal services. API gateway handles the routing, transforming and aggregating request data, and implementing shared logic like authentication and rate-limiters.
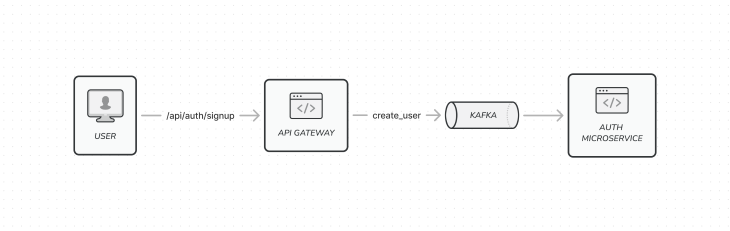
Typically, when the frontend app calls the signup API, the API gateway will emit the create_user event to the Kafka queue. The auth microservice will poll the create_user event from the queue and create a user from the event payload.
The frontend app won’t interact with the microservice directly in this architectural pattern. Usually, in real-world scenarios, the API gateway also has additional functionalities like logging, analytics, and load balancing.
In the api-gateway app, create the auth module responsible for handling authentication-related requests like sign up. Configure the Kafka client using ClientsModule from the @nestjs/microservices package in the auth module.
The ClientsModule exposes a static register() method that takes an array of objects describing microservice transporters as an argument. Each transporter object has a name property, a transporter property, which in this case is Transport.Kafka, and a transporter-specific options property. The name property defines the injection token, which you can use later in your service class to publish events:
// apps/api-gateway/src/auth/auth.module.ts

import { Module } from '@nestjs/common';
import { ClientsModule, Transport } from '@nestjs/microservices';
import { AuthController } from './auth.controller';
import { AuthService } from './auth.service';

@Module({
  imports: [
    ClientsModule.register([
      {
        name: 'AUTH_MICROSERVICE',
        transport: Transport.KAFKA,
        options: {
          client: {
            clientId: 'auth',
            brokers: ['localhost:9092'],
          },
          producerOnlyMode: true,
          consumer: {
            groupId: 'auth-consumer',
          },
        },
      },
    ]),
  ],
  providers: [AuthService],
  controllers: [AuthController],
})
export class AuthModule {}
Since the transport is Kafka, the options property will define the Kafka client object, which includes the clientId, brokers, and a consumer object with the groupId. Here, the groupId you specify is essential because consumers with the same groupId can only read the published events.
For example, consumers with groupId auth-consumer can only read events published with groupId: 'auth-consumer'. The producerOnlyMode option will bypass consumer group registration for the api-gateway app and only function as a producer.
Since the HTTP request payload and the event payload for creating the user will be the same, it’s better to create a shared data transfer object (DTO) that all the services can access in the monorepo.
Create a shared library by running the following command:
> nx g @nrwl/node:lib shared
Next, create a dto folder; add CreateUserDto class with mandatory name and email properties in the create-user.dto.ts file:
// libs/shared/src/lib/dto/create-user.dto.ts

import { IsEmail, IsNotEmpty, IsString } from 'class-validator';

export class CreateUserDto {
  @IsString()
  @IsNotEmpty()
  name: string;

  @IsEmail()
  @IsNotEmpty()
  email: string;
}
// libs/shared/src/lib/dto/index.ts

export * from './create-user.dto';
Now, add an entry in the paths object for resolving dto files in the tsconfig.base.json file:
{
  ...
  "paths": {
      ...
      "@nestjs-microservices/shared/dto": ["libs/shared/src/lib/dto/index.ts"]
  }
  ...
}
Coming back to the api-gateway app, create the AuthService to publish an event to the auth microservice.
Create an instance of ClientKafka by using the @Inject() decorator, and use the AUTH_MICROSERVICE injection token specified in the name property of the Kafka transport. Using the client instance, you can access the emit() method to publish the create_user event along with the payload:
// apps/api-gateway/src/auth/auth.service.ts

import { Inject, Injectable } from '@nestjs/common';
import { ClientKafka } from '@nestjs/microservices';
import { CreateUserDto } from '@nestjs-microservices/shared/dto';

@Injectable()
export class AuthService {
  constructor(
    @Inject('AUTH_MICROSERVICE') private readonly authClient: ClientKafka
  ) {}

  createUser(createUserDto: CreateUserDto) {
    this.authClient.emit('create_user', JSON.stringify(createUserDto));
  }
}
Next, in the AuthController class, create an API endpoint for creating the user and call the createUser method of the AuthService:
// apps/api-gateway/src/auth/auth.controller.ts

import { Body, Controller, Post, ValidationPipe } from '@nestjs/common';
import { AuthService } from './auth.service';
import { CreateUserDto } from '@nestjs-microservices/shared/dto';

@Controller('auth')
export class AuthController {
  constructor(private readonly authService: AuthService) {}

  @Post('sign-up')
  createUser(@Body(ValidationPipe) createUserDto: CreateUserDto) {
    return this.authService.createUser(createUserDto);
  }
}
Next, you’ll create the auth microservice to consume the create_user message sent by the API gateway.
To create the auth-microservice app, run the following command:
> nx g @nrwl/nest:app auth-microservice
In the main.ts file of the auth-microservice app, remove the boilerplate code of the bootstrap() function and replace it with the NestFactory.createMicroservice() method.
Pass the AppModule in the first argument and the Kafka transport object in the second argument of the createMicroservice() method. In the groupId property of the consumer object, ensure you’ve specified the same value used in AuthModule of the api-gateway app:
// apps/auth-microservice/src/main.ts

async function bootstrap() {
  const app = await NestFactory.createMicroservice<MicroserviceOptions>(
    AppModule,
    {
      transport: Transport.KAFKA,
      options: {
        client: {
          brokers: ['localhost:9092'],
        },
        consumer: {
          groupId: 'auth-consumer',
        },
      },
    }
  );
  await app.listen();
}
Next, create a User entity in the shared library to represent user data. Use this entity it in the UsersRepository class to perform actions like saving user data and retrieving a single user by id:
// libs/shared/src/lib/entities/user.entity.ts

export class User {
  id?: number;
  name: string;
  email: string;
}
// libs/shared/src/lib/entities/index.ts

export * from './user.entity';
// apps/auth-microservice/src/app/users.repository.ts

import { Injectable } from '@nestjs/common';
import { User } from '@nestjs-microservices/shared/entities';

@Injectable()
export class UsersRepository {
  private readonly users: User[] = [];

  save(user: User) {
    this.users.push({ ...user, id: this.users.length + 1 });
  }

  findOne(id: number) {
    return this.users.find((u) => u.id === id) || null;
  }
}
Usually, in NestJS applications, TypeORM is used to manage the data using a database, but for the sake of brevity in this demo, we’ll store the data in memory.
In the AppService, create the methods createUser() and getUser() to create and find a user, respectively, with the UsersRepository methods:
// apps/auth-microservice/src/app/app.service.ts

import { CreateUserDto } from '@nestjs-microservices/shared/dto';
import { User } from '@nestjs-microservices/shared/entities';
import { Injectable } from '@nestjs/common';
import { UsersRepository } from './users.repository';

@Injectable()
export class AppService {
  constructor(private readonly usersRepository: UsersRepository) {}

  createUser(data: CreateUserDto): void {
    this.usersRepository.save(data);
  }

  getUser(id: number): User {
    return this.usersRepository.findOne(id);
  }
}
Now in the app.controller.ts file, create a method to handle the create_user event. Use the @EventPattern() decorator to create an event handler and pass the event name. You can access the event data using the @Payload() decorator and, similar to the @Body() decorator, you can use the ValidationPipe to validate the payload object:
// apps/auth-microservice/src/app/app.controller.ts

import { CreateUserDto } from '@nestjs-microservices/shared/dto';
import { Controller, ParseIntPipe, ValidationPipe } from '@nestjs/common';
import { EventPattern, MessagePattern, Payload } from '@nestjs/microservices';

import { AppService } from './app.service';

@Controller()
export class AppController {
  constructor(private readonly appService: AppService) {}

  @EventPattern('create_user')
  handleUserCreate(@Payload(ValidationPipe) data: CreateUserDto) {
    this.appService.createUser(data);
  }
}
Now that the auth microservice is up and running, let’s add a payments microservice to process payments for the user accounts and complete the whole architecture.
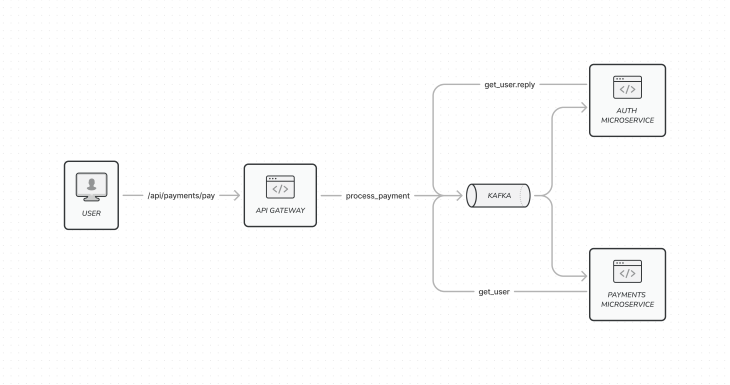
The first step is to create an API endpoint in the api-gateway app that the frontend app can call to initiate the payment. In the request body, you’ll need the userId and the payment amount.
The API gateway will emit an event called process_payment with the payment data, which the payment microservice will read. The payment microservice will require user details to process the payment. Since you’re only passing the userId, the rest of the data will be retrieved from the auth service by publishing the get_user event.
In the api-gateway app, you’ll create the payments module and register the Kafka client similar to how you set it up for the auth module. For the payments module, the groupId will be payment-consumer:
// apps/api-gateway/src/payment/payments.module.ts

import { Module } from '@nestjs/common';
import { ClientsModule, Transport } from '@nestjs/microservices';
import { PaymentController } from './payment.controller';
import { PaymentService } from './payment.service';

@Module({
  imports: [
    ClientsModule.register([
      {
        name: 'PAYMENT_MICROSERVICE',
        transport: Transport.KAFKA,
        options: {
          client: {
            clientId: 'payment',
            brokers: ['localhost:9092'],
          },
          consumer: {
            groupId: 'payment-consumer',
          },
        },
      },
    ]),
  ],
  providers: [PaymentService],
  controllers: [PaymentController],
})
export class PaymentModule {}
Then, create the MakePaymentDto in the shared library that will be used to represent the payload for processing the payment:
// libs/shared/src/lib/dto/make-payment.dto.ts

import { IsNotEmpty, IsNumber } from 'class-validator';

export class MakePaymentDto {
  @IsNotEmpty()
  @IsNumber()
  userId: number;

  @IsNotEmpty()
  @IsNumber()
  amount: number;
}
Next, in the PaymentController, add a POST API to create an entry point for publishing the process_payment event:
// apps/api-gateway/src/payment/payment.controller.ts

import { Body, Controller, Post, ValidationPipe } from '@nestjs/common';
import { PaymentService } from './payment.service';
import { MakePaymentDto } from '@nestjs-microservices/shared/dto';

@Controller('payments')
export class PaymentController {
  constructor(private readonly paymentService: PaymentService) {}

  @Post('pay')
  makePayment(@Body(ValidationPipe) makePaymentDto: MakePaymentDto) {
    return this.paymentService.makePayment(makePaymentDto);
  }
}
In the PaymentService, inject the ClientKafka using the @Inject() decorator and the PAYMENT_MICROSERVICE as the injection token. Now, emit the process_payment event using the Kafka client:
// apps/api-gateway/src/payment/payment.service.ts

import { Inject, Injectable } from '@nestjs/common';
import { ClientKafka } from '@nestjs/microservices';
import { MakePaymentDto } from '@nestjs-microservices/shared/dto';

@Injectable()
export class PaymentService {
  constructor(
    @Inject('PAYMENT_MICROSERVICE') private readonly paymentClient: ClientKafka
  ) {}

  makePayment(makePaymentDto: MakePaymentDto) {
    this.paymentClient.emit('process_payment', JSON.stringify(makePaymentDto));
  }
}
The API gateway portion of the payments integration is complete. Now, let’s build with the microservice app.
Start by running the following command to create the payments-microservice app:
> nx g @nrwl/nest:app payments-microservice
Similar to the auth-microservice, replace the content of the main.ts file with the createMicroservice() method. Here you’ll also define groupId with the value 'payment-consumer':
// apps/payments-microservice/src/main.ts

import { NestFactory } from '@nestjs/core';
import { MicroserviceOptions, Transport } from '@nestjs/microservices';

import { AppModule } from './app/app.module';

async function bootstrap() {
  const app = await NestFactory.createMicroservice<MicroserviceOptions>(
    AppModule,
    {
      transport: Transport.KAFKA,
      options: {
        client: {
          brokers: ['localhost:9092'],
        },
        consumer: {
          groupId: 'payment-consumer',
        },
      },
    }
  );
  await app.listen();
}

bootstrap();
Now, register a Kafka client for emitting events to the auth-microservice in the app.module.ts file:
// apps/payments-microservice/src/app/app.module.ts

import { Module } from '@nestjs/common';
import { ClientsModule, Transport } from '@nestjs/microservices';

import { AppController } from './app.controller';
import { AppService } from './app.service';

@Module({
  imports: [
    ClientsModule.register([
      {
        name: 'AUTH_MICROSERVICE',
        transport: Transport.KAFKA,
        options: {
          client: {
            clientId: 'auth',
            brokers: ['localhost:9092'],
          },
          consumer: {
            groupId: 'auth-consumer',
          },
        },
      },
    ]),
  ],
  controllers: [AppController],
  providers: [AppService],
})
export class AppModule {}
In the AppService, inject the Kafka client for publishing events to the auth-microservice app. When you emit the get_user event, you’ll need to listen for the response from the auth microservice; this is different from what you did for the create_user event.
With Kafka communication, an event’s response is returned in a reply event that NestJS handles out of the box. Nest automatically sends the reply back in a new event that ends with a .reply keyword. This type of communication between microservices is known as the request-response pattern.
To configure this communication in the AppService, you’ll need to implement the onModuleInit interface and use the onModuleInit() lifecycle method to subscribe to the response of the get_user event using the subscribeToResponseOf() method. You don’t have to manually add any handlers for the get_user.reply event since Nest takes care of that.
// apps/payments-microservice/src/app/app.service.ts

import { MakePaymentDto } from '@nestjs-microservices/shared/dto';
import { User } from '@nestjs-microservices/shared/entities';
import { Inject, Injectable, OnModuleInit } from '@nestjs/common';
import { ClientKafka } from '@nestjs/microservices';

@Injectable()
export class AppService implements OnModuleInit {
  constructor(
    @Inject('AUTH_MICROSERVICE') private readonly authClient: ClientKafka
  ) {}

  processPayment(makePaymentDto: MakePaymentDto) {
    const { userId, amount } = makePaymentDto;
    console.log('process payment');
    this.authClient
      .send('get_user', JSON.stringify({ userId }))
      .subscribe((user: User) => {
        console.log(
          `process payment for user ${user.name} - amount: ${amount}`
        );
      });
  }

  onModuleInit() {
    this.authClient.subscribeToResponseOf('get_user');
  }
}
Instead of using the emit() method to publish the get_user event, use the send() method. The send() method enables you to use a callback to subscribe to the reply of an event.
Now, finish off the payments microservice by adding the event handler for process_payment event in the payment AppController:
// apps/payments-microservice/src/app/app.controller.ts

import { MakePaymentDto } from '@nestjs-microservices/shared/dto';
import { Controller, ValidationPipe } from '@nestjs/common';
import { EventPattern, Payload } from '@nestjs/microservices';

import { AppService } from './app.service';

@Controller()
export class AppController {
  constructor(private readonly appService: AppService) {}

  @EventPattern('process_payment')
  handleProcessPayment(@Payload(ValidationPipe) data: MakePaymentDto) {
    this.appService.processPayment(data);
  }
}
Next, switch back to the AppController of the auth-microservice app and add the handler for the get_user event to complete the request-response communication. For the request-response messaging pattern, you’ll need to use the @MessagePattern() decorator to consume the event:
// apps/auth-microservice/src/app/app.controller.ts


@Controller()
export class AppController {

  @MessagePattern('get_user')
  handleGetUser(@Payload('userId', ParseIntPipe) userId: number) {
    return this.appService.getUser(userId);
  }
}
To test and see all the services in action, you’ll need to run the following commands individually on separate terminals:
> nx serve api-gateway
> nx serve auth-microservice
> nx serve payments-microservice
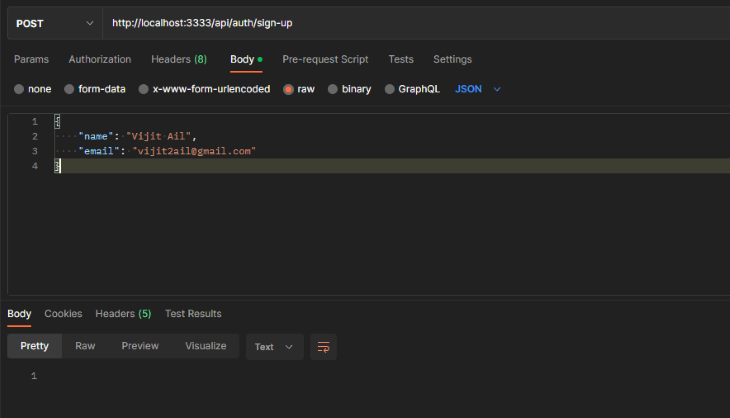
Now that the microservices are up and running, let’s test them with Postman.
Select the /api/auth/signup API to create the user:
Next, call the /api/payments/pay API to process the payment with userId and the amount:
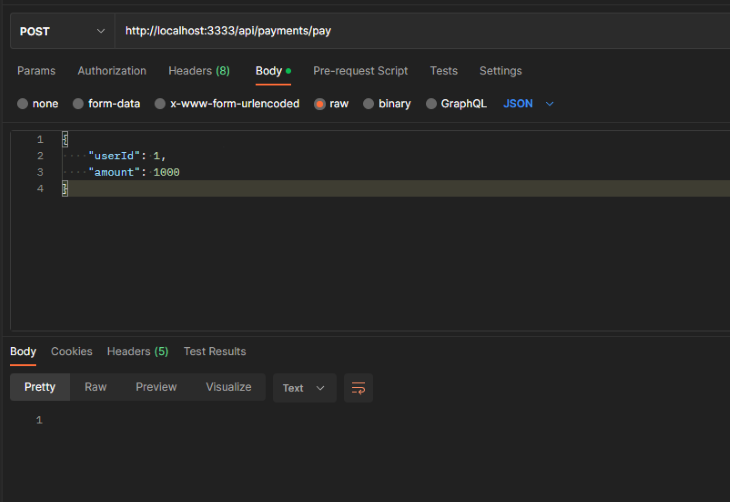

If the communication is set up correctly between the microservices, you should see a console message appear on the terminal like that shown above.
This article investigated building a robust application using a microservices architecture with NestJS and Kafka. We demonstrated how these technologies can be used together to create a scalable, reliable, and easy-to-maintain system. This stack is worth considering if you’re looking for a way to build microservices that are easy to develop and deploy.
You can explore microservices further by creating a retry logic with Kafka communication so that critical data is never lost if a microservice is down.
For your reference, you can find the complete code from this guide on GitHub.

LogRocket lets you replay user sessions, eliminating guesswork by showing exactly what users experienced. It captures console logs, errors, network requests, and pixel-perfect DOM recordings — compatible with all frameworks, and with plugins to log additional context from Redux, Vuex, and @ngrx/store.
With Galileo AI, you can instantly identify and explain user struggles with automated monitoring of your entire product experience.
Modernize how you understand your web and mobile apps — start monitoring for free.

Discover how React Fiber works under the hood. Learn how React builds the DOM, handles concurrent rendering, and works alongside React 19 features and the new React Compiler.

Learn how to use Skybridge, an open-source React framework, to build and deploy cross-platform AI apps and interactive UI widgets for ChatGPT, Claude, and MCP clients from a single codebase.

Learn how to set up Meilisearch, index documents, and build keyword, semantic, and hybrid search with AI-powered retrieval.

Compare pnpm and npm across security defaults, disk usage, dependency strictness, and workspace policy to decide which package manager fits your project.
Would you be interested in joining LogRocket's developer community?
Join LogRocket’s Content Advisory Board. You’ll help inform the type of content we create and get access to exclusive meetups, social accreditation, and swag.
Sign up now

