Flutter developers use various design patterns to write clean and maintainable codebases. They often write reusable widget implementations in individual Dart files, separate the main app screens into different files, and decompose large and isolated widgets into private methods/classes.

But we can also use generic software design patterns in our Flutter apps to improve the quality of the codebase. For example, design concepts like the MVC (Model–view–controller) architecture, repository pattern, service model pattern, and Data Transfer Object (DTO) can also help us to write manageable codebases. The repository pattern in particular motivates us to decouple data access logic (database layer interface) from the business logic via an additional abstraction layer.
Almost all Flutter apps use data sources for data persistence and retrieval. The repository pattern is helpful for all Flutter developers in learning how to organize their code in a better, more manageable way. In this tutorial, I will explain how you can implement a repository pattern in your Flutter applications.
The repository pattern is a software design pattern that decouples the data access logic from the business logic by introducing a centralized component called a repository. Look at the following diagram.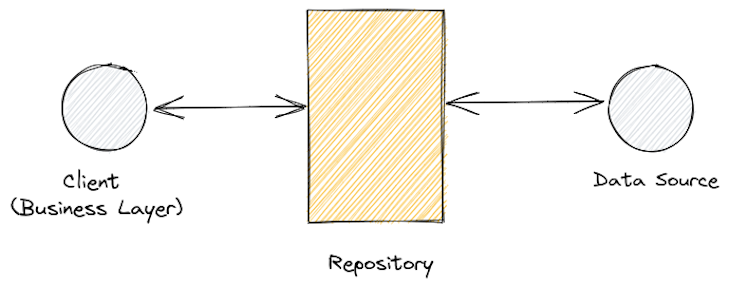 As you can see in the above diagram, the generic repository pattern consists of three inter-connected components:
Assume we are going to build a repository called BookRepository. The BookRepository can expose a method to list all book titles in a given database. Then, everywhere you need to retrieve books, you can access the BookRepository, rather than writing repetitive code to find books from the data source.
The repository pattern offers us the following key benefits:
Now that we know the theoretical background behind the repository pattern, let’s implement one in our Flutter app.
There is indeed not a strict rule about how to implement a repository pattern in real-world apps, like any other design pattern principle — this pattern teaches you a generic design concept to decouple data access logic. However, most developers recommend exposing CRUD (Create, Read, Update, and Delete) operations from repositories. Also, as a best practice, we’ll create one repository for each business entity.
Let’s implement a simple bookstore application with the CRUD-based repository pattern. Note that we will use a virtual data layer (a mock database provider) as our data provider infrastructure to focus solely on the repository pattern implementation. You can replace any data layer API such as SQLite, Firebase, or another RESTful API with this virtual data layer module.
You can try this example application by creating a new Flutter application, or you can use these design principles in your existing Flutter project. If you plan to begin with a new project, enter the following command to create the bookstore app.
flutter create repo_bookstore
Run the app with the following command to get it started. You can test this example on Chrome, mobile, or desktop window, since Flutter is a universal app development framework.
cd repo_bookstore
flutter run
Repositories don’t expose the internal data source’s structures or data formats — they expose data via models, also known as DTOs.
The bookstore app will show some details about books, so we need to create a book model. Add the following code to ./lib/models/book.dart
class Book {
  final int id;
  final String title;
  final int year;

  Book(this.id, this.title, this.year);

  Book.fromMap(Map<String, dynamic> data) :
    id = data['id'],
    title = data['title'],
    year = data['year'];

  Map<String, dynamic> toMap() {
    return {
      'id': id,
      'title': title,
      'year': year
    };
  }
}
The above code defines a model for the Book business entity with several properties and methods. We are planning to build a virtual database access layer with Dart Maps, so here, we created fromMap and toMap helper functions for type conversion purposes.
Now we need to create a virtual data access layer. This module will simulate a data provider like a RESTful API or database connection with a simple Dart class. Add the following code to lib/db/virtual_db.dart.
import 'dart:math';

class VirtualDB {
  List<Map<String, dynamic>> _items = [];
  static final VirtualDB _db = VirtualDB._privateConstructor();

  VirtualDB._privateConstructor();

  factory VirtualDB() {
    return _db;
  }

  Future<void> insert(Map<String, dynamic> item) async {
    item['id'] = Random().nextInt(1000);
    _items.add(item);
  }

  Future<void> remove(int id) async {
    _items.removeWhere((item) => item['id'] == id);
  }

  Future<void> update(Map<String, dynamic> updatedItem) async {
    int i = _items.indexWhere((item) => item['id'] == updatedItem['id']);
    _items[i] = updatedItem;
  }

  Future<List<Map<String, dynamic>>> list() async {
    await Future.delayed(Duration(milliseconds: 800));
    return _items;
  }

  Future<Map<String, dynamic>?> findOne(int id) async {
    return _items.firstWhere((item) => item['id'] == id);
  }
}
The above singleton class implements several functions to add, edit, remove, and retrieve key-value-based data records. As you may have already noticed, we made all operations asynchronous to simulate a real data layer connection. Also, the list operation simulates a data read delay with the Future.delayed function.
The repository pattern motivates us to consume a data layer connection via a repository class — so, we need to create a repository class for the Book business entity.
But, first, we need to create the base repository interface as a good practice. Then we can write multiple concrete repositories by implementing the same interface. For example, you can create book repository implementations for various data sources — a SQLite-based book repository, aRESTful book repository, etc. — with this base interface.
Add the following code to lib/repositories/book_interface.dart:
import 'package:repo_bookstore/models/book.dart';

abstract class IBookRepository {
  Future<List<Book>> getAll();
  Future<Book?> getOne(int id);
  Future<void> insert(Book book);
  Future<void> update(Book book);
  Future<void> delete(int id);
}
Now, let’s create a concrete implementation for the book repository using the above interface definition. Add the following code to lib/repositories/book.dart:
import 'package:repo_bookstore/db/virtual_db.dart';
import 'package:repo_bookstore/repositories/book_interface.dart';
import 'package:repo_bookstore/models/book.dart';

class BookRepository implements IBookRepository {

  final VirtualDB _db;

  BookRepository(this._db);

  @override
  Future<List<Book>> getAll() async {
    var items = await _db.list();
    return items.map((item) => Book.fromMap(item)).toList();
  }

  @override
  Future<Book?> getOne(int id) async {
    var item = await _db.findOne(id);
    return item != null ? Book.fromMap(item) : null;
  }

  @override
  Future<void> insert(Book book) async {
    await _db.insert(book.toMap());
  }

  @override
  Future<void> update(Book book) async {
    await _db.update(book.toMap());
  }

  @override
  Future<void> delete(int id) async {
    await _db.remove(id);
  }
}
The above code snippet implements the book repository via the previous book repository interface definition by overriding all abstract methods.
Note that, at this level, we only expose functions using business entities. For example, we can insert a new book into our virtual database by sending a Book instance. At this level, we added an abstraction layer on top of the data access layer, so we don’t need to consider our virtual database layer for the next steps.
Besides, this repository layer is the highest layer where we directly access the database layer.
Our book repository is now ready to be used. Let’s move on to creating a frontend for our bookstore app.
We typically don’t add data processing logic to views (Flutter widgets) to keep UI logic decoupled from the main business logic. Therefore, we can create a controller/service to manipulate data from the widget level.
Let’s assume that we need to implement a frontend for adding, displaying, and removing books. We’ll then need to expose the required functionality via a controller.
Add the following code to lib/controllers/home.dart to create a controller for the homepage.
import 'package:repo_bookstore/db/virtual_db.dart';
import 'package:repo_bookstore/repositories/book.dart';
import 'package:repo_bookstore/models/book.dart';

class HomeController {
  BookRepository _bookRepo = BookRepository(VirtualDB());

  Future<List<Book>> getAllBooks() {
    return _bookRepo.getAll();
  }

  Future<void> addBook(Book book) {
    return _bookRepo.insert(book);
  }

  Future<void> removeBook(int id) {
    return _bookRepo.delete(id);
  }
}
Our controller class is ready; it exposes functions for listing, adding, and removing books by wrapping the book repository API.
Now we can build the frontend for the bookstore app. Replace your existing lib/main.dart file’s code with the following Dart code.
import 'package:flutter/material.dart';
import 'package:flutter/services.dart';
import 'package:repo_bookstore/controllers/home.dart';
import 'package:repo_bookstore/models/book.dart';

void main() {
  runApp(MyApp());
}

class MyApp extends StatelessWidget {
  @override
  Widget build(BuildContext context) {
    return MaterialApp(
      home: Scaffold(
          appBar: AppBar(
            title: const Text('Repo Book Store'),
          ),
          body: HomePage()),
    );
  }
}

class HomePage extends StatefulWidget {
  final HomeController _homeController = HomeController();

  @override
  _HomePageState createState() => _HomePageState();
}

class _HomePageState extends State<HomePage> {
  void _refreshList() {
    setState(() {});
  }

  @override
  Widget build(BuildContext context) {
    return ListView(children: [
      _Form(widget._homeController, _refreshList),
      _BookTable(widget._homeController, _refreshList)
    ]);
  }
}

class _Form extends StatefulWidget {
  final HomeController _homeController;
  final VoidCallback _refreshList;

  _Form(this._homeController, this._refreshList);

  @override
  _FormState createState() => _FormState();
}

class _FormState extends State<_Form> {
  final GlobalKey<FormState> _formKey = GlobalKey<FormState>();
  final TextEditingController _titleFieldController = TextEditingController();
  final TextEditingController _yearFieldController = TextEditingController();

  @override
  void dispose() {
    _titleFieldController.dispose();
    _yearFieldController.dispose();
    super.dispose();
  }

  @override
  Widget build(BuildContext context) {
    return Form(
      key: _formKey,
      child: Container(
        padding: const EdgeInsets.all(8.0),
        child: Column(
          crossAxisAlignment: CrossAxisAlignment.start,
          children: <Widget>[
            TextFormField(
              controller: _titleFieldController,
              decoration: const InputDecoration(
                labelText: 'Title',
              ),
              validator: (String? value) {
                if (value == null || value.isEmpty) {
                  return 'Please enter book title';
                }
                return null;
              },
            ),
            TextFormField(
              controller: _yearFieldController,
              decoration: const InputDecoration(
                labelText: 'Year',
              ),
              keyboardType: TextInputType.number,
              inputFormatters: [
                FilteringTextInputFormatter.allow(RegExp(r'[\d]')),
              ],
              validator: (String? value) {
                if (value == null || value.isEmpty) {
                  return 'Please enter released year';
                }
                return null;
              },
            ),
            Container(
                margin: const EdgeInsets.only(top: 10.0),
                child: ElevatedButton(
                  onPressed: () async {
                    if (_formKey.currentState!.validate()) {
                      await widget._homeController.addBook(Book(
                          0,
                          _titleFieldController.text,
                          int.parse(_yearFieldController.text)));
                      _titleFieldController.clear();
                      _yearFieldController.clear();
                      widget._refreshList();
                    }
                  },
                  child: Text('Add book'),
                )),
          ],
        ),
      ),
    );
  }
}

class _BookTable extends StatelessWidget {
  final HomeController _homeController;
  final VoidCallback _refreshList;

  _BookTable(this._homeController, this._refreshList);

  @override
  Widget build(BuildContext context) {
    return FutureBuilder<List<Book>>(
        future: _homeController.getAllBooks(),
        builder: (context, snapshot) {
          if (!snapshot.hasData) {
            return const Center(child: Text('Loading..'));
          } else {
            return DataTable(
                columns: _createBookTableColumns(),
                rows: _createBookTableRows(snapshot.data ?? []));
          }
        });
  }

  List<DataColumn> _createBookTableColumns() {
    return [
      const DataColumn(label: Text('ID')),
      const DataColumn(label: Text('Book')),
      const DataColumn(label: Text('Action')),
    ];
  }

  List<DataRow> _createBookTableRows(List<Book> books) {
    return books
        .map((book) => DataRow(cells: [
              DataCell(Text('#' + book.id.toString())),
              DataCell(Text('${book.title} (${book.year.toString()})')),
              DataCell(IconButton(
                icon: const Icon(Icons.delete),
                onPressed: () async {
                  await _homeController.removeBook(book.id);
                  _refreshList();
                },
              )),
            ]))
        .toList();
  }
}
The above UI code implements a multi-component single-page application with a form and data table. The form component lets the user add new books, and the data table component displays all book information. Besides, the user can remove a book from the store by tapping on the trash bin icon.
Here, we added the entire UI into a single Dart file by using a callback-based state management approach . This mainly works because we have only one application screen. However, when you are developing large-scale Flutter apps with multiple screens, it’s always good to use multiple Dart files and select a flexible state management approach (the Flutter team recommends Provider).
Note the following important points about the above UI source code:
HomeController instanceFutureBuilder class to render UI conditionally with asynchronous data retrieval. The FutureBuilder class provides a productive way to display another widget until the asynchronous operation completes; in our case, we show a text label until we receive all books from the repositoryCheck your application, add new books, and try to remove existing books, as shown below.
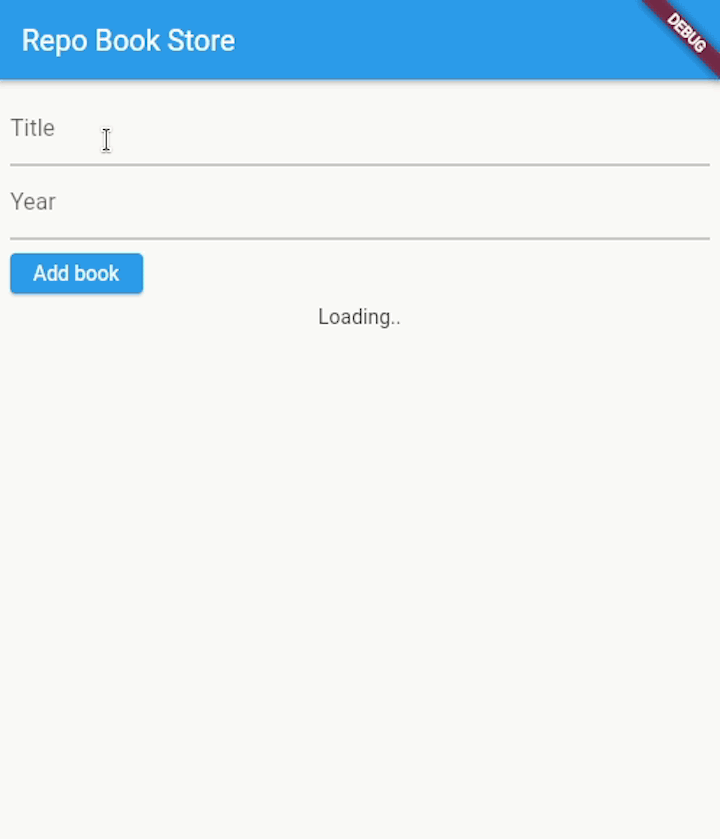 The bookstore app supports adding, listing, and removing book entities via the book repository instance. Similarly, you can add another screen to update a selected book by using the
 getOne and update repository functions. The pattern is the same — you need to expose necessary repository functions via the controller to the stateful widget.
The full source code is available at my GitHub repository.
You can implement unit testing for different elements of your Flutter applications, such as widgets, controllers, models, services, and repositories. It’s possible to unit-test repository-based Flutter codebases with the following strategies:
You don’t need to implement mock classes by yourself — the Mockito package helps you to generate them quickly and automatically. If you need to test the repository with a mock database class, you can pass the mock database instance to the repository, as shown below.
final mockDB = MockDB();
final bookRepo = BookRepository(mockDB);
// tests ...
Our bookstore application had only one business object and one repository. But, as we alluded to earlier, you may have to work with many business entities if you work with large-scale Flutter apps. How can we create multiple repositories for many business objects?
Assume that we also need to manage e-books in the bookstore app we have made. Now we have two business entities: Book and e``-books.
We can organize our code with some additional classes with Dart generics syntax, as shown in the following steps.
First, we need to define our models:
abstract class BaseEntity {
  // common structure
}
class Book extends BaseEntity {
  // book implementation
}
class EBook extends BaseEntity {
  // e-book implementation
}
Next, create a generic interface for the base repository definition.
abstract class IRepository<T> {
  Future<List<T>> getAll();
  Future<void> insert(T item);
  // other methods....
}
Now you can either write multiple concrete repositories or one generic concrete repository, according to your project’s architectural requirement. However, adding one generic repository implementation is a good way to avoid code repetition in all scenarios. Look at the following EntityRepository class.
class EntityRepository<T extends BaseEntity> implements IRepository<T> {

  @override
  Future<List<BaseEntity>> getAll() async {
    // implementation
  }

  @override
  Future<void> insert(T item) async {
    // implementation
  }
}
Note that, here, we are accepting only the BaseEntity type for generics with the T extends BaseEntity definition. Finally, you can use the above EntityRepository with different sub-classes, as shown below.
var bookRepo = EntityRepository<Book>();
var eBookRepo = EntityRepository<EBook>();
bookRepo.insert(Book());
eBookRepo.insert(EBook());
You can inspect and run this example online from my DartPad.
The repository pattern looks somewhat similar to a Data Access Object (DAO) — not to be confused with Decentralized Autonomous Organizations (DAOs) — and service patterns, but there are several noticeable differences, as explained in the table below.
We learned how to implement the repository design pattern for Flutter applications with a sample app. Flutter app development teams use various design patterns for organizing code and managing the app state. For example, they often use various state management packages such as Redux, Riverpod, or Provider. They may also organize codebases with the MVC pattern, reusable components, inheritance, and reusable generic functions.
The repository concept also provides a way to organize code by creating another abstraction layer. If you need to process business entities, you can create a service class by wrapping a repository instance (or many) as we created a controller.
We can also hide the complexity of the data persistence layer by creating a DAO with repositories, but don’t over-engineer small or medium-scale apps with many classes, as these complex design patterns primarily exist for handling large-scale applications’ complexities.
Install LogRocket via npm or script tag. LogRocket.init() must be called client-side, not
server-side
$ npm i --save logrocket

// Code:

import LogRocket from 'logrocket';
LogRocket.init('app/id');
// Add to your HTML:

<script src="https://cdn.lr-ingest.com/LogRocket.min.js"></script>
<script>window.LogRocket && window.LogRocket.init('app/id');</script>

Learn how to protect full-stack projects from NPM supply chain attacks with a practical security checklist.

Explore 15 essential MCP servers for web developers to enhance AI workflows with tools, data, and automation.

Learn how contrast-color() automatically picks accessible text colors using native CSS, without JavaScript.

Learn how to build a harness-style AI workflow using Claude Code with specialized Dev, QE, and Ops subagents, gated handoffs, MCP telemetry, and LEARNING.md.
Would you be interested in joining LogRocket's developer community?
Join LogRocket’s Content Advisory Board. You’ll help inform the type of content we create and get access to exclusive meetups, social accreditation, and swag.
Sign up now

