Flutter is a popular, flexible, and full-featured framework for building cross-platform applications. It was started as a cross-platform mobile application development framework, especially for building Android and iOS apps, but now we can use Flutter to build native desktop applications for Linux, macOS, and Windows too.

In most applications, programmers have to display some data in a tabular structure — they may have to display simple lists, lists with some actions, or editable lists.
Flutter comes with its own UI toolkit full of many widgets that do various things. One such widget Flutter offers is the DataTable widget to display tabular data structures. The DataTable widget is very flexible compared to native platform-specific list views.
In this tutorial, I will explain the principles of the DataTable widget and discuss all of its features by showing you several practical examples.
You can create a new Flutter app or open an existing one to get started with this tutorial. If you would like to create a new app, use the following command as usual.
flutter create datatable-demo
You can also use FlutLab to try out the upcoming code snippets more quickly, without even installing Flutter.
The DataTable widget has three key sub-widgets: DataColumn, DataRow, and DataCell. DataColumn defines columns, DataRow defines rows, and DataCell defines cells inside rows.
The DataTable widget has the following syntax.
DataTable(
  columns: [...] // A list of DataColumns
  rows: [...] // A list of DataRows
  ...
  ...
  // other parameters
  ...
)
Let’s build a simple book list with DataTable. Add the following code to your main.dart file by replacing the existing code.
import 'package:flutter/material.dart';
void main() {
  runApp(MyApp());
}
class MyApp extends StatefulWidget {
  @override
  _MyAppState createState() => _MyAppState();
}
class _MyAppState extends State<MyApp> {
  @override
  Widget build(BuildContext context) {
    return MaterialApp(
      home: Scaffold(
        appBar: AppBar(
          title: Text('DataTable Demo'),
        ),
        body: ListView(
          children: [
            _createDataTable()
          ],
        ),
      ),
    );
  }
DataTable _createDataTable() {
    return DataTable(columns: _createColumns(), rows: _createRows());
  }
List<DataColumn> _createColumns() {
    return [
      DataColumn(label: Text('ID')),
      DataColumn(label: Text('Book')),
      DataColumn(label: Text('Author'))
    ];
  }
List<DataRow> _createRows() {
    return [
      DataRow(cells: [
        DataCell(Text('#100')),
        DataCell(Text('Flutter Basics')),
        DataCell(Text('David John'))
      ]),
      DataRow(cells: [
        DataCell(Text('#101')),
        DataCell(Text('Dart Internals')),
        DataCell(Text('Alex Wick'))
      ])
    ];
  }
}
Once you save the file, you’ll see a book list, as shown below.
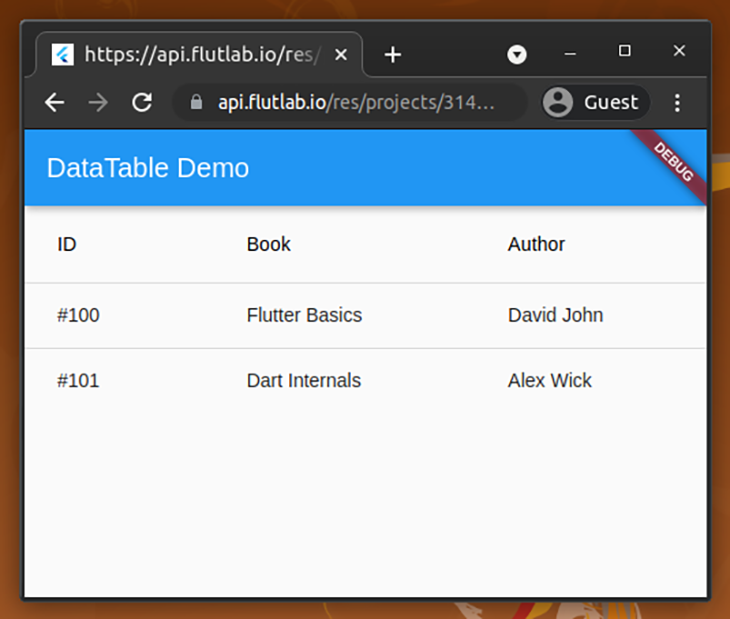
Here we created a simple book list with three columns and two rows. The DataTable creator code is decomposed into two functions: _createColumns for generating columns, and _createRows for generating rows with cell data.
This table has hardcoded mock data for demonstration purposes, but you can populate row-column data based on RESTful API requests, device files, and dynamically generated data.
In those scenarios, you may have to generate row-column data dynamically based on Dart lists and maps. The following code renders the same book list from a list and map. We’ll try to add new books to the list.
import 'package:flutter/material.dart';
void main() {
  runApp(MyApp());
}
class MyApp extends StatefulWidget {
  @override
  _MyAppState createState() => _MyAppState();
}
class _MyAppState extends State<MyApp> {
  List<Map> _books = [
    {
      'id': 100,
      'title': 'Flutter Basics',
      'author': 'David John'
    },
    {
      'id': 102,
      'title': 'Git and GitHub',
      'author': 'Merlin Nick'
    },
    {
      'id': 101,
      'title': 'Flutter Basics',
      'author': 'David John'
    },
  ];
  @override
  Widget build(BuildContext context) {
    return MaterialApp(
      home: Scaffold(
        appBar: AppBar(
          title: Text('DataTable Demo'),
        ),
        body: ListView(
          children: [
            _createDataTable()
          ],
        ),
      ),
    );
  }
DataTable _createDataTable() {
    return DataTable(columns: _createColumns(), rows: _createRows());
  }
List<DataColumn> _createColumns() {
    return [
      DataColumn(label: Text('ID')),
      DataColumn(label: Text('Book')),
      DataColumn(label: Text('Author'))
    ];
  }
List<DataRow> _createRows() {
    return _books
        .map((book) => DataRow(cells: [
              DataCell(Text('#' + book['id'].toString())),
              DataCell(Text(book['title'])),
              DataCell(Text(book['author']))
            ]))
        .toList();
  }
}
We provided only rows and column data to create the above data table. Therefore, the Flutter framework rendered the table by applying the default styles and configurations.
The DataTable widget is very flexible, though, so we can customize it as we need — by providing various parameters. For example, we can configure the DataTable widget with several styles and configurations using the following code. Update your main.dart file with the below.
import 'package:flutter/material.dart';
void main() {
  runApp(MyApp());
}
class MyApp extends StatefulWidget {
  @override
  _MyAppState createState() => _MyAppState();
}
class _MyAppState extends State<MyApp> {
  @override
  Widget build(BuildContext context) {
    return MaterialApp(
      home: Scaffold(
        appBar: AppBar(
          title: Text('DataTable Demo'),
        ),
        body: ListView(
          children: [
            _createDataTable()
          ],
        ),
      ),
    );
  }
}
DataTable _createDataTable() {
  return DataTable(columns: _createColumns(),
      rows: _createRows(),
      dividerThickness: 5,
      dataRowHeight: 80,
      showBottomBorder: true,
      headingTextStyle: TextStyle(
                          fontWeight: FontWeight.bold,
                          color: Colors.white
                        ),
      headingRowColor: MaterialStateProperty.resolveWith(
                        (states) => Colors.black
                      ),
  );
}
List<DataColumn> _createColumns() {
  return [
    DataColumn(label: Text('ID'), tooltip: 'Book identifier'),
    DataColumn(label: Text('Book')),
    DataColumn(label: Text('Author'))
  ];
}
List<DataRow> _createRows() {
  return [
    DataRow(cells: [
      DataCell(Text('#100')),
      DataCell(Text('Flutter Basics', style: TextStyle(fontWeight: FontWeight.bold))),
      DataCell(Text('David John'))
    ]),
    DataRow(cells: [
      DataCell(Text('#101')),
      DataCell(Text('Dart Internals')),
      DataCell(Text('Alex Wick'))
    ])
  ];
}
Now, you have customized your DataTable as shown below.
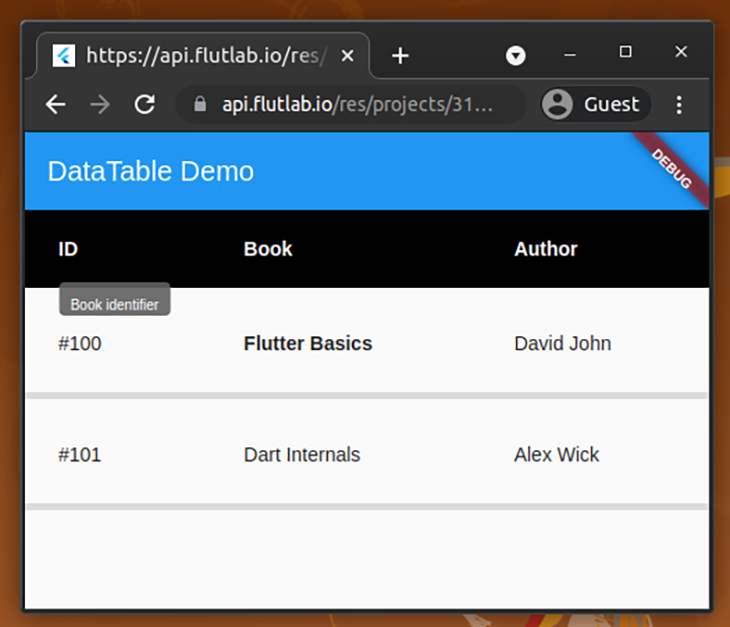
Customization details:
dividerThickness parameterheadingRowColor and headingTextStyle parametersshowBottomBorder parameter to truetooltip parameterAs demonstrated above, you can customize data tables as you wish. If you maintain a custom Flutter theme, you can define these adjustments in your theme data object with the DataTableThemeData class.
Sorting is a must-have feature to increase usability when your data tables include numerical values. Sometimes, programmers also add checkboxes to table rows to enable selections. We can improve the usability and productivity of the app by adding a feature to select/deselect all items at once.
Let’s add these features to our book list!
The sorting feature is an inbuilt feature in the DataTable widget. You can enable sorting by defining the primary sort column index and the onSort callback function for the sortable column.
Add the following code to your main.dart file.
import 'package:flutter/material.dart';
void main() {
  runApp(MyApp());
}
class MyApp extends StatefulWidget {
  @override
  _MyAppState createState() => _MyAppState();
}
class _MyAppState extends State<MyApp> {
  List<Map> _books = [
    {
      'id': 100,
      'title': 'Flutter Basics',
      'author': 'David John'
    },
    {
      'id': 101,
      'title': 'Flutter Basics',
      'author': 'David John'
    },
    {
      'id': 102,
      'title': 'Git and GitHub',
      'author': 'Merlin Nick'
    }
  ];
  int _currentSortColumn = 0;
  bool _isSortAsc = true;
@override
  Widget build(BuildContext context) {
    return MaterialApp(
      home: Scaffold(
        appBar: AppBar(
          title: Text('DataTable Demo'),
        ),
        body: ListView(
          children: [
            _createDataTable()
          ],
        ),
      ),
    );
  }
DataTable _createDataTable() {
    return DataTable(
      columns: _createColumns(),
      rows: _createRows(),
      sortColumnIndex: _currentSortColumn,
      sortAscending: _isSortAsc,
    );
  }
List<DataColumn> _createColumns() {
    return [
      DataColumn(
        label: Text('ID'),
        onSort: (columnIndex, _) {
          setState(() {
            _currentSortColumn = columnIndex;
            if (_isSortAsc) {
              _books.sort((a, b) => b['id'].compareTo(a['id']));
            } else {
              _books.sort((a, b) => a['id'].compareTo(b['id']));
            }
            _isSortAsc = !_isSortAsc;
          });
        },
      ),
      DataColumn(label: Text('Book')),
      DataColumn(label: Text('Author'))
    ];
  }
List<DataRow> _createRows() {
    return _books
        .map((book) => DataRow(cells: [
              DataCell(Text('#' + book['id'].toString())),
              DataCell(Text(book['title'])),
              DataCell(Text(book['author']))
            ]))
        .toList();
  }
}
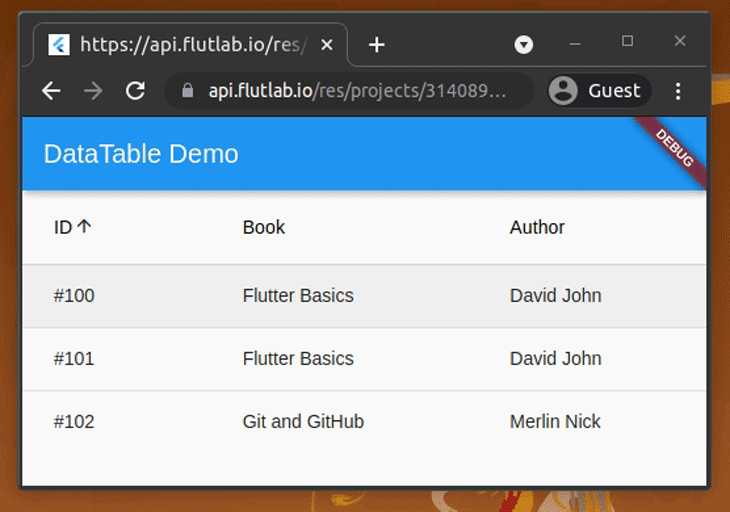
As you can see, the above code defines a sort function that sorts the books list based on the sorting direction. When the user clicks on the ID column header, the sort function changes the sorting direction with the setState method.
If you run the above code, you’ll see the following result. You can click on the ID column to sort the data table’s rows.
You don’t need to add checkbox widgets to your data table manually to enable checkbox-based selections — Flutter DataTable offers checkbox-based selections as a feature! You just need to add a callback for DataRow’s onSelectChanged parameter and set the selection state via DataRow’s selected parameter to enable the checkbox-based selection feature.
Add the following code to your main.dart to see this feature in action.
import 'package:flutter/material.dart';
import 'package:collection/collection.dart';
void main() {
  runApp(MyApp());
}
class MyApp extends StatefulWidget {
  @override
  _MyAppState createState() => _MyAppState();
}
class _MyAppState extends State<MyApp> {
  // The following list is already sorted by id
  List<Map> _books = [
    {
      'id': 100,
      'title': 'Flutter Basics',
      'author': 'David John'
    },
    {
      'id': 101,
      'title': 'Flutter Basics',
      'author': 'David John'
    },
    {
      'id': 102,
      'title': 'Git and GitHub',
      'author': 'Merlin Nick'
    }
  ];
  List<bool> _selected = [];
@override
  void initState() {
    super.initState();
    _selected = List<bool>.generate(_books.length, (int index) => false);
  }
@override
  Widget build(BuildContext context) {
    return MaterialApp(
      home: Scaffold(
        appBar: AppBar(
          title: Text('DataTable Demo'),
        ),
        body: ListView(
          children: [
            _createDataTable()
          ],
        ),
      ),
    );
  }
DataTable _createDataTable() {
    return DataTable(columns: _createColumns(), rows: _createRows());
  }
List<DataColumn> _createColumns() {
    return [
      DataColumn(label: Text('ID')),
      DataColumn(label: Text('Book')),
      DataColumn(label: Text('Author'))
    ];
  }
List<DataRow> _createRows() {
    return _books
        .mapIndexed((index, book) => DataRow(
                cells: [
                  DataCell(Text('#' + book['id'].toString())),
                  DataCell(Text(book['title'])),
                  DataCell(Text(book['author']))
                ],
                selected: _selected[index],
                onSelectChanged: (bool? selected) {
                  setState(() {
                    _selected[index] = selected!;
                  });
                }))
        .toList();
  }
}
The above code stores the currently selected row’s index details inside the selected list. Also, it sets whether the current row is selected or not via DataRow’s selected parameter. The onSelectChanged callback function updates the selection indices list based on the user action. Flutter framework automatically handles the select-all checkbox’s action.
Run the above code. You will see a result like below.
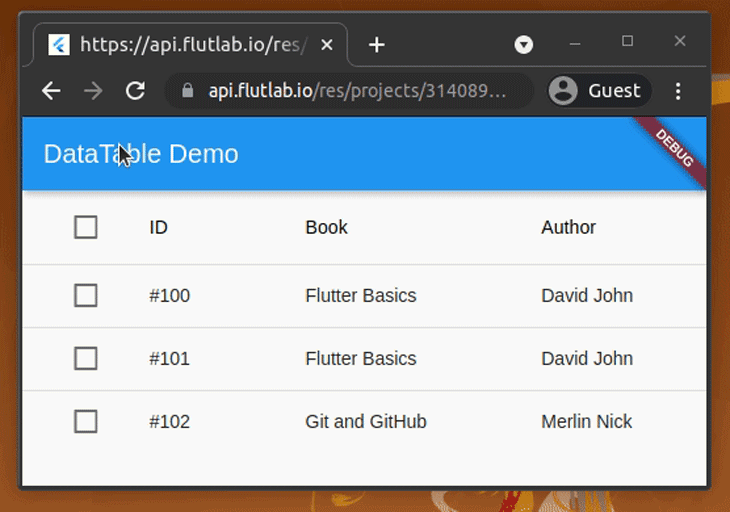
You can find all selected indices from the selected list.
In previous examples, we used the Text widget to display the content of the cells. Sometimes, programmers have to show some icons, buttons, links, etc. with data tables. Like with any other complex Flutter widget, it’s possible to show widgets inside data tables too.
Let’s add an image inside a data cell by creating a new column called Category. For demonstration, the following code will add the Flutter logo to the category column.
import 'package:flutter/material.dart';
void main() {
  runApp(MyApp());
}
class MyApp extends StatefulWidget {
  @override
  _MyAppState createState() => _MyAppState();
}
class _MyAppState extends State<MyApp> {
  List<Map> _books = [
    {
      'id': 100,
      'title': 'Flutter Basics',
      'author': 'David John'
    },
    {
      'id': 102,
      'title': 'Git and GitHub',
      'author': 'Merlin Nick'
    },
    {
      'id': 101,
      'title': 'Flutter Basics',
      'author': 'David John'
    },
  ];
  @override
  Widget build(BuildContext context) {
    return MaterialApp(
      home: Scaffold(
        appBar: AppBar(
          title: Text('DataTable Demo'),
        ),
        body: ListView(
          children: [
            _createDataTable()
          ],
        ),
      ),
    );
  }
DataTable _createDataTable() {
    return DataTable(columns: _createColumns(), rows: _createRows());
  }
List<DataColumn> _createColumns() {
    return [
      DataColumn(label: Text('ID')),
      DataColumn(label: Text('Book')),
      DataColumn(label: Text('Author')),
      DataColumn(label: Text('Category'))
    ];
  }
List<DataRow> _createRows() {
    return _books
        .map((book) => DataRow(cells: [
              DataCell(Text('#' + book['id'].toString())),
              DataCell(Text(book['title'])),
              DataCell(Text(book['author'])),
              DataCell(FlutterLogo())
            ]))
        .toList();
  }
}
Once you execute the above code, you’ll see the following output.
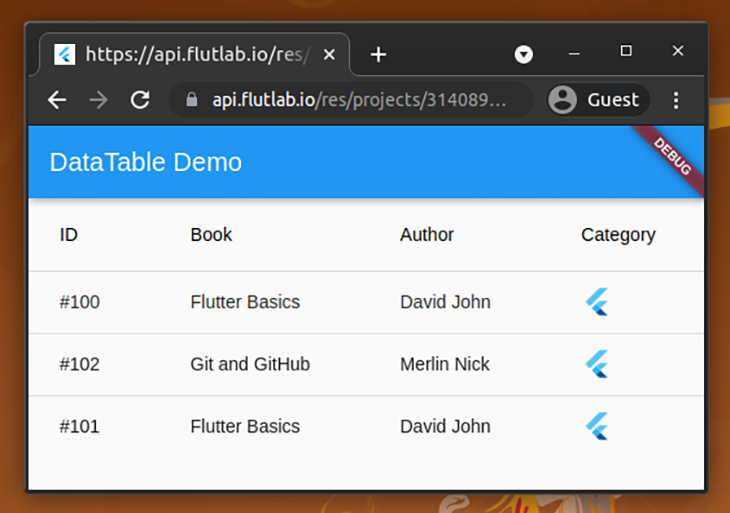
Similarly, you can add any widget into data cells by simply passing the required widget into DataCell’s constructor.
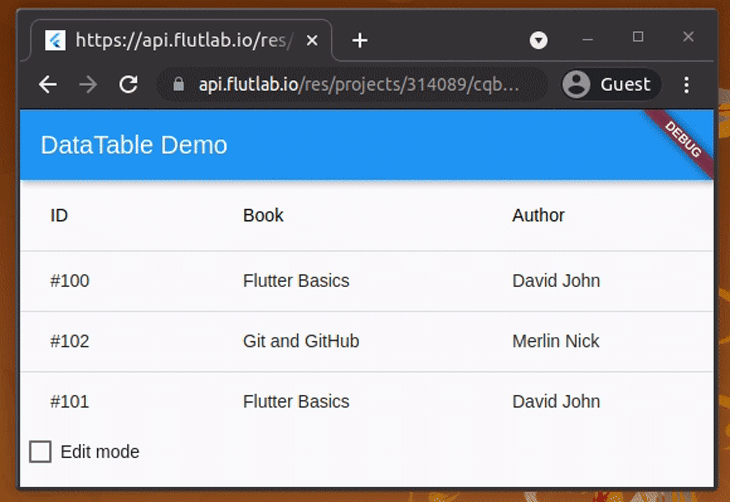
Sometimes, we have to dynamically change cell data based on the user’s actions. For example, we can let users edit some cell values when the edit mode is activated.
We can add this edit mode feature to our book list by adding a checkbox to enable/disable the edit mode. Once the edit mode is enabled, the book names will be turned into editable text boxes.
Add the following code to the main.dart file to get the example running.
import 'package:flutter/material.dart';
void main() {
  runApp(MyApp());
}
class MyApp extends StatefulWidget {
  @override
  _MyAppState createState() => _MyAppState();
}
class _MyAppState extends State<MyApp> {
  List<Map> _books = [
    {
      'id': 100,
      'title': 'Flutter Basics',
      'author': 'David John'
    },
    {
      'id': 102,
      'title': 'Git and GitHub',
      'author': 'Merlin Nick'
    },
    {
      'id': 101,
      'title': 'Flutter Basics',
      'author': 'David John'
    },
  ];
  bool? _isEditMode = false;
  @override
  Widget build(BuildContext context) {
    return MaterialApp(
      home: Scaffold(
        appBar: AppBar(
          title: Text('DataTable Demo'),
        ),
        body: ListView(
          children: [
            _createDataTable(),
            _createCheckboxField()
          ],
        ),
      ),
    );
  }
DataTable _createDataTable() {
    return DataTable(columns: _createColumns(), rows: _createRows());
  }
List<DataColumn> _createColumns() {
    return [
      DataColumn(label: Text('ID')),
      DataColumn(label: Text('Book')),
      DataColumn(label: Text('Author'))
    ];
  }
List<DataRow> _createRows() {
    return _books
        .map((book) => DataRow(cells: [
              DataCell(Text('#' + book['id'].toString())),
              _createTitleCell(book['title']),
              DataCell(Text(book['author']))
            ]))
        .toList();
  }
DataCell _createTitleCell(bookTitle) {
    return DataCell(_isEditMode == true ?
            TextFormField(initialValue: bookTitle,
            style: TextStyle(fontSize: 14))
            : Text(bookTitle));
  }
Row _createCheckboxField() {
    return Row(
      children: [
        Checkbox(
          value: _isEditMode,
          onChanged: (value) {
            setState(() {
              _isEditMode = value;
            });
          },
        ),
        Text('Edit mode'),
      ],
    );
  }
}
The above code dynamically shows data for the book title cells with the _createTitleCell function. If the edit mode checkbox is selected, the _createTitleCell function returns an editable text box. Otherwise, it returns a read-only text field as usual.
The new application will work as below.
Flutter lets programmers define their application layout inside Dart files, and it doesn’t provide a separate layout syntax like other popular frameworks do. Therefore, when you develop large-scale Flutter applications, your source files can become complex and less readable.
This situation can happen with data tables, too. The following design pattern practices help us to reduce the complexity of our Flutter apps.
_createColumns function we created before.As we discussed in this tutorial, you can use Flutter DataTable for displaying tabular data. Also, it’s possible to make data tables very interactive and user-friendly by writing in the above configurations. Moreover, you can add features such as searching and filtering to the DataTable by writing some additional Dart code and adding some other Flutter widgets near the DataTable according to your requirements.
DataTable is suitable for displaying a small number of data records. If you need to show many data records, consider using PaginatedDataTable.
If you are trying to show large data tables for smaller screens, make sure to wrap your data table with SingleChildScrollView to handle the horizontal overflow.
Install LogRocket via npm or script tag. LogRocket.init() must be called client-side, not
server-side
$ npm i --save logrocket

// Code:

import LogRocket from 'logrocket';
LogRocket.init('app/id');
// Add to your HTML:

<script src="https://cdn.lr-ingest.com/LogRocket.min.js"></script>
<script>window.LogRocket && window.LogRocket.init('app/id');</script>
Would you be interested in joining LogRocket's developer community?
Join LogRocket’s Content Advisory Board. You’ll help inform the type of content we create and get access to exclusive meetups, social accreditation, and swag.
Sign up now
A breakdown of the wrapper and container CSS classes, how they’re used in real-world code, and when it makes sense to use one over the other.

This guide walks you through creating a web UI for an AI agent that browses, clicks, and extracts info from websites powered by Stagehand and Gemini.

This guide explores how to use Anthropic’s Claude 4 models, including Opus 4 and Sonnet 4, to build AI-powered applications.

Which AI frontend dev tool reigns supreme in July 2025? Check out our power rankings and use our interactive comparison tool to find out.


One Reply to "Flutter’s DataTable widget: A guide to displaying data"
Very useful article, Thank You.