Whether you’re working a simple to-do application or building your dream app, authentication helps you personalize the experience with user-specific information. It’s also a crucial component for privacy and security.

Firebase Authentication is a preconfigured backend service that makes it really easy to integrate with a mobile app using an SDK. You don’t have to maintain any backend infrastructure for the authentication process and Firebase supports integration with popular identity providers such as Google, Facebook, and GitHub.
In this tutorial, we’ll show you how to integrate Firebase Authentication with your Flutter app. To demonstrate with a practical example, we’ll walk you through the process of building an email-password registration and login process.
We’ll walk through the following steps:
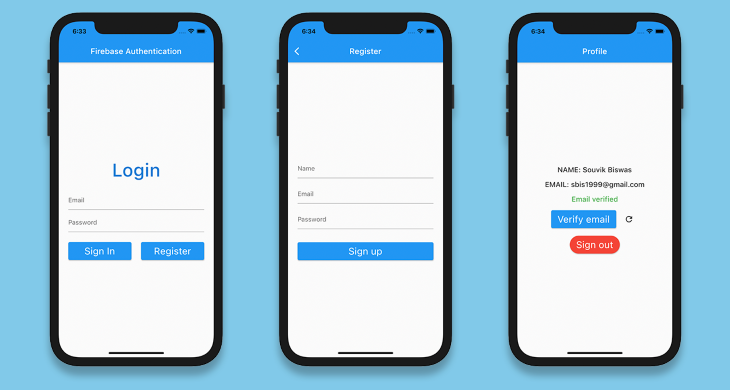
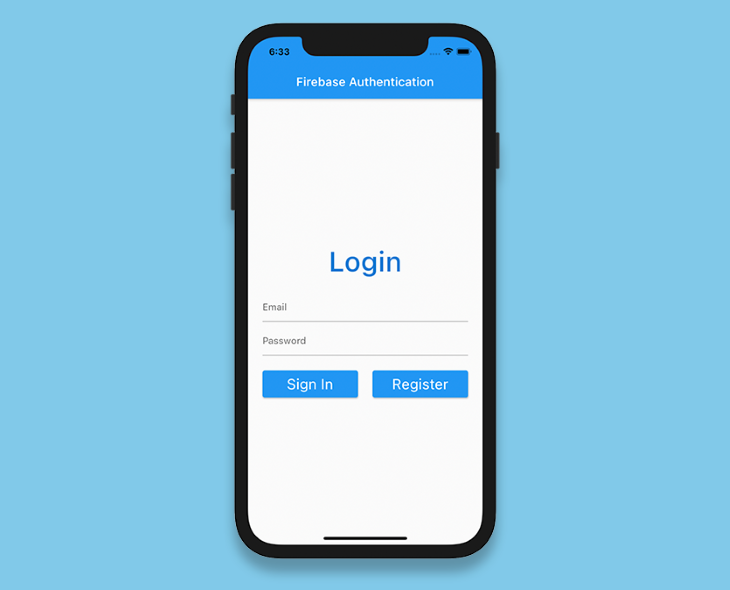
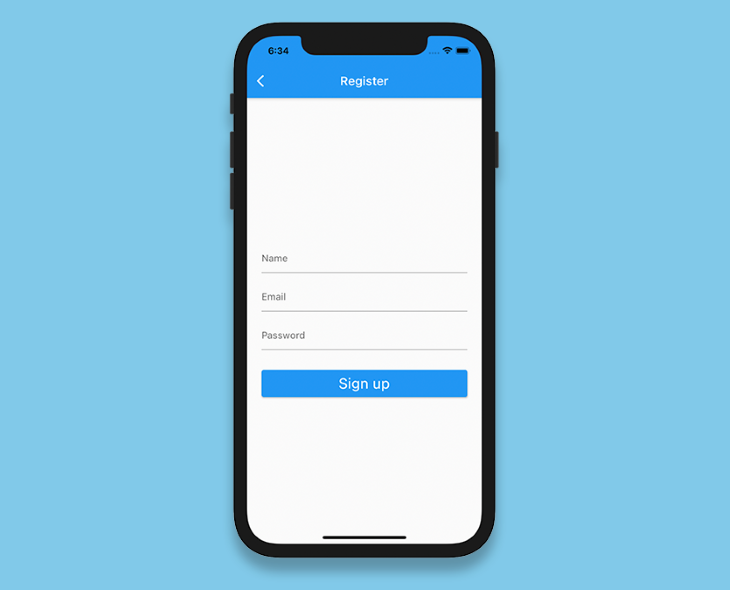
The finished app will look like this:
Create a new Flutter project using the following command:
flutter create flutter_authentication
Open the project in your favorite code editor. Here’s how to open it using VS Code:
code flutter_authentication
To integrate Firebase with your Flutter project, you have to create a new Firebase project by going to the console.
Add a new project and give it a name. We don’t need Google Analytics for this sample project, so you can disable it. Once you’ve created your project, you’ll be directed to your Firebase project dashboard.
To use Firebase with Android, iOS or web, you have to complete some configurations for each platform. See the complete configuration guides below:
Now that we have the basic setup for using Firebase, let’s dive into our Flutter app.
Before you start to implement the authentication logic, you need to import the following plugins:
firebase_core, which is required to use any Firebase service in a Flutter appfirebase_auth to get access to Firebase Authentication servicesAdd these plugins to your pubspec.yaml file:
dependencies:
  firebase_core: ^1.0.4
  firebase_auth: ^1.1.1
Before using any Firebase service within the Flutter app, you need to initialize Firebase App.
Modify the main.dart file to the following:
import 'package:flutter/material.dart';
import 'screens/login_page.dart';
void main() {
  runApp(MyApp());
}
class MyApp extends StatelessWidget {
  @override
  Widget build(BuildContext context) {
    return MaterialApp(
      title: 'Flutter Authentication',
      debugShowCheckedModeBanner: false,
      theme: ThemeData(
        primarySwatch: Colors.cyan,
      ),
      home: LoginPage(),
    );
  }
}
Define the LoginPage:
import 'package:flutter/material.dart';
class LoginPage extends StatelessWidget {
  @override
  Widget build(BuildContext context) {
    return Scaffold(
      appBar: AppBar(
        title: Text('Firebase Authentication'),
      ),
    );
  }
}
Add a new method to initialize Firebase App:
Future<FirebaseApp> _initializeFirebase() async {
    FirebaseApp firebaseApp = await Firebase.initializeApp();
    return firebaseApp;
}
Because this method is asynchronous, you have to use FutureBuilder inside the build method:
class LoginPage extends StatelessWidget {
  Future<FirebaseApp> _initializeFirebase() async {
    FirebaseApp firebaseApp = await Firebase.initializeApp();
    return firebaseApp;
  }
  @override
  Widget build(BuildContext context) {
    return Scaffold(
      appBar: AppBar(
        title: Text('Firebase Authentication'),
      ),
      body: FutureBuilder(
        future: _initializeFirebase(),
        builder: (context, snapshot) {
          if (snapshot.connectionState == ConnectionState.done) {
            return Column(
              children: [
                Text('Login'),
              ],
            );
          }
          return Center(
            child: CircularProgressIndicator(),
          );
        },
      ),
    );
  }
}
For now, we’re just showing a simple Text widget as the async task completes, and otherwise just a CircularProgressIndicator.
When a new user arrives, before logging in, they have to register to the Firebase authentication.
Create a new dart file called fire_auth.dart and define a new method called registerUsingEmailPassword():
class FireAuth {
  static Future<User?> registerUsingEmailPassword({
    required String name,
    required String email,
    required String password,
  }) async {
    FirebaseAuth auth = FirebaseAuth.instance;
    User? user;
    try {
      UserCredential userCredential = await auth.createUserWithEmailAndPassword(
        email: email,
        password: password,
      );
      user = userCredential.user;
      await user!.updateProfile(displayName: name);
      await user.reload();
      user = auth.currentUser;
    } on FirebaseAuthException catch (e) {
      if (e.code == 'weak-password') {
        print('The password provided is too weak.');
      } else if (e.code == 'email-already-in-use') {
        print('The account already exists for that email.');
      }
    } catch (e) {
      print(e);
    }
    return user;
  }
}
Here we are registering a new user using the email and password provided and associating the name of the user with this profile.
There can be various FirebaseAuthException errors, which we have handled in the above code snippet.
To sign in a user who has already registered in our app, define a new method called signInUsingEmailPassword(), passing the user email and password:
static Future<User?> signInUsingEmailPassword({
  required String email,
  required String password,
  required BuildContext context,
}) async {
  FirebaseAuth auth = FirebaseAuth.instance;
  User? user;

  try {
    UserCredential userCredential = await auth.signInWithEmailAndPassword(
      email: email,
      password: password,
    );
    user = userCredential.user;
  } on FirebaseAuthException catch (e) {
    if (e.code == 'user-not-found') {
      print('No user found for that email.');
    } else if (e.code == 'wrong-password') {
      print('Wrong password provided.');
    }
  }

  return user;
}
The email and password are used to generate the User object provided by Firebase. The User can be used later to retrieve any additional data (e.g., user name, profile picture, etc.) stored in that account.
You can use the signOut() method to log a user out. There is no need to create a separate method for signing out because it’s just a single line of code:
FirebaseAuth.instance.signOut();
Let’s say you want to verify whether a user has entered the correct email address before proceeding. To send an email verification, you can use the sendEmailVerification() method on the User object:
user.sendEmailVerification();
We’ll define one more method inside the FireAuth class for refreshing the User:
static Future<User?> refreshUser(User user) async {
  FirebaseAuth auth = FirebaseAuth.instance;

  await user.reload();
  User? refreshedUser = auth.currentUser;

  return refreshedUser;
}
Our app will have three form fields for name, email, password. We’ll create a validator for each one. The validators will help to check whether the user has entered any inappropriate value in a specific field and show an error accordingly.
Create a new file called validator.dart, define a class Validator, and specify three methods inside it (each of which will take a String as a parameter):
validateName() to check whether the name field is emptyvalidateEmail() to check whether the email address field is empty and validate that it’s in the correct format using a regular expressionvalidatePassword() to check whether the password field is empty and verify that the length is longer than six charactersclass Validator {
static String? validateName({required String name}) {
if (name == null) {
return null;
}
if (name.isEmpty) {
return 'Name can\'t be empty';
}
return null;
}
static String? validateEmail({required String email}) {
if (email == null) {
return null;
}
RegExp emailRegExp = RegExp(
r"^[a-zA-Z0-9.!#$%&'*+/=?^_`{|}~-]+@[a-zA-Z0-9](?:[a-zA-Z0-9-]{0,253}[a-zA-Z0-9])?(?:\.[a-zA-Z0-9](?:[a-zA-Z0-9-]{0,253}[a-zA-Z0-9])?)*$");
if (email.isEmpty) {
return 'Email can\'t be empty';
} else if (!emailRegExp.hasMatch(email)) {
return 'Enter a correct email';
}
return null;
}
static String? validatePassword({required String password}) {
if (password == null) {
return null;
}
if (password.isEmpty) {
return 'Password can\'t be empty';
} else if (password.length < 6) {
return 'Enter a password with length at least 6';
}
return null;
}
}
Let’s add a form to the LoginPage for accepting the user’s email address and password:
Define a GlobalKey:
final _formKey = GlobalKey<FormState>();
Add a form and specify the key:
Form(
  key: _formKey,
  child: Column(
    children: <Widget>[
      // Add widgets
    ],
  ),
)
Next, add two TextFormFields to accept the email and password:
Form(
  key: _formKey,
  child: Column(
    children: <Widget>[
      TextFormField(
        controller: _emailTextController,
        focusNode: _focusEmail,
        validator: (value) => Validator.validateEmail(email: value),
      ),
      SizedBox(height: 8.0),
      TextFormField(
        controller: _passwordTextController,
        focusNode: _focusPassword,
        obscureText: true,
        validator: (value) => Validator.validatePassword(password: value),
      ),
    ],
  ),
)
Add two buttons inside the Form: one to sign in and the other for navigating to the RegisterPage:
Row(
  mainAxisAlignment: MainAxisAlignment.spaceBetween,
  children: [
    Expanded(
      child: ElevatedButton(
        onPressed: () async {
          if (_formKey.currentState!.validate()) {
            User? user = await FireAuth.signInUsingEmailPassword(
              email: _emailTextController.text,
              password: _passwordTextController.text,
            );
            if (user != null) {
              Navigator.of(context)
                  .pushReplacement(
                MaterialPageRoute(builder: (context) => ProfilePage(user: user)),
              );
            }
          }
        },
        child: Text(
          'Sign In',
          style: TextStyle(color: Colors.white),
        ),
      ),
    ),
    Expanded(
      child: ElevatedButton(
        onPressed: () {
          Navigator.of(context).push(
            MaterialPageRoute(builder: (context) => RegisterPage()),
          );
        },
        child: Text(
          'Register',
          style: TextStyle(color: Colors.white),
        ),
      ),
    ),
  ],
)
Inside the Sign In button we have called FireAuth.signInUsingEmailPassword() for performing the sign in process using Firebase Authentication.
The RegisterPage will also contain a Form similar to this, just one more field would be there for accepting the name of the user as they sign up for the first time.
You can check out the UI code for the RegisterPage here.
On the ProfilePage, we’ll pass the User object and show the following details: name, email and whether the user has completed the email validation.
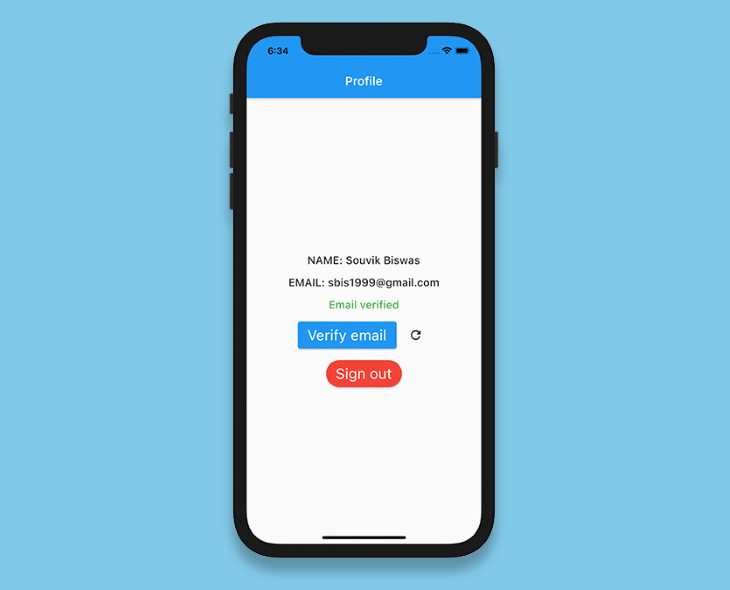
This page will also contain two buttons: one for sending email verification and the other for signing out the user.
class ProfilePage extends StatefulWidget {
  final User user;
  const ProfilePage({required this.user});
  @override
  _ProfilePageState createState() => _ProfilePageState();
}
class _ProfilePageState extends State<ProfilePage> {
  bool _isSendingVerification = false;
  bool _isSigningOut = false;
  late User _currentUser;

  @override
  void initState() {
    _currentUser = widget.user;
    super.initState();
  }

  @override
  Widget build(BuildContext context) {
    return Scaffold(
      appBar: AppBar(
        title: Text('Profile'),
      ),
      body: Center(
        child: Column(
          mainAxisAlignment: MainAxisAlignment.center,
          children: [
            Text(
              'NAME: ${_currentUser.displayName}',
              style: Theme.of(context).textTheme.bodyText1,
            ),
            SizedBox(height: 16.0),
            Text(
              'EMAIL: ${_currentUser.email}',
              style: Theme.of(context).textTheme.bodyText1,
            ),
            SizedBox(height: 16.0),
            _currentUser.emailVerified
                ? Text(
                    'Email verified',
                    style: Theme.of(context)
                        .textTheme
                        .bodyText1!
                        .copyWith(color: Colors.green),
                  )
                : Text(
                    'Email not verified',
                    style: Theme.of(context)
                        .textTheme
                        .bodyText1!
                        .copyWith(color: Colors.red),
                  ),
              // Add widgets for verifying email
              // and, signing out the user
          ],
        ),
      ),
    );
  }
}
The button for sending email verification is as follows:
ElevatedButton(
  onPressed: () async {
    await _currentUser.sendEmailVerification();
  },
  child: Text('Verify email'),
)
We’ll also add an IconButton, which can be used to refresh the user when the email is verified.
IconButton(
  icon: Icon(Icons.refresh),
  onPressed: () async {
    User? user = await FireAuth.refreshUser(_currentUser);
    if (user != null) {
      setState(() {
        _currentUser = user;
      });
    }
  },
)
Lastly, the button for signing out the user:
ElevatedButton(
  onPressed: () async {
    await FirebaseAuth.instance.signOut();

    Navigator.of(context).pushReplacement(
      MaterialPageRoute(
        builder: (context) => LoginPage(),
      ),
    );
  },
  child: Text('Sign out')
)
There is one more important thing left to do. In most apps, you only have to log in once and it remembers the status on subsequent visits — that is, it automatically signs you into the app so that you don’t have to provide your credentials every time.
Inside the _LoginPageState class, modify the _initializeFirebase() method to retrieve the current user. If the User is not null, that means the user is already logged into the app, so just navigate to the UserInfoScreen with the retrieved user.
Future<FirebaseApp> _initializeFirebase() async {
    FirebaseApp firebaseApp = await Firebase.initializeApp();
    User? user = FirebaseAuth.instance.currentUser;
    if (user != null) {
      Navigator.of(context).pushReplacement(
        MaterialPageRoute(
          builder: (context) => ProfilePage(
            user: user,
          ),
        ),
      );
    }
    return firebaseApp;
}
Congratulations! You’ve successfully integrated Firebase Authentication with your Flutter app. As you may have noticed, Firebase Authentication not only provides the backend infrastructure for authenticating users easily, but also the predefined methods for auto login and email verification. And there’s a lot more to explore; Firebase Authentication also provides support for integration with a number of identity providers, including Google, Facebook, Twitter, Apple, etc.
You can find the code used in the sample project on GitHub.
If you have any suggestion or question about this Flutter and Firebase authentication tutorial, feel free to connect with me on Twitter or LinkedIn.
Install LogRocket via npm or script tag. LogRocket.init() must be called client-side, not
server-side
$ npm i --save logrocket

// Code:

import LogRocket from 'logrocket';
LogRocket.init('app/id');
// Add to your HTML:

<script src="https://cdn.lr-ingest.com/LogRocket.min.js"></script>
<script>window.LogRocket && window.LogRocket.init('app/id');</script>

Learn how to set up Meilisearch, index documents, and build keyword, semantic, and hybrid search with AI-powered retrieval.

Compare pnpm and npm across security defaults, disk usage, dependency strictness, and workspace policy to decide which package manager fits your project.

I migrated 20 production-style components from Tailwind to StyleX. Here’s what the data showed about LOC, CSS bundle size, build time, and type safety.

A guide for using JWT authentication to prevent basic security issues while understanding the shortcomings of JWTs.
Would you be interested in joining LogRocket's developer community?
Join LogRocket’s Content Advisory Board. You’ll help inform the type of content we create and get access to exclusive meetups, social accreditation, and swag.
Sign up now

