In this modern area of JavaScript-powered web pages, the DOM can be an expensive abstraction. Without the right tools to enhance performance, a single prop change in your React app can cause elements to re-render unnecessarily.

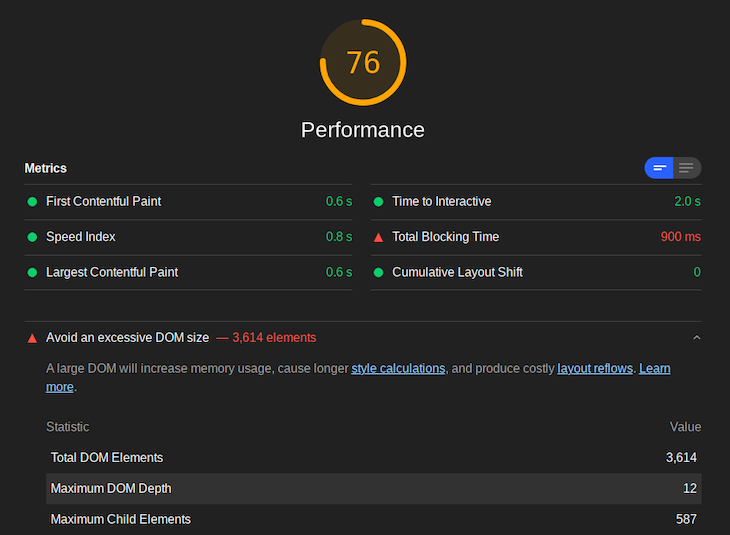
But even without the involvement of JavaScript, having a large DOM tree can slow down your pages and tank your Core Web Vitals, putting a burden on your network requests, runtime, and memory performances.
The Replay is a weekly newsletter for dev and engineering leaders.
Delivered once a week, it's your curated guide to the most important conversations around frontend dev, emerging AI tools, and the state of modern software.

It’s important to keep in mind that although browsers can handle larger DOM trees, it’s advised to limit the total DOM nodes count to 1500, the DOM depth to 32, and the DOM node count for a single parent element to 60.
We can end up with an excessive DOM size by either sending a sizable HTML file over the wire or by generating elements at runtime until we exceed the performance budgets.
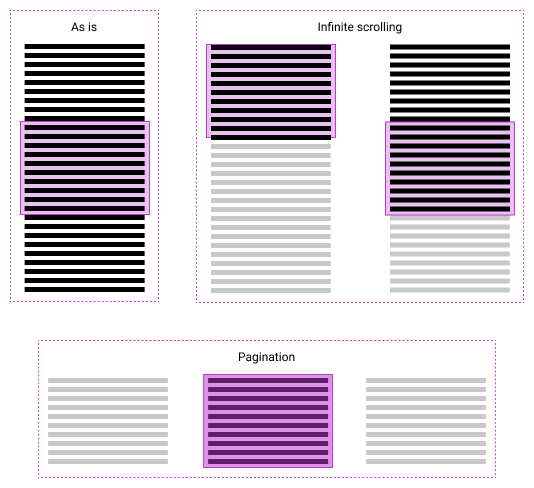
When displaying a large set of data, there are many ways we can implement the visualization. The most notable ways to render the data set are via as-is, pagination, or infinite scrolling.
We can visualize these three options as such:

When we have continuous content, such as multiple paragraphs, on our page, we would use the “as-is” strategy to render our content. To optimize our page performance, we recourse to the CSS content-visibility property. See this blog post for more details.
However, using content-visibility would only help on the initial render. When we scroll down the page to the areas that the browser skipped rendering, we will end up with a slow-moving page again.
The same is true for infinite scrolling. The difference is that we only request content as it’s needed. However, we will eventually experience the same sluggish performance issues.
Pagination, on the other hand, is the most performant way to render. It displays only the necessary content on the initial render, it requests content as needed, and the DOM never bloats with needless content.
But, pagination is a pattern that isn’t suitable for displaying every large data set on a webpage. Instead, we can use virtualization.
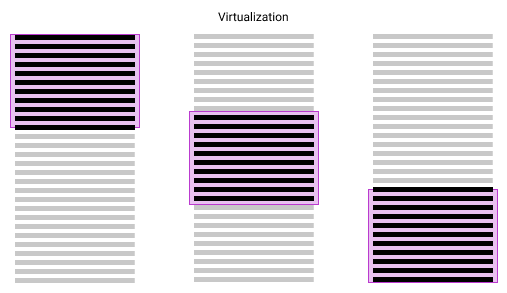
Virtualization is a rendering concept that focuses on tracking the user’s position and only committing what is visually relevant to the DOM in any given scroll position. Essentially, it provides us with all the benefits of pagination along with the UX of infinite scrolling.

To virtualize a list, we pre-calculate the total height of our list using the dimensions of the given list items and multiplying it by the count of our list items.
Then, we position the items to create a list that the user can scroll through. Positioning our elements correctly is key to the efficiency of virtualization because individual items can be added or removed without affecting other items or causing them to reflow (i.e., the process of re-calculating an element’s position on the page).
However, there’s another way to render data.
react-windowTo implement virtualization, we will use react-windo, which is a rewrite of react-virtualized. You can read a comparison between the two libraries here.
To install react-window, run the following:
$ yarn add react-window # the library
$ yarn add -D @types/react-window # auto-completion
react-window will be installed as a dependency, while the types for it will be installed as a devDependency even if we’re not using TypeScript. We will also need faker.js to generate our large data set.
$ yarn add faker
In our App.js, we will import faker as well as useState, and initialize our data state with faker’s address.city function. In our code, it will create an array with a length of 10000.
import React, { useState } from "react";
import * as faker from "faker";

const App = () => {
  const [data, setData] = useState(() =>
    Array.from({ length: 10000 }, faker.address.city)
  );

  return (
    <main>
      <ul style={{ width: "400px", height: "700px", overflowY: "scroll" }}>
        {data.map((city, i) => (
          <li key={i + city}>{city}</li>
        ))}
      </ul>
    </main>
  );
};
Next, we lazily initialize our state using a function to optimize for performance. Then, we make our list scrollable by giving it a width and a height and setting overflowY to scroll.
To compare the performance with and without virtualization, we will add a reverse button that reverses our data array.
const App = () => {
  const [data, setData] = useState(() =>
    Array.from({ length: 10000 }, faker.address.city)
  );

  const reverse = () => {
    setData((data) => data.slice().reverse());
  };

  return (
    <main>
      <button onClick={reverse}>Reverse</button>
      <ul style={{ width: "400px", height: "700px", overflowY: "scroll" }}>
        {data.map((city, i) => (
          <li style={{ height: "20px" }} key={i + city}>{city}</li>
        ))}
      </ul>
    </main>
  );
};
See the Pen
Non-virtualized list in React by Simohamed (@smhmd)
on CodePen.
Now, try the reverse button and notice how latent the update is.
To virtualize this list, we will be using react-window’s FixedSizeList.
import { FixedSizeList as List } from "react-window";

const App = () => {
  const [data, setData] = useState(() =>
    Array.from({ length: 10000 }, faker.address.city)
  );
  const reverse = () => {
    setData((data) => data.slice().reverse());
  };

  return (
    <main>
      <button onClick={reverse}>Reverse</button>
      <List
        innerElementType="ul"
        itemCount={data.length}
        itemSize={20}
        height={700}
        width={400}
      >
        {({ index, style }) => {
          return (
            <li style={style}>
              {data[index]}
            </li>
          );
        }}
      </List>
    </main>
  );
};
We can use FixedSizeList in multiple ways. In this instance, we are creating an imaginary array with the same length of our data (through itemCount) and using it to index our data.
FixedSizeList’s children expose a render prop that has each index and the necessary styles (absolute positioning styles, etc.) passed into it.
We can also be explicit and pass our data and receive it in the render prop through itemData, like so:
<List
  itemData={data}
  innerElementType="ul"
  itemCount={data.length}
  itemSize={20}
  height={700}
  width={400}
>
  {({ data, index, style }) => {
    return <li style={style}>{data[index]}</li>;
  }}
</List>
Notice that our inline styles from earlier are now replaced with width and height props. overflowY is controlled by the layout prop, which defaults to vertical.
It’s important to pass the style render prop argument to the outermost element (the li, in our case). Without it, all elements will stack on top of one another and there will be nothing to scroll through.
The FixedSizeList elements render two wrapper elements that both default to divs and can be customized using innerElementType and outerElementType.
In our case, we set innerElementType to ul for accessibility reasons. However, only predefined props can be used. Adding props such as role or data-* will not have any effect.
By default, FixedSizeList will use the data indices as React keys. But because we are modifying our data array, we must use unique values for our keys. For that, FixedSizeList exposes the itemKey prop, which takes a function that should return either a string or a number. We will be using faker’s datatype.uuid function.
<List
  itemKey={faker.datatype.uuid}
  itemData={data}
  innerElementType="ul"
  itemCount={data.length}
  itemSize={20}
  height={700}
  width={400}
>
  {({ data, index, style }) => {
    return <li style={style}>{data[index]}</li>;
  }}
</List>
See the Pen
Virtualized list in React by Simohamed (@smhmd)
on CodePen.
As I mentioned, we can instantaneously compare our virtualized list to the non-virtualized list using the reverse button. But the performance optimizations do not end there. If we have an expensive element that we render per each list item instead of our single li, react-window allows us to render a simple UI instead when scrolling.
To do this, we first need to enable the isScrolling boolean by passing useIsScrolling to our FixedSizeList.
<List
  useIsScrolling={true}
  itemCount={data.length}
  itemSize={20}
  height={700}
  width={400}
>
  {({ index, style, isScrolling }) =>
    isScrolling ? (
      <Skeleton style={style} />
    ) : (
      <ExpensiveItem index={index} style={style} />
    )
  }
</List>;
Here’s what that could look like:

See the Pen
React Window’s isScrolling by Simohamed (@smhmd)
on CodePen.
react-windowNow that we know how to virtualize a list, let’s learn to virtualize a grid. It’s a similar process, but the difference is that you have to add your data’s count and dimensions in both directions: vertically (columns) and horizontally (rows).
import { FixedSizeGrid as Grid } from "react-window";
import * as faker from "faker";

const COLUMNS = 18;
const ROWS = 30;

const data = Array.from({ length: ROWS }, () =>
  Array.from({ length: COLUMNS }, faker.internet.avatar)
);

function App() {
  return (
    <Grid
      columnCount={COLUMNS}
      rowCount={ROWS}
      columnWidth={50}
      rowHeight={50}
      height={500}
      width={600}
    >
      {({ rowIndex, columnIndex, style }) => {
        return <img src={data\[rowIndex\][columnIndex]} alt="" />;
      }}
    </Grid>
  );
}
See the Pen
React Window Grid by Simohamed (@smhmd)
on CodePen.
Easy, right?
In this article, we covered the performance limits of the DOM as well as how to optimize a lean DOM using multiple rendering strategies. We also discussed how virtualization, through the use of react-window, can efficiently display large data sets to meet our performance targets.
Install LogRocket via npm or script tag. LogRocket.init() must be called client-side, not
server-side
$ npm i --save logrocket

// Code:

import LogRocket from 'logrocket';
LogRocket.init('app/id');
// Add to your HTML:

<script src="https://cdn.lr-ingest.com/LogRocket.min.js"></script>
<script>window.LogRocket && window.LogRocket.init('app/id');</script>

React Server Components and the Next.js App Router enable streaming and smaller client bundles, but only when used correctly. This article explores six common mistakes that block streaming, bloat hydration, and create stale UI in production.

Gil Fink (SparXis CEO) joins PodRocket to break down today’s most common web rendering patterns: SSR, CSR, static rednering, and islands/resumability.

@container scroll-state: Replace JS scroll listeners nowCSS @container scroll-state lets you build sticky headers, snapping carousels, and scroll indicators without JavaScript. Here’s how to replace scroll listeners with clean, declarative state queries.

Explore 10 Web APIs that replace common JavaScript libraries and reduce npm dependencies, bundle size, and performance overhead.
Would you be interested in joining LogRocket's developer community?
Join LogRocket’s Content Advisory Board. You’ll help inform the type of content we create and get access to exclusive meetups, social accreditation, and swag.
Sign up now