Editor’s note: This article was last updated by Chinwike Maduabuchi on 14 June 2024 according to changes in the Auth.js v5 release and to include information about authenticating with magic links.

Authentication is an important and sensitive feature in applications where a user’s credentials, such as username, email, and password, are used to verify their identity.
In this article, we’ll set up a client-side authentication that doesn’t require a password in Next.js using the Auth.js library. Our app, which we will build using React Hooks and functional components, will allow users to log in using their GitHub account or magic links. Upon successful signup, we will have access to the user’s data (profile picture and email) from their social media accounts. You’ll also learn how to protect routes with middleware.
The Replay is a weekly newsletter for dev and engineering leaders.
Delivered once a week, it's your curated guide to the most important conversations around frontend dev, emerging AI tools, and the state of modern software.
Auth.js, previously known as NextAuth.js, is a secure and flexible authentication library designed to sync with a large list of OAuth services and offer full support for passwordless sign-in.
Auth.js can be used with or without a database, and it has default support for popular databases such as MySQL, MongoDB, PostgreSQL, and MariaDB. It can be used without a database by syncing with services like OAuth and JSON Web Tokens.
With a library like Auth.js, you don’t need to be an expert in identity protocol like you would if you were to use OAuth to build secured Next.js applications. Although Auth.js has password authentication built-in with its Credentials provider, they strongly advise against storing sensitive data like a user’s password because of security risks.
Auth.js has a client-side API you can use to interact with sessions in your app. The session data returned from the Providers contains a user payload, which can be displayed to the user upon successful login.
The session data returned to the client looks like this:
{
  expires: '2055-12-07T09:56:01.450Z';
  user: {
        email: '[email protected]';
        image: 'https://avatars2.githubusercontent.com/u/45228014?v=4';
        name: 'Ejiro Asiuwhu';
    }
}
The payload doesn’t contain any sensitive data. The session payload or data is meant for presentation purposes — that is, it’s meant to be displayed to the user.
Auth.js also provides the useSession React Hook, which can be used to check user login status. Meanwhile, Auth.js provides a REST API that is used by the React app. To learn more about what the REST API NextAuth exposes, check out the official docs.
To get started, create a new Next.js application by running the following command:
npx create-next-app@latest
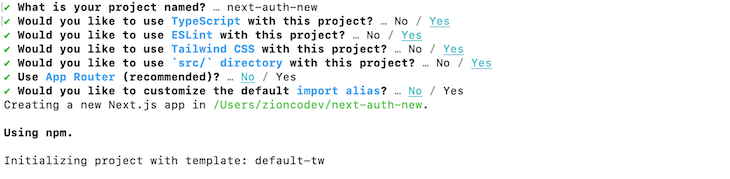
You will be prompted to go through a series of questions; your selections should be the same as the ones from the image below:
Now, change the directory into the project folder and launch the development server:
npm run dev
# or
yarn run dev
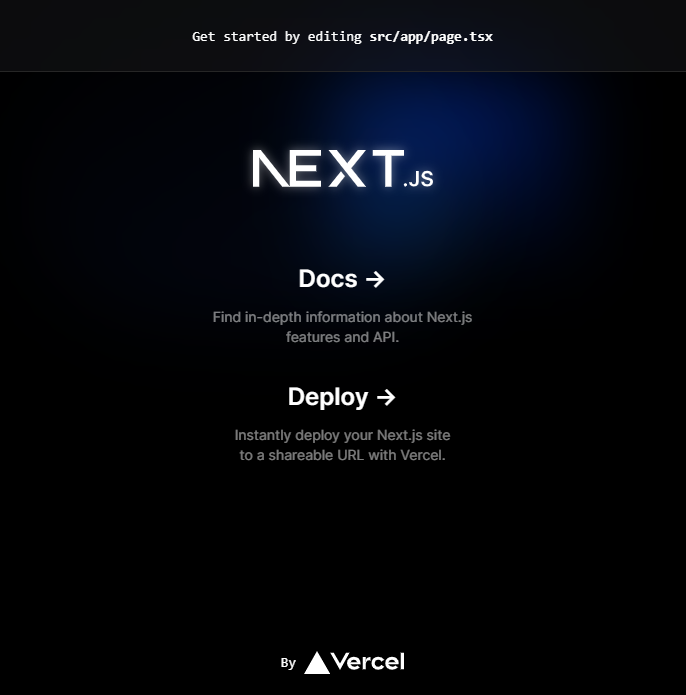
By default, the project will run on port 3000. Launch your browser and navigate to http://localhost:3000. You should end up with this:
Now that we have the Next.js starter application, we’re ready to learn how to authenticate a Next.js app with Auth.js.
This Auth.js client-side authentication tutorial will cover the following:
Here is the repository for the demo shown in this tutorial.
Auth.js v5 is currently in beta, so use the beta suffix as seen in the command below to install it:
npm install next-auth@beta
# or
pnpm add next-auth@beta
Our demo app will allow users to sign in using Auth.js’ GitHub and Email providers. Let’s begin by correctly configuring Auth.js in our project.
To correctly set up Auth.js, you’ll first need to set up the configuration file and expose the required Auth.js endpoints that handle the authentication flow. In v5, Auth.js moved the configuration file, auth.ts, to the project’s root to avoid exporting your configuration from one file and passing it around as authOptions throughout your application.
Because we have a src directory, we’ll create the Auth.js config file at that point like so:
// ./src/auth.ts
import NextAuth from 'next-auth'
import Github from 'next-auth/providers/github'
import type { NextAuthConfig } from 'next-auth'

export const { handlers, auth } = NextAuth({
    providers: [Github],
    debug: process.env.NODE_ENV === 'development',
} satisfies NextAuthConfig)
The code above configures Auth.js for authentication using GitHub as the provider. It exports the handlers and auth objects, which are set up to handle authentication flows, and enables debug mode during development. The configuration is also validated against the NextAuthConfig type for type safety.
Next, we need to create a catch-all dynamic route that will respond to all the relevant Auth.js API routes — like /signIn and /signOut — so that our application can interact with our chosen OAuth provider using the OAuth 2 protocol. From your app directory, create the following file: /api/[…nextauth]/route.ts:
// src/app/api/[...nextauth]/route.ts
import { handlers } from '@/auth'
export const { GET, POST } = handlers
The handler is exported under the aliases GET and POST, indicating that it will manage both types of HTTP requests for authentication routes. We cannot authenticate users at this stage because we haven’t set our Auth.js secret key or obtained our GitHub credentials. Let’s explore how to configure environment variables in Auth.js to resolve this.
Before you ship your Auth.js app to production with any one of the available providers, some environment variables must be present in your application. It is also important to note that in Auth.js v5, the library automatically picks up environment variables prefixed with AUTH_ and uses them in the server configuration.
The first required env variable is AUTH_SECRET, which Auth.js uses to sign and verify JWTs (JSON Web Tokens) and encrypt session data. Ideally, this variable’s value should be a long, random string, kept secure and never exposed publicly.
You can use the Node.js built-in crypto module or the OpenSSL command available on all Linux/Mac OS X systems to generate a secret:
node -e "console.log(require('crypto').randomBytes(32).toString('hex'))"
or
openssl rand -base64 32
This generates a secure, random, 32-byte value encoded as a hexadecimal string. Set this string as the value of the AUTH_SECRET environment variable in your .env.local file:
# .env.local
AUTH_SECRET=<YOUR_SECRET_KEY>
Note: If you don’t provide an AUTH_SECRET variable, Auth.js will automatically generate one for you when the server starts. However, this dynamically generated secret won’t persist across server restarts.
This means all your signed tokens and sessions will become invalid every time your server restarts, as they will fail the verification against the new secret. Therefore, it is strongly recommended that you provide your own AUTH_SECRET variable for consistent session and token management in production environments.
If you’re using an OAuth provider like GitHub or Google, your provider will provide you with a Client ID and Client Secret that you will need to set as environment variables. The Client IDs and Client Secrets should be named AUTH_[PROVIDER]_ID and AUTH_[PROVIDER]_SECRET. To find your GitHub credentials, follow this guide from the Auth.js docs.
Your .env.local file should now look like this:
# .env.local
AUTH_SECRET=<YOUR_SECRET_KEY>
AUTH_GITHUB_ID=<YOUR_GITHUB_ID>
AUTH_GITHUB_SECRET=<YOUR_GITHUB_SECRET>
And that’s all it takes to set up a barebones GitHub authentication with Auth.js! The steps are similar for other OAuth providers but make sure to read the Auth.js documentation for each particular provider as a guide.
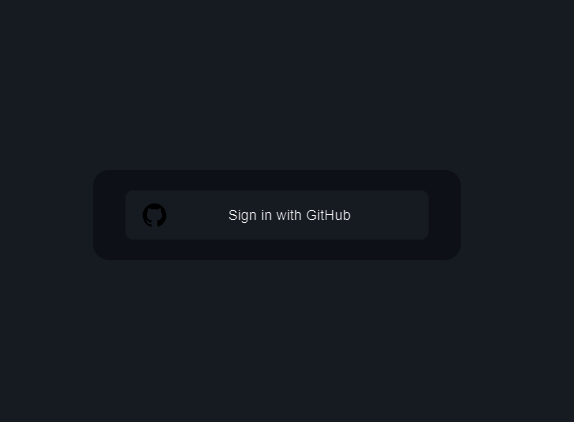
If you navigate to the default Auth.js login screen at http://localhost:3000/api/auth/signin, you’ll see a button to sign in with GitHub:
You can also import the signIn function from the next-auth/react package into any client component and manually initiate the sign-in process from a button:
"use client"
import { signIn } from 'next-auth/react'

export default function GitHubButton() {
  return (
    <button onClick={() => signIn('github')>Continue with GitHub</button>
  )
}
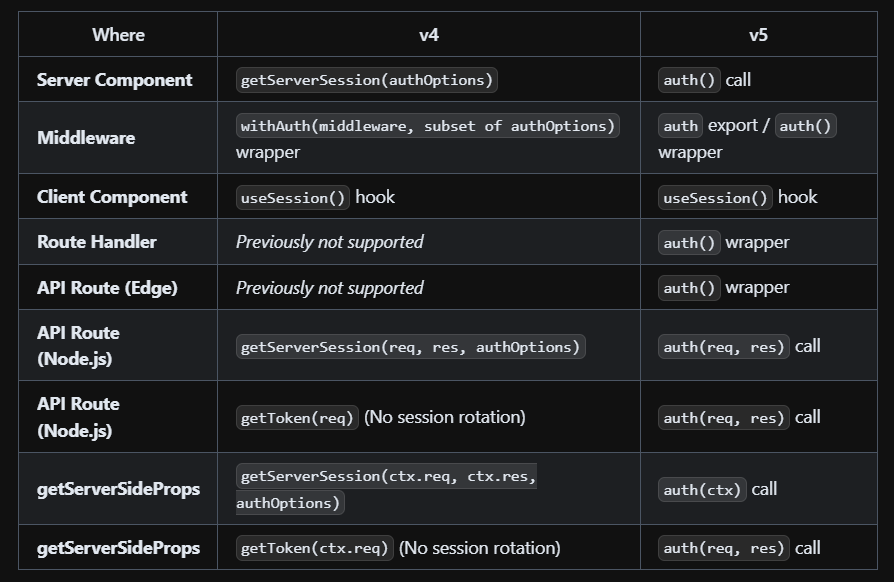
Auth.js v5 has streamlined the process for querying a user’s session by unifying APIs such as getServerSession, getSession, withAuth, and getToken into a single, universal auth() call. We already encountered this function when we exported it from the Auth.js configuration file:
export const { handlers, auth } = NextAuth({ … });
Below is a table from the Auth.js documentation demonstrating how to use the new auth() method in various environments. The consensus is that useSession should be used within React Client Components and the auth() call in other scenarios:
SessionProviderBefore we can fetch the session data on the client using useSesstion, we first need to give our application access to that data. Auth.js provides a SessionProvider component we can configure and wrap around our application to achieve this.
Note: Only the useSession Hook needs the SessionProvider to access a session’s data. However, we will configure the SessionProvider first before exploring the auth() call to check the user login state and obtain session information.
Let’s start by updating the layout.tsx file with the code snippet below:
import type { Metadata } from 'next'
import { Inter } from 'next/font/google'
import { Toaster } from '@/components/ui/sonner'
import './globals.css'
import { auth } from '@/auth'
import { SessionProvider } from 'next-auth/react';

const inter = Inter({ subsets: ['latin'] })

export const metadata: Metadata = {
    title: 'Create Next App',
    description: 'Generated by create next app',
}

export default async function RootLayout({
    children,
}: Readonly<{
    children: React.ReactNode
}>) {
    const session = await auth()
    return (
        <html lang='en'>
            <body className={inter.className}>
                <SessionProvider session={session}>
                    {children}
                    <Toaster />
                </SessionProvider>
            </body>
        </html>
    )
}
In the above code snippet, we imported the SessionProvider component from the next-auth/react package and the auth function from Auth.js. We will use them to provide session state to all components in your application, allowing you to access a session’s data.
If you’ve followed the steps so far, you’ll notice something strange: an error occurs. This is because:
SessionProvider component is a client component that uses the Context API. That’s why it is exported from next-auth/react and not next-auth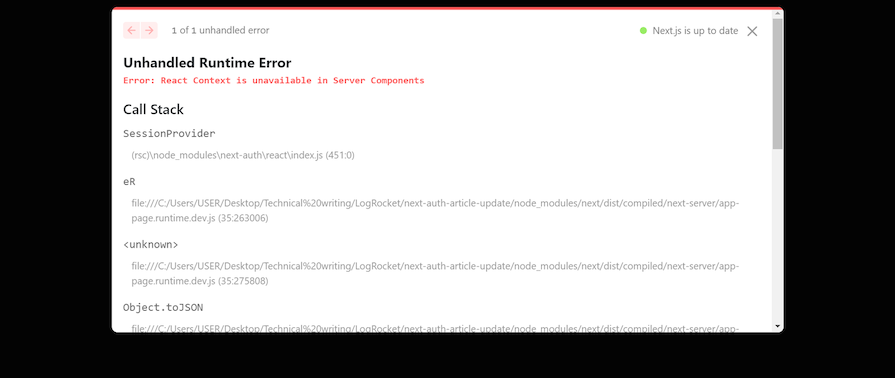
We can solve this error by flagging the SessionProvider as a Client Component and then exporting it. Create an AuthProvider.tsx file and input the code below:
"use client"; //tells Next.js to render this component on the client
export { SessionProvider as AuthProvider } from 'next-auth/react'
Instead of importing SessionProvider directly from Auth.js, we will use the client-compatible version we just created. Here’s the updated code for the layout.tsx file:
import { AuthProvider } from '@/components/AuthProvider'
/* other imports */

export default async function RootLayout({
    children,
}: Readonly<{
    children: React.ReactNode
}>) {
    const session = await auth()
    return (...); //previous code here remains unchanged
}
useSession HookHaving configured the SessionProvider, let’s use the useSession Hook to fetch the logged-in user’s info and display that data in the application.
Create a UserSession.tsx file with the following code:
'use client'
import { useSession, signIn, signOut } from 'next-auth/react'
import { Button } from './ui/button'
import { usePathname } from 'next/navigation'
import { cn } from '@/lib/utils'
export default function UserSession() {
const { data: session } = useSession()
const pathname = usePathname()
return (
<main
className={cn(
'mt-5 flex justify-center text-white w-[350px] p-3 rounded-md',
session && 'bg-slate-300/90'
)}
>
<div className='flex flex-col space-y-4'>
{session && (
<>
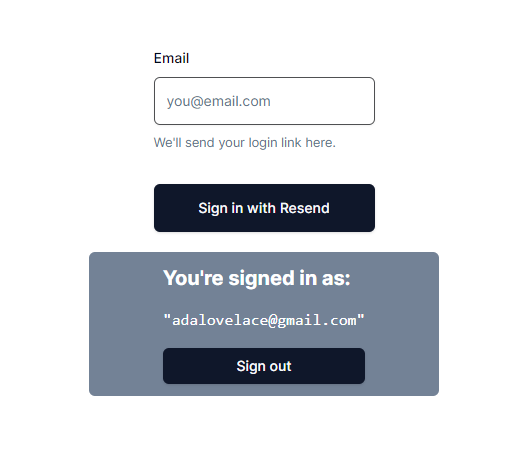
<h2 className='text-xl font-bold'>
You're signed in as:
</h2>
<pre>
{JSON.stringify(session.user?.email)} </pre> <Button className='mt-3' onClick={() => signOut()}> Sign out </Button> </> )} {!session && pathname !== '/signin' && ( <Button onClick={() => signIn()}>Sign In</Button> )} </div> </main> ) }
In the above code snippet, we imported the next-auth hooks signOut and useSession:
signOut Hook destroys the activate session and logs the user outuseSession Hook provides us with the details of the logged-in userWe can now render this component under the form to show the login status of the user:
In summary, we used useSession to check if a session exists and conditionally render the sign-in and sign-out links. Note that we also use the “use client” directive here, or else the same error will occur, as shown in the image below:

As mentioned earlier, the auth call can be used in React Server Components, route handlers, and any server environment to query the user’s session:
import { auth } from '@/auth'

export default async function MyServerComponent({
    children,
}: Readonly<{
    children: React.ReactNode
}>) {
    const session = await auth()
    return (
        <div>
          <p>My email is ${session.user?.email}</p>
        </div>
    )
}
Passwordless authentication methods like magic links have become increasingly popular as a secure alternative to passwords and usernames. Auth.js makes this easy to implement with the Email Provider.
Using magic links in Auth.js requires configuring a database to securely store and manage the unique tokens sent to users for authentication. The database ensures that tokens are valid, not reused, and can be easily revoked if necessary.
While a database is required for token management, the session management strategy is different and can still be set to jwt. This approach allows for stateless sessions, reducing database load, and improving scalability.
Let’s start by setting the Auth.js session strategy to jwt:
import NextAuth from 'next-auth'
import Github from 'next-auth/providers/github'
import type { NextAuthConfig } from 'next-auth'

export const { handlers, auth } = NextAuth({
    providers: [Github],
    session: {
        strategy: 'jwt',
        // how long (seconds) a user's session is valid before expiring
        maxAge: 432000, // 5days
    },
} satisfies NextAuthConfig)
Now let’s set up a database. Auth.js has adapters for various databases including SQL, Postgres, MongoDB, and more. We’ll adopt the MongoDB adapter for this example. You can follow this post’s Atlas UI guide to create a MongoDB database in the cloud. After you do so, grab your database connection string and save it as MONGO_URI in your env file.
Next, install MongoDB and its Auth.js adapter with the command below:
npm install @auth/mongodb-adapter mongodb
The MongoDB adapter does not handle connections automatically, so you will have to make sure that you pass the adapter a MongoClient that is already connected. In the src folder, create a new file at lib/mongo-client.ts with the following code from their docs:
// src/lib/mongo-client.ts
import { MongoClient } from 'mongodb'
if (!process.env.MONGODB_URI) {
    throw new Error('Invalid/Missing environment variable: "MONGODB_URI"')
}
const uri = process.env.MONGODB_URI
const options = {}
let client
let clientPromise: Promise<MongoClient>
declare global {
    var _mongoClientPromise: Promise<MongoClient>
}
if (process.env.NODE_ENV === 'development') {
    // In development mode, use a global variable so that the value
    // is preserved across module reloads caused by HMR (Hot Module Replacement).
    if (!global._mongoClientPromise) {
        client = new MongoClient(uri, options)
        global._mongoClientPromise = client.connect()
    }
    clientPromise = global._mongoClientPromise
} else {
    // In production mode, it's best to not use a global variable.
    client = new MongoClient(uri, options)
    clientPromise = client.connect()
}
// Export a module-scoped MongoClient promise. By doing this in a
// separate module, the client can be shared across functions.
export default clientPromise
Now we’re ready to use the email provider for authentication.
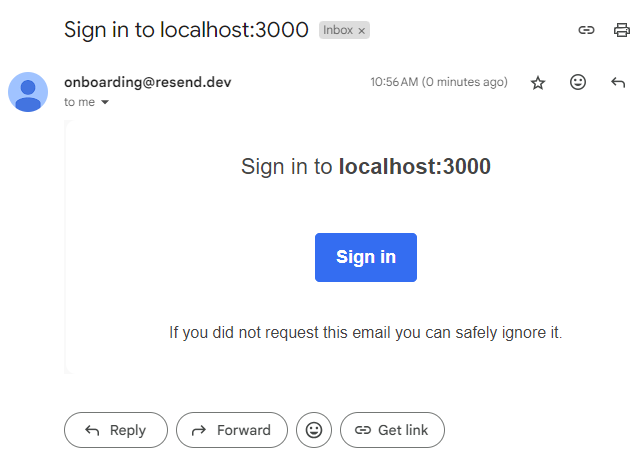
A 24-hour lifespan verification token is attached to the login email sent to the email address provided. If the token is used within the valid time, an account is created for the user under the Users database collection and they are signed in.
When using magic link authentication in Auth.js, the signIn callback is triggered twice. It is first triggered when the user requests a verification (before they receive their magic link), and second, when they activate the link in the sign-in email. During the first trigger, a verificationRequest Boolean is attached to the email parameter of the signIn callback. In the second trigger, this Boolean is not present.
This distinction is important because it allows us to determine when to save the user to the database or validate against a blocked list before sending a magic link. We’ll explore this further in a later section.
Auth.js has a Resend integration via the Resend provider that makes setting up magic link auth extremely fast. Start by creating a Resend account and registering a new API key for your app.
Next, add this API key to your .env.local file under AUTH_RESEND_KEY. Auth.js will automatically recognize this variable.
Update your auth.ts file with the code below:
import NextAuth from 'next-auth'
import Github from 'next-auth/providers/github'
import Resend from 'next-auth/providers/resend'
import type { NextAuthConfig } from 'next-auth'
import { MongoDBAdapter } from '@auth/mongodb-adapter'
import clientPromise from './src/lib/mongo-client'

export const { handlers, auth, signIn } = NextAuth({
    adapter: MongoDBAdapter(clientPromise),
    providers: [
        Github,
        Resend({
            from: '[email protected]',
        }),
    ],
   session: {
        strategy: 'jwt',
        // how long (seconds) a user's session is valid before expiring
        maxAge: 432000, // 5days
    },
} satisfies NextAuthConfig)
This setup allows you to send pre-made test emails exclusively to your email address, using the free [email protected] domain.
And that’s all! Magic link authentication should now work in your app. To initiate this authentication flow, I’ve created a simple form using Shadcn and React Hook Form in the demo repository. Here is a snippet:
'use client'
import { Button } from '@/components/ui/button'
import {
Form,
FormControl,
FormDescription,
FormField,
FormItem,
FormLabel,
FormMessage,
} from '@/components/ui/form'
import { Input } from '@/components/ui/input'
import { signIn } from 'next-auth/react'
import { useTransition } from 'react'
import { useForm } from 'react-hook-form'
import { toast } from 'sonner'
export default function Home() {
const form = useForm()
const [isPending, startTransition] = useTransition()
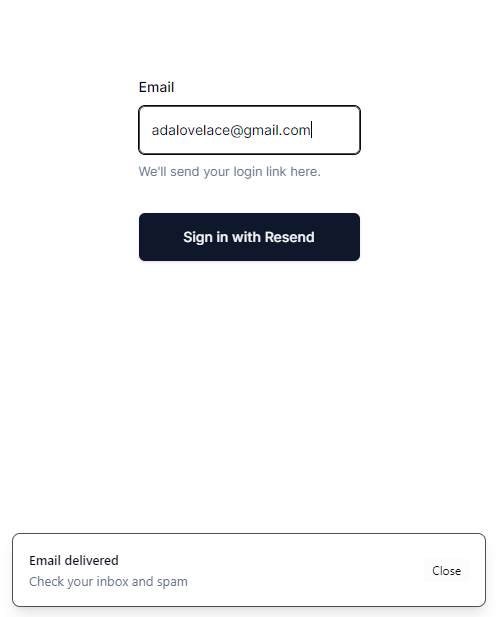
async function sendMagicLink(data: { email: string }) {
startTransition(async () => {
try {
const signInResult = await signIn('resend', {
email: data.email.toLowerCase(),
redirect: false,
callbackUrl: '/protected',
})
if (signInResult?.ok && !signInResult.error) {
toast('Email delivered', {
description: 'Check your inbox and spam',
action: {
label: 'Close',
onClick: () => true,
},
})
return
}
} catch (error: any) {
toast('Oops, we encountered an error', {
description:
'Sorry, we encountered a problem sending the email',
action: {
label: 'Close',
onClick: () => true,
},
})
}
})
}
return (
<main className='flex min-h-screen flex-col items-center justify-center'>
<Form {...form}>
<form
onSubmit={form.handleSubmit(sendMagicLink)}
className='space-y-8'
>
<FormField
control={form.control}
name='email'
render={({ field }) => (
<FormItem>
<FormLabel>Email</FormLabel>
<FormControl>
<Input
placeholder='[email protected]'
type='email'
{...field}
/>
</FormControl>
<FormDescription>
We'll send your login link here.
</FormDescription>
<FormMessage />
</FormItem>
)}
/>
<Button
className='w-full'
type='submit'
size='lg'
disabled={isPending}
>
{isPending ? '...' : 'Sign in with Resend'}
</Button>
</form>
</Form>
</main>
)
}
Notice the logic in the sendMagicLink function and how the callbackUrl parameter of the signIn function is used to redirect the user to a /protected route — which we’ll create soon — after successfully signing in:
More often than not, you will want full autonomy over the look of your email and the logic in control of sending out the magic link emails. Auth.js gives you full customizability over this using the sendVerificationRequest function present in the EmailProvider options:
import EmailProvider from "next-auth/providers/email";
...
providers: [
  EmailProvider({
    server: process.env.EMAIL_SERVER,
    from: process.env.EMAIL_FROM,
    sendVerificationRequest({
      identifier: email,
      url,
      provider: { server, from },
    }) {
      /* your function */
    },
  }),
]
For an example codebase that demonstrates the implementation of custom magic links with Auth.js v5, this repository and Shadcn’s taxonomy are valuable resources.
So far in our code, we’ve created a custom login form for the magic link authentication. But currently, the GitHub authentication is only accessible at /api/auth/signin. Now, let’s create a custom login page for the app and move our magic link form into this custom page. We’ll also add a custom Sign in with GitHub button.
To do that, you need to modify the auth.ts file with Auth’s pages option:
...
export const authOptions: NextAuthOptions = {
  providers: [
        ...
    ],
  pages: {
      signIn: "/signin",
  },
}
...
Here, you overrode the signIn value of the default login page and set it to /signin. Moving forward, this is the page Auth.js will use for user authentication. It will redirect users to this page when authentication is required.
Now, you need to make the page. Create a signin/page.tsx file in the app directory and add the code snippet below:
'use client'
import { signIn } from 'next-auth/react'
import { Button } from '@/components/ui/button'
import {
Form,
FormControl,
FormDescription,
FormField,
FormItem,
FormLabel,
FormMessage,
} from '@/components/ui/form'
import { Input } from '@/components/ui/input'
import { useTransition } from 'react'
import { useForm } from 'react-hook-form'
import { toast } from 'sonner'
import UserSession from '@/components/Usersession'
import Link from 'next/link'
export default function SignInPage() {
const form = useForm()
const [isPending, startTransition] = useTransition()
async function sendMagicLink(data: { email: string }) {
startTransition(async () => {
try {
const signInResult = await signIn('resend', {
email: data.email.toLowerCase(),
redirect: false,
callbackUrl: '/protected',
})
console.log('signInResult: ', signInResult)
if (signInResult?.ok && !signInResult.error) {
toast('Email delivered', {
description: 'Check your inbox and spam',
action: {
label: 'Close',
onClick: () => true,
},
})
return
}
} catch (error: any) {
toast('Oops, we encountered an error', {
description:
'Sorry, we encountered a problem sending the email',
action: {
label: 'Close',
onClick: () => true,
},
})
}
})
}
return (
<main className='flex min-h-screen flex-col items-center justify-center'>
<Form {...form}>
<form
onSubmit={form.handleSubmit(sendMagicLink)}
className='space-y-8'
>
<FormField
control={form.control}
name='email'
render={({ field }) => (
<FormItem>
<FormLabel>Email</FormLabel>
<FormControl>
<Input
placeholder='[email protected]'
type='email'
{...field}
/>
</FormControl>
<FormDescription>
We'll send your login link here.
</FormDescription>
<FormMessage />
</FormItem>
)}
/>
<Button
className='w-full'
type='submit'
size='lg'
disabled={isPending}
>
{isPending ? '...' : 'Sign in with Resend'}
</Button>
</form>
</Form>
<Button
variant='outline'
className='w-30 mt-3'
onClick={() => {
signIn('github', {
callbackUrl: '/protected',
})
}}
>
Sign in with GitHub
</Button>
<UserSession />
</main>
)
}
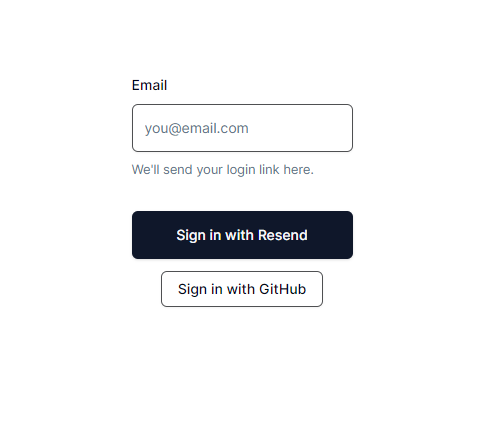
With that, anyone who tries to log in will be redirected to the custom login page below:
Callbacks in Auth.js are asynchronous functions that you can use to control what happens when an action is performed, such as user sign-in, redirects, session creation, or JWT generation.
These callbacks allow you to implement access controls, integrate with external databases or APIs, and customize the behavior of the authentication flow.
Auth.js provides several callbacks that you can configure in your application:
signIn callbackThe signIn callback is used to control whether a user is allowed to sign in or not. It receives parameters such as user, account, profile, email, and credentials, depending on the authentication provider used. You can use this callback to implement custom logic for allowing or denying user sign-in based on specific conditions.
Here’s an example demonstrating how to use the signIn callback to check if the email address is already in the database and, if not, save it to the database after a successful sign-in:
import NextAuth from 'next-auth'
import Github from 'next-auth/providers/github'
import Resend from 'next-auth/providers/resend'
import type { NextAuthConfig } from 'next-auth'
import { MongoDBAdapter } from '@auth/mongodb-adapter'
import clientPromise from './lib/mongo-client'
import User from 'your-mongodb-model'

export const { handlers, auth } = NextAuth({
    adapter: MongoDBAdapter(clientPromise),
    providers: [
        Github,
        Resend({
            from: '[email protected]',
        }),
    ],
    callbacks: {
        async signIn({ user, account, profile, email, credentials }) {
        await connectToDatabase('your-database')
        // grab the submitted email address
        const { email: user_email } = user
        // signIn was triggered from the verification email
        if (account?.provider === 'email' && !email?.verificationRequest) {
          try {
            const userExists = await User.findOne({ email: user_email })
            if (!userExists) {
              // save user to database
          } catch (error) {
            console.error(error)
          }
        }
        return true
    },
    session: {
        strategy: 'jwt',
        // how long (seconds) a user's session is valid before expiring
        maxAge: 432000, // 5days
    },
} satisfies NextAuthConfig)
redirect callbackThe redirect callback is called anytime the user is redirected to a callback URL (e.g., on sign-in or sign-out). By default, Auth.js only allows URLs on the same origin as the site. You can use this callback to customize this behavior and allow or deny specific redirect URLs.
Here’s the default implementation of the redirect callback:
callbacks: {
  async redirect({ url, baseUrl }) {
    // Allows relative callback URLs
    if (url.startsWith("/")) return `${baseUrl}${url}`
    // Allows callback URLs on the same origin
    else if (new URL(url).origin === baseUrl) return url
    return baseUrl
  }
}
jwt callbackThe jwt callback is called whenever a JSON Web Token is created (e.g., at sign-in) or updated (e.g., whenever a session is accessed on the client). This callback allows you to customize the contents of the JWT by adding or modifying claims.
Here’s an example of the jwt callback that persists an OAuth access token and user ID in the JWT:
callbacks: {
  async jwt({ token, account, profile }) {
    // Persist the OAuth access_token and user id to the token right after sign-in
    if (account) {
      token.accessToken = account.access_token
      token.id = profile.id
    }
    return token
  }
}
session callbackThe session callback is called whenever a session is checked, such as when using getSession, useSession, or /api/auth/session. By default, Auth.js only returns a subset of the token for security reasons. If you want to make something available to the client that you added to the token (like access_token and user.id from the jwt callback), you need to explicitly forward it in this callback.
Here’s an example of the session callback that sends the access token and user ID to the client:
callbacks: {
  async session({ session, token }) {
    // Send properties to the client, like an access_token and user id from a provider.
    session.accessToken = token.accessToken
    session.user.id = token.id
    return session
  }
}
The Next.js Server Components architecture provides two primary methods for protecting routes in your application:
Let’s explore these in detail.
Protecting routes in Server Components is recommended because server-side protection ensures that sensitive data and functionality are safeguarded before reaching the client, preventing unauthorized access through direct API calls.
In our example, we’ll protect the /protected route. Unauthenticated users that access this route will be redirected to the /signin route we created earlier. Create a page.tsx file and a layout.tsx file in app/protected/ with the following content:
// app/protected/page.tsx
import Link from 'next/link';

export default function ProtectedPage() {
    return (
        <div className='min-h-screen flex flex-col gap-3 items-center justify-center'>
            <h2 className='text-3xl font-bold'>Protected Page</h2>
            <Link href='/' className='underline'>
                Back Home
            </Link>
        </div>
    );
}


// app/protected/layout.tsx
import { auth } from '@/auth';
import { redirect } from 'next/navigation';

export default async function ProtectedLayout({
    children,
}: {
    children: React.ReactNode;
}) {
    const session = await auth();
    if (!session) {
        redirect('/signin');
    }
    return <main>{children}</main>;
}
The code above checks if a user session exists. If there is no session, it uses Next.js’ redirect function to redirect the user to the sign-in page. If there is a session, the user gets access to the page. This ensures that only logged-in users can access the protected route.
The Next.js framework includes a middleware feature that allows you to run some logic before processing a request, similar to middleware in backend frameworks. This middleware can be used for many purposes, including login, request validation, and authentication checks.
We’ll move the auth check logic in protected/layout.tsx into middleware. Auth.js supports middleware, providing direct access to the current session, and allowing us to manipulate it as needed.
To use middleware in Next.js, create a middleware.ts file at the root of your application or in the src directory, and update it with the following code:
export { auth as middleware } from "@/auth"

export const config = {
  matcher: [
    // apply middleware to all routes excluding API routes, static asset routes, image optimization routes, and the favicon
    '/((?!api|_next/static|_next/image|favicon.ico).*)',
  ],
};
Notice the config object where we define the routes we want Next.js middleware functionality to apply to. The matcher property dictates the paths — and subpaths — to which the middleware function should be applied.
But if you open your app now, you’ll notice that it crashed with the error Error: The edge runtime does not support Node.js 'crypto' module, and a stack trace pointing to MongoDB and the mongodb-adapter package:
Import trace for requested module:
./node_modules/.pnpm/@[email protected][email protected]/node_modules/@auth/mongodb-adapter/index.js
This is because the Edge runtime does not support certain Node.js modules, including crypto. To tackle this, we’ll need to export an auth instance from our middleware file that doesn’t have a database adapter attached to it. We can do this by creating an auth.config.ts file that will hold an instance of the NextAuthConfig interface:
// src/auth.config.ts
import type { NextAuthConfig } from 'next-auth'
export const authConfig = {
    providers: [],
} satisfies NextAuthConfig
We can then initialize it in our middleware like so to effectively protect the /protected route:
// src/middleware.ts
import NextAuth from 'next-auth';
import { authConfig } from '@/auth.config';

const { auth } = NextAuth(authConfig);

export default auth((req) => {
    const { nextUrl } = req;
    // req.auth is provided by Auth.js
    console.log('req.auth.user: ' + req.auth?.user?.email);

    // set isAuthenticated to true if req.auth is a truthy value. otherwise set to false.
    const isAuthenticated = !!req.auth;

    // use boolean value to determine if the requested route is a protected route
    const isProtectedRoute = ['/protected', '/your-protected-route'].includes(nextUrl.pathname);

    // redirect to signin if route is a protected route and user is not authenticated
    if (isProtectedRoute && !isAuthenticated)
        return Response.redirect(new URL('/signin', nextUrl));
});

export const config = {
    matcher: ['/((?!api|_next/static|_next/image|favicon.ico).*)'],
};
And now the /protected route is protected from unauthenticated users. auth.config.ts should be an extension of your NextAuth config in auth.ts so we’ll import this object and spread it into the NextAuth config:
// src/auth.ts
import NextAuth from 'next-auth';
import type { NextAuthConfig } from 'next-auth';
import { authConfig } from './auth.config';
import { MongoDBAdapter } from '@auth/mongodb-adapter';
import clientPromise from './lib/mongo-client';
import Github from 'next-auth/providers/github';
import Resend from 'next-auth/providers/resend';

export const { handlers, auth } = NextAuth({
    ...authConfig,
    // providers array below overwrites array in auth.config.ts
    providers: [
        Github,
        Resend({
            from: '[email protected]',
        }),
    ],
    adapter: MongoDBAdapter(clientPromise),
    callbacks: {
        async signIn({ user, account, profile, email, credentials }) {
            return true;
        },
    },
    pages: {
        signIn: '/signin',
    },
    session: {
        strategy: 'jwt',
        // how long (seconds) a user's session is valid before expiring
        maxAge: 432000, // 5 days
    },
} satisfies NextAuthConfig);
The middleware code works similarly to the strategy we used in the auth() call in layout.tsx. The key advantage here is that the logic for protecting routes is now centralized and not scattered across several layout.tsx files.
In this article, we explored the process of setting up client-side authentication in a Next.js application using the Auth.js library. Auth.js, formerly known as NextAuth.js, offers a secure and flexible authentication solution that supports OAuth providers and passwordless sign-in methods like GitHub and magic links.
By following this guide, you should hopefully now be able to implement a secure authentication system in your Next.js applications.
Happy coding!
Debugging Next applications can be difficult, especially when users experience issues that are difficult to reproduce. If you’re interested in monitoring and tracking state, automatically surfacing JavaScript errors, and tracking slow network requests and component load time, try LogRocket.
LogRocket captures console logs, errors, network requests, and pixel-perfect DOM recordings from user sessions and lets you replay them as users saw it, eliminating guesswork around why bugs happen — compatible with all frameworks.
LogRocket's Galileo AI watches sessions for you, instantly identifying and explaining user struggles with automated monitoring of your entire product experience.
The LogRocket Redux middleware package adds an extra layer of visibility into your user sessions. LogRocket logs all actions and state from your Redux stores.


Modernize how you debug your Next.js apps — start monitoring for free.

AI-generated tests can speed up React testing, but they also create hidden risks. Here’s what broke in a real app.re

Why the future of DX might come from the web platform itself, not more tools or frameworks.

A hands-on test of Claude Code Review across real PRs, breaking down what it flagged, what slipped through, and how the pipeline actually performs in practice.

CSS art once made frontend feel playful and accessible. Here’s why it faded as the web became more practical and prestige-driven.
Would you be interested in joining LogRocket's developer community?
Join LogRocket’s Content Advisory Board. You’ll help inform the type of content we create and get access to exclusive meetups, social accreditation, and swag.
Sign up now

