Editor’s note: This article was last updated on 6 April 2022 to reflect the most up-to-date versions of Express and Node.js.
Everybody’s talking about OAuth 2.0. Regardless of the size of the company you work for or the number of services and APIs you’re running in the background, there’s a good chance you need OAuth 2.0 if you aren’t already using it.
Given the huge amount of information, tools, and frameworks available, it can be really hard to understand and easily apply the protocol to your projects. When it comes to JavaScript, and more specifically, Node.js, it also depends on factors like the server you’re choosing and whether it already provides OAuth 2.0 support. It’s also important to consider the maturity of the project, the docs, and the community.
We can simplify this issue with node-oauth2-server, a framework-agnostic module for implementing an OAuth 2 server in Node.js. node-oauth2-server is open sourced, simple, and easy to integrate with your Node apps, even if they’ve already been running for a while.
Although the repo hasn’t been updated for some time, it is still completely compatible with the latest Node.js standards at the time of writing.
In this article, we’ll explore the OAuth 2 framework by developing our own overwritten implementation and testing it through a real API. We’ll also integrate it with a Postgres database to see the project in action, blocking and allowing access to a specific endpoint.
For simplicity, our example will explore the password grant type of OAuth 2. Based on this example, you can adapt the implementation to other types. You can review the full source code for this example. Let’s get started!
Within its docs, you can find the official Model Specification that describes how your JavaScript code must override the default OAuth 2 functions to provide your customized authentication experience:
const model = {
  // We support returning promises.
  getAccessToken: function() {
    return new Promise('works!');
  },

  // Or, calling a Node-style callback.
  getAuthorizationCode: function(done) {
    done(null, 'works!');
  },

  // Or, using generators.
  getClient: function*() {
    yield somethingAsync();
    return 'works!';
  },

  // Or, async/wait (using Babel).
  getUser: async function() {
    await somethingAsync();
    return 'works!';
  }
};

const OAuth2Server = require('oauth2-server');
let oauth = new OAuth2Server({model: model});
With the OAuth2Server object in hand, you can override the default OAuth 2 provider of your Express server, enabling you to provide your own authentication experience. For more info on how the framework works behind the scenes, please refer to the official docs.
First, let’s install all the required tools and dependencies for our project. Make sure you have Postgres installed on your respective OS. After you’ve successfully installed Postgres, create a new database called logrocket_oauth2 with the following command:
CREATE DATABASE logrocket_oauth2;
To create our user and access token tables, run the following SQL command:
CREATE TABLE public.users
(
    id serial,
    username text,
    user_password text,
    PRIMARY KEY (id)
)
WITH (
    OIDS = FALSE
);

ALTER TABLE public.users
    OWNER to postgres;


CREATE TABLE public.access_tokens
(
    id serial,
    access_token text,
    user_id integer,
    PRIMARY KEY (id)
)
WITH (
    OIDS = FALSE
);

ALTER TABLE public.access_tokens
    OWNER to postgres;
Make sure you replace postgres with your own Postgres username. We’ve mostly simplified the tables, so in this article, we won’t cover columns related to creating to updating date times.
Next, create a new folder in the directory of your choice called logrocket-oauth2-example and run the npm init -y command to initialize it with your package.json file. Then, run the following command to install the required dependencies:
npm install express pg node-oauth2-server
We use Express to create REST APIs, pg, short for node-postgres, to connect our Node.js server to PostgreSQL, and finally, node-oauth2-server to provide relevant utilities that help us make the OAuth 2 server.
If you prefer, you can also run the commands using Yarn with the code below:
yarn add express pg node-oauth2-server
Finally, be sure to reproduce the following folder structure:
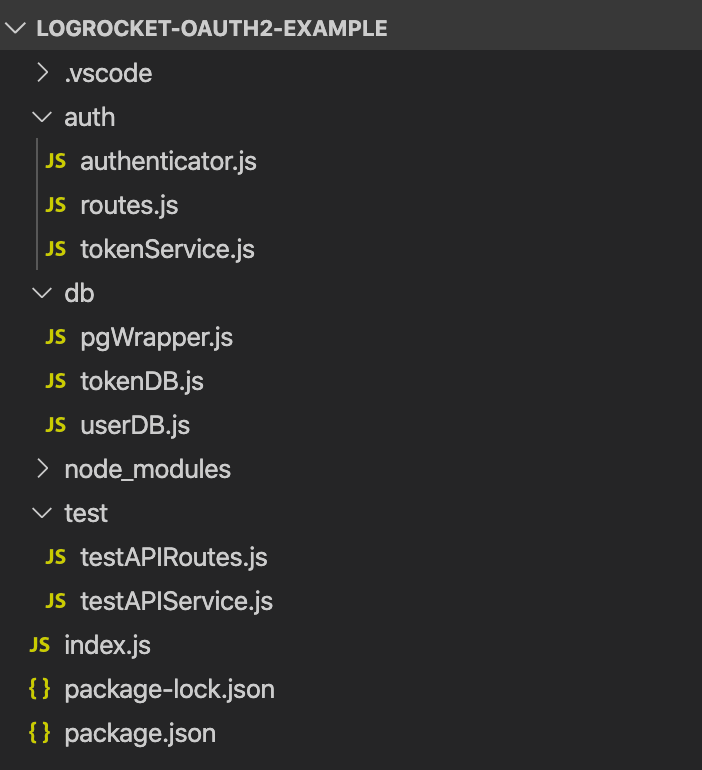
Now, let’s move on to the database setup. After you’ve successfully created the database and tables, we’ll need a Postgres wrapper to encapsulate the queries we’ll make in the db folder. Inside the db folder, add the following code to the pgWrapper.js file:
const Pool = require("pg").Pool;
function query(queryString, cbFunc) {
  const pool = new Pool({
    user: "postgres",
    host: "localhost",
    database: "logrocket_oauth2",
    password: "postgres",
    port: 5432,
  });
  pool.query(queryString, (error, results) => {
    cbFunc(setResponse(error, results));
  });
}
function setResponse(error, results) {
  return {
    error: error,
    results: results ? results : null,
  };
}
module.exports = {
  query,
};
The most important part of this code is the query() function. Instead of throwing the Postgres connection pool object everywhere, we’re going to centralize it in this file and export the function.
It’s pretty simple. The query() function is made of a new pg Pool instance and a callback function that, in turn, will always receive a JSON object composed of error and results properties. Let’s keep results as an array for simplicity.
Note: Be sure to change the database properties to yours.
Next, we’ll need two repositories that will handle the database operations for both users and tokens. The first one will be the userDB.js file:
let pgPool;

module.exports = (injectedPgPool) => {
    pgPool = injectedPgPool;

    return {
        register,
        getUser,
        isValidUser,
    };
};

var crypto = require("crypto");

function register(username, password, cbFunc) {
    var shaPass = crypto.createHash("sha256").update(password).digest("hex");

    const query = `INSERT INTO users (username, user_password) VALUES ('${username}', '${shaPass}')`;

    pgPool.query(query, cbFunc);
}

function getUser(username, password, cbFunc) {
    var shaPass = crypto.createHash("sha256").update(password).digest("hex");

    const getUserQuery = `SELECT * FROM users WHERE username = '${username}' AND user_password = '${shaPass}'`;

    pgPool.query(getUserQuery, (response) => {
        cbFunc(
            false,
            response.results && response.results.rowCount === 1
                ? response.results.rows[0]
                : null
        );
    });
}

function isValidUser(username, cbFunc) {
    const query = `SELECT * FROM users WHERE username = '${username}'`;

    const checkUsrcbFunc = (response) => {
        const isValidUser = response.results
            ? !(response.results.rowCount > 0)
            : null;

        cbFunc(response.error, isValidUser);
    };

    pgPool.query(query, checkUsrcbFunc);
}
Our database model is going to resume three operations, the registration, searching, and validation of a user.
Note that we’re injecting the pgPool in the beginning of the file that we created before. For this code to work, we still need to pass the param to the constructor in the index.js file.
Each function deals with our previously created query function. The npm pg package receives the query itself as the first argument. The error-results composition is the second argument, which contains the result of our execution.
We’re injecting the params via the ${} operator to simplify the concatenation. However, you can also use parameterized queries by passing the values as an array in the second optional argument of the query function.
Finally, the pg package returns the values in the results object, but there isn’t any length property, which differs from other databases like MySQL.
To see if any results are coming, we need to access the rowCount property. Note that we’re passing around a lot of callback functions to avoid having the control under the function returns, making the whole architecture async. Feel free to adapt this to your own style.
Now, let’s go to the tokenDB.js implementation:
let pgPool;

module.exports = (injectedPgPool) => {
    pgPool = injectedPgPool;

    return {
        saveAccessToken,
        getUserIDFromBearerToken,
    };
};

function saveAccessToken(accessToken, userID, cbFunc) {
    const getUserQuery = `INSERT INTO access_tokens (access_token, user_id) VALUES ('${accessToken}', ${userID});`;

    pgPool.query(getUserQuery, (response) => {
        cbFunc(response.error);
    });
}

function getUserIDFromBearerToken(bearerToken, cbFunc) {
    const getUserIDQuery = `SELECT * FROM access_tokens WHERE access_token = '${bearerToken}';`;

    pgPool.query(getUserIDQuery, (response) => {
        const userID =
            response.results && response.results.rowCount == 1
                ? response.results.rows[0].user_id
                : null;

        cbFunc(userID);
    });
}
Like in our previous JavaScript file, we’re injecting the pg Pool in the constructor and calling the respective queries.
Pay special attention to the getUserIDFromBearerToken function. Attending to the default node-oauth2-server model contract, we need to provide a function that will evaluate if the given bearer token is actually valid, meaning that the token actually exists in the database.
Thanks to the previous isValidUser from userDB.js, which checks for username duplicity when inserting a new user, our token will work.
Now that the database layer is ready to be called, let’s implement the services and routes we need, starting with the tokenService.js file:
let userDB;
let tokenDB;

module.exports = (injectedUserDB, injectedTokenDB) => {
    userDB = injectedUserDB;
    tokenDB = injectedTokenDB;

    return {
        getClient,
        saveAccessToken,
        getUser,
        grantTypeAllowed,
        getAccessToken,
    };
};

function getClient(clientID, clientSecret, cbFunc) {
    const client = {
        clientID,
        clientSecret,
        grants: null,
        redirectUris: null,
    };

    cbFunc(false, client);
}

function grantTypeAllowed(clientID, grantType, cbFunc) {
    cbFunc(false, true);
}

function getUser(username, password, cbFunc) {
    userDB.getUser(username, password, cbFunc);
}

function saveAccessToken(accessToken, clientID, expires, user, cbFunc) {
    tokenDB.saveAccessToken(accessToken, user.id, cbFunc);
}

function getAccessToken(bearerToken, cbFunc) {
    tokenDB.getUserIDFromBearerToken(bearerToken, (userID) => {
        const accessToken = {
            user: {
                id: userID,
            },
            expires: null,
        };

        cbFunc(userID === null, userID === null ? null : accessToken);
    });
}
It sounds a bit more complex than it actually is. All of these functions are simply overwritten versions of the Model Specification contract we saw earlier.
For each of its default actions, we need to provide our own implementation that calls our database repository to save a new user, as well as a new access token to retrieve them or get the client application.
For the grantTypeAllowed function, we’re actually just recalling the callback function passed as a third argument, passed by the node-oauth2-server framework.
We validate if the given client ID has real access to this grant type, set to password only. You can add as many validations as you want. We can also integrate it with other private validation APIs that you or your company may have.
Now, let’s review the authenticator.js file code:
let userDB;

module.exports = (injectedUserDB) => {
    userDB = injectedUserDB;

    return {
        registerUser,
        login,
    };
};

function registerUser(req, res) {
    userDB.isValidUser(req.body.username, (error, isValidUser) => {
        if (error || !isValidUser) {
            const message = error
                ? "Something went wrong!"
                : "This user already exists!";

            sendResponse(res, message, error);

            return;
        }

        userDB.register(req.body.username, req.body.password, (response) => {
            sendResponse(
                res,
                response.error === undefined ? "Success!!" : "Something went wrong!",
                response.error
            );
        });
    });
}

function login(query, res) {}

function sendResponse(res, message, error) {
    res.status(error !== undefined ? 400 : 200).json({
        message: message,
        error: error,
    });
}
In the code above, we have the two main authentication methods, one for the user registration and the other for the user login. Whenever an attempt to register a user is made, we first need to make sure it’s valid, meaning it’s not a duplicate, then register it.
We’ve already seen the validation and saving functions. Now, it’s just a single call. In turn, the login function doesn’t need to have any implementation because it’s going to call the framework default flow. In the end, check for whether we had an error or a success for each request so that we can set the proper HTTP response code.
Finally, we need to set up our Express routes in the routes.js file:
module.exports = (router, app, authenticator) => {
    router.post("/register", authenticator.registerUser);
    router.post("/login", app.oauth.grant(), authenticator.login);

    return router;
};
Simple, isn’t it? The only difference is that we’re calling the Express oauth function grant() to make sure this user is logged in properly. To assure that the implementation is fully working, we’ll also need a safe test endpoint. It’ll be created like any other endpoint, but protected, meaning that only authorized users can have access to it by sending a valid bearer token.
Add the following code to our testAPIService.js:
module.exports = {
    helloWorld: helloWorld,
};

function helloWorld(req, res) {
    res.send("Hello World OAuth2!");
}
Now, add the code below to the testAPIRoutes.js:
module.exports = (router, app, testAPIService) => {
    router.post("/hello", app.oauth.authorise(), testAPIService.helloWorld);

    return router;
};
Last but not least, we need to set up the index.js mappings:
// Database imports
const pgPool = require("./db/pgWrapper");
const tokenDB = require("./db/tokenDB")(pgPool);
const userDB = require("./db/userDB")(pgPool);
// OAuth imports
const oAuthService = require("./auth/tokenService")(userDB, tokenDB);
const oAuth2Server = require("node-oauth2-server");
// Express
const express = require("express");
const app = express();
app.oauth = oAuth2Server({
    model: oAuthService,
    grants: ["password"],
    debug: true,
});
const testAPIService = require("./test/testAPIService.js");
const testAPIRoutes = require("./test/testAPIRoutes.js")(
    express.Router(),
    app,
    testAPIService
);
// Auth and routes
const authenticator = require("./auth/authenticator")(userDB);
const routes = require("./auth/routes")(
    express.Router(),
    app,
    authenticator
);
app.use(express.json())
app.use(express.urlencoded({ extended: true }));
app.use(app.oauth.errorHandler());
app.use("/auth", routes);
app.use("/test", testAPIRoutes);
const port = 3000;
app.listen(port, () => {
    console.log(`listening on port ${port}`);
});
We’re basically importing all the required modules, as well as injecting the corresponding ones into each other.
Pay special attention to the Express settings. Notice that we’re overwriting the default oauth object of Express with our own implementation, as well as defining the grant type and the model service.
Then, we must assign the routes for the authenticator and the tests to the Express Router so that Express understands how to redirect each of the approaching requests.
Now, let’s test our endpoints. We’ll use the Postman tool because it’s simple and practical, however, you should feel free to use one of your choice. Then, start the server by running the following code:
node index.js
First, we need to create a new user. To do so, perform a POST request to http://localhost:3000/auth/register/ with the following body params encoded as x-www-form-urlencoded:
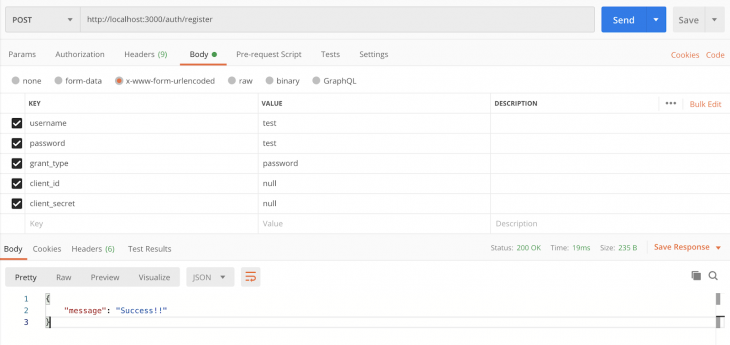
Go ahead and check if the user was successfully created in your database.
With a valid user in hand, you can now log in by sending another POST request to http://localhost:3000/auth/login/ with the following body params:
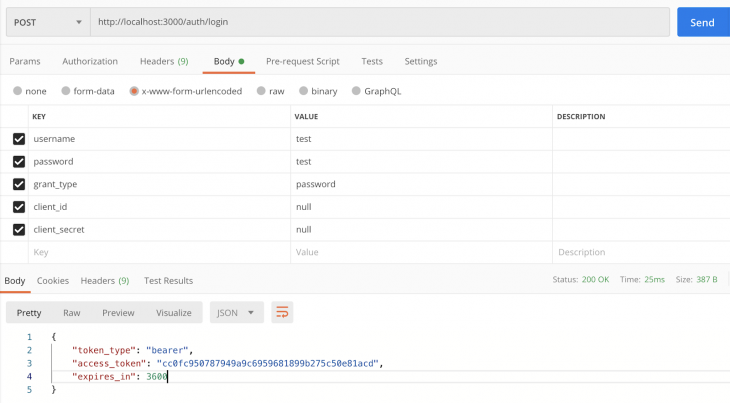
If you change the credentials to invalid ones, you’ll get a message reading OAuth2Error: User credentials are invalid.
Now, with OAuth 2 implemented and working, we can run our most important test, validating our secure endpoint. Postman provides us with special features to test this, the Authorization tab:
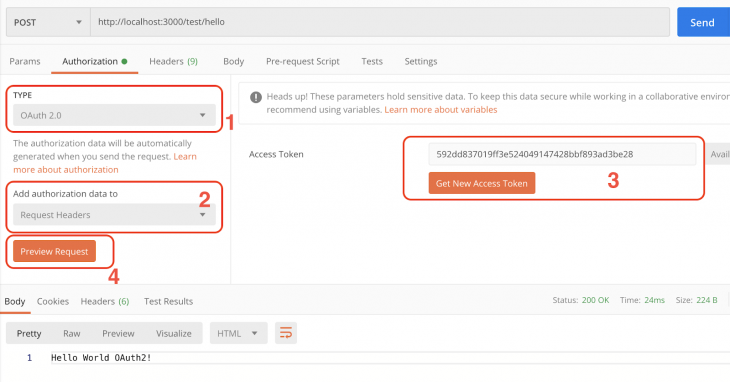
By selecting the Authorization tab, you get access to some interesting test features, like the type of authorization flow your API is using, which is OAuth 2.0 in our case.
You’ll also be able to choose where exactly Postman should place the authorization data. For example, select the header option to place the authorization data to the request header or body.
Additionally, you have two options of where to retrieve the access tokens. You can explicitly drop the token text into the available textarea, or click the Get NewAccess Token button that will, in turn, open a dialog modal with some more fields. Those fields will ask for the access token URL endpoint to get new ones, the TTL, grant type, etc.
Here, you can preview the request. After clicking the button, the inputted values will be automatically translated to the header and body configurations of the current request. This way, you don’t have to manually change each header every time you need to run a new request.
Click the Send button and the Hello World OAuth2 will appear as a result.
This framework is just one of the options available out there. You can go to the OAuth.net project and check out the latest recommendations for Node.js and your preferred language as well. Of course, there’s a lot to see.
OAuth 2.0 is a huge protocol that deserves more time and attention when reading and applying its specifications. However, this simple introduction will allow you to understand how the framework works along with Express and Postgres.
You can also change the server and the database to switch your needs. Just make sure to use the same contract we’ve established so far. I hope you enjoyed this article. Happy coding!
 Monitor failed and slow network requests in production
Deploying a Node-based web app or website is the easy part. Making sure your Node instance continues to serve resources to your app is where things get tougher. If you’re interested in ensuring requests to the backend or third-party services are successful, try LogRocket.

LogRocket lets you replay user sessions, eliminating guesswork around why bugs happen by showing exactly what users experienced. It captures console logs, errors, network requests, and pixel-perfect DOM recordings — compatible with all frameworks.
LogRocket's Galileo AI watches sessions for you, instantly identifying and explaining user struggles with automated monitoring of your entire product experience.
LogRocket instruments your app to record baseline performance timings such as page load time, time to first byte, slow network requests, and also logs Redux, NgRx, and Vuex actions/state. Start monitoring for free.
Hey there, want to help make our blog better?
Join LogRocket’s Content Advisory Board. You’ll help inform the type of content we create and get access to exclusive meetups, social accreditation, and swag.
Sign up now
Not sure if low-code is right for your next project? This guide breaks down when to use it, when to avoid it, and how to make the right call.

Compare Firebase Studio, Lovable, and Replit for AI-powered app building. Find the best tool for your project needs.

Discover how to use Gemini CLI, Google’s new open-source AI agent that brings Gemini directly to your terminal.

This article explores several proven patterns for writing safer, cleaner, and more readable code in React and TypeScript.
12 Replies to "How to implement OAuth 2.0 in Node.js"
HI , I getting “OAuth2Error: User credentials are invalid” . I am sure that both user name and password correct
Very straight forward and effective. Thank you very much.
Hi, I am in the “most important test” http://localhost:3000/test/hello and I get error because new version of postman is a bit different. Can you post a curl script with all paramaters please ?
I hope it can help somebody, to test http://localhost:3000/test/hello you must use postman 7.36.1 and the code to test it is
curl –location –request POST ‘http://localhost:3000/test/hello’ \
–header ‘Authorization: Bearer 9bc8aefc932074166cada3cb1234705824e6e6ad’
put token that you get in the previous step.
This is a string injection security vulnerability:
___________
function getUserIDFromBearerToken(bearerToken, cbFunc) {
const getUserIDQuery = `SELECT * FROM access_tokens WHERE access_token = ‘${bearerToken}’;`;
___________
Don’t use this code. Parameterized SQL queries are the reliable way to escape a string.
Hey!
Thank you for your effort and time writing this post. However, the post is a kind of bad example of OAuth 2.0 protocol that we find on the web. We should notice that OAuth 2.0 is an authorization protocol, not an authentication one, although many developers try to use it for that purpose.
You can find the spec here: https://oauth.net/2/. Some useful links to visit:
* https://dev.to/kimmaida/authorization-and-authentication-for-everyone-27j3
* https://newbedev.com/why-is-it-a-bad-idea-to-use-plain-oauth2-for-authentication
* https://auth0.com/docs/authorization/protocols/protocol-oauth2
* https://www.digitalocean.com/community/tutorials/an-introduction-to-oauth-2
* https://dev.to/bam92/oauth-2-spec-is-misunderstood-why-14jd
What do you mean that login would be handled by the framework default flow?
The effort you did to create this content is considerable but it’s really important to take note of this:
“This implements the password credential grant. The error should be JSON as well (currently HTML). Please note, that the password credential grant is not the recommended way to do OAuth – consider using the authorization code grant.”
the library hasn`t been updated for 3 years..
I tried to rewrite for MySQL. I reated user successfully but I had not had any success with the “/login” route:
OAuth2Error: User credentials are invalid
at OAuth2Error (d:\web-work\oa2\logrocket-oauth2-example\node_modules\node-oauth2-server\lib\error.js:30:12)
at d:\web-work\oa2\logrocket-oauth2-example\node_modules\node-oauth2-server\lib\grant.js:228:19
at d:\web-work\oa2\logrocket-oauth2-example\db\userDB.js:29:9
at Query.onResult (d:\web-work\oa2\logrocket-oauth2-example\db\pgWrapper.js:37:9)
at d:\web-work\oa2\logrocket-oauth2-example\node_modules\mysql2\lib\commands\query.js:86:16
at processTicksAndRejections (node:internal/process/task_queues:78:11)
OAuth2Error: Method must be POST with application/x-www-form-urlencoded encoding
I want to send payload as Content-Type: application/json
Any solution to this