Suppose you want to convert your website or web application into a mobile application using React Native, or you have static HTML code that you want to show on any particular page in your application. What will you do? Will you re-write a whole bunch of code?

Certainly no need for it. You can render HTML directly into React Native. Woah! That’s amazing. So, in this article, we will learn how to render HTML to React Native using the react-native-render-html library. Let’s see how it works.
Jump ahead:
react-native-render-html to render HTML to React Native
react-native-render-htmlA few prerequisites for this tutorial include having npm and Node.js installed on your device along with having a basic understanding of React and React Native.
The Replay is a weekly newsletter for dev and engineering leaders.
Delivered once a week, it's your curated guide to the most important conversations around frontend dev, emerging AI tools, and the state of modern software.
To start this tutorial, we need to set up a React Native project. We will do so by running the following command:
npx react-native init MyTestApp
Now let’s move ahead. After creating a project, we will run it once to check everything is working as expected using either of the following commands:
npm run android
//or
npm run ios
The app will build and start running as per your chosen configuration, whether you’re using a virtual device or an Android or iOS device.
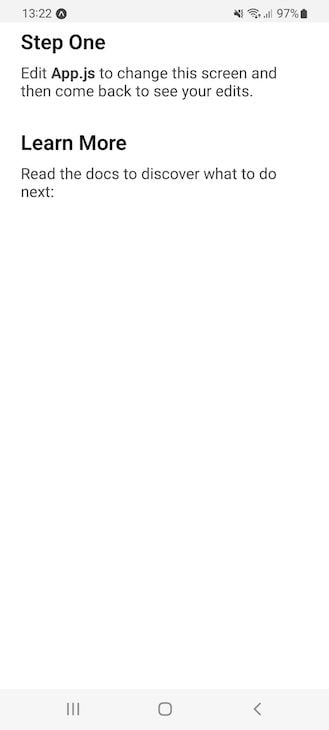
You can modify the App.js file to see the changes on your homepage — the entry page of your application. I changed a few lines of code to check if it’s working fine or not. If everything goes well, you can see a homepage like the one shown below:

react-native-render-html to render HTML to React NativeIn this tutorial, we will use the react-native-render-html package to render HTML into our React Native application. Keep some sample HTML code to use later in the React Native app.
The react-native-render-html library is an open source component with over three thousand GitHub stars and 46 contributors. It takes your HTML and renders 100% native views in your iOS or Android apps.
This library supports all the textual CSS methods we typically use while developing web applications. Apart from text, it also supports images, anchor tags, and lists.
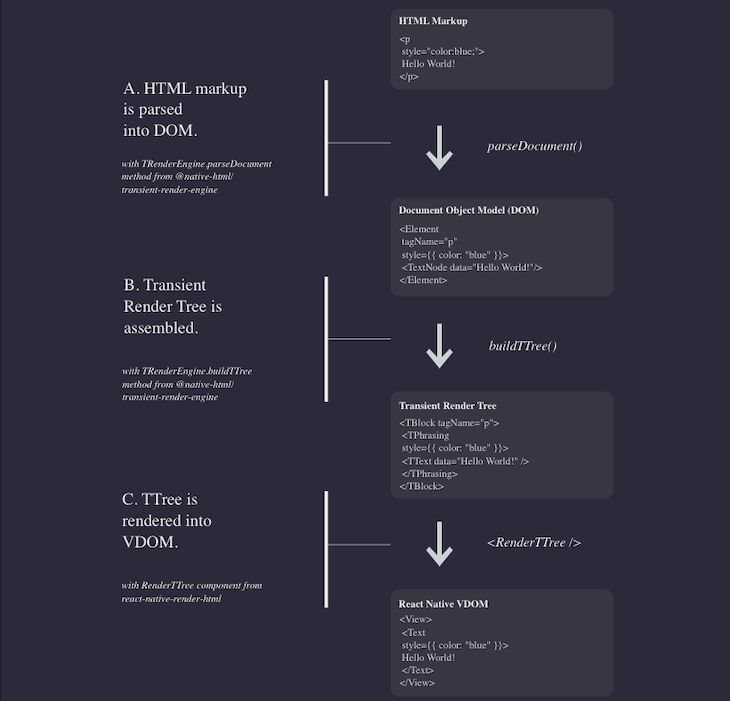
react-native-render-html parses HTML into React NativeThe react-native-render-html docs use the following data flow diagram to demonstrate how this tool parses HTML into React Native:

In summary, first, the HTML markup we passed will be parsed into the DOM. Then, the Transient Render Tree is assembled based on input. After that, TTree is rendered into Virtual DOM.
To learn more about how rendering works, refer to the docs. Otherwise, let’s move on to our practical example.
For styling, you can use an inline style, like so:
<p style= "color: purple; font-size: 2rem;">
The above won’t break your application. It supports four props to customize element styles: base, id style, class style, and tag style.
There’s also another way to deal with styling, which is by using mixedStyle records. Basically, mixedStyle is an object that contains all your CSS; the styles will be applied from there. See the example below:
//JavaScript
const mixedStyle = {
  body: {
    whiteSpace: 'normal',
    color: '#aaa'
  },
  p: {
    color: '#fff'
  }
}
To use your custom styles during the HTML render to React Native, the react-native-render-html library supports the tagsStyles attribute. You can pass your declared style in that attribute, like so:
//JavaScript
<RenderHtml
  source={source}
  tagsStyles={mixedStyle}
/>
Remember, when rendering HTML and custom styles to a React Native application, React Native styles will be ignored at build time and will not be applied or reflected.
With the react-native-render-html library, you can play with the htmlparser2 ecosystem, which is used for DOM tampering. You can process the DOM at any point in time. For example:
import React from 'react';
import { useWindowDimensions } from 'react-native';
import RenderHtml from 'react-native-render-html';
import { removeElement, isTag } from 'domutils';

function onElement(element) {
  // Remove the first p from div which has class "parentDiv"
  if (element.attribs['class'] == 'parentDiv') {
    let i = 0;
    for (const p of element.children) {
      if (isTag(p) && i < 1) {
        removeElement(p);
        i++;
      }
    }
  }
}

const source = {
  html: `
    <div class="parentDiv">
      <p>para-1</p>
      <p>para-2</p>
      <p>para-3</p>
    </div>
  `
};

const domVisitors = {
  onElement: onElement
};

export default function App() {
  const { width } = useWindowDimensions();
  return (
    <RenderHtml
      contentWidth={width}
      source={source}
      domVisitors={domVisitors}
    />
  );
}
Now let’s render HTML code in the application using an external library. For that, you need to modify the App.js file as shown below:
//JavaScript - JSX
import type {Node} from 'react';
import {
  ScrollView,
  Text,
  View,
} from 'react-native';
import RenderHtml from 'react-native-render-html';

const source = {
  html: `
    <header style="max-width: 1200px;
      overflow: hidden;
      box-sizing: border-box;
      margin: 20px auto;
      text-align: center;">
      <nav style="padding: 20px 0 0;
          max-width: 400px;
          margin: 0 auto;">
          <a style="display: inline-block;
            color: #666666;
            text-decoration: none;
            font-size: 14px;
            cursor: pointer;" href="#section1">Section 1</a>
          <a style="display: inline-block;
            color: #666666;
            text-decoration: none;
            font-size: 14px;
            cursor: pointer;" href="#section1" href="#section2">Section 2</a>
      </nav>
    </header>
    <header style="display: none;
      position: fixed;
      width:100%,
      top: 0;
      background: #FFFFFF;
      margin: 0 -15px;
      width: 100%;
      border-bottom: 1px solid #CCCCCC;
      box-sizing: border-box;
      box-shadow: 0px 0px 10px 0 rgba(0, 0, 0, 0.5);
      opacity: 0.9;
      z-index: 100;">
      <div style="max-width: 1200px;
          padding: 15px 30px;
          margin: 0 auto;
          overflow: hidden;
          box-sizing: border-box;">
          <nav style="padding: 5px 0;
            max-width: 400px;
            float: right;
            text-align: right;">
            <a style="display: inline-block;
                color: #666666;
                text-decoration: none;
                font-size: 14px;
                cursor: pointer;" href="#section1">Section 1</a>
            <a style="display: inline-block;
                color: #666666;
                text-decoration: none;
                font-size: 14px;
                cursor: pointer;" href="#section2">Section 2</a>
          </nav>
      </div>
    </header>
    <div style="min-width: 300px;
      margin: 0 auto;
      height: 1000px;
      position: relative;
    ">
      <div style="min-height: 100px;position: relative; background: #ffd6cd; width=100vw;" id="section1">
          <h1 style="text-align: center;
            line-height: 500px;
            color: #666666;
            margin: 0;">Section 1</h1>
      </div>
      <div style="min-height: 100px;position: relative; background: #ddebfd; width=100vw;" id="section2">
          <h1 style="text-align: center;
            line-height: 500px;
            color: #666666;
            margin: 0;">Section 2</h1>
      </div>
    </div>
    </div>
  `
};
const App: () => Node = () => {
  return (
    <ScrollView contentInsetAdjustmentBehavior="automatic">
    <View>
      <Text style={{top:"3%", textAlign:"center"}}>
        Render HTML to React Native demo
      </Text>
      <RenderHtml
        source={source}
      />
    </View>
    </ScrollView>
  );
};
export default App;
Beginning at line number 10, in the source variable, we wrote our HTML code. This code is then rendered by a method called RenderHtml at line number 94. We have to provide our HTML as a source attribute, and the package will handle the rest.
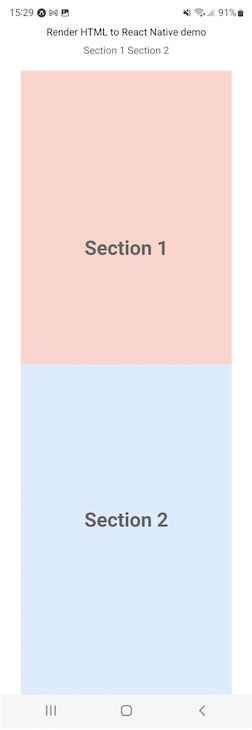
To demonstrate that the rendered HTML from the external library will look the same as code written with React Native, line number 91 uses the default React Native <Text> method to show the text.
Both the text rendered by the default method and the text output from rendering HTML should look like the below:

react-native-render-htmlApart from the react-native-render-html library, there’s one more option for rendering web components into React Native applications — React Native WebView. This modern cross-platform alternative to the built-in webview has great support for embedding anything from whole web apps to simple HTML files.
In this library, you can find a similar pattern as above. Check out the below example:
//Javascript - JSX
import React, { Component } from 'react';
import { StyleSheet, Text, View } from 'react-native';
import { WebView } from 'react-native-webview';

// ...
class MyWebComponent extends Component {
  render() {
    return <WebView source={{ uri: 'https://reactnative.dev/' }} />;
  }
}
This library has many useful features — like uploading and downloading files, custom cookies, page navigations, and many more. Check out this complete guide to React Native WebView to see if it’s the right solution for your needs.
React Native is in demand due to the popularity of React. If you understand React, it’s straightforward to make a mobile application via React using native support for React Native.
In addition, you may have HTML ready and want to make a mobile application using your existing code rather than rewriting it to fit your target platform. It is possible to natively render HTML to React Native using one of the approaches discussed above. You don’t need to reinvent the wheel to make that work in an Android or an IOS application.
I used to rewrite the code to make it a native application, but I came to know some pretty amazing libraries I can use to showcase my HTML. The resulting view is the same as the native view, so this approach does not impact the user experience.
If you want to render HTML directly in your React Native application, make sure you check to see if the library you want to use fits your requirements. If you have any questions, let me know in the comments below!

LogRocket's Galileo AI watches sessions for you and and surfaces the technical and usability issues holding back your React Native apps.
LogRocket also helps you increase conversion rates and product usage by showing you exactly how users are interacting with your app. LogRocket's product analytics features surface the reasons why users don't complete a particular flow or don't adopt a new feature.
Start proactively monitoring your React Native apps — try LogRocket for free.

Compare the top AI development tools and models of February 2026. View updated rankings, feature breakdowns, and find the best fit for you.

Broken npm packages often fail due to small packaging mistakes. This guide shows how to use Publint to validate exports, entry points, and module formats before publishing.

Discover what’s new in The Replay, LogRocket’s newsletter for dev and engineering leaders, in the February 11th issue.

Cut React LCP from 28s to ~1s with a four-phase framework covering bundle analysis, React optimizations, SSR, and asset/image tuning.
Hey there, want to help make our blog better?
Join LogRocket’s Content Advisory Board. You’ll help inform the type of content we create and get access to exclusive meetups, social accreditation, and swag.
Sign up now