
Google offers tons of APIs for accessing its map services, one of which is the Places API. The Places API primarily gives you information about places using HTTP requests. You can get all the information you need about a local address, town, city, district, restaurant, or any other place, including its coordinates.

The Places API includes tons of features such as returning a list of places related to a search string, providing photos of a place, and many others. One of its most commonly needed and used features is the autocomplete service.
Using the autocomplete service, Google can automatically fill in the address or name of a place being searched through the API. So, for example, as your user types in the name of a restaurant they want to order from, you can provide them with suggestions based on what they type.
In this article, we will look at how we can use the autocomplete service in React Native. However, we don’t have to directly work with the Places API because a React Native package called react-native-google-places-autocomplete can handle this for us.
So, let’s look at how we can use the react-native-google-places-autocomplete package in a React Native project, as well as some of its key functionalities and how we can customize it to fit our project. We will cover:
The Replay is a weekly newsletter for dev and engineering leaders.
Delivered once a week, it's your curated guide to the most important conversations around frontend dev, emerging AI tools, and the state of modern software.
The react-native-google-places-autocomplete package is only a medium through which to access the Places API. It will not function without first setting up a Google Cloud project to use the Places API. So let me show how you can do that in four steps:
Let’s start by creating a Google Cloud project.
Without a Google Cloud project, we can’t use any of Google API services. Head over to the Google Cloud Console and sign up if you haven’t already.
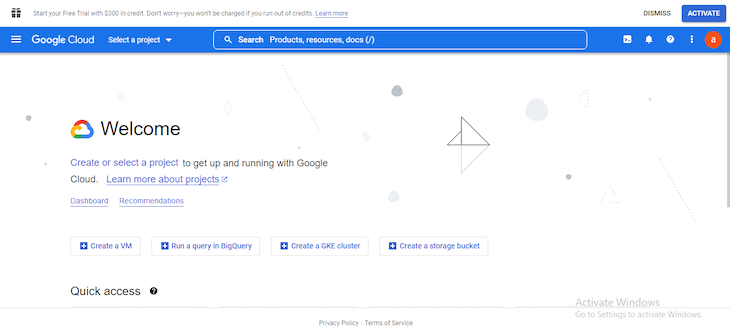
You’ll land on the page shown in the image above. If you haven’t created a project before, click the “Create or Select Project” button. A modal will pop up immediately. Click “New project” at the top right.
A new page will load that requires you to enter the name of the project and the location — “location” meaning to which organization the project should belong. You can leave the location as “No organization” and just enter a name for your project.
Finally, click “Create” to create the project. You can then select the project or visit the project page to see your list of projects.
The Google Places API is not free forever. Google uses a pay-as-you-go pricing model. But the first couple of requests you make will be free every month.
Google makes it compulsory for you to enable billing for your project before you can use the Places API.
Head up to the billing page, and select the project you want to enable billing for. A modal will pop up, simply click “Create billing account” if you haven’t already.
Follow this official guide by Google to create a billing account.
You only need to enable the Places API and Geocoding API to use the react-native-google-places-autocomplete package. Let’s do that next.
Head up to your project dashboard, which should look like this:
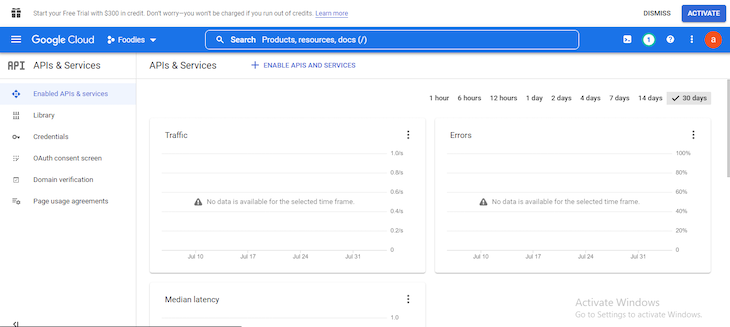
If it doesn’t look like the image above, make sure the “Enable APIs & Services” at the sidebar is selected. Next click “Enable APIs and Services” on the navbar. It will take you to the API library page:
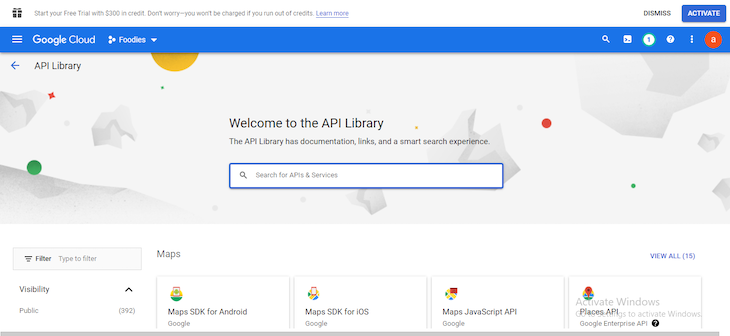
Search for “Places API” and click the result. The next page contains information about the Places API, including pricing information and a button to enable the API for your project. Click the “Enable” button, and that will be it.
If you haven’t enabled billing for your project, you will be prompted to do so when you try to enable the Places API.
Afterwards, head back to the API library page and enable the Geocoding API as well.
This is the last step we have to take before we can use the package. Go to your APIs dashboard. At the left sidebar, select the “Credentials” option.
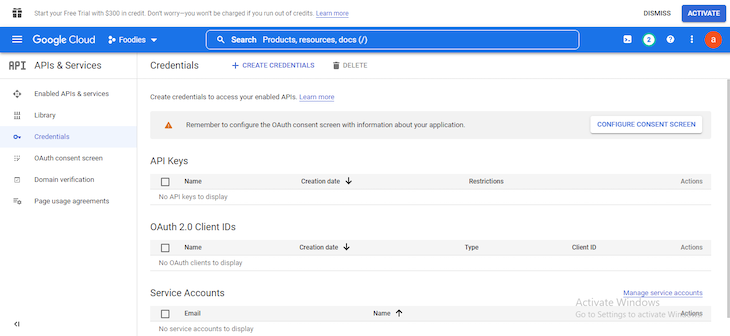
Click “Create Credentials” at the top navbar and select “API key.” This will create an API key for your project. With this API key, you only have access to the APIs you have enabled. Copy the API key and store it somewhere safe.
You may notice a warning icon by the side of your API key. It is important you pay attention to it. Google recommends you restrict your API keys to your apps only. Otherwise, if you fail to keep your API key a secret, the API key will be useless for any other apps or website.
This is mostly useful for production purposes. Since we are only going to be testing the features of the react-native-google-places-autocomplete package, there is no need to restrict the key.
react-native-google-places-autocompleteThe react-native-google-places-autocomplete npm package provides a customizable component for using the Google Places autocomplete services.
It also uses the Places Details services to provide more details about a searched place, including user reviews and coordinates, and the Geocoding API for converting readable addresses into geometric coordinates and vice versa.
To follow along with this article and see this package at work, set up a React Native project.
For our example React Native project, we will create an app for foodies to look up places to eat. We won’t go through every step of building the app, since the main focus of this article is to show some examples of how to use the react-native-google-places-autocomplete package.
Head over to your terminal and run the following:
npx react-native init Foodies
If you’re having a TypeError: cli.init is not a function issue when creating a React Native project with the command above, uninstall both the global react-native-cli and react-native. Now reinstall only the global react-native.
Now let’s install the dependencies. We only need one dependency for now: the react-native-google-places-autocomplete package.
npm install react-native-google-places-autocomplete
The package provides a component with everything we need to use and customize the Places API in our app. Let’s see a basic example:
import {GooglePlacesAutocomplete} from 'react-native-google-places-autocomplete';
import {apiKey} from './config'; // your google cloud api key

const App = () => {
  return (
    <SafeAreaView>
      <GooglePlacesAutocomplete
        placeholder="Type a place"
        query={{key: apiKey}}
      />
    </SafeAreaView>
  );
};
Let’s go over some important parts of the example above.
GooglePlacesAutocomplete is the text input form where users type in the name of a place. As the user types in, a modal of suggested places based on what the user types in will appear as a dropdown.
The query prop is the only required prop; without its key property, the autocomplete package will not be able to use the Places API. You need to import your API key and use it here. Also, don’t forget to enable billing on your Cloud project to use the Places and Geocoding APIs.
It isn’t a safe practice to store sensitive information inside your React Native project. Let’s discuss how you can secure your API key.
It’s very important you don’t store your API key within your React Native project. Anyone with your app bundle can access your API key, so this is not a secure storage method.
You can solve this by using a server to store your API key. Such that when the app is opened by the user, you simply make a request to your server to fetch the API key.
There are also measures to secure the API key in the server. Brad Traversy’s video on securing API keys demonstrates how to do this.
The first set of responses from the Google Places API are the autocomplete suggestions. The react-native-google-places-autocomplete package handles this set of responses, so we don’t have to worry about them.
However, there are other responses that will be triggered by user events. For example, when a suggested address is pressed, the user’s input does not return any more suggestions (i.e place not found). These responses will have to be handled by us.
Again, the autocomplete package has done the difficult part for us by providing event props for handling these responses. Let’s take a look at an example:
const App = () => {
  return (
    <SafeAreaView>
      <GooglePlacesAutocomplete
        placeholder="Type a place"
        query={{key: apiKey}}
        fetchDetails={true}
        onPress={(data, details = null) => console.log(data, details)}
        onFail={error => console.log(error)}
        onNotFound={() => console.log('no results')}
      />
    </SafeAreaView>
  );
};
These new props introduced — onPress, onFail, and onNotFound — are vital. When using a package for the Places API like this, you can use these props to answer questions like:
The autocomplete package provides ways to answer these questions with props. It’s up to us to handle the responses with custom functions. Alright, let’s tackle these questions one after the other.
When the user taps a suggestion, information about the selected place will be returned as a parameter passed into the function that is then passed into the onPress prop. The two parameters from the example above — data and details — both make up the information about the place.
The data parameter returns an object of basic information about the place like the description or address name, country, city, and other details.
The details parameter will return the same object as the data object if the fetchDetails prop is false.
The fetchDetails prop is set to false by default, but when set to true, the details parameter gives more detailed information about the place including the geometry. Google provides an example of a complete Place Details response in their docs.
It is quite likely that a user may sometimes type a search string and receive no results. With the onNotFound prop, we can create awareness all over the project that there were no results. Then, within your app, you can handle how it should be displayed or what should or should not happen based on this response.
For example, we could deactivate all other features (like proceeding to the next step for ordering foods) and display a custom message indicating no results.
Alternatively, if you want to only alert the user and not do anything special about the lack of results somewhere else in your app, you can use the FlatList listEmptyComponent prop to alert the users when no results are found.
You can do this by passing in either a component or an element, like so:
const App = () => {
  return (
    <SafeAreaView>
      <GooglePlacesAutocomplete
        placeholder="Type a place"
        onPress={(data, details = null) => console.log(data, details)}
        query={{key: apiKey}}
        fetchDetails={true}
        onFail={error => console.log(error)}
        onNotFound={() => console.log('no results')}
        listEmptyComponent={() => (
          <View style={{flex: 1}}>
            <Text>No results were found</Text>
          </View>
        )}
      />
    </SafeAreaView>
  );
};
As a result of the code above, if the user types in something for which there are no results, the text “No results were found” will display under the search bar.
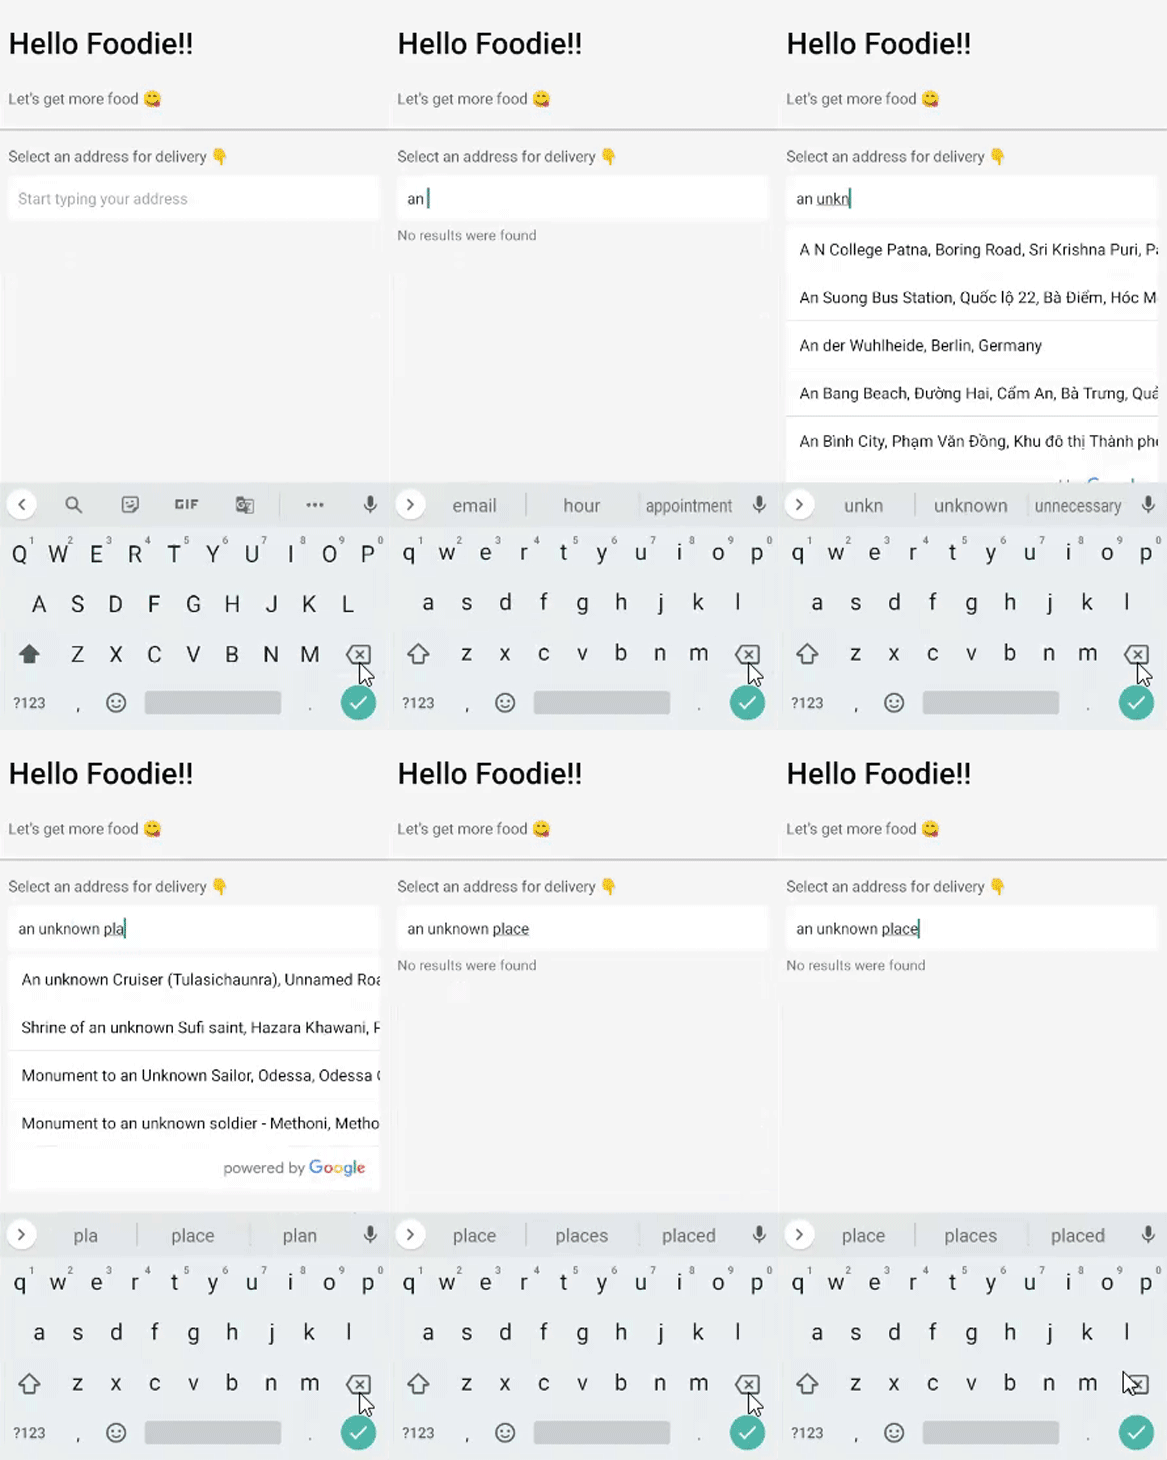
It is also quite likely that fetching data from the Places API may sometimes lead to an error. For example, the Places API may throw its own error because there is a configuration issue with your Google Cloud project or billing address.
The onFail prop returns an error when there is an error from the API, whether while using the Places API or the Geocoding API.
A very common issue you could run into here is when billing is not enabled on your project or some other issue with making necessary billings.
You can use your users’ favorite or most-visited places as predefined places for the GooglePlacesAutocomplete component.
A predefined place contains an address with information about the place. You can choose to display the address or any name you want to the user.
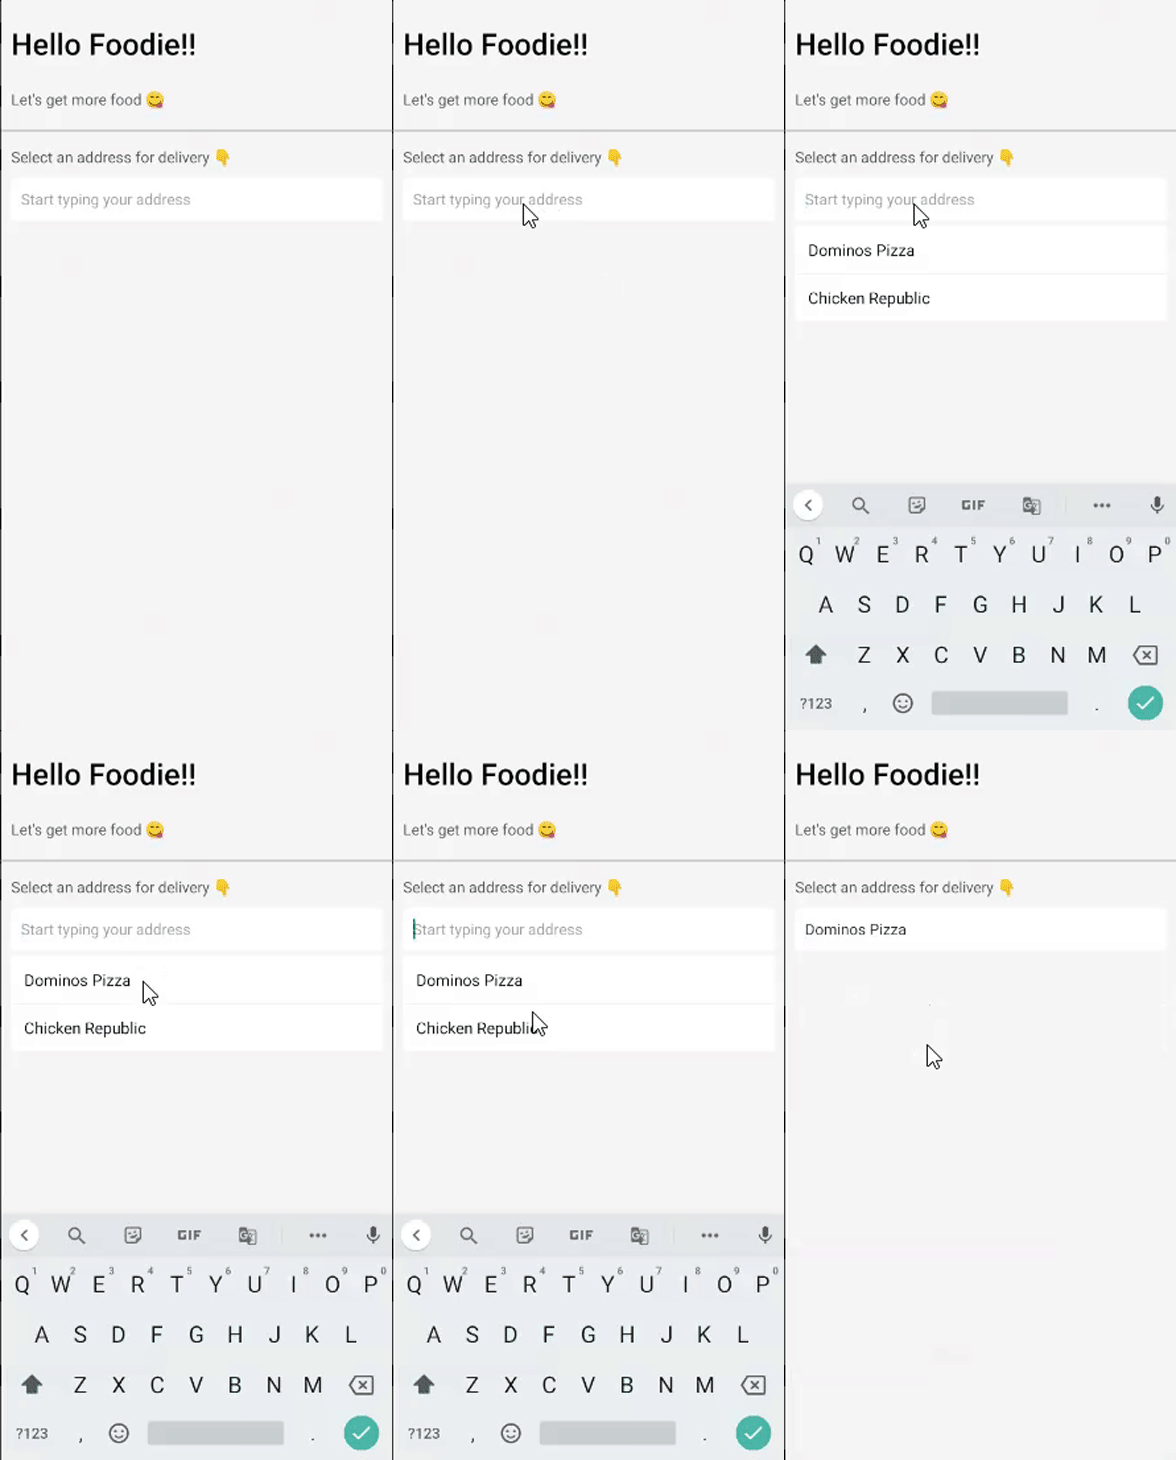
If you use predefined places, when the user focuses on the text input to search for an address, the predefined options will pop up as autocomplete suggestions.
Here’s how to set two locations — Dominos Pizza and Chicken Republic — as favorite types of predefined places:
const App = () => {
  return (
    <SafeAreaView>
      <GooglePlacesAutocomplete
        placeholder="Type a place"
        onPress={(data, details = null) => console.log(data, details)}
        query={{key: apiKey}}
        fetchDetails={true}
        onFail={error => console.log(error)}
        onNotFound={() => console.log('no results')}
        predefinedPlaces={[
          {
            type: 'favorite',
            description: 'Dominos Pizza',
            geometry: {location: {lat: 48.8152937, lng: 2.4597668}},
          },
          {
            type: 'favorite',
            description: 'Chicken Republic',
            geometry: {location: {lat: 48.8496818, lng: 2.2940881}},
          },
        ]}
      />
    </SafeAreaView>
  );
};
In the code above, the description is the name that will be displayed to the user. When any predefined option is selected, the object you created for the place will be returned with the data and details parameters of that place.
The object isn’t limited to just type, description, and geometry. You can add more information about the place.
As a result of the code above, you should see these favorite predefined places appear as suggestions even before the user begins typing. See the outcome below:
By default, the react-native-google-places-autocomplete package uses React Native’s TextInput component for the text input. However, you’re not stuck with the package’s choice
With the textInputProps prop, you can use any custom component of your choice, such as Input from React Native Elements.
import {GooglePlacesAutocomplete} from 'react-native-google-places-autocomplete';
import {apiKey} from './config'; // your google cloud api key
import {Input} from '@rneui/themed';

const App = () => {
  return (
    <SafeAreaView>
      <GooglePlacesAutocomplete
        placeholder="Type a place"
        onPress={(data, details = null) => console.log(data, details)}
        query={{key: apiKey}}
        fetchDetails={true}
        onFail={error => console.log(error)}
        onNotFound={() => console.log('no results')}
        textInputProps={{
          InputComp: Input,
        }}
      />
    </SafeAreaView>
  );
};
textInputProps is an object of all the props of the text input component. So if you’re using React Native’s TextInput, you can use props specific to it here. For example:
const App = () => {
  return (
    <SafeAreaView>
      <GooglePlacesAutocomplete
        placeholder="Type a place"
        onPress={(data, details = null) => console.log(data, details)}
        query={{key: apiKey}}
        fetchDetails={true}
        onFail={error => console.log(error)}
        onNotFound={() => console.log('no results')}
        textInputProps={{
          autoFocus: true,
          blurOnSubmit: false,
        }}
      />
    </SafeAreaView>
  );
};;
The props used above in textInputProps are all specific to React Native’s TextInput. The same thing happens when you use a third-party library.
GooglePlacesAutocomplete componentThe default styles of the GooglePlacesAutocomplete component are well-styled, so they may be enough for your app.
Nevertheless, you can add to the default styles to make them fit your app. You can also completely get rid of the default styles and completely customize the style from scratch.
The GooglePlacesAutocomplete component has a styles prop for styling all the components, from the text input to the dropdown. Let’s see it in action:
const App = () => {
  return (
    <SafeAreaView>
      <GooglePlacesAutocomplete
        placeholder="Type a place"
        onPress={(data, details = null) => console.log(data, details)}
        query={{key: apiKey}}
        fetchDetails={true}
        onFail={error => console.log(error)}
        onNotFound={() => console.log('no results')}
        styles={{
          container: {
            flex: 0,
          },
          description: {
            color: '#000',
            fontSize: 16,
          },
          predefinedPlacesDescription: {
            color: '#3caf50',
          },
        }}
      />
    </SafeAreaView>
  );
};
The styles prop is an object that uses React Native’s standard style properties and values. With the styles prop, you can style the different sections that make up the GooglePlacesAutocomplete component.
These sections — such as the text input, dropdown container, each dropdown element, and others — are the child elements of the GooglePlacesAutocomplete component. For example, styling the text input would be done like so:
styles={
  textInput: {
   borderColor: 'orange',
   fontSize: 20
 }
}
You should try and style each section or property based on its type. For example, the component’s container is a View component, therefore it should be styled as a View component. Here is a list of all sections/properties and their element types
It is possible to limit the search results shown in the react-native-google-places-autocomplete suggestions to one country. As such, only places that match the user’s search string in a particular country will pop up.
Use the component property in the query prop to specify a country, like so:
query={{key: apiKey, components: 'country:us'}}
The country:us value simply means the United States. It is the abbreviation of the country name that is used rather than the complete name. Here is a list of supported countries.
With the query prop, you can also provide results in a different language. The default language is English, but with the language property, you can specify a different language in its ISO 639-1 code.
query={{key: apiKey, components: 'country:us', language: 'it'}}
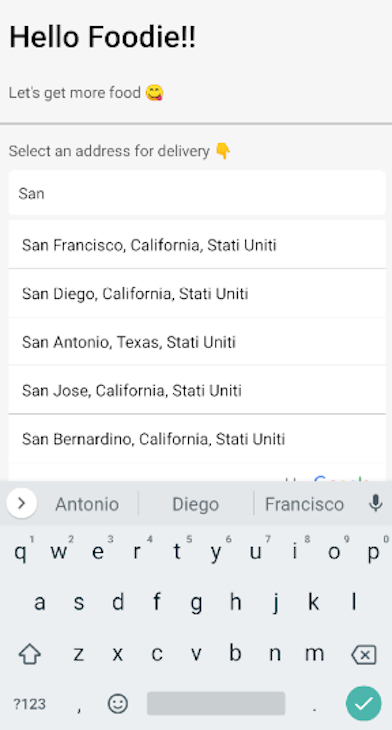
In the code above, we set the language property to it. This will provide results in Italian. If you want to provide your search results in other languages, take a look at the list of supported languages and their codes.
Now, if the user begins searching, the search results will appear in Italian and only show options within the United States.
One of the methods provided by the react-native-google-places-autocomplete package is getAddressText. This method returns the value of the user’s text input.
There are many use cases for this method. Examples include displaying the user’s input in a special way when an unknown place is searched or reusing the user’s last input if an error occurs while searching.
To use any methods provided by the package, we first have to make a reference to the GooglePlacesAutocomplete component using React refs, like so:
const App = () => {
  const placesRef = useRef();

  const getAddress = () => {
    console.log(placesRef.current?.getAddressText());
  };

  return (
    <SafeAreaView>
      <GooglePlacesAutocomplete
        placeholder="Type a place"
        onPress={(data, details = null) => console.log(data, details)}
        query={{key: apiKey}}
        fetchDetails={true}
        onFail={error => console.log(error)}
        onNotFound={() => console.log('no results')}
        ref={placesRef}
      />
    </SafeAreaView>
  );
};
Other methods that can also be useful are:
setAddressText: changes the value of the text inputclear: clears the text inputisFocused: returns true if the text input is focused, returns false if not.getCurrentLocation: makes a query to find nearby places based on current location.Let’s explore how to use getCurrentLocation next.
The getCurrentLocation method makes a query to find nearby places based on the user’s current location. However, this is not the only location functionality this package provides; it can also get the user’s current location the same way it retrieves information about a place.
The package uses geolocation services to find the user’s location and include it as part of the autocomplete suggestions. When selected, the details about the user’s current location will be returned.
For that to happen, we’d have to set the currentLocation prop to true:
const App = () => {
  return (
    <SafeAreaView>
      <GooglePlacesAutocomplete
        placeholder="Type a place"
        onPress={(data, details = null) => console.log(data, details)}
        query={{key: apiKey}}
        fetchDetails={true}
        onFail={error => console.log(error)}
        onNotFound={() => console.log('no results')}
        currentLocation={true}
        currentLocationLabel="Your location!" // add a simple label
      />
    </SafeAreaView>
  );
};
This isn’t all there is to set up for a fully functioning app. You’d also have to install a geolocation service provider like react-native-geolocation-service.
In addition, you’d need to ask your users to grant location permission to use any location service with react-native-google-places-autocomplete. However, these specific steps go beyond the scope of this article, which focuses specifically on the react-native-google-places-autocomplete package.
In this article, we looked at how to set up a Google cloud project for the react-native-google-places-autocomplete package. We’ve also looked at a ton of functionalities through props and methods of the package.
For example, we looked at handling responses, securing your API key, styling the GooglePlacesAutocomplete component, limiting results to one country, showing results in a different language, using methods like getAddressText, using a custom text input component, and more.
Now, the package is not limited to what we have listed here. You can find more props and methods that would help customize the package to fit how you want the Google Places API to be used in your app.
I hope you had a blast. Let me know what you think in the comment section. Thanks for reading, and happy hacking.

LogRocket's Galileo AI watches sessions for you and and surfaces the technical and usability issues holding back your React Native apps.
LogRocket also helps you increase conversion rates and product usage by showing you exactly how users are interacting with your app. LogRocket's product analytics features surface the reasons why users don't complete a particular flow or don't adopt a new feature.
Start proactively monitoring your React Native apps — try LogRocket for free.

Russ Miles, a software development expert and educator, joins the show to unpack why “developer productivity” platforms so often disappoint.

Discover what’s new in The Replay, LogRocket’s newsletter for dev and engineering leaders, in the February 18th issue.

Learn how to recreate Claude Skills–style workflows in GitHub Copilot using custom instruction files and smarter context management.

Claude Code is deceptively capable. Point it at a codebase, describe what you need, and it’ll autonomously navigate files, write […]
Would you be interested in joining LogRocket's developer community?
Join LogRocket’s Content Advisory Board. You’ll help inform the type of content we create and get access to exclusive meetups, social accreditation, and swag.
Sign up now