Using Eleventy alone can help you produce great static websites efficiently and boost performance. However, this does not work well when using dynamic data in your application.

In this tutorial, we’ll walk through the process of creating Eleventy components and then show you how to use the Eleventy Serverless plugin to handle logic and data.
Eleventy is a static site generator that uses various templating languages to assemble finished HTML webpages you can host with your provider.
Eleventy cycles through all the files in your project to gather data from different template languages, including markdown, Nunjucks, Liquid, Haml, JavaScript, etc. Then, during build time, it uses the templating languages to generate an output folder with *.html files — i.e., a static HTML website.
This makes for outstanding performance, but it comes with a drawback around dynamic content and user input.
Eleventy Serverless is a plugin that enables you to manage dynamically generated data in Eleventy using serverless functions. It uses Netlify Functions but can also work with Netlify’s On-demand Builders, as we will explain later.
Eleventy Serverless works hand in hand with your static site, but it runs one or more template files at the point of HTTP requests to generate dynamic pages. It can unlock many new use cases to move beyond static webpages into dynamically generated content.
On-demand Builders are functions that cache the result. Run it once and get static HTML on every other run.
Let’s initiate our project and add our package.json by running this command:
npm init
To use Eleventy Serverless, we need the latest version of the 1.0 release of 11ty, which is 1.0.0.canary.44 at the time of writing:
npm i @11ty/eleventy@^1.0.0-canary.44
Also, we can install Netlify Functions:
npm install @netlify/functions
To use Eleventy Serverless, we need to go to our root folder to create and configure our .eleventy.js file. This file helps us configure Eleventy Serverless in our project. The Eleventy Serverless plugin ships with Eleventy itself, which we just installed).
The Eleventy configuration is as follows:
const { EleventyServerlessBundlerPlugin } = require("@11ty/eleventy");
// Require the package we just installed
const axios = require("axios");
module.exports = function (eleventyConfig) {
  eleventyConfig.addPlugin(EleventyServerlessBundlerPlugin, {
    name: "rick", // The serverless function name for the permalink object
    functionsDir: "./netlify/functions/",
  });


};
As mentioned earlier, we import EleventyServerlessBundlerPlugin from our 11ty/eleventy. Then, we set the config for our serverless plugin using eleventyConfig.addPlugin.
We can add the name of our serverless function and the Netlify Function directory that’ll handle our serverless function.
Now it’s time to see Eleventy Serverless in action. We’ll demonstrate how to make requests or add business logic to display dynamic content on your site.
We’ll use the Rick and Morty API to display all characters named Rick who are still alive on the show.
First, let’s go back to our .eleventy.js file and create our filter:
const { EleventyServerlessBundlerPlugin } = require("@11ty/eleventy");
// Require the package we just installed
const axios = require("axios");
module.exports = function (eleventyConfig) {
  eleventyConfig.addPlugin(EleventyServerlessBundlerPlugin, {
    name: "rick",
    functionsDir: "./netlify/functions/",
  });
  eleventyConfig.addFilter("rickList", (name) => {
    const list = axios
      .get(
        `https://rickandmortyapi.com/api/character/?name=${name}&status=alive`
      )
      .then((res) => {
        console.log(res.data.results);
        let i = res.data.results
        return i
      })
      .catch((err) => console.log(err));
      return list
  });
};
This rickList filter takes in a name parameter and sends a request to the Rick and Morty API, which returns a response. We’ll display this response in our UI.
The build will automatically create the netlify/functions folder for our serverless functions.
Our Netlify Functions can either be dynamic or cached. By default, it’ll be a dynamic serverless function that runs on every load.
With cache, we’ll use Netlify On-demand Build to improve performance and cache its results. So if our filter has reoccurring arguments, we don’t need to run that script again. Instead, we can use the previously cached result. This way, we only run the functions when there are new arguments for our serverless functions. The cache serverless function uses Netlify On-demand Builders to run.
To set our function to cache, go into the generated netlify/functions/rick/index.js, scroll to the bottom, and replace the following:
exports.handler = handler;
With the following:
const { builder } = require("@netlify/functions");
exports.handler = builder(handler);
Before getting into the actual code, we should add the right files to our .gitignore file. We need to add our Netlify Function files, so we will not upload them to a version control tool such as Git.
netlify/functions/rick/**
!netlify/functions/rick/index.js
Now, create a new folder called _includes. Within this folder, create a base.njk file. By default, Eleventy uses _includes to find the template file to render.
<!DOCTYPE html>
<html lang="en">
<head>
    <meta charset="UTF-8">
    <meta http-equiv="X-UA-Compatible" content="IE=edge">
    <meta name="viewport" content="width=device-width, initial-scale=1.0">
    <link rel="stylesheet" href="https://unpkg.com/some-nice-basic-css/global.css" />
    <style>.container{max-width: 80ch;margin: auto;</style>
    <title>{{ title }}</title>
</head>
<body>
    <main class="container">
        {{ content | safe }}
    </main>
</body>
</html>
Let’s go to our root folder and create an index.njk file that we will import into the _includes/base.njk. This index.njk file will contain our homepage, which is what the user sees once they open the site.
---
title: "Rick Finder"
layout: "base.njk"
permalink:
    build: "/"
---
{% set pageTitle %}
    {% if eleventy.serverless.path.title %}
        {{ eleventy.serverless.query.query | safe }}
    {% else %}
        {{ title }}
    {% endif %}
{% endset %}
<h1>{{ pageTitle }}</h1>

<button onclick="window.location.href = '/rick/'" id="rickForm"> Follow this button to see rick</button>
The index.njk file displays a title and button to help us navigate to the /rick page.
Create a rick.html file in the root folder, the same level as the index.njk file:
---
layout: "base.njk"
permalink:
rick: "/rick/"
---
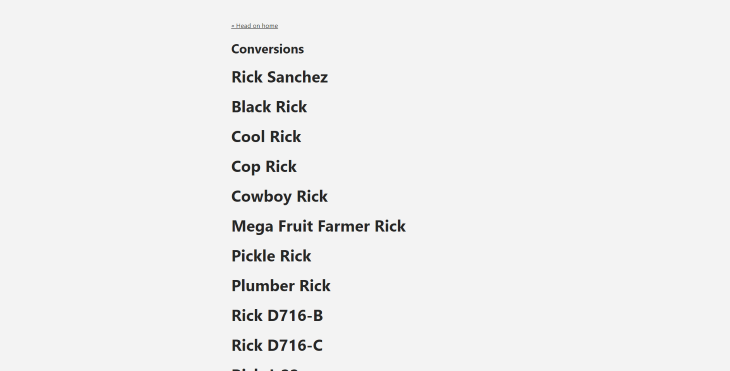
<a href="/">« Head on home</a>
<h2>Names</h2>
{% assign name = "rick" %}
{% assign results = name | rickList %}
<div class="card-grid">
{% for result in results %}
<h1>{{ result.name }}</h1>
{% endfor %}
</div>
Here, we set the permalink of this page to be the same as the name of our serverless plugin.
We’ll create a variable called name and assign it to the string rick. Then, we’ll trigger the rickList filter in our config file by providing with name as an argument. The response is assigned to results. Then, we loop through the response and display the names.
We can kickstart it by running npm run start.
Now, if we go to localhost:8080/rick/, we’ll see a list of characters in Rick and Morty that bear the name Rick:
Congratulations if you made it to the end!
In this tutorial, we introduced you to Eleventy Serverless, walked through the steps of installing configuring Eleventy, and demonstrated how to use Eleventy Serverless to handle asynchronous logic in a real-world project. Most importantly, we showed how this can be done beyond static sites.
The complete code used for this demonstration is available on GitHub.
Install LogRocket via npm or script tag. LogRocket.init() must be called client-side, not
server-side
$ npm i --save logrocket

// Code:

import LogRocket from 'logrocket';
LogRocket.init('app/id');
// Add to your HTML:

<script src="https://cdn.lr-ingest.com/LogRocket.min.js"></script>
<script>window.LogRocket && window.LogRocket.init('app/id');</script>
Hey there, want to help make our blog better?
Join LogRocket’s Content Advisory Board. You’ll help inform the type of content we create and get access to exclusive meetups, social accreditation, and swag.
Sign up now
Discover how the Interface Segregation Principle (ISP) keeps your code lean, modular, and maintainable using real-world analogies and practical examples.

<selectedcontent> element improves dropdowns

Learn how to implement an advanced caching layer in a Node.js app using Valkey, a high-performance, Redis-compatible in-memory datastore.

Learn how to properly handle rejected promises in TypeScript using Angular, with tips for retry logic, typed results, and avoiding unhandled exceptions.


