When building web applications, we often decouple the backend from the frontend and provide communication between them using a GraphQL or REST API. However, this usually complicates our application and increases the deployment and hosting responsibilities for the back and frontends.

Even when building a non-decoupled server-side web app, we’re limited by the frontend template options provided by the server-side framework. What if there was a way to make a fully JavaScript single-page app to replace server-side rendered views without the added complexity of building APIs and a separate frontend?
This article will look at how we can achieve this using Inertia.js, Vue.js, and AdonisJs. To follow along and complete this tutorial, you’ll need Node.js installed and a basic knowledge of JavaScript and Vue.js.
Jump ahead:
AdonisJs is a popular Node.js web framework for building APIs and server-side applications. It‘s known for its clean and intuitive syntax. AdonisJs primarily uses the Edge template framework on the frontend. With Inertia, however, we can use frontend frameworks like React, Vue, and Svelte.
Inertia is a popular library for building full-stack single-page applications (SPAs) using supported frameworks like React, Vue, and Svelte on the frontend. On the backend, Inertia supports Laravel and other frameworks by using adapters. Inertia also allows you to create SPAs that behave like traditional server-rendered applications while capitalizing on SPA architecture’s benefits.
We’ll be using Vue.js as our framework of choice in this article. Vue.js is a popular JavaScript framework for building user interfaces. It is known for its simplicity and flexibility and is often used for creating SPAs and progressive web applications (PWAs).
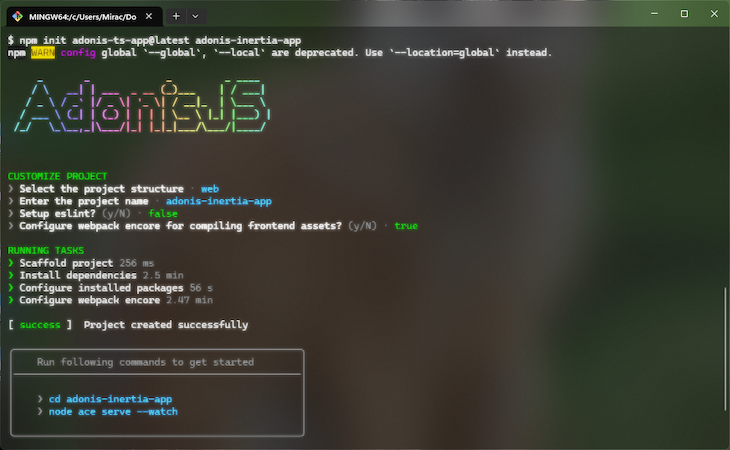
To create an AdonisJs application, run the following command:
npm init adonis-ts-app@latest adonis-inertia-app
Now, we can navigate into our project with the code below:
cd adonis-inertia-app
Once that’s done, we can configure the inertiajs-adonisjs adapter to add Inertia to our AdonisJs project. To do this, install the adapter with the command below:
npm i @eidellev/inertia-adonisjs
After installation, we can add some configurations by running the following command:
$ node ace configure @eidellev/inertia-adonisjs
During the installation, we’ll be asked a few questions. We’ll respond with the following:
❯ Enter the edge file you would like to use as your entrypoint · app
❯ Would you like to install the Inertia.js client-side adapter? (Y/n) · true
❯ Would you like to use SSR? (y/N) · true
❯ Which client-side adapter would you like to set up? · @inertiajs/inertia-vue3
Once the configuration is complete and the dependencies have been installed, we can install vue-loader to use in webpack to load Vue files:
npm i -D vue-loader
Now, we have to add it to our webpack Encore configuration in ./webpack.config.js:
// ./webpack.config.js
// ...
/*
|--------------------------------------------------------------------------
| Enable Vue loader
|--------------------------------------------------------------------------
|
| Uncomment the following lines of code to enable support for vue. Also make
| sure to install the required dependencies.
|
*/
Encore.enableVueLoader(() => {}, {
  version: 3,
  runtimeCompilerBuild: false,
  useJsx: false
})
Let’s register the inertiajs-adonisjs adapter middleware globally into our project by adding it to our ./start/kernel.ts file:
// ./start/kernel.ts
// ...
/*
|--------------------------------------------------------------------------
| Global middleware
|--------------------------------------------------------------------------
|
| An array of global middleware, that will be executed in the order they
| are defined for every HTTP requests.
|
*/
Server.middleware.register([
  () => import('@ioc:Adonis/Core/BodyParser'),


  // import the inertia-adonis middleware
  () => import('@ioc:EidelLev/Inertia/Middleware'),
])
Now that the adapter has been configured in our project, we can connect our Vue app with Inertia.
In our Vue ./resources/js/app.js app file, import createInertiaApp and add some configurations, as shown below:
// ./resources/js/app.js
import { createApp, h } from "vue";
import { createInertiaApp } from "@inertiajs/inertia-vue3";
import '../css/app.css'
createInertiaApp({
  resolve: (name) => require(`./pages/${name}`),
  setup({ el, App, props, plugin }) {
    createApp({ render: () => h(App, props) })
      .use(plugin)
      .mount(el);
  },
});
The resolve function requires that the page component in ./resources/js/Pages/ be rendered according to the set name on the server side. In the setup function, we call createApp() to render the app with props and plugins.
To get server-side rendering working, we’ll install a few dependencies:
npm install -D @vue/server-renderer @inertiajs/server
Then, we have to add an additional script entry point specific to SSR in a new file, as shown below:
./resources/js/ssr.js
// ./resources/js/ssr.js
import { createSSRApp, h } from "vue";
import { renderToString } from "@vue/server-renderer";
import { createInertiaApp } from "@inertiajs/inertia-vue3";
export default function render(page) {
  return createInertiaApp({
    page,
    render: renderToString,
    resolve: (name) => require(`./Pages/${name}`),
    setup({ app, props, plugin }) {
      return createSSRApp({
        render: () => h(app, props),
      }).use(plugin);
    },
  });
}
We’ll also enable the Vue loader in ./webpack.ssr.config.js:
// ./webpack.ssr.config.js
/*
|--------------------------------------------------------------------------
| Enable Vue loader
|--------------------------------------------------------------------------
|
| Uncomment the following lines of code to enable support for vue. Also make
| sure to install the required dependencies.
|
*/
Encore.enableVueLoader(() => {}, {
  version: 3,
  runtimeCompilerBuild: false,
  useJsx: false,
})
Setting up routes is pretty straightforward. To set up routing within our Inertia and Vue app, we’ll register routes and use inertia.render() to render them. In this section, we’ll see how we can create the homepage component and set up the route in a routes.ts file. We’ll also see how we can pass props to our route.
/Let’s create a new route for / by creating a ./resources/js/Pages/Home.vue page:
<!-- ./resources/js/Pages/Home.vue -->
<template>
  <section>
    <header>
      <h1>Home</h1>
      <p>Home page</p>
    </header>
  </section>
</template>
Now that we have a component for Home, we can register the route in ./start/routes.ts:
// ./start/routes.ts
import Route from '@ioc:Adonis/Core/Route'
Route.get('/', async ({ inertia }) => {
  return inertia.render('Home')
})
We can also pass props to our component from the ./start/routes.ts routes file, as shown below:
// ./start/routes.ts
// ...
Route.get("/", async ({ inertia }) => {
  return inertia.render("Home", {
    title: "Home",
    message: "Hello World",
  });
});
Then, in ./resources/js/Pages/Home.vue, add the following code:
<!-- ./resources/js/Pages/Home.vue -->
<script>
export default {
  props: {
    // Define props here
    title: String,
    message: String,
  },
};
</script>
<template>
  <section>
    <header>
      <h1>{{ title }}</h1>
      <p>{{ message }}</p>
    </header>
  </section>
</template>
Start the application by running npm run dev and start the SSR server by running node ace ssr:watch in a new terminal. We should have something like this:
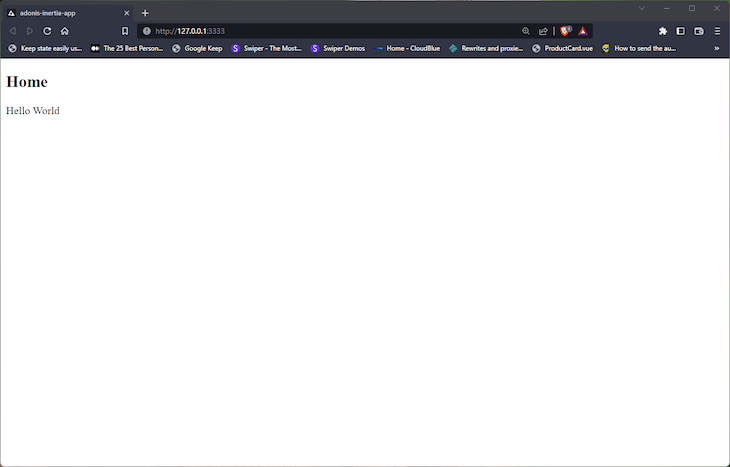
Awesome!
To set up Tailwind CSS in our application, we have to install the following packages:
npm i -D postcss-loader tailwindcss
Next, we generate the configuration file with the command below:
npx tailwindcss init
This generates a ./tailwind.config.js file to specify the files for Tailwind CSS to scan and apply Tailwind cases and support tree-shaking. In the ./tailwind.config.js file, add the following code:
// ./tailwind.config.js
/** @type {import('tailwindcss').Config} */
module.exports = {
  content: ["./resources/**/*.{edge,js,ts,vue,jsx,tsx}"],
  theme: {
    extend: {},
  },
  plugins: [],
};
Now, we’ll configure the PostCSS. First, enable the PostCSSLoader in ./webpack.config.js:
//./webpack.config.js
/*
|--------------------------------------------------------------------------
| CSS loaders
|--------------------------------------------------------------------------
|
| Uncomment one of the following line of code to enable support for
| PostCSS or CSS.
|
*/
Encore.enablePostCssLoader()
Next, we’ll create a ./postcss.config.js file to call the Tailwind CSS plugin:
// ./postcss.config.js
module.exports = {
  plugins: [
    require('tailwindcss')()
  ]
}
Finally, we’ll add Tailwind directives to ./resources/css/app.css:
/* ./resources/css/app.css */
@tailwind base;
@tailwind components;
@tailwind utilities;
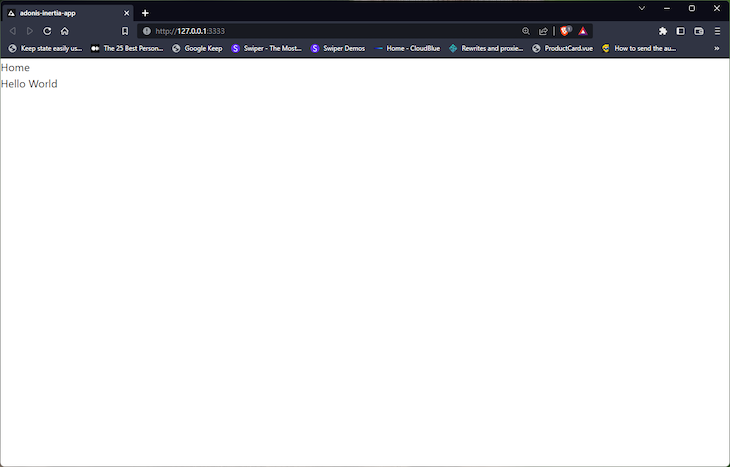
Now, when we restart our dev server, we should see that all default styles have been reset with Tailwind CSS styles:
We can create and add components to our application like a regular Vue application. Now, let’s make the SiteNav and SiteHeader components.
SiteNav and SiteHeader componentsCreate a new file ./resources/js/components/SiteNav.vue, as shown below:
→- ./resources/js/components/SiteNav.vue -->
<template>
  <nav class="site-nav">
    <div class="wrapper">
      <ul class="links">
        <li class="link">
          <Link href="/login">Login</Link>
        </li>
        <li class="link">
          <Link href="/register">Register</Link>
        </li>
      </ul>
    </div>
  </nav>
</template>
<script setup>
import { Link } from "@inertiajs/inertia-vue3";
</script>
<style scoped>
.site-nav .links {
  @apply flex gap-2;
}
.links .link {
  @apply text-gray-600;
}
</style>
In the code above, we’re using the Inertia Link component to link between routes.
SiteHeader componentNow, to create the SiteHeader component, create a new file called ./resources/js/components/SiteHeader.vue:
<!-- ./resources/js/components/SiteHeader.vue -->
<template>
  <header class="site-header">
    <div class="wrapper">
      <figure class="site-logo">
        <span class="font-bold text-2xl">My site</span>
      </figure>
      <slot />
    </div>
  </header>
</template>
<style scoped>
.site-header {
  @apply sticky top-0 left-0 w-full p-4;
}
.site-header > .wrapper {
  @apply flex justify-between items-center p-4 py-2 bg-white max-w-6xl m-auto rounded-lg shadow-md;
}
</style>
Here, we created a header element with a .site-logo element for the site logo and positioned it at the top of the page with some basic styles.
We can make our components globally accessible by registering them in our ./resources/js/app.js. This makes it so we don’t have to import them into every file. Add the following code to your ./resources/js/app.js folder:
// ./resources/js/app.js
import { createApp, h } from "vue";
import { createInertiaApp } from "@inertiajs/inertia-vue3";
import DefaultLayout from "./layouts/Default.vue";
import SiteNav from "./components/SiteNav.vue";
import SiteHeader from "./components/SiteHeader.vue";
import "../css/app.css";
createInertiaApp({
  resolve: (name) => {
    const page = require(`./pages/${name}`).default;
    // If the page doesn't have a layout, use the default layout.
    if (!page.layout) {
      page.layout = DefaultLayout;
    }
    return page;
  },
  setup({ el, App, props, plugin }) {
    createApp({ render: () => h(App, props) })
      .use(plugin)
      .component("site-nav", SiteNav)
      .component("site-header", SiteHeader)
      .mount(el);
  },
});
Here, we imported the SiteHeader and SiteNav components and registered them in the component method. In the next section, we’ll add these components to our layouts.
First, we create a default layout file by adding the following code to our ./resources/js/layouts/Default.vue file:
<!-- ./resources/js/layouts/Default.vue -->
<template>
  <main>
    <site-header>
      <site-nav />
    </site-header>
    <slot />
  </main>
</template>
Here, we have <slot /> to render the views for the routed page.
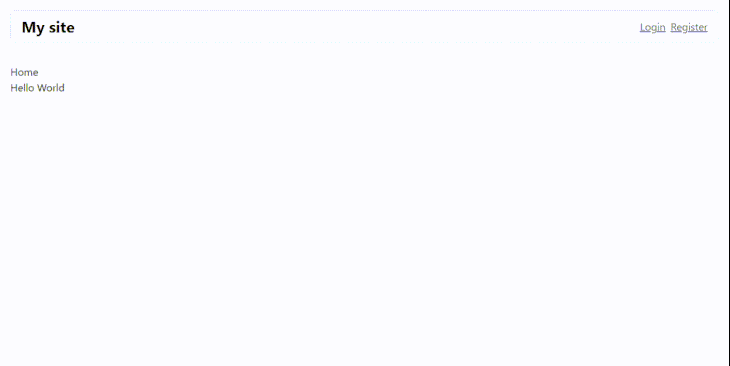
DefaultLayoutIn our ./resources/js/app.js we’ll import the layout we just created and add it to the layout property of the page to be rendered:
// ./resources/js/app.js
import { createApp, h } from "vue";
import { createInertiaApp } from "@inertiajs/inertia-vue3";
import DefaultLayout from "./layouts/Default.vue";
import "../css/app.css";
createInertiaApp({
  resolve: (name) => {
    const page = require(`./pages/${name}`).default;
    // If the page doesn't have a layout, use the default layout.
    if (!page.layout) {
      page.layout = DefaultLayout;
    }
    return page;
  },
  setup({ el, App, props, plugin }) {
    createApp({ render: () => h(App, props) })
      .use(plugin)
      .mount(el);
  },
});
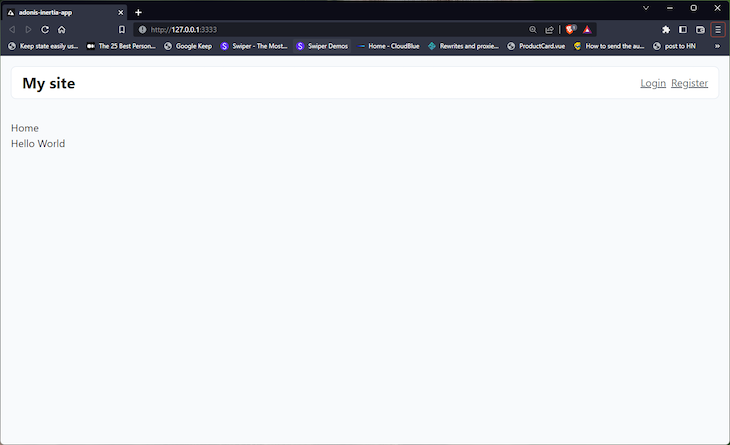
With this, every page will be rendered with this layout. Here’s what our homepage will look like now:
To define layouts for each page, we’ll assign the layout component to the layout property in the page file. For example, if we create a new layout in ./resources/js/layouts/AppLayout.vue, we can add the <site-header /> component to be displayed on every route, and the <slot> element will render the content for the current route. Here’s what that should look like:
<!-- ./resources/js/layouts/AppLayout.vue -->
<template>
  <main>
    <site-header />
    <section class="auth-section">
      <header class="auth-header">
        <h1 class="font-bold text-3xl">
          Get started
        </h1>
      </header>
      <div class="wrapper">
        <slot />
      </div>
    </section>
  </main>
</template>
<style scoped>
.auth-section > .auth-header {
  @apply pt-6 max-w-4xl m-auto;
}
.auth-section > .wrapper{
  @apply py-6 max-w-4xl m-auto;
}
</style>
Next, we can create a Login page with a simple form in ./resources/js/pages/Login.vue:
<!-- ./resources/js/pages/Login.vue -->
<template>
  <div class="form-cont">
    <form class="auth-form">
      <div class="wrapper">
        <div class="form-control">
          <label for="email">Email</label>
          <input type="email" id="email" class="form-input" />
        </div>
        <div class="form-control">
          <label for="password">Password</label>
          <input type="password" id="password" class="form-input" />
        </div>
        <div class="action-cont">
          <button type="submit" class="cta">Login</button>
        </div>
        <span> Or <Link class="link" href="/register">Register</Link> </span>
      </div>
    </form>
  </div>
</template>
<script>
import { Link } from "@inertiajs/inertia-vue3";
import AuthLayout from "../layouts/Auth.vue";
export default {
  layout: AuthLayout,
  components: {
    Link,
  },
};
</script>
<style scoped>
.auth-form {
  @apply relative p-6 bg-white border border-slate-200 rounded-lg;
}
.auth-form > .wrapper {
  @apply flex flex-col gap-4;
}
</style>
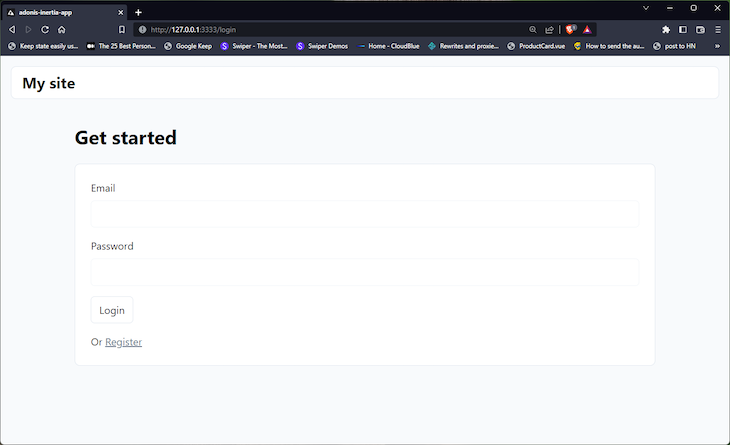
Here, you can see that we defined the Layout for this page by importing and defining it in the layout property. Now, we can add this page to our routes in ./start/routes.ts:
// ./start/routes.ts
import Route from "@ioc:Adonis/Core/Route";
Route.get("/", async ({ inertia }) => {
  return inertia.render("Home", {
    title: "Home",
    message: "Hello World",
  });
});
Route.get("/login", async ({ inertia }) => {
  return inertia.render("Login", {
    title: "Login",
  });
});
With that, we should have something like this:
In the next section, we’ll see how we can use Inertia.js forms in our application.
Inertia supports processing form submissions that use asynchronous HTTP requests. This allows us to use the response to update our page accordingly. This response is Inertia.js form helper, which makes it easier to manage forms and perform common form-related tasks in an Inertia.js application. Let’s go over the basic steps of using the Inertia.js form helper to manage forms in our application.
FormInput componentTo create the FormInput component, create a new ./resources/js/components/FormInput.vue file:
<!-- ./resources/js/components/FormInput.vue -->
<template>
  <div class="form-control">
    <label v-if="label" for="password">{{ label }}</label>
    <input
      :type="type"
      v-model="inputVal"
      :placeholder="placeholder"
      class="form-input"
    />
  </div>
</template>
<script setup>
import { computed } from "vue";
const props = defineProps({
  type: {
    type: String,
    default: "text",
  },
  label: String,
  placeholder: String,
  modelValue: String,
});
const emit = defineEmits(["update:modelValue"]);
const inputVal = computed({
  get() {
    return props.modelValue;
  },
  set(value) {
    emit("update:modelValue", value);
  },
});
</script>
Next, we’ll use this component in our auth pages. Now, let’s create a new Register page.
Register pageTo create a Register page, create a new ./resources/js/pages/Register.vue file, as shown below:
<!-- ./resources/js/pages/Register.vue -->
<template>
  <div class="form-cont">
    <form @submit.prevent="form.post('/register')" class="auth-form">
      <div class="wrapper">
        <FormInput label="Email" type="email" v-model="form.email" />
        <FormInput label="Password" type="password" v-model="form.password" />
        <div class="action-cont">
          <button attr-type="submit" class="cta">Register</button>
        </div>
        <span> Or <Link class="link" href="/login">Login</Link> </span>
      </div>
    </form>
  </div>
</template>
<script>
import { Link } from "@inertiajs/inertia-vue3";
import FormInput from "../components/FormInput.vue";
import AuthLayout from "../layouts/Auth.vue";
import { useForm } from "@inertiajs/inertia-vue3";
export default {
  layout: AuthLayout,
  components: {
    Link,
    FormInput,
  },
  setup() {
    const form = useForm({
      email: "",
      password: "",
    });
    return {
      form,
    };
  },
};
</script>
This is pretty similar to what we had in our login page. Here, we’re using the new FormInput components we created earlier. We’re also using the useForm helper: import { useForm } from "@inertiajs/inertia-vue3", which we assign to the form in setup().
With this, we can send a POST request when the form is submitted using form.post():
<form @submit.prevent="form.post('/register')" class="auth-form">
RoutesNow, let’s update our Register GET and POST requests routes. To do this, enter the following into the ./start.routes.ts file:
// ./start/routes.ts
Route.get("/register", async ({ inertia }) => {
  return inertia.render("Register", {
    title: "Regsiter",
  });
});
Route.post("/register", async ({ request, response }) => {
  console.log({
    registerBody: request.body(),
  });
  return response.redirect("/");
});
Here in Route.post, we’ve logged out the request body and redirected them to the home route:
With that, we should have something like this in our console:

We can also do the same for the Login page. Let’s add our FormInput component to the Login in ./resources/js/pages/Login.vue:
<!-- ./resources/js/pages/Login.vue -->
<template>
  <div class="form-cont">
    <form @submit.prevent="form.post('/login')" class="auth-form">
      <div class="wrapper">
        <FormInput label="Email" type="email" v-model="form.email" />
        <FormInput label="Password" type="password" v-model="form.password" />
        <div class="action-cont">
          <button attr-type="submit" class="cta">Login</button>
        </div>
        <span> Or <Link class="link" href="/register">Register</Link> </span>
      </div>
    </form>
  </div>
</template>
<script>
import { Link } from "@inertiajs/inertia-vue3";
import FormInput from "../components/FormInput.vue";
import AuthLayout from "../layouts/Auth.vue";
import { useForm } from "@inertiajs/inertia-vue3";
export default {
  layout: AuthLayout,
  components: {
    Link,
    FormInput,
  },
  setup() {
    const form = useForm({
      email: "",
      password: "",
    });
    return {
      form,
    };
  },
};
</script>
Then in our ./start/routes.ts file, we can add the POST route:
// ./start/routes.ts
// ...
Route.post("/login", async ({ request, response }) => {
  console.log({
    registerBody: request.body(),
  });
  return response.redirect("/");
});
Now, we’ll have something similar to our register page:
This article covered getting started with AdonisJs, Inertia.js, and Vue.js. These great technologies can help developers create fast and performant web applications.
By following the steps outlined in this article, you can easily set up these technologies and start building your applications. With the ability to add server-side rendering, Tailwind CSS for styling, and the Inertia.js form helper for form submission, these technologies provide comprehensive solutions for building modern web applications.
Whether you are a seasoned developer or just getting started, AdonisJs, Inertia.js, and Vue.js are worth considering for your next project.
Debugging Vue.js applications can be difficult, especially when users experience issues that are difficult to reproduce. If you’re interested in monitoring and tracking Vue mutations and actions for all of your users in production, try LogRocket.

LogRocket lets you replay user sessions, eliminating guesswork by showing exactly what users experienced. It captures console logs, errors, network requests, and pixel-perfect DOM recordings — compatible with all frameworks.
With Galileo AI, you can instantly identify and explain user struggles with automated monitoring of your entire product experience.
Modernize how you debug your Vue apps — start monitoring for free.

Learn how to use Skybridge, an open-source React framework, to build and deploy cross-platform AI apps and interactive UI widgets for ChatGPT, Claude, and MCP clients from a single codebase.

Learn how to set up Meilisearch, index documents, and build keyword, semantic, and hybrid search with AI-powered retrieval.

Compare pnpm and npm across security defaults, disk usage, dependency strictness, and workspace policy to decide which package manager fits your project.

I migrated 20 production-style components from Tailwind to StyleX. Here’s what the data showed about LOC, CSS bundle size, build time, and type safety.
Would you be interested in joining LogRocket's developer community?
Join LogRocket’s Content Advisory Board. You’ll help inform the type of content we create and get access to exclusive meetups, social accreditation, and swag.
Sign up now

