In this tutorial, we’ll demonstrate how to build a full-stack DApp, test it on the Ropsten testnet, and deploy it with the Alchemy Web3 development platform. We’ll use Vite, React, and Tailwind CSS to build the DApp frontend and Solidity to create the backend.

Jump ahead:
To follow along with this article’s demo, you’ll need the following:
Additionally, it will be helpful to have the following VS Code extensions:
We’ll begin by creating a folder with the name of our intended project. Then, we’ll open the folder in VS Code. You may use the code editor of your choosing.
Now, we’ll create two folders, client and smart_contract, and then navigate to the client folder on the terminal.
We’ll create a scaffold for our React application using Vite. This aptly named build tool (Vite is French for quick) helps developers scaffold a web project quickly and easily.
Install Vite with npm, like so:
$ npm create vite@latest
Next, run the following command to initialize a scaffold for the project and allow the installation of create-vite@latest:
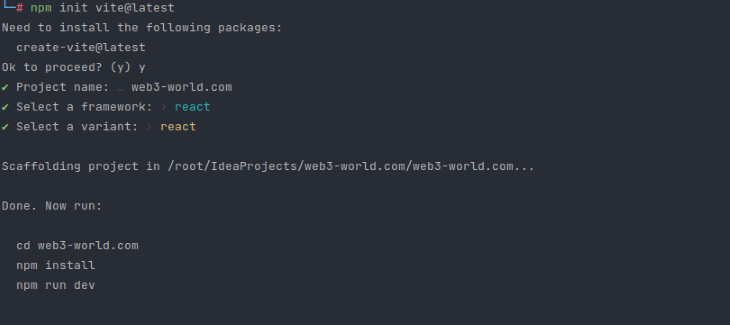
$ npm init vite@latest
When the scaffold creation is complete, you’ll see output in your terminal requesting project details.
Choose a project name and then a package name. This demo uses web3-world.com for both the project and package names.
Next, select React for both the framework and the variant.
You should see the following on the screen:
This creates the following files for the project:
index.htmlpackage.jsonsrc foldervite.config.jsNext, run the following commands:
$ npm install
$ npm run dev
This code will deploy the project as a React application accessible on the specified local network. If we Navigate to the port on localhost, we should see the following:

We can stop the terminal from hosting the server with the Ctrl + C command.
Next, we’ll navigate into the smart_contract directory and run the following:
$ npm init -y
This creates a package.json file for our smart_contract folder.
Now, we’ll use npm to install Tailwind CSS. We’ll add Tailwind to our React project with create-react-app. To do this, we’ll simply follow the four steps outlined in the Tailwind documentation.
Then, we’ll install Tailwind in the client folder, like so:
$ npm install -D tailwindcss postcss autoprefixer
$ npx tailwindcss init -p
After running these commands, we can confirm that two files were added to our project folder: a Tailwind CSS config file and a PostCSS config file.
Now, we’ll delete the contents of the project’s tailwind.config.js file and replace them with the contents from the tailwind.config file on the documentation page:
module.exports = {

 content: [

   "./src/**/*.{js,jsx,ts,tsx}",

 ],

 theme: {

   extend: {},

 },

 plugins: [],

}
Next, we’ll replace the contents of the copy of the project’s index.css file with the directives shown on the documentation page:
@tailwind base;
@tailwind components;
@tailwind utilities;
Now, let’s work on building our application’s frontend.
We’ll start by creating a new folder, called components, inside the src folder. There, we’ll create the dashboard components for our project:
Navigation_bar.jsxFooter.jsxLoader.jsxServices.jsxWelcome.jsxTransactions.jsxThese components will each contain the following code, replacing Component_name with their respective names:
const Component_name = () => {
    return (
    <h1>Component_name</h1>
    );
}

export default Component_name;
We’ll use the following code to create an index.js file to export all these components:
export { default as Loader } from './Loader';
export { default as Navbar } from './Navbar';
export { default as Footer } from './Footer';
export { default as Welcome } from './Welcome';
export { default as Services } from './Services';
export { default as Transactions } from './Transactions';
Next, we’ll focus on working on the client UI. We’ll primarily be dealing with these three files and folders for now:
index.css: contains our desired frontend stylingimages folder: this is located under the client folder and contains our desired imagescomponentsfolder: contains our dashboard elements, like the ones listed aboveNow, we’ll install the react-icons and ethers packages. The ethers package will make it possible for us to interact with the smart contract.
$ npm install react-icons ethers
If we run the application following installation, we should see the new changes.
Hardhat is an Ethereum development environment that is used to run Solidity code locally.
Run the following command in the smart_contracts folder to install Hardhat on your local machine:
npm install --save-dev hardhat @nomiclabs/hardhat-waffle ethereum-waffle chai @nomiclabs/hardhat-ethers ethers
This command installs the dependencies needed to use the Hardhat development ecosystem. You’ll notice that there are new folders and files in the codebase. To test that these are working perfectly, run this command:
npx hardhat test
This should compile the Solidity source file now available in the contracts folder in the main project directory. It will deploy the Solidity file and test to see if it runs successfully.
To build the backend for our DApp, we’ll add our Solidity code to the contracts folder and delete the Greeter.sol file.
Next, we’ll create a Transactions.sol file and input the following code:
// SPDX-License-Identifier: UNLICENSED
pragma solidity ^0.8.0;

// contract name is conventionally the same as file name
contract Transactions {
    //transactionCounter holds the number of our transactions
    uint256 transactionCounter;
    // we  will call the event later on
    event Transfer(address from, address receiver, uint amount, string message, uint256 timestamp, string keyword);

    // struct will hold all above object properties
    struct TransferStructure {
        address sender;
        address receiver;
        uint amount;
        string message;
        uint256 timestamp;
        string keyword;
    }

    // create an array to store transactions with above objects as fields
    TransferStructure[] transactions;

    function addToBlockchain(address payable receiver, uint amount, string memory message, string memory keyword) public {
        transactionCounter += 1;
        transactions.push(TransferStructure(msg.sender, receiver, amount, message, block.timestamp, keyword));

        emit Transfer(msg.sender, receiver, amount, message, block.timestamp, keyword);
    }

    function getAllTransactions() public view returns (TransferStructure[] memory) {
        return transactions;
    }

    function getTransactionCount() public view returns (uint256) {
        return transactionCounter;
    }
}
At this point, the entire backend is complete!
Now, we can move on to testing and then deployment. In the scripts folder, there is a sample-script.js that we can convert to a deploy-script.js script.
We’ll use the following for the content of the deploy-script.js script:
const main = async () => {

  // We get the contract to deploy
  const Transactions = await hre.ethers.getContractFactory("Transactions");
  const transactions = await Transactions.deploy();

  await transactions.deployed();

  console.log("Transactions deployed to:", transactions.address);
}

const runMain = async () => {
  try {
    await main();
    process.exit(0);
  } catch (error) {
    console.error(error);
    process.exit(1);
  }
}

runMain();
You should have a project structure similar to this:

The project build is now complete and the deployment script is ready for execution. However, deploying smart contracts on the Ethereum blockchain warrants the use of a computational resource called gas. Gas must be purchased with ether, and the price can fluctuate. Depending on the power of the smart contract, the price could be a little or it could be a lot.
Fortunately, Ethereum allows the use of test ether (fake ether) that can be used to test smart contracts on test networks. To take advantage of this, we’ll create an Ethereum wallet with MetaMask. Then, we’ll request test ether for our deployment.
After creating, or logging into, your Ethereum wallet on metamask.io, go to Show Test Networks under Settings and select Ropsten Account. Next, copy the Ropsten address and navigate to faucet.egorfine.com to get the testnet faucet.
Once you receive the test eth to your address, we’ll move on to deployment.
We’ll deploy our smart contract with the Alchemy Web3 development platform.
From alchemy.com, we’ll click on Get started for free and register for an account. Next, we’ll select the Ethereum + L2 option and then click Get Started.
This will bring us to a dashboard where we can specify the requested credentials:
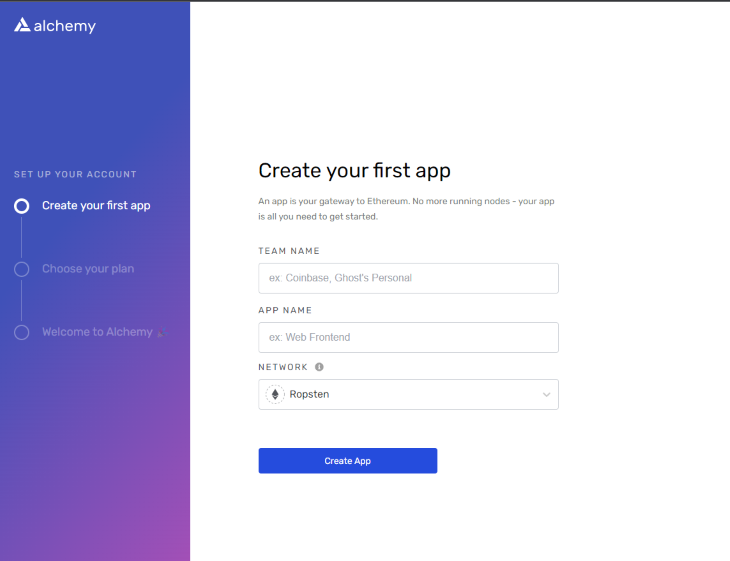
From the dashboard Network dropdown, we’ll select Ropsten. if you prefer, you can select the Kovan or Rinkeby networks instead; both permit requests for test eth.
Next, we’ll be asked to choose a plan for deployment. Because this is a demo, we’ll select the FREE FOREVER plan at $0, Skip For Now for payment details and Capped Capacity for scaling policy. Next, click Continue.
In the dashboard, we’ll click the +Create App button. Then, we’ll add a description for the app. We’re deploying on the Ropsten test network now, but we can deploy this same contract on the Mainnet (using main eth) later.
Click the View Key button and copy the HTTP key. Now, we’ll go back to our coding environment and paste the key in the hardhat.config.js file in the smart_contract folder of our codebase.
We’ll format the file to contain the following code:
require("@nomiclabs/hardhat-waffle");

module.exports = {
  solidity: "0.8.0",
  networks: {
    ropsten: {
      url: 'https://eth-ropsten.alchemyapi.io/v2/HwDxJjZs10sSafsRoYKKqQ0Db1Yaexhv',
      accounts: '0xPrivateKeyToYourAccount' // replace with your private key
    }
  }
};
To deploy the entire contract, we’ll navigate to our smart_contract folder in the terminal and run the following command:
npx hardhat run scripts/deploy.js --network ropsten
This will compile the code and deploy it to a contract address. That contract address will be specified in the terminal, and a new Transactions.json file will be created in the contracts folder.
Next, we’ll make a utils folder and then create the following files in it:
constants.jsTransactions.json, containing the contents of Transactions.json in the contracts folderdummyData.js, for example)We’ll import the Application Binary Interface (ABI) from the Transactions.json file into the constants.js file, like so:
import abi from "./Transactions.json";

export const contractAddress = "0xTheGeneratedContractAddress";
export const contractABI = abi.abi;
A context folder in the client/src directory will need to be connected to the blockchain. Inside the folder, we’ll write a TransactionContext.jsx file that will import the following:
import React, { useEffect, useState } from "react";
import { ethers } from "ethers";
import { contractABI, contractAddress } from "../utils/constants";

export const TransactionContext = React.createContext();
It will also contain the Ethereum window object that will allow us manage the connection to the Ethereum blockchain.:
const { ethereum } = window;
That’s it! We’ve built, tested, and deployed our DApp!
In this tutorial, we demonstrated a step-by-step process for building a full-stack DApp that could serve as an NFT marketplace or an exchange platform for trading Ethereum. We showed how to structure a full-stack DApp project and detailed the requirements and process for building, testing, and deploying a Solidity smart contract.
I hope you enjoyed this tutorial. To further enhance your Web3 development skills, try building this project by yourself using this article as a guide.
Client-side issues that impact users’ ability to activate and transact in your apps can drastically affect your bottom line. If you’re interested in monitoring UX issues, automatically surfacing JavaScript errors, and tracking slow network requests and component load time, try LogRocket.

LogRocket lets you replay user sessions, eliminating guesswork around why bugs happen by showing exactly what users experienced. It captures console logs, errors, network requests, and pixel-perfect DOM recordings — compatible with all frameworks.
LogRocket's Galileo AI watches sessions for you, instantly identifying and explaining user struggles with automated monitoring of your entire product experience.
Modernize how you debug web and mobile apps — start monitoring for free.
Install LogRocket via npm or script tag. LogRocket.init() must be called client-side, not
server-side
$ npm i --save logrocket

// Code:

import LogRocket from 'logrocket';
LogRocket.init('app/id');
// Add to your HTML:

<script src="https://cdn.lr-ingest.com/LogRocket.min.js"></script>
<script>window.LogRocket && window.LogRocket.init('app/id');</script>

Learn how to protect full-stack projects from NPM supply chain attacks with a practical security checklist.

Explore 15 essential MCP servers for web developers to enhance AI workflows with tools, data, and automation.

Learn how contrast-color() automatically picks accessible text colors using native CSS, without JavaScript.

Learn how to build a harness-style AI workflow using Claude Code with specialized Dev, QE, and Ops subagents, gated handoffs, MCP telemetry, and LEARNING.md.
Hey there, want to help make our blog better?
Join LogRocket’s Content Advisory Board. You’ll help inform the type of content we create and get access to exclusive meetups, social accreditation, and swag.
Sign up now

