There is always a transfer of data within a class or across multiple classes in any typical application, including Flutter apps. A class or function generates data to consume, either within itself or by another class or function. Data is most likely passed from one widget to another through the constructor.

Sometimes, you may have to pass data across several layers of widgets before it finally gets to its destination widget. In such instances, the layers of widgets in between do not need this data, but rather serve as tools to transfer the data to the widget that needs it.
This is a very inefficient technique of managing data within your application, especially on a large scale. It leads to a large amount of boilerplate code and could lead to a performance lapse on your application.
This article will explore Flutter application state management and some of its techniques. We’ll also dive into how we can efficiently manage data in our Flutter application using Redux.
Redux is a state management architecture library that successfully distributes data across widgets in a repetitive manner. It manages the state of an application through a unidirectional flow of data. Let’s explore the diagram below:
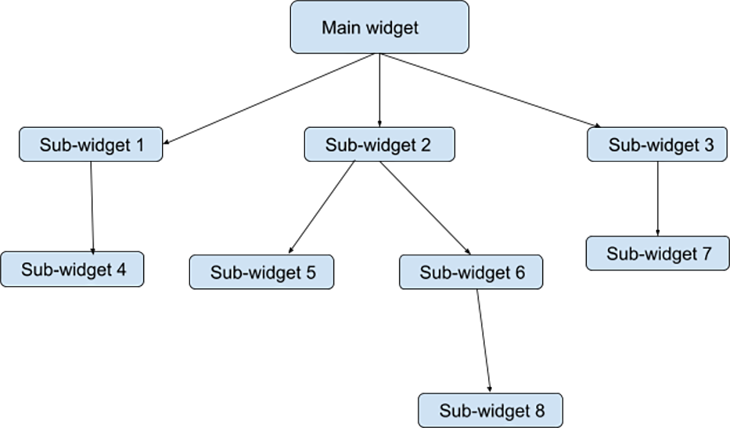
In this example, data generated in the main widget is needed in sub-widget 8. Ordinarily, this data passes through sub-widget 2 to sub-widget 6 and then, finally, it reaches sub-widget 8. This is also the case for widgets that need data generated or saved in the state of any widget that’s higher up in the hierarchy.
With Redux, you can structure your application so that the state is extracted in a centrally-located store. The data in this centralized store can be accessed by any widget that requires the data, without needing to pass through a chain of other widgets in the tree.
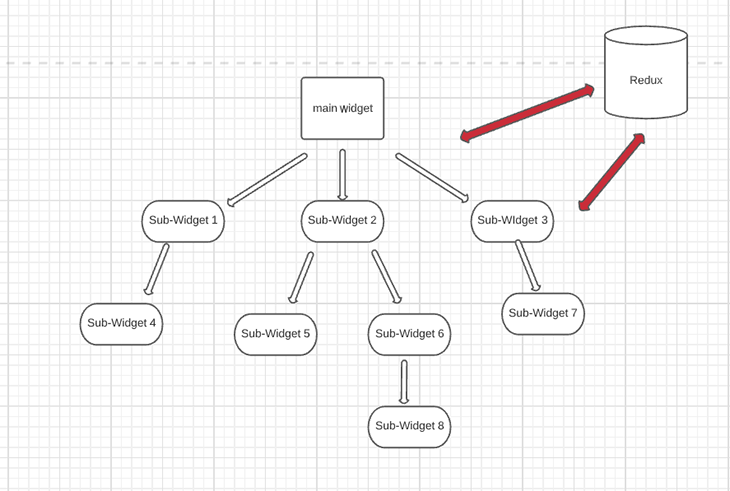
Any widget that needs to add, modify, or retrieve the data in a state managed by the Redux store would have to request it with the appropriate arguments.
Likewise, for every change made to the state, the dependent widgets respond to the change either through the user interface or any other configured means.
In a medium or large-scale application with many widgets, when a child widget needs data, it is common to manage the data from the main.dart file.
This data could be distributed through the constructors of widgets as arguments until the data gets to the recipient widget, but as we discussed in the intro, this could lead to a long chain of data transfer through widgets that don’t need this data.
Not only can it be cumbersome and difficult to pass data through the constructors, it can also affect the performance of an application. This is because when you manage data from the main widget — or any root widget — the entire widget tree rebuilds whenever a change occurs in any of its child widgets. You only want to run the build method in the widget that requires the changed data.
There should be only one store of information across your application. This not only helps with debugging, but each time data changes within your application, you are more easily able to detect where and why it has changed.
The state of your application should be immutable and accessed only by reading it. Part of this means that if you want to change a value inside a state, you have to completely replace the state with a new state that contains your new values.
This helps to secure the store and allow a change in state only by actions. It also enables transparency within the application because you can always detect the cause of changes to the state and the objects responsible for these changes.
Changes to the state should occur only by functions. These functions, known as reducers, are the only entities allowed to make changes to the state of your application.
@immutable
class AppState{
  final value;
  AppState(this.value);
}

enum Actions {Add, Subtract};

AppState reducer(AppState previousState, action){
  if(action == Actions.Add){
    return new AppState(previousState.value +  1);
  }
  if(action == Actions.Subtract){
    return new AppState(previousState.value -  1);
  }
  return previousState;
}
In the code above, AppState is an immutable class that holds the state of the value variable.
The actions permitted in the state are Add and Subtract.
Modifications to the state are done through the reducer function, which receives the state, and the action carried out on the state.
This is the central location within which the application state exists. The store holds information about the whole application state or any other, single state at every given time.
final Store<AppState> store = Store<AppState>(
reducer, initialState: AppState.initialState()
);
reducer is a function that updates the store with a new state. It receives the state and the action as arguments and updates the state based on the action.
Recall that the state is immutable and is updated by creating a new state. The reducer is the only way this update can be made to the state.
Flutter uses inherited widgets to manipulate the store. Some of these inherited widgets are:
StoreProvider: this widget injects the store into the widget tree of the application
class MyApp extends StatelessWidget {

 @override
 Widget build(BuildContext context) {

     ...

   return StoreProvider<AppState>(
     store: store,
     child: MaterialApp(
       title: 'Flutter Demo',
       theme: ThemeData.dark(),
       home: StoreBuilder<AppState>(
        ...
       ),

     ),
   );
 }
}
StoreBuilder: this listens to the whole store and rebuilds the entire widget tree with every update; it receives the store from the StoreProvider and StoreConnector
@override
 Widget build(BuildContext context) {

  ...

   return StoreProvider<AppState>(
     store: store,
     child: MaterialApp(
       title: 'Flutter Demo',
       theme: ThemeData.dark(),
       home: StoreBuilder<AppState>(
           onInit: (store) => store.dispatch(Action()),
         builder: (BuildContext context, Store<AppState> store) => MyHomePage(store),
       ),

     ),
   );
 }
StoreConnector: this is a widget used in place of the StoreBuilder. It receives the store from StoreProvider, reads data from our store, then sends it to its builder function. Then, the builder function rebuilds the widget whenever that data changes
class MyHomePage extends StatelessWidget{
 final Store<AppState> store;

 MyHomePage(this.store);

 @override
 Widget build(BuildContext context){

   return Scaffold(
     appBar: AppBar(
       title: Text('Redux Items'),
     ),
     body: StoreConnector<AppState, Model>(
       builder: (BuildContext context, Model model) {
   ...
  }
 }
}
Usually, when a state is stored, there are widgets and sub-widgets around the application that monitor this state and its current values. An action is the object that determines what event is performed on the state.
Following the event performed on this state, these widgets that are tracking the data in the state rebuild and the data they render are updated to the current values in the state. Actions include any event passed on to the store to update the app state.
When any widget wants to make a change to the state using an action, it uses the dispatch method of the store to communicate to the state about this action — the store invokes the action.
final Store<AppState> store = Store<AppState>(
reducer, initialState: AppState.initialState()
);


store.dispatch(Action());
Updates made to the state reflect on the UI — each time the state updates, it triggers the logic that rebuilds the UI within the StoreConnector widget, which rebuilds the widget tree with every change in the state.
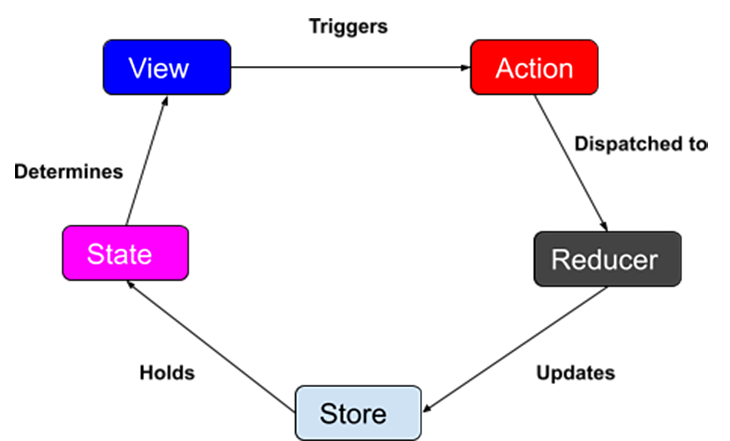
Let’s say there is a pop-up on the screen that requires a user response in the form of clicking or tapping a button. We’ll regard this pop-up as the View in our diagram above.
The effect of clicking the button is the Action. This action is wrapped and sent to the Reducer, which processes the action and updates the data in the Store. The store then holds the State of the application, and the state detects this change in the value of the data.
Since the data rendered on your screen is managed by the state, this change in data is reflected in the View and the cycle continues.
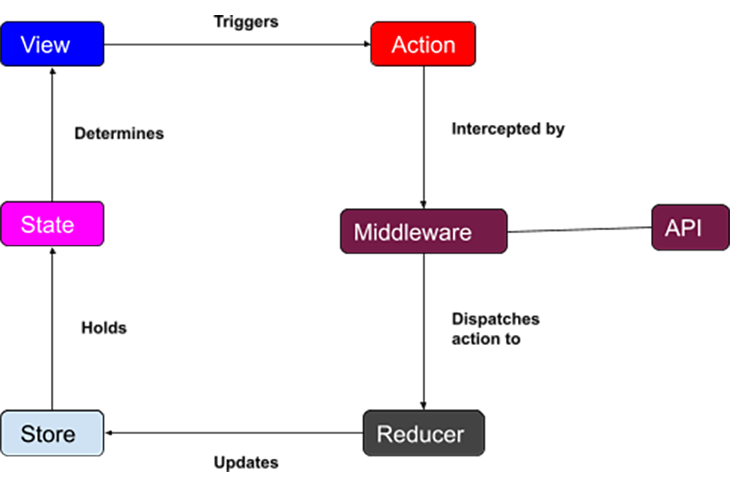
Middleware is a Redux component that processes an action before the reducer function receives it. It receives the state of the application and the dispatched action, then performs customized behaviors with the action.
Let’s say you want to perform an asynchronous operation, such as loading data from an external API. Middleware intercepts the action, then conducts the asynchronous tasks and logs any side effects that may have occurred or any other custom behavior displayed.
This is what a Redux flow looks like with the middleware:
Let’s put everything we’ve learned so far and build a basic application that implements Redux in Flutter.
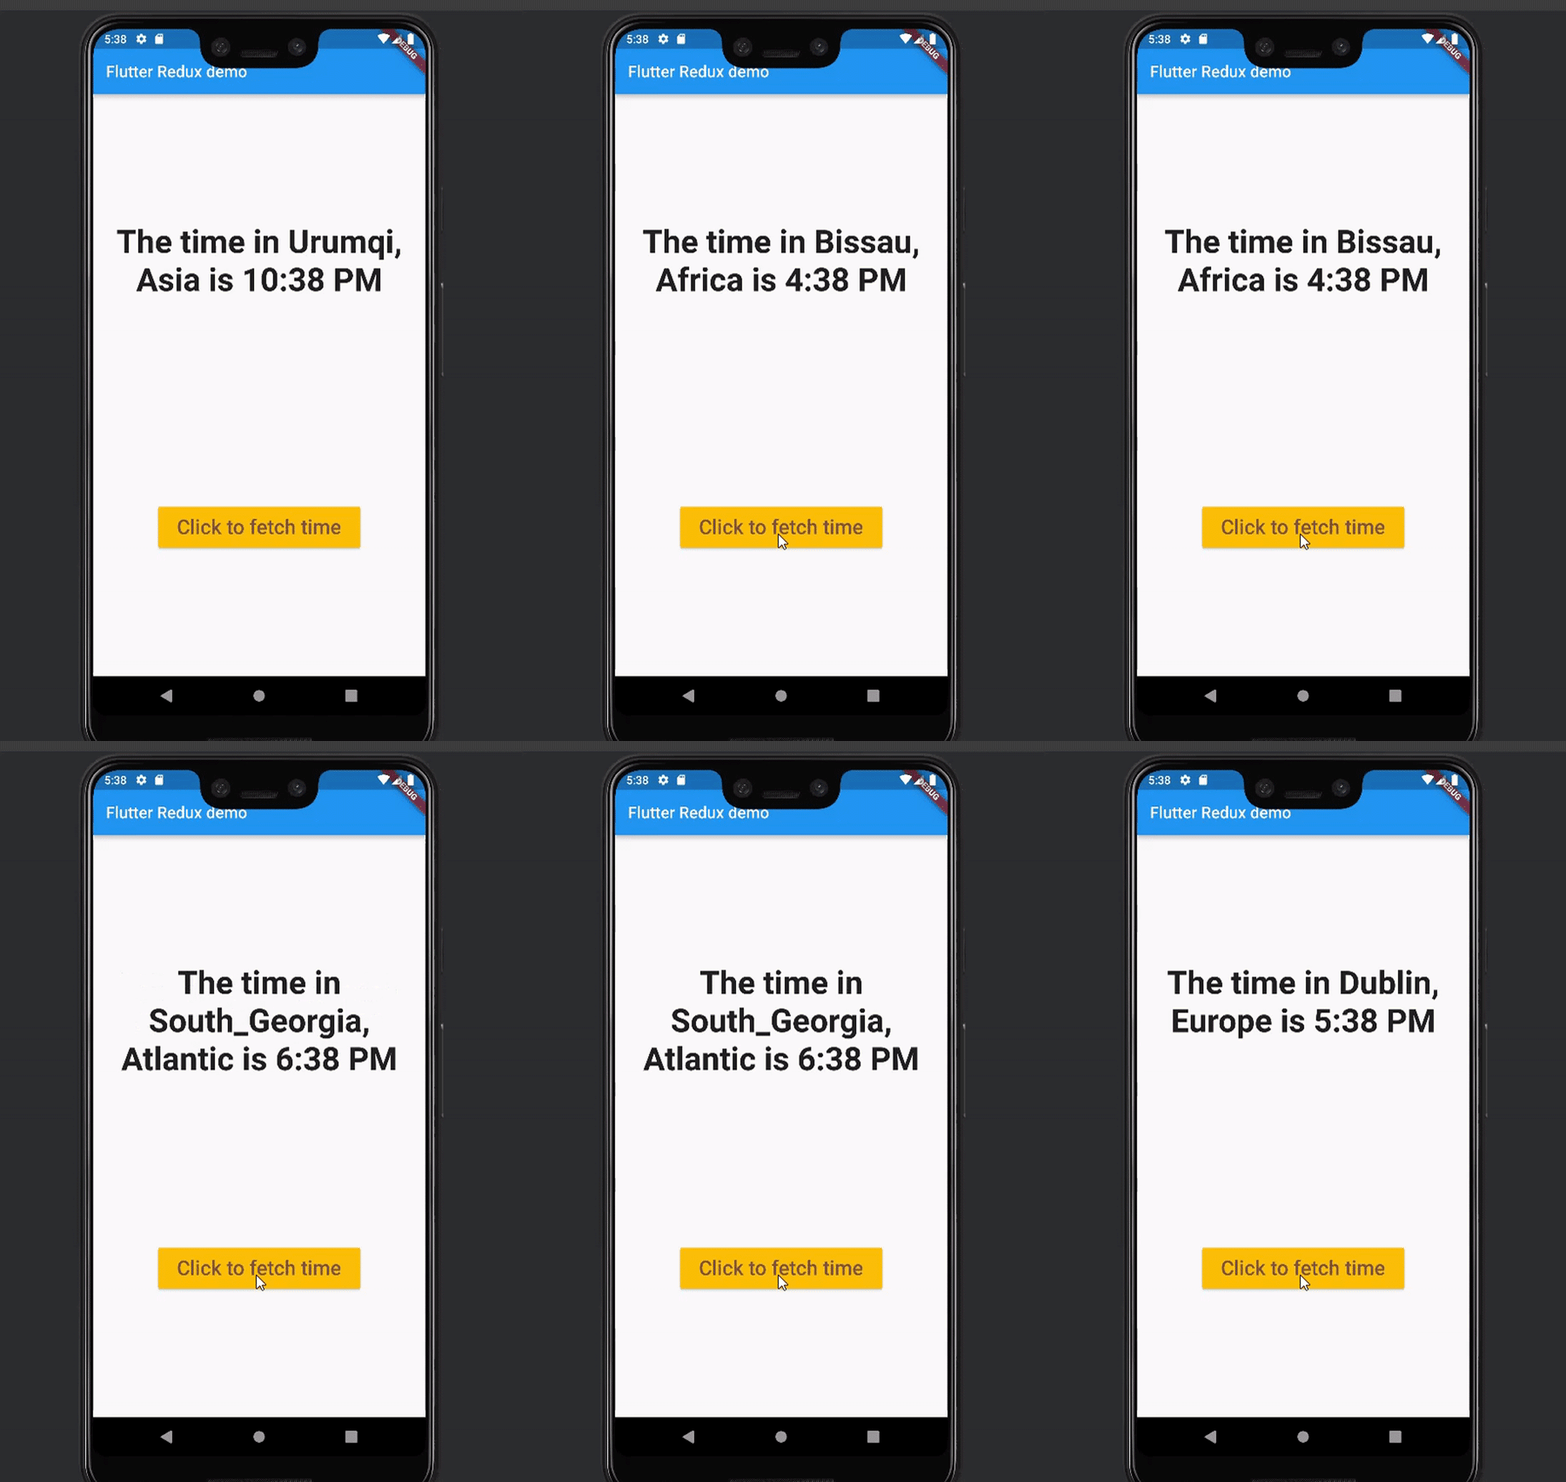
Our demo application will contain an interface with a button that fetches the current time of a location on every click. The application sends a request to the World Time API to fetch the time and location data needed to enable this feature.
Run the command on your terminal:
flutter create time_app
Add the following dependencies to your pubspec.yaml file, then run flutter pub get.
reducer functionStoreProviderStoreBuilderStoreConnectorNext, add the following code for AppState:
class AppState {
  final String _location;
  final String _time;

  String get location => _location;
  String get time => _time;

  AppState(this._location, this._time);

  AppState.initialState() : _location = "", _time = "00:00";

}
The app state here has fields to display the location and time. The fields are initially set to empty values. We have also provided a getter method for each field to retrieve their respective values.
Next, we’ll write our action class, FetchTimeAction:
class FetchTimeAction {
  final String _location;
  final String _time;

  String get location => _location;
  String get time => _time;

  FetchTimeAction(this._location, this._time);
}
The action class also has the same fields as the AppState. We will use the values in the fields to update the state when this action is called.
Now we’ll write the AppState reducer function:
AppState reducer(AppState prev, dynamic action) {
  if (action is FetchTimeAction) {
    return AppState(action.location, action.time);
  } else {
    return prev;
  }
}
The reducer function receives the state and the action. If the action is a FetchTimeAction, it returns a new state using the values in the action fields. Otherwise, it returns to the previous state.
The code for the middleware is as follows:
ThunkAction<AppState> fetchTime = (Store<AppState> store) async {

  List<dynamic> locations;

  try {
    Response response = await get(
        Uri.parse('http://worldtimeapi.org/api/timezone/'));
    locations = jsonDecode(response.body);
  }catch(e){
    print('caught error: $e');
    return;
  }

  String time;
  String location = locations[Random().nextInt(locations.length)] as String;
  try {
    Response response = await get(
        Uri.parse('http://worldtimeapi.org/api/timezone/$location'));
    Map data = jsonDecode(response.body);

    String dateTime = data['datetime'];
    String offset = data['utc_offset'].substring(1, 3);

    DateTime date = DateTime.parse(dateTime);
    date = date.add(Duration(hours: int.parse(offset)));
    time = DateFormat.jm().format(date);
  }catch(e){
    print('caught error: $e');
    time = "could not fetch time data";
    return;
  }

  List<String> val = location.split("/");
  location = "${val[1]}, ${val[0]}";

  store.dispatch(FetchTimeAction(location, time));

};
fetchTime is an asynchronous function that receives the store as its only argument. In this function, we make an asynchronous request to the API to fetch the list of locations available.
Then we used the Dart Random() function to select a random location in the list and make another asynchronous request to fetch the time for the selected location. We also formatted the date and location values received from the API to suit our application.
Finally, we dispatched a FetchTimeAction to the store so we could update the new state.
Now, let’s build the rest of our app:
import 'package:flutter/material.dart';
import 'package:redux/redux.dart';
import 'package:flutter_redux/flutter_redux.dart';
import 'package:redux_thunk/redux_thunk.dart';
import 'package:time_app/reducer.dart';

import 'app_state.dart';
import 'middleware.dart';

void main() => runApp(MyApp());

typedef FetchTime = void Function();

class MyApp extends StatelessWidget {

  final store = Store(reducer,
      initialState: AppState.initialState(),
      middleware: [thunkMiddleware]);


// root widget
  @override
  Widget build(BuildContext context) {
    return StoreProvider(
      store: store,
      child: MaterialApp(
        title: 'Flutter Redux Demo',
        theme: ThemeData(
          primarySwatch: Colors.blue,
        ),
        home: MyHomePage(),
      ),
    );
  }
}

class MyHomePage extends StatefulWidget {


  @override
  _MyHomePageState createState() => _MyHomePageState();
}

class _MyHomePageState extends State {

  @override
  Widget build(BuildContext context) {
    return Scaffold(
      appBar: AppBar(
        title:   const Text("Flutter Redux demo"),
      ),
      body:   Center(
        child:   Container(
          height: 400.0,
          child: Column(
            mainAxisAlignment: MainAxisAlignment.spaceBetween,
            children: [

              // display time and location
              StoreConnector<AppState, AppState>(
                converter: (store) => store.state,
                builder: (_, state) {
                  return  Text(
                    'The time in ${state.location} is ${state.time}',
                    textAlign: TextAlign.center,
                    style: const TextStyle(fontSize: 40.0, fontWeight: FontWeight.bold),
                  );
                },
              ),

              // fetch time button
              StoreConnector<AppState, FetchTime>(
                converter: (store) => () => store.dispatch(fetchTime),
                builder: (_, fetchTimeCallback) {
                  return   SizedBox(
                    width: 250,
                    height: 50,
                    child: ElevatedButton(
                      style: ButtonStyle(
                        backgroundColor: MaterialStateProperty.all(Colors.amber),
                        textStyle: MaterialStateProperty.all(
                          TextStyle(
                            color: Colors.brown,
                          ),
                        )
                      ),
                        onPressed: fetchTimeCallback,
                        child:   const Text(
                            "Click to fetch time",
                          style: TextStyle(
                            color: Colors.brown,
                            fontWeight: FontWeight.w600,
                            fontSize: 25
                          ),
                        )
                    ),
                  );
                },
              )
            ],
          ),
        ),
      ),
    );
  }
}
We begin by assigning an instance of the Store<AppState>. Then, we wrap the MaterialApp in StoreProvider<AppState>. This is because it is a base widget that will pass the given Redux store to all descendants that request it.
The Text widget that renders the location and time is one of the descendent widgets that depends on the store, so we wrap it in a StoreConnector to enable communication between the store and this widget.
The ElevatedButton widget is the second widget that depends on the store. We also wrap it in the StoreConnector. Every click triggers the middleware to run its function and thereby update the state of the application.
This is what our final app looks like:
In Flutter apps, or frontend applications in general, it’s key to manage your data and the user interface that reflects it.
Data is quite a broad term. It can refer to any value shown on your app and could range in significance from determining whether or not a user is logged in, or the result of any form of interaction generated by your app user.
When building your next application, I hope this article provides a comprehensive guide to how you can efficiently build it using the Flutter Redux architecture.
Would you be interested in joining LogRocket's developer community?
Join LogRocket’s Content Advisory Board. You’ll help inform the type of content we create and get access to exclusive meetups, social accreditation, and swag.
Sign up now
Not sure if low-code is right for your next project? This guide breaks down when to use it, when to avoid it, and how to make the right call.

Compare Firebase Studio, Lovable, and Replit for AI-powered app building. Find the best tool for your project needs.

Discover how to use Gemini CLI, Google’s new open-source AI agent that brings Gemini directly to your terminal.

This article explores several proven patterns for writing safer, cleaner, and more readable code in React and TypeScript.
8 Replies to "Flutter Redux: Complete tutorial with examples"
How to use streams in Redux?
Could you please share the full code for the Flutter project in this example? I’m having trouble putitng everything together…
Here you go https://github.com/olu-damilare/Time-app
this is really nice, thanks for sharing
There are bugs in this article.
1. where does the object FetchTime at StoreConnector come from, i use dynamic keyword instead.
2. can’t find ThunkAction at ThunkAction fetchTime = (Store store) {}, i use dynamic also.
without using the dynamic, the program will not run.
Hello,
1. Fetchtime is void function declared in the main.dart file. Please refer to the main.dart file in the tutorial and ensure that you have the content of the file in your code. The dynamic keyword will work because it is designed by the Dart team to accomodate values of any data type.
2. ThunkAction is included in the redux_thunk package. Confirm that you have redux_thunk dependency included in your pubspec.yaml file as:
dependencies:
redux_thunk: ^0.4.0
Then import the package in the middleware.dart file as:
import ‘package:redux_thunk/redux_thunk.dart’;
Ok, thank you.
ok, thank you.