Expo SDK 53 has been released, and it brings with it a wealth of new and improved updates for the React Native ecosystem. It is a significant leap forward for developers building cross-platform mobile applications. The new update goes beyond an incremental release, as SDK 53 brings many new changes combined with powerful features to make this one of the most worthwhile updates yet. There is support for React 19 as well as React Native 0.79, giving developers the ability to use many of the latest features and improvements from the main frameworks.

Here are some of the biggest highlights:
expo-audio module and the alpha release of expo-mapsexpo-background-task and enhancements to Expo Router v5These new updates bring improvements to the tooling with much faster Android build times as well as a more streamlined TestFlight distribution when using EAS Build.
Upgrading software can sometimes be a challenging task. However, there are many benefits that come with SDK 53, including better app performance and an enhanced developer experience due to the more modern tooling and APIs.
It’s clear these new capabilities will not only lead to a better experience for your users but also ensure that your projects remain at the cutting edge within the React Native ecosystem.
In this article, we’ll go through a practical step-by-step checklist designed to guide you through the process of upgrading to the latest SDK. Regardless of whether you are upgrading an existing application or starting with a fresh project, this roadmap will provide you with a strategy to confidently navigate the changes and use all of the new features effectively.
So let’s get started as we go through this checklist of 14 steps to mastering Expo SDK 53!
The Replay is a weekly newsletter for dev and engineering leaders.
Delivered once a week, it's your curated guide to the most important conversations around frontend dev, emerging AI tools, and the state of modern software.
This table showcases some of the most significant differences and advancements in Expo SDK 53 compared to the previous versions:
| Feature Area | Previous SDKs ( SDK 52 and older) | Expo SDK 53 | Key Benefits |
|---|---|---|---|
| React Version | Usually React 18.x | React 19 (with React Native 0.79) | Access to new React features like <Suspense> for data fetching, use() Hook, Actions |
| Audio Handling | expo-av (Audio component) | expo-audio (Stable Release) — Recommended for new implementations | More reliable, performant, easier-to-use, and robust API for audio playback and recording |
| Mapping Solutions | Reliance on third-party libraries (react-native-maps) or limited Expo libraries | expo-maps (Alpha Release) — Wraps native Google Maps (Android) & Apple Maps (iOS 17+) | A modern, Expo-maintained solution for common map use cases, built with Jetpack Compose & SwiftUI |
| Background Tasks | expo-background-fetch for simple periodic tasks | expo-background-task — More robust and flexible API for managing background operations | Better support for complex background tasks like data syncing, downloads, or routine maintenance |
| Android Edge-to-Edge | Manual configuration is usually required; it is not the default | Streamlined Edge-to-Edge Display — Default in new projects and Expo Go; opt-in for existing projects | Easier implementation of modern, immersive Android UIs that draw under system bars |
| Bundle Analysis | Expo Atlas was experimental; reliance on other tools like webpack-bundle-analyzer for web | Expo Atlas (Stable Release) — EXPO_ATLAS=1 npx expo start | Integrated, stable tool for visualizing JS bundle composition, aiding in app size optimization |
| Dependency Resolution (Metro) | Less strict enforcement of package.json “exports” | Stricter package.json:”exports” enforcement by default — Via Metro in RN 0.79+ | Aligns with modern Node.js/npm standards, and can deal with library compatibility issues much better |
| TestFlight Distribution (EAS) | Standard EAS Submit process | Simplified development build to TestFlight — New workflow using distribution: “store” and npx testflight | Easier and faster distribution of development builds to iOS testers via TestFlight |
| Local Android Builds | Standard compilation of all modules | Prebuilt Expo Modules for Android — Enabled by default for faster local builds | Potential reduction in local Android build times (up to 25% reported) by using precompiled standard modules |
Be aware that this is a high-level overview, and each of these features has more detailed specifications. The impact will vary depending on the project and how you implement the capabilities.
Keep reading this post to gain a much clearer view of these capabilities!
The first step is to upgrade your project codebase to the latest version. Expo SDK 53 has many new changes. You must be aware that it’s still new, which means that there are probably going to be some bugs and breaking changes, which you can read about on their GitHub Issues page.
Take a look at the initial steps for upgrading your project and follow along. This will ensure that there is a smooth upgrade phase.
We first must upgrade our project’s Expo SDK version. This can be done fairly simply using the Expo SDK command-line tool, which automates most of this process. This, of course, includes installing the right version and the correct dependencies.
Before you run the upgrade, make sure that your project’s Git working directory is clean. You can do this by committing or stashing any changes. If you have yet to initiate the project as a Git repo, then you don’t need to worry about this step. Just run the following command in your project’s folder to begin the upgrade process:
npx expo install expo@latest
Alternatively, you can use these commands if you want more control over the version you’re installing:
# Install a specific SDK version (for example, SDK 53)
npx expo install expo@^53.0.0

# Upgrade all dependencies to match the installed SDK version
npx expo install --fix
With these commands, you are able to update the expo package and install a compatible version of other Expo libraries such as expo-router and expo-font, which are found in your package.json file. Make sure that you pay attention to any warnings or instructions. You can learn more by following the official upgrading expo sdk walkthrough guide.
If your project is a few versions behind the most recent release, then I’d recommend an incremental update (for example, going from 51 > 52 > 53). This can help isolate any potential issues with past versions.
SDK 53 is able to integrate with React Native 0.79, which uses the Metro bundler settings that enforce package.json exports much more strictly. This is seen as a very positive step for the ecosystem. However, it can sometimes cause compatibility issues with other third-party libraries, which have yet to adopt this type of standard.
When the upgrade command has completed its task, run the npx expo-doctor command to check for issues, including those related to dependency mismatches. Any warnings about peer dependencies or packages are likely to be flagged by the doctor.
If you encounter any errors with packages you have installed, it’s always a good idea to check the libraries repository for updates and fixes that are compatible with Expo SDK 53 and React Native 0.79. You might need to update these packages manually with the usual npm command npm install package-name@latest or wait for a patch from the library maintainer. Searching the Expo forums, GitHub issues, and StackOverflow is another way to potentially resolve issues that other users might have found.
The New Architecture of React Native (Fabric for the UI and TurboModules for native modules) is opt-in across all projects by default. The architecture offers better performance and more fluid communication between JavaScript and native code.
Previously, communication relied on a system called the “bridge,” which acts as a translator as it sends and receives messages. However, the bridge was a bottleneck. Especially when handling many tasks at the same time, it often caused slower app performance and response times. The New Architecture eliminates the bridge in favour of a more direct approach, eliminating those delays and delivering faster, more responsive apps.
Your project will be using this New Architecture going forward, unless you choose to opt out of it. If you happen to encounter any breaking changes or crashes, then it’s wise to temporarily disable it. Not all dependencies are going to be compatible yet.
To disable the New Architecture, add or modify it by changing the value for the newArchEnabled property for the expo object in the app.json or app.config.js file. This process is shown in the code example:
// In app.json or app.config.js
  "expo": {
    "name": "my-app",
    "slug": "my-app",
    "version": "1.0.0",
    "orientation": "portrait",
    "icon": "./assets/images/icon.png",
    "scheme": "myapp",
    "userInterfaceStyle": "automatic",
    "newArchEnabled": true, // change this value to false
    }
The New Architecture is definitely the future; however, the legacy bridge architecture is still the most understood. You can always opt out and use it as a fallback when encountering breaking changes, but it’s worth noting that the new architecture is the long-term choice.
For more information on disabling it, take a look at the official documentation page on Expo New Architecture Guide – Disabling.
With the latest SDK 53 update, support is now available for edge-to-edge displays on Android devices. This means that it’s now possible to have the app’s UI draw beneath the system status and navigation bars.
This provides a more modern and immersive look. Going forward, it is the default behaviour in new projects created with SDK53 as well as the Expo Go client application.
Like before, there is the option to opt in or opt out of this new feature. This behaviour can be controlled by using the edgeToEdgeEnabled in your app.json or app.config.js as shown in this code snippet:
// In app.json or app.config.js - Example toggling edge-to-edge
    "android": {
      "adaptiveIcon": {
        "foregroundImage": "./assets/images/adaptive-icon.png",
        "backgroundColor": "#ffffff"
      },
      "edgeToEdgeEnabled": true // Use true or false
    },
When testing on Android devices, you should now see how backgrounds or full-screen images extend under the systems bars when it is enabled. With this new change, be mindful that interactive elements are not blocked.
Have a read about Edge-to-Edge Display Now Streamlined in this official Expo blog post and take a look at this example on Display content edge-to-edge in views to see how the change works on Android.
Completing this first phase initial setup ensures that you are ready for the next phase, as we explore the new APIS and features available.
The new release of SDK 53 means there are several big updates and many new features for the Expo ecosystem. In this upcoming section, we will go through some of them and explore how these exciting changes can enhance your project.
expo-audioGo over your current audio implementation and replace the existing usage of the expo-av setup with the new and improved expo-audio library. This is a necessary migration path for handling audio in Expo.
With expo-audio, projects now gain a much improved and more reliable foundation. It offers better performance characteristics and a modern and intuitive API design. Moving from expo-av to expo-audio is the recommended approach for audio in your projects.
Below, you can see a comparison between the old and new approach in these code snippets:
expo-av (Older approach):import ParallaxScrollView from '@/components/ParallaxScrollView';
import { Audio } from 'expo-av';
import { Image } from 'expo-image';
import { Button, StyleSheet, View } from 'react-native';
export default function HomeScreen() {
async function playSoundAv() {
const { sound } = await Audio.Sound.createAsync(
require('@/assets/sounds/sound.mp3')
);
await sound.playAsync();
}
return (
<ParallaxScrollView
headerBackgroundColor={{ light: '#A1CEDC', dark: '#1D3D47' }}
headerImage={
<Image
source={require('@/assets/images/partial-react-logo.png')}
style={styles.reactLogo}
/>
}
>
<View>
<Button title="Play Sound" onPress={playSoundAv} />
</View>
</ParallaxScrollView>
);
}
const styles = StyleSheet.create({
reactLogo: {
height: 178,
width: 290,
bottom: 0,
left: 0,
position: 'absolute',
},
});
expo-audio (recommended):import ParallaxScrollView from '@/components/ParallaxScrollView';
import { useAudioPlayer } from 'expo-audio';
import { Image } from 'expo-image';
import { Button, StyleSheet, View } from 'react-native';
const audioSource = require('@/assets/sounds/sound.mp3');
export default function HomeScreen() {
const player = useAudioPlayer(audioSource);
return (
<ParallaxScrollView
headerBackgroundColor={{ light: '#A1CEDC', dark: '#1D3D47' }}
headerImage={
<Image
source={require('@/assets/images/partial-react-logo.png')}
style={styles.reactLogo}
/>
}
>
<View>
<Button title="Play Sound" onPress={() => player.play()} />
</View>
</ParallaxScrollView>
);
}
const styles = StyleSheet.create({
reactLogo: {
height: 178,
width: 290,
bottom: 0,
left: 0,
position: 'absolute',
},
});
With the new library, it’s become even easier to create projects that require audio playback for music, podcasts, games, or anything you can imagine.
expo-maps (alpha)The new map library is impressive and brings many new features. For compatibility reasons, you need to be using Android or iOS 17+. The library is still in alpha, so there could be many more upcoming changes.
expo-maps aims to provide a unified, modern, and stable JavaScript interface over native map components. On Android, it uses Google Maps. Meanwhile on iOS, expo-maps makes use of Apple Maps, most notably the SwiftUI-based APIs, which are available from iOS 17 onwards.
Modern SwiftUI map components are the reason why iOS 17+ is needed with this release. Support for Google Maps on iOS is not on the roadmap for this library, as its main focus is to be a wrapper for the platform’s native map solution.
A basic map view example can be seen here:
import { AppleMaps, GoogleMaps } from 'expo-maps';
import { Platform, Text } from 'react-native';

export default function App() {
  if (Platform.OS === 'ios') {
    return <AppleMaps.View style={{ flex: 1 }} />;
  } else if (Platform.OS === 'android') {
    return <GoogleMaps.View style={{ flex: 1 }} />;
  } else {
    return <Text>Maps are only available on Android and iOS</Text>;
  }
}
The library is still in alpha, so you’ll have to use development builds to try it. You can learn more on the Expo Maps page.
expo-background-taskexpo-background-fetch is now legacy and has been replaced by the more flexible expo-background-task.
The new library is designed to handle more complex and reliable background processing needs. You now can register certain tasks that the operating system can execute, even when your app is minimized and not in active use. Any operations that do not require immediate user interaction can keep data fresh and perform maintenance. Some good use cases include tasks that require data synchronization, cleanup, or update checks.
Take a look at this code snippet to get a feel for a potential use case:
import * as BackgroundTask from 'expo-background-task';
import * as TaskManager from 'expo-task-manager';
import * as Updates from 'expo-updates';
import { useEffect, useState } from 'react';
import { Button, StyleSheet, Text, View } from 'react-native';

// Define a task name for our background task
const BACKGROUND_TASK_NAME = 'update-check-task';

// Define the task outside the component to ensure it's registered properly
TaskManager.defineTask(BACKGROUND_TASK_NAME, async () => {
  try {
    console.log(`Background task executed at ${new Date().toISOString()}`);

    // Check for updates
    const update = await Updates.checkForUpdateAsync();
    if (update.isAvailable) {
      await Updates.fetchUpdateAsync();
      console.log('Update downloaded and ready for next app launch');
    }

    return BackgroundTask.BackgroundTaskResult.Success;
  } catch (error) {
    console.error('Error in background task:', error);
    return BackgroundTask.BackgroundTaskResult.Failed;
  }
});

export default function HomeScreen() {
  const [isRegistered, setIsRegistered] = useState(false);
  const [taskStatus, setTaskStatus] = useState('Not registered');

  // Check if task is registered when component mounts
  useEffect(() => {
    checkTaskStatus();
  }, []);

  // Check if the task is registered
  const checkTaskStatus = async () => {
    try {
      const registered = await TaskManager.isTaskRegisteredAsync(BACKGROUND_TASK_NAME);
      setIsRegistered(registered);
      setTaskStatus(registered ? 'Registered' : 'Not registered');
    } catch (error) {
      console.error('Error checking task status:', error);
    }
  };

  // Register the background task
  const registerTask = async () => {
    try {
      await BackgroundTask.registerTaskAsync(BACKGROUND_TASK_NAME, {
        minimumInterval: 60 * 15, // 15 minutes
      });

      setIsRegistered(true);
      setTaskStatus('Task registered successfully');
    } catch (error: any) {
      console.error('Error registering task:', error);
    }
  };

  // Unregister the background task
  const unregisterTask = async () => {
    try {
      await BackgroundTask.unregisterTaskAsync(BACKGROUND_TASK_NAME);
      setIsRegistered(false);
      setTaskStatus('Task unregistered');
    } catch (error: any) {
      console.error('Error unregistering task:', error);
    }
  };

  return (
    <View style={styles.container}>
      <View style={{height: 40}}></View>

      <View style={styles.card}>
        <Text>Status: {taskStatus}</Text>

        <View style={styles.buttonContainer}>
          {!isRegistered ? (
            <Button
              title="Register Background Task"
              onPress={registerTask}
            />
          ) : (
            <Button
              title="Unregister Background Task"
              onPress={unregisterTask}
            />
          )}
        </View>
      </View>

      <View style={styles.card}>
        <Text style={styles.infoTitle}>How it works:</Text>
        <Text>1. Register the task to run in the background</Text>
        <Text>2. Background task will check for updates</Text>
        <Text>3. Task runs automatically when app is backgrounded</Text>
      </View>
    </View>
  );
}

const styles = StyleSheet.create({
  container: {
    padding: 16,
    flex: 1,
  },
  title: {
    fontSize: 20,
    fontWeight: 'bold',
    marginBottom: 20,
    textAlign: 'center',
  },
  card: {
    backgroundColor: '#f5f5f5',
    padding: 16,
    borderRadius: 8,
    marginBottom: 16,
  },
  buttonContainer: {
    marginTop: 16,
  },
  infoTitle: {
    fontWeight: 'bold',
    marginBottom: 8,
  },
});
Just to be clear, Background Task functionality is not available in Expo Go; you’ll need to use a development build to avoid the limitations. You can take a look at the Expo Development Client documentation to learn more.
The latest version of Expo Router has new features like build-time redirects/rewrites and Protected Routes. With Expo Router v5, users can make use of some powerful enhancements for routing and navigation.
Build-time redirects and rewrites offer more efficient ways to manage URL changes, improvements to SEO when handling legacy links, and a more logical method to structure an app’s navigation without complex client-side logic. When using protected routes, it becomes simpler to implement authentication flows. A declarative method helps guard routes and automatically redirects unauthenticated users to a different screen.
As always, test your navigation setup before upgrading to avoid unforeseen breaking changes. Expo SDK 53 can support build-time redirects by using the expo-router plugin. Configuring redirects can be accomplished by using the source and destination keys within the redirects array in your configuration file.
Check out this example code:
{
  "expo": {
    "plugins": [
      [
        "expo-router",
        {
          "redirects": [
            {
              "source": "/old-page", // The original path you want to redirect from.
              "destination": "/new-feature" // The new path you want to redirect to.
            }
          ]
        }
      ]
    ]
  }
}
Expo Router v5 also provides a more reliable way to support protected routes. You are able to use the Stack.Protected component inside your layout files to render screens based on their authentication status.
Check out this example:
import { Stack } from 'expo-router';

const isLoggedIn = true; // Replace with your actual authentication logic

export default function AppLayout() {
  return (
    <Stack>
      <Stack.Protected guard={!isLoggedIn}>
        <Stack.Screen name="login" />
      </Stack.Protected>

      <Stack.Protected guard={isLoggedIn}>
        <Stack.Screen name="private" />
      </Stack.Protected>
    </Stack>
  );
}
In this setup:
isLoggedIn is false, the login screen is accessibleisLoggedIn is true, the private screen is accessibleThis approach allows you to control access to different parts of your application based on a user’s authentication status.
It’s also possible to implement authentication logic within _layout.js or _layout.tsx files using context providers as well as the Redirect component from expo-router. With this method, you can utilize dynamic redirection based on a user’s authentication status, too. These features can improve your app’s navigation structure, optimize SEO transitions, secure sections, and help handle deep links more effectively.
SDK 53 is shipping with React 19, so it’s now the perfect time to utilize new features, especially like <Suspense>, which manages loading states, and the use() Hook, which can handle promises or contexts more effectively.
React 19 introduces several features that can simplify asynchronous logic and rendering patterns. <Suspense> allows you to define a loading fallback UI for components that are in the process of waiting for data — or any other type of asynchronous operation
The new use() Hook provides a more direct and cleaner way to hold the value of a promise or context directly inside your component’s render logic. This could potentially replace patterns involving useEffect or context consumers in some specific use cases.
As an added bonus, these features can enable cleaner code and better user experiences, as they make loading states more seamless inside the component tree. To learn more, read the official React v19 documentation.
Here’s a code snippet example that uses the use() Hook with <Suspense>:
import React, { createContext, Suspense, use, useState } from 'react';
import { ActivityIndicator, Button, StyleSheet, Text, View } from 'react-native';

const styles = StyleSheet.create({
  container: {
    flex: 1,
    padding: 20,
    justifyContent: 'center',
    alignItems: 'center',
  },
  title: {
    fontSize: 24,
    fontWeight: 'bold',
    marginBottom: 20,
  },
  text: {
    fontSize: 16,
  },
  card: {
    backgroundColor: 'white',
    borderRadius: 8,
    padding: 16,
    marginTop: 20,
    width: '100%',
    alignItems: 'center',
  },
  heading: {
    fontSize: 18,
    fontWeight: 'bold',
  },
  loadingContainer: {
    padding: 20,
    alignItems: 'center',
  },
});

async function fetchData() {
  console.log('Fetching data...');
  await new Promise(resolve => setTimeout(resolve, 2000));
  return { message: 'Data loaded successfully!' };
}

type Theme = 'light' | 'dark';
const ThemeContext = createContext<{theme: Theme; toggleTheme: () => void}>({theme: 'light', toggleTheme: () => {}});

function DataDisplay() {
  const data = use(fetchData());

  return (
    <View style={styles.card}>
      <Text style={styles.heading}>{data.message}</Text>
    </View>
  );
}

export default function HomeScreen() {
  const [theme, setTheme] = useState<Theme>('light');

  const toggleTheme = () => {
    setTheme(current => current === 'light' ? 'dark' : 'light');
  };

  const containerStyle = {
    ...styles.container,
    backgroundColor: theme === 'light' ? '#f5f5f5' : '#222',
  };

  const textStyle = {
    ...styles.text,
    color: theme === 'light' ? '#000' : '#fff',
  };

  return (
    <ThemeContext.Provider value={{theme, toggleTheme}}>
      <View style={containerStyle}>
        <Text style={[styles.title, textStyle]}>React 19 Demo</Text>

        <Button
          title={`Switch to ${theme === 'light' ? 'Dark' : 'Light'} Theme`}
          onPress={toggleTheme}
        />

        <Suspense fallback={
          <View style={styles.loadingContainer}>
            <ActivityIndicator size="large" color={theme === 'light' ? '#0066ff' : '#ffffff'} />
            <Text style={textStyle}>Loading data...</Text>
          </View>
        }>
          <DataDisplay />
        </Suspense>
      </View>
    </ThemeContext.Provider>
  );
}
These React 19 additions make it much easier to simplify data fetching and loading state management in components and display fallback UI. In contrast, lazy-loaded components and resources are fetched, which leads to cleaner consumption of asynchronous context values and improves the perceived performance of your application by better handling loading states.
Now that your Expo SDK 53 project has been upgraded and the initial setup and configuration are complete, it’s time to adjust the development workflow and make sure that your app is stable. In these upcoming steps, we’ll go over some strategies for making the best use of the new tooling and creating through testing strategies.
Expo SDK 53 offers better optimization techniques, which speed up local Android build times because they use prebuilt versions of some Expo modules.
This feature is enabled by default in all new projects, as long as you’ve upgraded. In most cases, you don’t really need to do anything if you want to benefit from them.
Builds are precompiling some of the core Expo universal modules, so this optimization can reduce time in the compilation stages. Users have noted that Expo can reduce local build time by 25%.
As you can imagine, this is very beneficial. However, if you suspect an issue related to these prebuilt modules or need to compile them from source for debugging reasons, you can always opt-out ( just like with the other features mentioned in this guide).
To do this, you would configure the Expo autolinking options in your package.json for buildFromSource:, as seen in the code example:
{
  "name": "opt-out-example",
  "dependencies": {},
  "expo": {
    "autolinking": {
      "android": {
        "buildFromSource": [".*"]
      }
    }
  }
}
Understanding the elements of your bundle size is crucial to optimizing load times and overall performance.
Expo Atlas, now stable in SDK 53, provides an excellent way to visualize your JavaScript bundle.
To use Expo Atlas, you must start your development server with the EXPO_ATLAS=1 environment variable as seen here:
EXPO_ATLAS=1 npx expo start
You can open Atlas through the More Tools option in the CL, using the shift+m key command, or by opening http://localhost:8081/expo/atlas in a browser. After launching your app on Android, iOS, or the web, Atlas provides all the information you need for each platform.
Expo Atlas allows you to see what packages and modules are contributing the most to your bundle size. The visual breakdown will help you identify large dependencies that can be trimmed, opportunities for code splitting, or areas in your code that can be better optimized to cut file size.
Take a look at what the Expo Atlas web interface looks like in this example: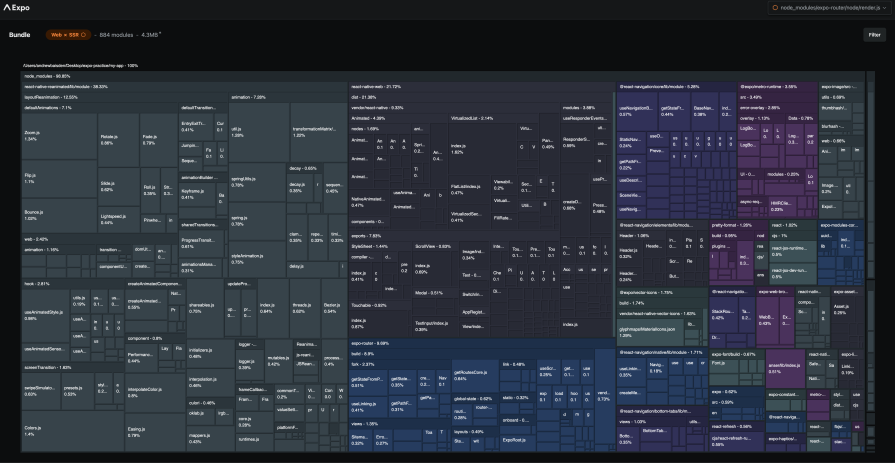
Expo Application Services (EAS) is a fantastic way to simplify the build and submit process for applications. With SDK 53, there is an improved workflow for pushing the Development Builds straight to the TestFlight testers, streamlining the testing loop.
You can configure your eas.json to allow development builds to be submitted to the store. You can then use the npx testflight command to complete the process.
To begin with, you can use the eas.json file to ensure your development build profile has "distribution": "store". Then you can add a new submit profile specifically for these development client submissions, as shown here:
// In eas.json
{
  "build": {
    "development": {
      "distribution": "store" // Allows this build to be submitted
    }
  },
  "submit": {
    "production": {},
    "development_testflight": {
      // New profile for submitting dev builds to TestFlight
      "buildProfile": "development" // Specifies which build profile to use
    }
  }
}
After successfully building your development client with EAS Build, you can then submit it using the following command seen below:
npx testflight --profile development_testflight
This approach makes it much easier to distribute development builds to your iOS testers via TestFlight, as you can bypass the need for manually registering device UDIDs for ad-hoc distribution of development clients.
While Expo Go is excellent for initial configuration and quick experimentation, development builds become more critical the more stable your app becomes, and as you move towards newer SDKs like 53. I always recommend using development builds as your primary environment for testing and debugging while developing with SDK 53.
Expo Go is a pre-built app with a fixed set of native modules. When you use new SDKs or have custom native code, Expo Go won’t be able to fully support all features.
For example, push notification warnings occur with SDK 53 on Expo Go, which might hide internal native integration issues. Development builds, on the other hand, are manually built versions of your app that utilize your own choice of native dependencies. This allows you to provide an environment significantly closer to your final released app.
Expo Go Repository is excellent for quick preview and limited native customization, but sometimes fails to accurately represent production behaviour for complex apps or new SDK features. Development builds, in contrast, have all your project’s native dependencies and offer a production-like test environment, which is essential for debugging native bugs and compatibility.
Upgrading any SDK, especially one with significant changes like SDK 53, can require deep testing to catch any regressions. It’s important to test all critical user flows and features inside your application after you have upgraded.
Don’t just rely on a quick smoke test; it’s a good idea to pay special attention to areas directly impacted by the SDK 53 changes. This can include features using newly migrated or added modules like expo-audio, which has a new API. App navigation could also be impacted, especially if you have made changes to utilize the new Expo Router features. Any custom native modules or components should be checked to ensure they behave as expected with the New Architecture and this is even though you might have temporarily opted out. Regardless, it’s good to check.
Check for UI consistency and behaviour on Android, especially if you have implemented or modified the edge-to-edge display settings. Test on a selection of actual iOS and Android devices and OS versions that your app supports to see device-specific problems firsthand. Prioritizing these workflow optimizations and extensive testing methodologies will offer you a high-quality, high-performing application that accesses the full potential of Expo SDK 53.
Expo SDK 53 is a significant release, giving developers a more robust and refined set of tools for building universal native apps. It’s important to ensure that you are getting the most out of these advances, such as the React 19 support, and the New Architecture.
New APIs like the stable expo-audio, the alpha of expo-maps, and robust expo-background-task support are also worth using, because they can lead to big improvements and performance capabilities inside your app. Expo Router v5 is worth a mention too, alongside the tooling improvements which create potentially quicker local builds of Android. Lastly, let’s not forget Expo Atlas, which enhances bundle analysis inside your app project.
As you gain knowledge in these areas, it becomes simpler for you to develop more modern and efficient apps. It’s true that in some cases, the upgrade process can be frustrating. For example, navigating dependency compatibility, with a much stricter package.json exports situation, can result in short-term headaches. However, the long-term reward of being current with improved app performance, streamlined development process, and new feature access is well worth your time and effort.
To continue your learning of Expo SDK 53 and its related tech, check out the Official Expo SDK 53 Changelog and the Expo Upgrade Guide.

LogRocket's Galileo AI watches sessions for you and and surfaces the technical and usability issues holding back your React Native apps.
LogRocket also helps you increase conversion rates and product usage by showing you exactly how users are interacting with your app. LogRocket's product analytics features surface the reasons why users don't complete a particular flow or don't adopt a new feature.
Start proactively monitoring your React Native apps — try LogRocket for free.

Learn how to use Gemini CLI subagents to delegate frontend, backend, testing, and docs tasks to specialized agents with guardrails and clear ownership.

Learn how next-browser gives AI agents runtime context for debugging Next.js apps, including React props, hydration, PPR, forms, and performance.

Build dynamic LLM routing in Next.js with OpenRouter, TanStack AI, task classification, model fallbacks, and cost-aware routing.

TSRX adds first-class control flow, conditional hooks, and scoped styles to React via a TypeScript compiler extension — no new framework required.
Hey there, want to help make our blog better?
Join LogRocket’s Content Advisory Board. You’ll help inform the type of content we create and get access to exclusive meetups, social accreditation, and swag.
Sign up now

