In modern system engineering and programming, containers are a widely used tool to package and distribute software. In the most general terms, a container is a standalone piece of software that includes everything it needs to run (code, dependencies, tools, runtime, and so forth). Containers can be easily deployed and run by anyone, making the development and deployment process easier and faster.
One of the most widespread container platforms is Docker, a monolithic tool. It handles every aspect of the containerization process, from building, running, and inspecting container images.
In this article, we’ll cover a few Docker alternatives. Each tool covered in this tutorial adheres to the Open Containers Initiative (OCI) specification, which includes specifications for container runtime, container distribution, and container images. Let’s get started!
Editor’s note: This article was updated by Matteo Di Pirro in February 2025 to expand coverage of Docker alternatives and include new information on additional alternatives, including CRI-O.

Podman, a container engine developed by RedHat, is one of the most prominent Docker alternatives for building, running, and storing container images. Podman maintains compatibility with the OCI container image spec just like Docker, meaning Podman can run container images produced by Docker and vice versa.
Podman is the default container engine in RedHat 8 and CentOS 8.
Podman’s command line interface is identical to Docker’s, including the arguments. As a matter of fact, we can simply alias the docker command to podman without noticing the difference, making it easy for existing Docker users to transition to Podman:
# .bashrc
alias docker=podman
Unlike Docker, which uses the dockerd daemon to manage all the containers under its control, Podman is daemonless. Therefore, there’s no persistent connection to some long-living process, removing the single point of failure issue in Docker, where an abrupt crash in the daemon process can kill running containers or cause them to become orphaned.
In simpler terms, Docker has a client-server logic with a daemon in between. Podman, on the other hand, does not need the mediator and its architecture is therefore more lightweight and secure.
To run and manage containers, Podman relies on systemd.
Podman also differentiates from Docker by using rootless containers by default. Root access is not necessary for launching and operating a container, but it helps to mitigate potential vulnerabilities in the container runtime that can cause privilege escalation.
To be fair, Docker supports a rootless mode as well, which debuted as an experimental feature in Docker Engine v19.03 before being stabilized in v20.10. However, its use is not yet widespread in the ecosystem. Furthermore, Podman got there first.
This doesn’t necessarily mean that Podman is safer than Docker. However, rootless containers are safer than containers with root privileges. Furthermore, Docker daemons have root privileges, which makes them more suitable for an attacker. Still, Podman can run root containers, so it’s not immune from the problem.
An additional feature of Podman that is not yet present in Docker is the ability to create and run pods. A pod is a collection of one or more containers that utilize a shared pool of resources and work closely together to achieve a specific function. Pods are also the smallest execution unit in Kubernetes, making the transition to Kubernetes easier, should the need arise. For example, we might have a pod running a backend and a frontend container, sharing resources and running different containers for the same application.
Lastly, Podman is not an all-in-one solution like Docker. For example, it does not support Docker Swarm, even if it has recently introduced Docker Compose support to be compliant with Docker Swarm. Furthermore, Podman specializes in running containers. To build them, it needs another tool, named Buildah (see below). Lastly, Podman is part of the RedHat OpenShift Container Platform.
In conclusion, there’s no winner between Podman and Docker. The former might be more suitable when we need a specialized lightweight tool to run containers, but the latter is an all-in-one solution. In many cases, Podman can replace Docker. Therefore, when choosing one over the other, always consider your requirements.

Buildah is a Docker alternative for building images. Developed by RedHat, Buildah is often used together with Podman. In fact, Podman uses a subset of Buildah’s functionality to implement its build subcommand.
Buildah is a great tool if we need fine-grained control over the whole image-building process thanks to the Buildah CLI tool. This is very important when we want to optimize our images or when we work with complex builds.
Similarly to Podman, the images produced by Buildah fully comply with the OCI specification, operating in the same manner as images built with Docker. Buildah can also create images using an existing Dockerfile or Containerfile. Unlike Docker, however, Buildah lets us use Bash scripts that sidestep the limitations of Dockerfiles, automating the process more easily. Bash scripting uses the commands of Buildah CLI to install packages, copy files, and configure the layers of an image. It gives us more control, but, in turn, the learning curve is steeper.
Like Podman, Buildah follows a fork-exec model that doesn’t require a central daemon or root access to work. Thus, all operations are executed directly by the Buildah CLI, which then interacts with the container runtime (e.g. runc). This makes it more lightweight than Docker as well as potentially more secure.
One advantage of using Buildah over Docker is its ability to commit many changes to a single layer. This was a long-requested feature among container users. Buildah also provides the ability to create an empty container image storing only metadata, making it easy to add only the required packages in the image. Consequently, the final output is smaller than its Docker equivalent.
Buildah images are user-specific, so only the images built by a user will be visible to them.
As for the use cases, Docker is ideal for developers needing a fast way to produce images. Simply write a Dockerfile and let Docker take care of the rest. Buildah, on the other hand, is for advanced users who like to get their hands dirty. Whenever we need fine-grained control over the build process, Buildah is a perfect fit.
At the time of writing, Buildah works on several Linux distributions but is not supported on Windows or macOS.

BuildKit is an improved image-building engine for Docker that was developed as part of the Moby project. It is the default builder for users on Docker Desktop and Docker Engine as of version 23.0, but it also comes as a standalone tool.
One of BuildKit’s headline features includes improved performance through parallel processing of image layers that don’t depend on each other. Another feature is better caching, which reduces the need to rebuild each layer of an image. This tool offers extensibility through a more pluggable architecture. Finally, BuildKit introduces rootless builds and the ability to skip unused stages.
If we’re using Docker Engine < v23, we can optionally enable BuildKit by setting the DOCKER_BUILDKIT environment variable to 1:
$ DOCKER_BUILDKIT=1 docker build .
Alternatively, we can configure Docker to use BuildKit by default simply by editing the /etc/docker/daemon.json file as follows:
{
  "features": {
    "buildkit": true
  }
}
After saving the file, reload the daemon to apply the change:
$ systemctl reload docker
It’s easy to tell when BuildKit is being used because of its output, which differs from the default engine:
$ DOCKER_BUILDKIT=1 docker build . [+] Building 30.8s (7/7) FINISHED => [internal] load build definition from Dockerfile 0.1s => => transferring dockerfile: 142B 0.1s => [internal] load .dockerignore 0.0s => => transferring context: 2B 0.0s => [internal] load metadata for docker.io/library/centos:latest 0.6s => [auth] library/centos:pull token for registry-1.docker.io 0.0s => [1/2] FROM docker.io/library/centos:latest@sha256:a27fd8080b517143cbbbab9dfb7c8571c40d67d534bbdee55bd6 14.3s => => resolve docker.io/library/centos:latest@sha256:a27fd8080b517143cbbbab9dfb7c8571c40d67d534bbdee55bd6c 0.0s => => sha256:a27fd8080b517143cbbbab9dfb7c8571c40d67d534bbdee55bd6c473f432b177 762B / 762B 0.0s => => sha256:a1801b843b1bfaf77c501e7a6d3f709401a1e0c83863037fa3aab063a7fdb9dc 529B / 529B 0.0s => => sha256:5d0da3dc976460b72c77d94c8a1ad043720b0416bfc16c52c45d4847e53fadb6 2.14kB / 2.14kB 0.0s => => sha256:a1d0c75327776413fa0db9ed3adcdbadedc95a662eb1d360dad82bb913f8a1d1 83.52MB / 83.52MB 2.0s => => extracting sha256:a1d0c75327776413fa0db9ed3adcdbadedc95a662eb1d360dad82bb913f8a1d1 10.8s => [2/2] RUN yum -y install httpd 14.7s => exporting to image 1.0s => => exporting layers 1.0s => => writing image sha256:c18170a407ca85218ee83526075a3f2a2e74f27d7bd5908ad68ba2328b4f4783 0.0s

Developed by Google, Kaniko is used to build container images inside of an unprivileged container or a Kubernetes cluster. Like Buildah, Kaniko does not require a daemon, and it can build images from Dockerfiles without depending on Docker.
For example, here’s a Kubernetes Pod definition of building an image using Kaniko:
apiVersion: v1
kind: Pod
metadata:
  name: kaniko
spec:
  containers:
  - name: kaniko
    image: gcr.io/kaniko-project/executor:latest
    args: ["--dockerfile=<path-to-dockerfile>",
           "--context=dir://<path-to-source-code>",
           "--destination=<registry>/<image-name>:<tag>"]
  restartPolicy: Never
In the code snippet above, we define a container, running the kaniko:latest Docker image. The container’s arguments build a new image, based on a Dockerfile possibly mounted on the pod itself.
The whole process is a bit more cumbersome when run locally. In this case, everything happens in the context of a docker run command:
docker run \
    -v /path/to/your/source/code:/workspace \
    gcr.io/kaniko-project/executor:latest \
    --dockerfile=/workspace/Dockerfile \
    --destination=your-registry/your-image-name:your-tag
The major difference between Docker and Kaniko is that the latter is more focused on Kubernetes workflows, and it is meant to be run as an image, making it a bit less suitable for local development. Furthermore, being more focused on running inside Kubernetes containers, Kaniko can only run on Linux.
Similarly to Docker, Kaniko produces OCI-compliant images, making it a drop-in replacement for Docker-in-Kubernetes use cases.
Speaking of use cases, Kaniko is particularly suitable for building secure images in environments (aka CI/CD pipelines) when running the privileged mode needed by Docker is a no-go.
Regarding the build process, in Kaniko we can specify a set of directories or files needed during the build. In contrast, Docker needs the entire project directory (the so-called build context) to be sent to the Docker daemon. Consequently, Kaniko builds are generally faster.
Skopeo is another tool developed by RedHat and part of the RedHat OpenShift Container Platform. As such, it is usually adopted along with Podman and Buildah.
More precisely, Skopeo provides us with a way to inspect Docker images. In particular, the inspect sub-command returns low-level information about a container image, similar to docker inspect.
Not surprisingly, and similar to Podman and Buildah, Skopeo doesn’t require a daemon to run nor does it need root privileges. Lastly, it works with OCI-compatible images.
In contrast to Docker, Skopeo can help us gather useful information about a repository or a tag without having to download it first:
$ skopeo inspect docker://docker.io/fedora # inspect remote image
{
    "Name": "docker.io/library/fedora",
    "Digest": "sha256:72c6c48a902baff1ab9948558556ef59e3429c65697287791be3c709738955b3",
    "RepoTags": [
        "20",
        "21",
        "22",
        "23",
        "24",
        "25",
        "26",
        "26-modular",
        "27",
        "28",
        "29",
        "30",
        "31",
        "32",
        "33",
        "34",
        "35",
        "36",
        "branched",
        "heisenbug",
        "latest",
        "modular",
        "rawhide"
    ],
    "Created": "2021-11-02T21:29:22.547065293Z",
    "DockerVersion": "20.10.7",
    "Labels": {
        "maintainer": "Clement Verna \[email protected]\u003e"
    },
    "Architecture": "amd64",
    "Os": "linux",
    "Layers": [
        "sha256:fc811dadee2400b171b0e1eed1d973c4aa9459c6f81c77ce11c014a6104ae005"
    ],
    "Env": [
        "PATH=/usr/local/sbin:/usr/local/bin:/usr/sbin:/usr/bin:/sbin:/bin",
        "DISTTAG=f35container",
        "FGC=f35",
        "FBR=f35"
    ]
}
In this regard, Skopeo is simply a replacement for the docker inspect command, with similar use cases. However, it benefits from enhanced security, as we already saw for Podman and Buildah.
A major use case of Skopeo is the ability to copy a container image from one remote registry to another or a local directory:
 skopeo login quay.io

$ skopeo copy docker://hello-world:latest docker://quay.io/hello-world:latest
This is a nice-to-have, since Docker Hub has introduced rate limits and paid tier changes.
Lastly, another useful feature is Skopeo’s ability to synchronize images between container registries and local directories with the skopeo sync command.
As we said for Podman and Buildah, Skopeo does not mean to fulfill all the use cases addressed by Docker. On the other hand, adopting the RedHat OpenShift Container Platform would give us a toolbox for all our needs.
Dive is not a Docker alternative per se, but it’s surely worth a mention. It’s a tool for inspecting, analyzing, and optimizing container images. Dive can show the content of an image by layer, highlighting the differences between each. Through image analysis, Dive provides us with a percentage score for efficiency by estimating wasted space, which is helpful when trying to reduce the image size.
Another useful feature is Dive’s CI integration, which provides a pass-or-fail result based on the image’s efficiency and the amount of wasted space. To access the CI integration feature, set the CI environmental variable to true when invoking any valid dive command:
$ CI=true dive node:alpine
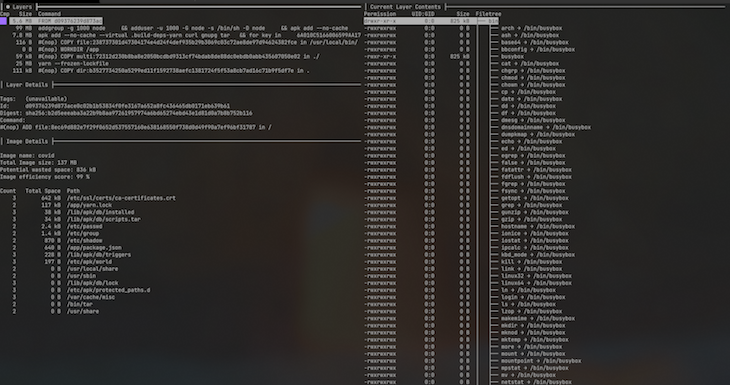
In conclusion, Dive is a great tool for learning and developing confidence in what we are building/shipping. We can use it to understand how Docker images work and how to write efficient Dockerfiles. Thanks to it, we can make any changes to the Dockerfile and see how it has affected the resulting layer structure.

runc is a CLI tool providing a low-level interface to create and run containers on Linux based on the OCI specification. runc was formerly embedded into Docker as a module but was later spun into a standalone tool in 2015. It’s specifically designed to be a lightweight and secure runtime that’s easily integrated with higher-level orchestrators (e.g. Kubernetes).
runc remains the default container runtime in Docker and most other container engines. An alternative to runc is crun, developed by RedHat and written in C instead of Go like most Linux container tools.
The main advantages of crun over runc are all about performance. According to RedHat, the crun binary is up to 50 times smaller and up to twice as fast as the runc binary. What’s important is that we can use runc and crun interchangeably, as both implement the OCI runtime specification. crun, however, supports more low-level features that make it the preferred choice if we want to have fine-grained control over the runtime our containers run on. For example, with crun we can set stricter limits on the memory allowed in the container.
Lastly, being written in C, crun works on architectures where Go support is limited or absent (e.g. Risc-V).
crun is Production-ready and we can therefore use it as a runc replacement without worries.
LXD and Docker are not competing container technologies, as they serve different purposes. The former, in particular, is a virtual machine manager and image-based system container. It offers images for a variety of Linux distributions as well as a complete user experience centered on entire Linux systems operating within containers or virtual machines.
LXD runs the so-called system containers, that are similar to virtual/physical machines, as they run a full operating system. Normally, system containers are long-lasting and used to host several applications.
Docker, on the other hand, runs application containers that package and run a single process or a service.
Both application and system containers share a kernel with the host operating system. The main difference, however, is that the former runs a single application/process, whereas the latter runs a full operating system, providing their users with more flexibility.
LXD offers compatibility for many storage backends and network types, along with the ability to run on hardware such as a laptop or cloud instance.
A component of LXD security and access control is based on group membership. As a root user, we may create an lxd group and add trusted members or users so that we can communicate with the local daemon and have complete control over LXD.
LXD provides snap packages for many Linux distributions (including Ubuntu, Fedora, Arch Linux, Debian, and OpenSUSE) to facilitate installation. LXD’s most important features are its basic API, instances, profiles, backup, export, and configurability.
Based on what we saw above, LXD and Docker are not competing technologies. In fact, we could run Docker containers in an LXD system container. Generally speaking, the former is more similar to VMWare or KVM hypervisors, even though it is much lighter on resources and without the virtualization overhead.
Docker, on the other hand, abstracts away storage, networking, and logging. It was specifically designed to decouple and isolate individual processes, which can then be scaled independently from the rest of the application or system they are a part of (basically a microservice architecture).
containerd is a container runtime created by Docker that handles the lifecycle of a container on a virtual machine. containerd retrieves container images from container registries, mounts storage and enables networking for a container. In other words, Docker builds upon containerd to give developers a more comprehensive experience.
containerd, together with Kubernetes, Envoy, Prometheus, and CoreDNS, graduated from the CNCF (Cloud Native Computing Foundation) in February 2019. It is available as a Linux and Windows daemon. Some of its users include eliot, Cloud Foundry, Docker, Firecracker, and Bottlerocket.
The main containerd features are as follows:
A container is a metadata object in containerd. A container can be associated with resources such as an OCI runtime specification, image, root filesystem, and other features:
redis, err := client.NewContainer(context, "redis-master")
defer redis.Delete(context)
Namespaces enable several consumers to use the same container without conflict. They offer the advantage of sharing data while maintaining isolation with containers and pictures.
To provide a namespace for API calls, run the following code:
context = context.Background()

//create a context for docker
docker = namespaces.WithNamespace(context, "docker")

containerd, err := client.NewContainer(docker, "id")
To provide a default namespace on the client, do the following:
client, err := containerd.New(address, containerd.WithDefaultNamespace("docker"))
containerd provides a complete client package to assist us in integrating it into our platform:
import (
  "context"

  "github.com/containerd/containerd"
  "github.com/containerd/containerd/cio"
  "github.com/containerd/containerd/namespaces"
)


func main() {
        client, err := containerd.New("/run/containerd/containerd.sock")
        defer client.Close()
}
For operating containers, containerd fully implements the OCI runtime specification.
When constructing a container, we can indicate how to alter the specification:
redis, err := client.NewContainer(context, "redis-master", containerd.WithNewSpec(oci.WithImageConfig(image)))
![]()
CRI-O is another container runtime implementing the Kubernetes Container Runtime Interface. This means we can use it in our Kubernetes clusters to run containers.
CRI-O is an alternative to containerd and the other container runtimes. Similar to the latter, it pulls container images from registries, manages them on disk, and runs them.
Therefore, their use cases are pretty much the same. Generally speaking, we should choose based on the ecosystem we’re adopting. CRI-O is backed by RedHat and used in the RedHat OpenShift Container Platform.
Hence, if are migrating to tools like Podman and Buildah, using CRI-O rather than containerd might be a good choice. For example, you might receive more support from RedHat if you’re paying for it.
Docker Desktop is a fully-featured software allowing Mac and Windows systems to use a Linux virtual machine to run the Docker engine. It enables us to create and share containerized applications and microservices.
In August 2021, however, Docker Desktop announced changes to its licensing, meaning it would no longer be free for companies with more than 250 employees or over $10 million in revenue.
However, there are several alternative approaches to containerization, often in the form of standalone tools, which sometimes offer better results than what Docker Desktop delivers:
Rancher Desktop features a built-in GUI and is easy to use. The container runtime used by Kubernetes and Rancher Desktop is similar. Lastly, Rancher Desktop offers container management for building, pushing, and running containers.
Minikube is a way to run Kubernetes clusters locally on Mac, Windows, and Linux. It’s open-source and is designed to be very customizable. For instance, we can configure the use of alternative container runtimes, custom virtual machine images, and support for GPU and other hardware pass-through.
Lima is a container management application designed specifically for macOS, but Linux users can enjoy it as well.
In this article, we’ve described several Docker alternatives for building, running, and distributing container images. Although Docker remains the dominant platform for containerization and container management, it’s good to know about different tools that may work better for our use cases.
Replacing a specific Docker aspect should be fairly seamless because each tool mentioned adheres to the OCI specification.
Generally speaking, in some cases we don’t really have to choose between Docker and something else. The OCI-compliance of basically all of the Docker alternatives enable us to experiment and to use different tools in different environments. For example, we could use Docker locally, for its simplicity and ecosystem, whereas we could be using containerd in our production environment. Even if (sometimes) limited, Dockerfiles do not couple us to Docker. As we saw, many tools are capable of building images from them.
Be sure to leave a comment if there is any tool you think we missed. Thanks for reading!
Install LogRocket via npm or script tag. LogRocket.init() must be called client-side, not
server-side
$ npm i --save logrocket

// Code:

import LogRocket from 'logrocket';
LogRocket.init('app/id');
// Add to your HTML:

<script src="https://cdn.lr-ingest.com/LogRocket.min.js"></script>
<script>window.LogRocket && window.LogRocket.init('app/id');</script>

Learn how to set up Meilisearch, index documents, and build keyword, semantic, and hybrid search with AI-powered retrieval.

Compare pnpm and npm across security defaults, disk usage, dependency strictness, and workspace policy to decide which package manager fits your project.

I migrated 20 production-style components from Tailwind to StyleX. Here’s what the data showed about LOC, CSS bundle size, build time, and type safety.

A guide for using JWT authentication to prevent basic security issues while understanding the shortcomings of JWTs.
Hey there, want to help make our blog better?
Join LogRocket’s Content Advisory Board. You’ll help inform the type of content we create and get access to exclusive meetups, social accreditation, and swag.
Sign up now

