When building an enterprise Angular app, we often need to develop a few different frontends to serve different user types or channels. While they may require different UI styles or have unique features, they still share a lot of common functionalities.

One solution is to create separate apps as different, discrete projects for each frontend. Perhaps obviously, this approach will bloat the codebase, likely cause duplication, and leave you with code that is hard to maintain.
Thus, you might be thinking you need to look for a single-Angular-project solution that manages to cleanly separate the different UI components and services while maximizing code sharing. That’s quite a challenge!
But, just like the other software design decisions we make every day, the key is to find a balance between these two concerns: cleanly separated code and shareable service and utility functions.
In this article, we will explore how to build an Angular app with multiple frontends by utilizing lazy loading feature modules and dynamic configurations.
As a contrived example, we are going to build an e-health app with two frontends:
As shown in the below diagram, the two portals expose different features, but are built on the same framework and share some common functionality.
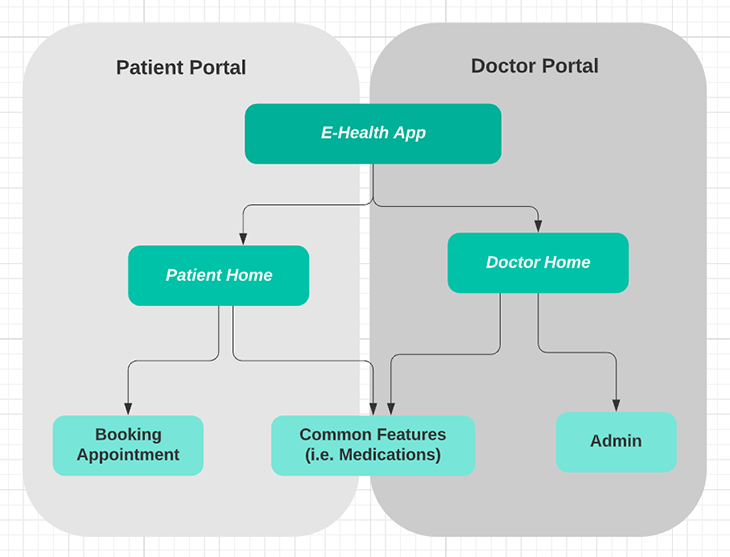
The goals we want to achieve are:
Before we start, make sure your local environment has the following tools installed:
Using the following Angular CLI command, we can create a new app skeleton.
ng new multipleFront
The newly created app contains a default app module and a default entry component. We can add a new module using the following CLI command.
ng g module patient --route patient --module app.module
The commands will generate a patient folder which contains the module, routing, and component files.
To create a new component, we can use the following CLI command:
ng g component home
Using the above CLI commands, we can set up our project structure as below.
 -- app
    -- patient module
          |-- [+] home components
          |-- patient-routing.module.ts
          |-- patient.module.ts
    -- doctor module
          |-- [+] home components
          |-- doctor-routing.module.ts
          |-- doctor.module.ts
    -- features
          |-- [+] admin module
          |-- [+] booking module
          |-- [+] meds module
    - app-routing.module.ts
    - app.module.ts
    - routes.ts
    - app-component.html
In Angular, everything is organized in modules. In the previous step, we generated the default app module, which is the entry point of the app. We can launch the app by bootstrapping the app module.
Then, we created feature modules. They’re typically organized by domain area, and can be used to group the related components, services, and other functionalities together.
A feature module has a root component that acts as the main view of the module. It hosts all of the sub-components within the module. The example below shows the admin feature module and its root component: AdminViewComponent.
    -- features
          |--  admin module
             |-- [+] Admin-View component
             |-- admin-routing.module.ts
             |-- admin.module.ts
Some benefits of feature modules include the ability to use lazy loading to load them on demand, and to reduce the bundle size of the main application.
      {
        path: 'booking',
        data: { title: 'Book appointment' },
        loadChildren: () =>
          import('../features/booking/booking.module').then(
            (m) => m.BookingModule
          ),
      }
In the above sample route, the booking feature module is only loaded when the route is activated. At build time, a separate bundle file is created for a lazy-loaded feature module, making the main bundle file size smaller.
To target each frontend portal, we’ll create a different environment file for them. Both environment files will reside under the environment folder, and we’ll use the moduleId to differentiate the patient and doctor portals.
// environment.ts
// default environment targeting the patient portal
export const environment = {
  production: false,
  moduleId: 'default'
}

// environment.doctor.ts
export const environment = {
    production: false,
    moduleId: 'doctor'
  }
Routes are the backbone for Angular. Different frontends require different routes. To serve each individual portal with only the routes it requires, we must generate the routes dynamically at runtime.
Firstly, we define all the routes in a single file, routes.ts, for easier maintenance.
export const routes: Routes = [
    {
      path: '',
      data: { name: 'default', modules: ['all'] },
      redirectTo: 'home',
      pathMatch: 'full',
    },
    {
      path: 'home',
      data: { name: 'home', title: 'Home', modules: ['default'] },
      loadChildren: () =>
        import('./patient/patient.module').then((m) => m.PatientModule),
    },
    {
      path: 'home',
      data: { name: 'home', title: 'home', modules: ['doctor'] },
      loadChildren: () =>
        import('./doctor/doctor.module').then((m) => m.DoctorModule),
    },
  ];
Why are there two Home routes in the file? That’s because we have two portal apps living in the project, and both of them require a Home route.
After the routes are defined, we set up the APP_INITIALIZER DI token to hook into the app bootstrap process.
  providers: [
    {
      provide: APP_INITIALIZER,
      useFactory: loadRoutes,
      deps: [Injector],
      multi: true,
    },
  ]
The APP_INITIALIZER token represents a factory function loadRoutes. The function executes during the application bootstrap process. The function will filter the routes and set routes into the current router, and the function will be completed before the app completely starts.
export function loadRoutes(injector: Injector) {
  return () => {
      const moduleId = environment.moduleId;
      const filteredRoutes = routes.filter((r) => {
        return (
          r.data?.modules.find((r: string) => r === 'all') ||
          r.data?.modules.find((r: string) => r === moduleId)
        );
      });
      const router: Router = injector.get(Router);
      router.resetConfig(filteredRoutes);
    };
}
In the above loadRoutes function, the routes are filtered by the moduleId configuration. Thus, only the relevant routes will be loaded into the app.
As a bonus, we can use dynamic routes as the data source to generate menus. When the routes are changed, the menu will update automatically.
Firstly, we create a menu service. It contains a menuItems$ observable.
menuItems$: BehaviorSubject<MenuItem[]>;
Once the service is initialized, we populate the menu items. The gist of the code below is:
configLoader to load the child routes, and transform the routes data into menu itemsthis.router.config.forEach((route) => {
const children: any[] = [];
if (route.loadChildren) {
(this.router as any).configLoader.load(this.injector, route).subscribe({
next: (moduleConf: { routes: any[] }) => {
children.push(
...moduleConf.routes.map((childRoute) =>
childRoute.children.map(
(x: { path: string; data: { title: string } }) => ({
path: x.path,
title: x.data?.title,
})
)
)
);
this.menuItems$.next(
this.menuItems$.value.concat
.apply([], [...children])
.filter((x) => x.title)
);
},
});
}
});
The menu service is injected into the menu component. We can use the same menu component across both portal apps. The same menu component will load and filter the menu items dynamically.
To apply different styles for each app, we create the following scss files:
styles.scss – the common style filestyles-patient.scss – the style file for patient portalstyles-doctor.scss – the style file for doctor portalIn the Angular.json file, the styles are mapped to different builds.
          "doctor": {
             "styles": ["src/styles-doctor.scss"],
To build and run the two portals separately, we rely on the environment configuration.
Since the app contains two environments, default and doctor, we need to add the following configuration into the Angular.json file.
The fileReplacements setting below specifies that the default environment.ts file will be replaced by the environment.doctor.ts file at runtime.
            "doctor": {
              "fileReplacements": [
                {
                  "replace": "src/environments/environment.ts",
                  "with": "src/environments/environment.doctor.ts"
                }
              ],
Each portal app can be built for their environment with the following command.
// package.json
// build patient portal with default configuration
"build": "ng build",
// build doctor portal
"build:doctor": "ng build -c doctor"
To build the app in production mode, we run the following command. Please note that doctorproduction is another environment configuration in our Angular.json file.
// package.json
// build the patient portal in production mode
"build:patient:prod": "ng build --prod"

// build the doctor portal in production mode
"build:doctor:prod": "ng build -configuration doctorproduction"
The build output will be copied into the dist folder, ready for publishing to the webhost.
We can start the app using one of the commands below.
// package.json
// start the app as default patient portal
"start": "ng serve"

// start the app as doctor portal
"start:doctor": "ng serve -c doctor"
Now, we have started the app successfully! The home screens for both the patient and doctor portals are shown below.
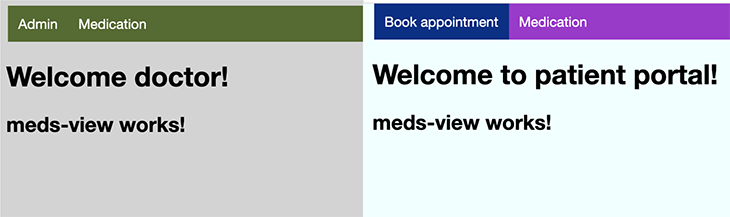
The patient portal and doctor portal have different entry components, which serve as the container for the child components. Each portal can have its own header/footer component and independent CSS styles. When we change one app, the other won’t be affected.
As shown in the above example app, each portal picks their own feature modules and lazy-loads them. The lazy-loading feature modules are built into small bundle files, which will only be downloaded to the client browser when the router is navigated to. For example, when the doctor portal is deployed and run, only the doctor module will be loaded. The patient portal modules won’t be loaded as they’re not in the route.
This design results in better performance because each app won’t load the modules that are not required. It’s also great for security — as the patient portal deployment package is built with only the related modules, it’s not possible to access the doctor-portal-only modules from the patient portal!
While the two portals work as different apps, they actually stay in the same project. This makes code sharing easy, and allows the common framework to be extracted into a shared module.
In this article, we walk through an Angular app with two frontends. They’re built with Angular custom environment configurations, dynamic routes, and lazy-loading feature modules. We achieved our goals of clear separation, easy code sharing, and independent build output.
I hope you find this article useful. The source code for the example project, including the CSS style files we mentioned earlier, can be found on my GitHub.
Debugging Angular applications can be difficult, especially when users experience issues that are difficult to reproduce. If you’re interested in monitoring and tracking Angular state and actions for all of your users in production, try LogRocket.
LogRocket lets you replay user sessions, eliminating guesswork by showing exactly what users experienced. It captures console logs, errors, network requests, and pixel-perfect DOM recordings—compatible with all frameworks.
With Galileo AI, you can instantly identify and explain user struggles with automated monitoring of your entire product experience.
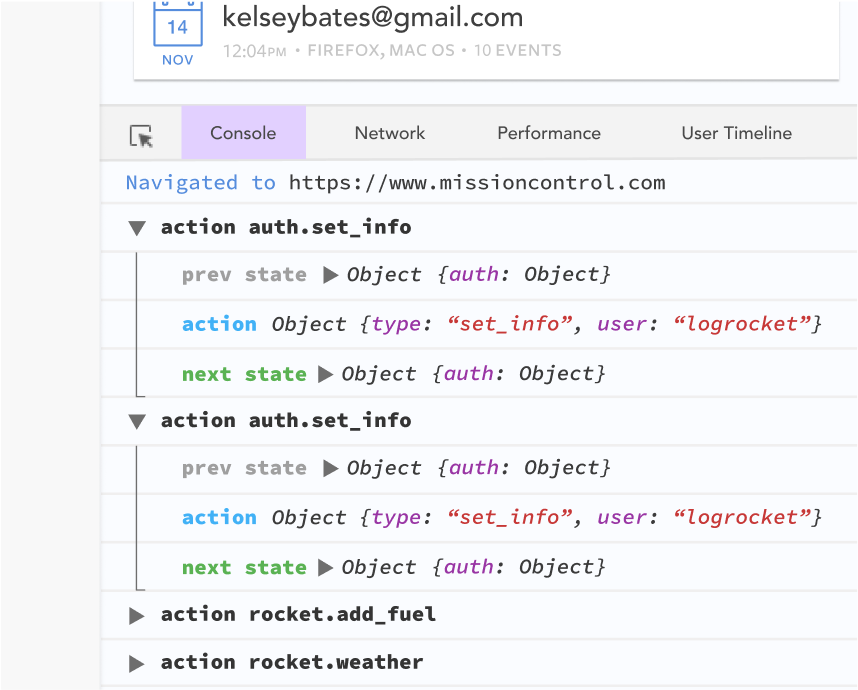
The LogRocket NgRx plugin logs Angular state and actions to the LogRocket console, giving you context around what led to an error, and what state the application was in when an issue occurred.
Modernize how you debug your Angular apps — start monitoring for free.
Would you be interested in joining LogRocket's developer community?
Join LogRocket’s Content Advisory Board. You’ll help inform the type of content we create and get access to exclusive meetups, social accreditation, and swag.
Sign up now
Learn how OpenAPI can automate API client generation to save time, reduce bugs, and streamline how your frontend app talks to backend APIs.

Discover how the Interface Segregation Principle (ISP) keeps your code lean, modular, and maintainable using real-world analogies and practical examples.

<selectedcontent> element improves dropdowns

Learn how to implement an advanced caching layer in a Node.js app using Valkey, a high-performance, Redis-compatible in-memory datastore.
