You may have come across websites with animated logos and wondered how they were created. There are different methods to achieve this effect, such as using SVG or GIF files with animated icons. However, these types of animations can be demanding on website performance and can slow down your website.
However, there’s a third type of animation that is often overlooked: Lottie. Lottie is a JSON-based animation format that is only half the size of other animation formats and can be seamlessly integrated into a website without concern for performance issues.
In this article, we’ll introduce Lottie’s features and walk through the process of creating a Lottie animation and integrating it into a Vue 3 application. We’ll also demonstrate how to apply these techniques to a real-life use case: creating animated logos and adding them to a website.
Jump ahead:
<Vue3Lottie> component
<Vue3Lottie> component into a Vue 3 appIn order to participate in the tutorial part of this article, it is recommended that you have:
Lottie is an open source animation file format for creating JSON-based animations that can be easily shipped on any platform as static assets. Lottie files are tiny, can function on any device, and can be scaled up or down without causing any pixelation. By adding Lottie animations to a native or web app, devlopers have complete control over every aspect of the animation, without any added complexity.
Lottie animations offer several advantages over other visual file formats, like GIF and PNG, thanks to their ability to be rendered through JSON. Lottie’s small file size and high performance makes it significantly faster than other animation file formats, translating to up to 90 percent faster page loading times:
Although the above animations may appear complex to produce, they are generally fairly easy to create using design tools like Adobe After Effects, Adobe XD, Figma, Framer X, or ProtoPie. These programs provide plugins that enable us to export any type of animation into a Lottie format.
A Lottie can be created using any motion design software that comes to mind, but Adobe After Effects is the most popular.
It’s possible to create intricate animations using Adobe After Effect and then export the animations as a Lottie. If you’re not proficient with animation design tools, just visit the official Lottie website and select one of the free, prebuilt animations for practice:

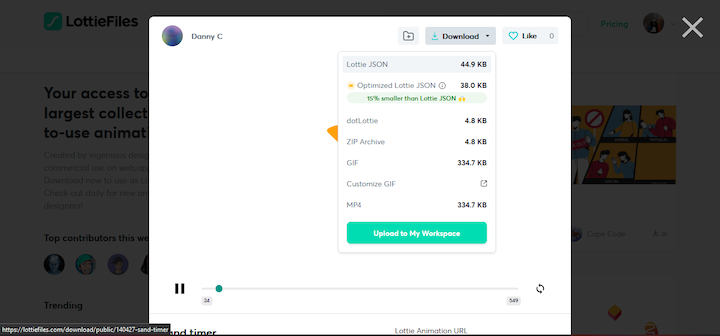
Sign up for a free account and peruse the available animations. Click on any animation to select it. Next, you can customize the animation by adjusting its color, background color, and speed in the modal popup:
Download the customized animation by clicking Download at the top, right of the modal. Select Lottie JSON as the download format and then add it to your project:
Instead of customizing and exporting a prebuilt Lottie file, you could also choose to convert an SVG into a Lottie animation. This approach allows you to make your animated graphics editable and customizable to match your website’s visual style, all while avoiding potential performance issues.
You can use specialized tools like IconScout, BodyMovin, or After Effect to convert an SVG animation into Lottie format. Usually, this involves uploading the SVG file to the tool and exporting it as a Lottie file.
Instead of going through the process of manually converting SVG files to Lottie format, we can save time by using the LottieFiles platform. LottieFiles offers a tool that automatically converts SVG files to Lottie files and animates them.
To use this tool, navigate to the LottieFiles SVG to Lottie conversion page and upload an SVG file:

Once the conversion process is finished, you’ll be directed to a new page where you can select the preferred animation style for the SVG. Once finished, click Download Lottie and include the file in your project:
Now that we know how to create a Lottie, let’s look at how to render Lottie animations in a Vue 3 project.
Vue.js, like other frontend frameworks, does not render Lottie files by default. In order to integrate Lottie files into a Vue application, we’ll use the vue3-lottie library. This library consists of a Vue 3 wrapper around the lottie-web library; it simplifies the process of using Lottie animations in Vue.js projects.
First we’ll need to create the Vue 3 development environment. Navigate to a desired directory on your machine and launch your preferred IDE. For the purposes of this tutorial, we’ll use VS Code.
Next, run the following command to install Vue.js:
npm init vue@latest
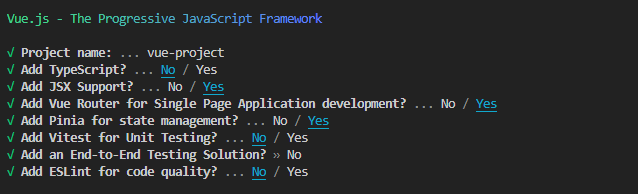
This command will initiate create-vue, the official Vue project scaffolding tool. It will prompt you to select some configurations. To follow along with this tutorial, the configuration options shown below will be adequate as this is a simple application:
Before starting the development server, run one of the following commands to install the vu3-lottie package:
npm install vue3-lottie@latest --save
Or
yarn add vue3-lottie@latest --save
Once the installation is complete, run npm install and npm run devto install the necessary dependencies for the project and start the development server.
<Vue3Lottie> componentThe vue3-lottie library provides a Lottie component, <Vue3Lottie>, that can be used to render Lottie animations with additional features such as event listeners and control over playback options.
The <Vue3Lottie> component offers a range of props that enable users to manage animation playback and trigger events in response to the animation’s state. Here’s an example of what the component looks like:
<Vue3Lottie
  ref="customControl"
  :animationData="AnimateJSON"
  :animationLink="https://assets5.lottiefiles.com/packages/lf20_vmollwvl.json"
  :height="200"
  :width="200"
  :loop="true"
  :speed="2"
  :autoPlay="true"
  :direction="forward"
  :pauseAnimation="true"
  :pauseOnHover="true"
/>
Let’s take a closer look at some of the <Vue3Lottie> component’s props.
refThe ref prop is critical for the <Vue3Lottie> component when creating complex animations, as it enables users to get a reference to the Lottie animation instance and interact with it programmatically. By using the ref prop, users can directly invoke animation playback methods on the component, allowing them to trigger playback on a desired event.
:animationDataThe :animationData prop enables the import of the Lottie JSON file from the assets folder into the project, as shown below:
:animationData="./assets/animateJSON"
:animationLinkThe :animationLink prop functions similarly to the :animationData prop. It is used to incorporate Lottie JSON files into the project. However, rather than importing the asset locally, it imports it from an external link, as demonstrated below:
:animationLink="https://assets5.lottiefiles.com/packages/lf20_vmollwvl.json"
:height and :widthThe :height and :width props are used to set the dimensions of the animation container. These props accept numerical values that correspond to pixels.
:loopThe :loop prop accepts a Boolean value that determines whether the animation should play only once or loop continuously.
:speedThe :speed prop accepts numerical values that regulate the speed of the animation playback.
:autoPlayThe autoPlay prop accepts a Boolean value that controls whether the animation should start playing automatically.
:directionThe direction prop is used to control the playback direction of the animation. It accepts two string values: forward or reverse. The forward value is used to play the animation normally from beginning to end, while the reverse value is used to play the animation in reverse when it reaches the end.
:pauseAnimation and :pauseOnHoverThe :pauseAnimation prop accepts Boolean values that control the play and pause state of the animation, while the :pauseOnHover prop pauses the animation when the cursor is hovering over it.
There are additional props that can be used to listen for events emitted by the <Vue3Lottie> component. These props accept functions that will be triggered when the corresponding event occurs:
onLoopComplete: triggers once the animation completes a full looponComplete: triggers (only if loop is false) once the animation completes playbackonEnterFrame: triggers on every frame played; note that this event fires frequentlyonSegmentStart: triggers when the animation enters each animation segmentonAnimationLoaded: triggers when the animation has finished loading; this event signals that the component’s methods are now available for referenceHere’s an example showing how these additional props can be used for event listening:
<Vue3Lottie
  ref="customControl"
  ...
  onComplete="complete"
  onLoopComplete="loopComplete"
  onEnterFrame="enterFrame"
  onAnimationLoaded="loaded"
  onSegmentStart="segmentStart"
/>
<Vue3Lottie> component into a Vue 3 appNow that we have an idea of how the <Vue3Lottie> component works, let’s now explore how we can integrate it into our sample project.
As a first step, we need to globally register the component. Navigate to the main.js file and add the following imports:
import Vue3Lottie from "vue3-lottie";
import "vue3-lottie/dist/style.css";
This is an import of the <Vue3Lottie> component and its peer-style dependency. Next, register the component by passing it into the app instance, like so:
app.use(Vue3Lottie);
After registering the <Vue3Lottie> component globally, the main.js file should look like this:
import { createApp } from "vue";
import App from "./App.vue";
import router from "./router";
import Vue3Lottie from "vue3-lottie";
import "vue3-lottie/dist/style.css";
import "./assets/main.css";

const app = createApp(App);

app.use(router);
app.use(Vue3Lottie);

app.mount("#app");
Alternatively, you can also import the component locally:
import { Vue3Lottie } from "vue3-lottie";
import "vue3-lottie/dist/style.css";

export default {
  components: {
    Vue3Lottie,
  },
};
Here’s a basic example of how to use the globally-registered <Vue3Lottie> component to render animations in Vue 3:
<script>
import playJSON from "./assets/play-football.json";

export default {
  data() {
    return {
      playJSON,
    };
  },
};
</script>

<template>
  <main>
    <div class="wrapper">
      <Vue3Lottie :animationData="playJSON" :height="200" :width="200" />
    </div>
  </main>
</template>
The <Vue3Lottie> component offers several methods that can be called directly on the component through the ref prop. Let’s take a closer look.
play()The play() method resumes the animation if it is paused and will start the animation if it is stopped:
<script>
import playJSON from "./assets/play-football.json";

export default {
  data() {
    return {
      playJSON,
    };
  },
  methods: {
    play() {
      this.$refs["anim"].play();
    },
  },
};
</script>

<template>
  <main>
    <div class="wrapper">
      <Vue3Lottie
        ref="anim"
        :animationData="playJSON"
        :height="200"
        :width="200"
        :autoPlay="false"
      />
      <button @click="play">Play()</button>
    </div>
  </main>
</template>
Here we use the anim ref to reference the animation instance on the <Vue3Lottie> component, and call the play() method when the button is clicked:
pause()The pause() method pauses the animation if it is playing:
<script>
import colorJSON from "./assets/color-loader.json";

export default {
  data() {
    return {
      colorJSON,
    };
  },
  methods: {
    play() {
      this.$refs["anim"].play();
    },
    pause() {
      this.$refs["anim"].pause();
    },
  },
};
</script>

<template>
  <main>
    <div class="wrapper">
      <Vue3Lottie
        ref="anim"
        :animationData="colorJSON"
        :height="200"
        :width="200"
        :autoPlay="false"
      />
      <div class="btns">
        <button @click="play">play()</button>
        <button @click="pause">pause()</button>
      </div>
    </div>
  </main>
</template>
In this example, we can control the animation by calling the play() and pause() methods on the animation instance. This allows us to pause and resume the animation as needed:
stop()The stop() method resets the animation to the first frame:
<script>
import loadingJSON from "./assets/loading.json";

export default {
  data() {
    return {
      loadingJSON,
    };
  },
  methods: {
    play() {
      this.$refs["anim"].play();
    },
    stop() {
      this.$refs["anim"].stop();
    },
  },
};
</script>

<template>
  <main>
    <div class="wrapper">
      <Vue3Lottie
        ref="anim"
        :animationData="loadingJSON"
        :height="200"
        :width="200"
        :autoPlay="false"
      />
      <div class="btns">
        <button @click="play">play()</button>
        <button @click="stop">stop()</button>
      </div>
    </div>
  </main>
</template>
In this code snippet, we’re using the play() and stop() methods to control the animation. This allows us to start and restart the animation as needed:
destroy()The destroy() method destroys the animation and removes it from the DOM:
<script>
import bookJSON from "./assets/dancing-book.json";

export default {
  data() {
    return {
      bookJSON,
    };
  },
  methods: {
    play() {
      this.$refs["anim"].play();
    },
    destroy() {
      this.$refs["anim"].destroy();
    },
  },
};
</script>

<template>
  <main>
    <div class="wrapper">
      <Vue3Lottie
        ref="anim"
        :animationData="bookJSON"
        :height="200"
        :width="200"
        :autoPlay="false"
      />
      <div class="btns">
        <button @click="play">play()</button>
        <button @click="destroy">destroy()</button>
      </div>
    </div>
  </main>
</template>
As demonstrated below, when the destroy() method is called on the Lottie animation, the animation is removed from the DOM:
Let’s apply what we’ve learned in the previous sections of this article and create an animated logo for a website. The procedure is straightforward. We simply need to animate the logo, export it as a Lottie (or convert it to a Lottie file), and then add it to the website’s header section.
Below is an example of an animated logo added to our example project:
  <header>
    <nav>
      <div ref="target" class="logo">
        <Vue3Lottie
          ref="anim"
          :animationData="feesbeeJSON"
          :height="60"
          :width="60"
          :loop="2"
        />
      </div>
      <ul class="list">
        <li>Home</li>
        <li>About</li>
        <li>Help</li>
      </ul>
    </nav>
  </header>
![]()
For further customization, we can take things up a notch and set the logo animation to play at a specified time interval.To do so, we’ll wrap the play() method inside a setInterval() method that invokes it every time it runs:
<script>
import flowJSON from "./assets/video-flow.json";
import { ref, onMounted } from "vue";
import { getCurrentInstance } from "vue";

export default {
  setup() {
    const anim = ref(null);

    //Get the play() function instance
    const instance = getCurrentInstance();

    //Set interval when app mounts
    onMounted(() => {
      setInterval(() => {
        instance.ctx.play();
      }, 7000);
    });

    return {
      flowJSON,
      anim,
    };
  },

  methods: {
    play() {
      this.$refs["anim"].play();
    },
    reset() {
      this.$refs["anim"].stop();
    },
  },
};
</script>

<template>
  <header>
    <nav>
      <div ref="target" class="logo">
        <Vue3Lottie
          ref="anim"
          :animationData="flowJSON"
          :height="60"
          :width="60"
          :loop="2"
          :autoPlay="false"
          @onLoopComplete="reset"
        />
      </div>
      <ul class="list">
        <li>Home</li>
        <li>About</li>
        <li>Help</li>
      </ul>
    </nav>
  </header>
  <main>
    <div class="wrapper">
      <div>
        <h1>Section 1</h1>
        <h1>Section 2</h1>
        <h1>Section 3</h1>
      </div>
    </div>
  </main>
</template>
In the above code, the play() method is being called on the animation every 7 seconds using the setInterval method. Although the loop prop is set to 2, the animation does not reset after running twice. To call the play() method on it a second time, we must first reset the animation. To address this, we use the @onLoopComplete prop to call a reset method that resets the animation using the stop() method when the animation ends:
![]()
Here is another example with a different animated logo:
![]()
There you have it, a comprehensive guide on how to create animated logos in Vue 3 applications!
Incorporating Lottie animations in Vue.js projects is an exciting way to enhance user experience and create engaging web content. With the right tools and techniques, you can create visually stunning and interactive animations that will captivate your audience.
In this article, we explored how to create, export, and add Lottie animations to Vue 3 projects, as well as how to control the animation’s behavior using the various methods provided by the <Vue3Lottie> component. We also demonstrated how to create animated logos with Lottie and add them to a Vue 3 application.
Debugging Vue.js applications can be difficult, especially when users experience issues that are difficult to reproduce. If you’re interested in monitoring and tracking Vue mutations and actions for all of your users in production, try LogRocket.

LogRocket lets you replay user sessions, eliminating guesswork by showing exactly what users experienced. It captures console logs, errors, network requests, and pixel-perfect DOM recordings — compatible with all frameworks.
With Galileo AI, you can instantly identify and explain user struggles with automated monitoring of your entire product experience.
Modernize how you debug your Vue apps — start monitoring for free.

Learn how to set up Meilisearch, index documents, and build keyword, semantic, and hybrid search with AI-powered retrieval.

Compare pnpm and npm across security defaults, disk usage, dependency strictness, and workspace policy to decide which package manager fits your project.

I migrated 20 production-style components from Tailwind to StyleX. Here’s what the data showed about LOC, CSS bundle size, build time, and type safety.

A guide for using JWT authentication to prevent basic security issues while understanding the shortcomings of JWTs.
Hey there, want to help make our blog better?
Join LogRocket’s Content Advisory Board. You’ll help inform the type of content we create and get access to exclusive meetups, social accreditation, and swag.
Sign up now

