Editor’s note: This article was last updated 16 June 2023 to include additional information about potential errors you may encounter in Diesel.

For the past seven years, the Rust programming language has been voted the most loved programming language in the annual Stack Overflow Developer Survey. Its popularity stems from its focus on safety, performance, built-in memory management, and concurrency. All of these features make it an excellent option for building web applications.
However, Rust is a system programming language; web frameworks like Rocket, Actix, Warp, and more enable developers to create web applications with Rust.
Combined, Rocket and Diesel provide a powerful and efficient toolset for building web apps in Rust. In this article, we’ll learn how to create a web app using Rust, Rocket, and Diesel. We’ll go over setting up the development environment, examining the different components, setting up API endpoints, and rendering HTML.
To get the most from this article, you’ll need to have a basic understanding of Rust. You’ll also need to have Rust and PostgreSQL installed and running. If you’re using macOS, you can install and get your PostgreSQL database up and running quickly by running the following commands in your terminal:
brew update && brew install postgresql && brew services start postgresql
You can also follow along with the GitHub repo. Let’s get started!
Jump ahead:
The Replay is a weekly newsletter for dev and engineering leaders.
Delivered once a week, it's your curated guide to the most important conversations around frontend dev, emerging AI tools, and the state of modern software.
Rocket is a Rust web framework with built-in tools that developers need to create efficient and secure web apps while maintaining flexibility, usability, memory, and type safety with a clean and simple syntax.
As is customary for most web frameworks, Rocket allows you to use object-relational mappers (ORMs) as a data access layer for your application. Rocket is ORM agnostic, meaning you can use any Rust ORM of your choice to access your database in your Rocket application.
In this article, we’ll use Diesel, one of the most popular Rust ORMs. At the time of writing, Diesel ORM supports SQLite, PostgreSQL, and MySQL databases.
First, let’s create a new Rust Binary-based application with Cargo, as shown below:
cargo new blog --bin
When you run the command above, a blog directory will automatically be generated with the following structure:
.
├── Cargo.toml
└── src
    └── main.rs
Next, we’ll need to add Diesel, Rocket, and other dependencies to the Cargo.toml file. These additional dependencies include:
dotenvy crate: Allows us to use environment variables from the .env fileserde: For data serialization and deserializationdependencies.rocket_contrib: Works with Serde for data deserializationdependencies.rocket_dyn_templates: For dynamic templating engine support#Cargo.toml
[package]
name = "blog"
version = "0.1.0"
edition = "2021"
[dependencies]
rocket = { version = "0.5.0-rc.2", features=["json"]}
diesel = { version = "2.0.0", features = ["postgres", "r2d2"] }
dotenvy = "0.15"
serde = "1.0.152"
[dependencies.rocket_dyn_templates]
features = ["handlebars"]
[dependencies.rocket_contrib]
version = "0.4.4"
default-features = false
features = ["json"]
With that, we have all the dependencies. Notice that I enabled json in features to make serde json available in the Rocket application. I also enabled postgres and r2d2 for Diesel to make the PostgreSQL and connection pooling features available.
Diesel provides a CLI that allows you to manage and automate the Diesel setup database reset and database migrations processes. Install the Diesel CLI by running the command below:
cargo install diesel_cli --no-default-features --features postgres
Make sure that you have PostgreSQL installed. Otherwise, you’ll encounter errors. Next, create a .env file and add your database connection string, as shown below:
DATABASE_URL=postgres://username:password@localhost/blog
Keep in mind that the blog database must exist on your Postgres database. From there, run the diesel setup command on your terminal. This command will create a migration file and a diesel.toml file with the necessary configurations, as shown below:
├── Cargo.toml
├── diesel.toml
├── migrations
│   └── 00000000000000_diesel_initial_setup
│       ├── down.sql
│       └── up.sql
└── src
    └── main.rs
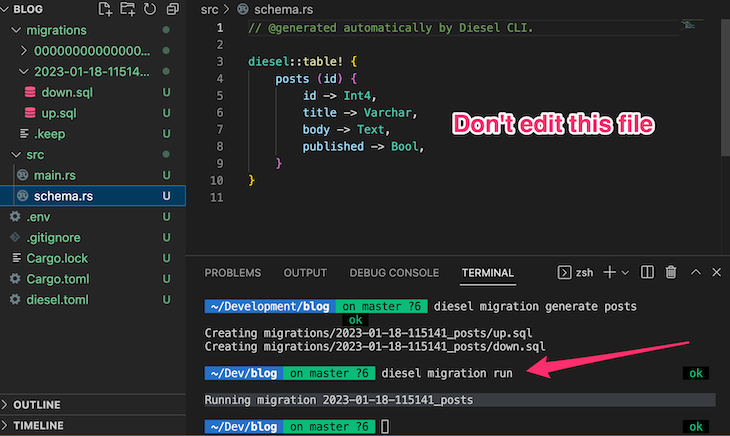
Because this project is a blog with a posts table to store all posts, we need to create a migration with diesel migration generate posts. The response should look like the following:

Now, when you open the up.sql file in the migration directory, there shouldn’t be any content in it. Next, add the SQL query to create the posts table with the code below:
CREATE TABLE posts (
  id SERIAL PRIMARY KEY,
  title VARCHAR NOT NULL,
  body TEXT NOT NULL,
  published BOOLEAN NOT NULL DEFAULT FALSE
)
Open the down.sql file and add a query to drop the table as follows:
-- This file should undo anything in `up.sql`
DROP TABLE posts
Once these files are updated, we can run the migration. You’ll need to create the down.sql file and make sure it’s accurate so that you can quickly roll back your migration with a simple command. To apply the changes we just made to the migration file, run the diesel migration run command.
You’ll notice that the schema.rs file and the database table will be created. It should look like the following:

In PostgreSQL, the table will look like the following images:


To redo the migration, run the diesel migration redo command. The table we just created will be deleted from the Postgres database. Of course, this isn’t something you’d want to do when you have real data because you’ll delete everything. So far, we’ve set up Diesel. Next, we need to set up the blog post model to allow Rocket to effectively interact with the schema.
To build the Rocket model, create a Models directory and a mod.rs file. Then, add the following code to it:
// models/mod.rs
use super::schema::posts;
use diesel::{prelude::*};
use serde::{Serialize, Deserialize};

#[derive(Queryable, Insertable, Serialize, Deserialize)]
#[diesel(table_name = posts)]
pub struct Post {
    pub id: i32,
    pub title: String,
    pub body: String,
    pub published: bool,
}
Notice that we’re deriving Queryable, Insertable, Serialize, Deserialize. Queryable will allow us to run select queries on the table. If you don’t want the table to be selectable, you can ignore it like Insertable, which allows you to create a record in the database. Finally, Serialize and Deserialize automatically allow you to serialize and deserialize the table.
Your application structure should now look like the following code:
.
├── Cargo.lock
├── Cargo.toml
├── diesel.toml
├── target
├── migrations
│   ├── 00000000000000_diesel_initial_setup
│   │   ├── down.sql
│   │   └── up.sql
│   └── 2023-01-18-115141_posts
│       ├── down.sql
│       └── up.sql
└── src
    ├── main.rs
    ├── models
    │   └── mod.rs
    └── schema.rs
At this point, we have everything set up. Now, let’s write a service to create a blog post via an API and display it in the browser. That way, we’ll learn how to handle both scenarios. Before making services to create and view the blog posts, let’s connect to the database.
Create a services directory and add the following code to the mod.rs file:
extern crate diesel;
extern crate rocket;
use diesel::pg::PgConnection;
use diesel::prelude::*;
use dotenvy::dotenv;
use rocket::response::{status::Created, Debug};
use rocket::serde::{json::Json, Deserialize, Serialize};
use rocket::{get, post };
use crate::models;
use crate::schema;
use rocket_dyn_templates::{context, Template};
use std::env;

pub fn establish_connection_pg() -> PgConnection {
    dotenv().ok();
    let database_url = env::var("DATABASE_URL").expect("DATABASE_URL must be set");
    PgConnection::establish(&database_url)
        .unwrap_or_else(|_| panic!("Error connecting to {}", database_url))
}
In the code above, we imported all the necessary crates we’ll use in the service and created the Postgres connection function. We’ll reuse this function when we create and query data from the database. Now that we have a database connection, let’s implement a function to create a record in the database.
Creating a record with Diesel is pretty straightforward. We’ll start by creating a struct that represents the structure of the data we are expecting from the client and then enable Serialization via the derive attribute:
//service/mod.rs

#[derive(Serialize, Deserialize)]
pub struct NewPost {
    title: String,
    body: String,
}
Next, we’ll create the actual function that receives and processes the data from the client:
type Result<T, E = Debug<diesel::result::Error>> = std::result::Result<T, E>;

#[post("/post", format = "json", data = "<post>")]
pub fn create_post(post: Json<NewPost>) -> Result<Created<Json<NewPost>>> {
    use self::schema::posts::dsl::*;
    use models::Post;
    let connection = &mut establish_connection_pg();

    let new_post = Post {
        id: 1,
        title: post.title.to_string(),
        body: post.body.to_string(),
        published: true,
    };

    diesel::insert_into(self::schema::posts::dsl::posts)
        .values(&new_post)
        .execute(connection)
        .expect("Error saving new post");
    Ok(Created::new("/").body(post))
}
The create_post function above accepts a post object as a parameter and returns a Result that could be an error or a successful creation. The #[post("/posts")] attribute indicates that it’s a POST request. The Created response returns a 200 status code. Created::new("/").body(post) returns both the 200 status code, and, if the insertion was successful, the record that was just inserted as a JSON Deserialized object.
Now that we can create records, let’s create the functionality to view the records in the browser. The creation logic was for a Rest API. Now, we need to meddle with HTML templates:
#[get("/posts")]
pub fn list() -> Template {
    use self::models::Post;
    let connection = &mut establish_connection_pg();
    let results = self::schema::posts::dsl::posts
        .load::<Post>(connection)
        .expect("Error loading posts");
    Template::render("posts", context! {posts: &results, count: results.len()})
}
In the code above, we requested all the posts in the posts table. Note that the #[get("/posts")] attribute indicates that it’s a GET request. We can also use a filter to only fetch published posts. For example, the code below will fetch all posts that have been published:
let results = self::schema::posts::dsl::posts
        .filter(published.eq(true))
        .load::<Post>(connection)
        .expect("Error loading posts");
The function returns a Template, right? Remember the Cargo.toml file that we added handlebars to as the templating engine? That function will return a template, and handlebars will take care of the rest:
[dependencies.rocket_dyn_templates]
features = ["handlebars"]
Let’s take a closer look at the response:
Template::render("posts", context! {posts: &results, count: results.len()})
The first argument is the handlebar’s template file name. We haven’t created it yet, so let’s do that now. First, create a directory named templates and add the posts.html.hbs file. Make sure that HTML is in the name. Otherwise, Rocket might not be able to recognize the file as a template.
For the content of the file, add the following code:
<!DOCTYPE html>
<html lang="en">
<head>
    <meta charset="UTF-8">
    <meta http-equiv="X-UA-Compatible" content="IE=edge">
    <meta name="viewport" content="width=device-width, initial-scale=1.0">
    <title>Blog Posts</title>
</head>
<body>
    <section id="hello">
        <h1>Posts</h1>
        New Posts
        <ul>
            {{#each posts}}
            <li>Title: {{ this.title }}</li>
            <li>Body: {{ this.body }}</li>
            {{else}}
            <p> No posts yet</p>
            {{/each}}
        </ul>
    </section>
</body>
</html>
We use the #each loop in the template to loop through the posts and display the content individually. By now, your directory structure should look like the following:
.
├── Cargo.lock
├── Cargo.toml
├── diesel.toml
├── migrations
│   ├── 00000000000000_diesel_initial_setup
│   │   ├── down.sql
│   │   └── up.sql
│   └── 2023-01-18-115141_posts
│       ├── down.sql
│       └── up.sql
├── src
│   ├── main.rs
│   ├── models
│   │   └── mod.rs
│   ├── schema.rs
│   └── services
│       └── mod.rs
└── templates
    └── posts.html.hbs
Lastly, let’s add a route and test the application. Open the main.rs file and replace the existing "Hello, World!" function with the following:
extern crate rocket;
use rocket::{launch, routes};
use rocket_dyn_templates::{ Template };
mod services;
pub mod  models;
pub mod  schema;

#[launch]
fn rocket() -> _ {
    rocket::build()
        .mount("/", routes![services::create_post])
        .mount("/", routes![services::list])
        .attach(Template::fairing())
}
In the code above, we imported the launch macro that generates the main function, the application’s entry point, and returns Rocket<Build>. You’ll have to mount every route you want to add. We use the attach method to render the template and pass the fairing trait to it. That’s it! Now, we’re ready to test the application.
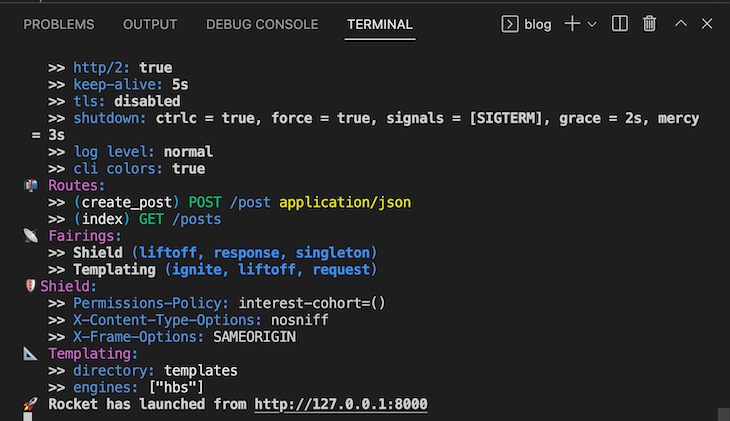
At this point, we’ve finished the hard part. Now, let’s do the fun part and see how it all works! First, compile and run the application by running the cargo run command on your terminal. If everything goes well, you should see something like the image below:

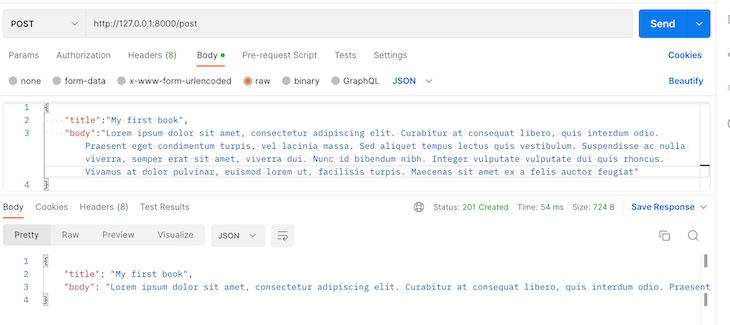
Go to http://127.0.0.1:8000/posts via your browser GET request to view all the posts you’ve created. Initially, there won’t be any posts, so let’s create one with Postman. We’ll make an HTTP POST request to the /post endpoint to create a blog post:

When we check back again on the browser, we should see our new post:

Now that we’re familiar with the basic things you can do with Diesel and the Rocket web framework, let’s take it a little further. We’ll consider a much more complex query that will aggregate data from multiple tables.
Diesel ORM simplifies the process of querying complex data using JOIN. Usually for a standard blog contains tags and categories. Assuming we want to fetch blog posts base on category what kind of query are we going to write to achieve that? Our current implementation returns the entire blog posts.
Let’s write a query with Diesel ORM that fetches posts based on categories. But before that, if you’ve been coding along, you might need to adjust the schema and the model to include categories.
Your Post model should now look like the following, including the category_id:
#[derive(Queryable, Insertable, Serialize, Deserialize)]
#[diesel(table_name = posts)]
pub struct Post {
    pub id: i32,
    pub title: String,
    pub body: String,
    pub published: bool,
    pub category_id: i32,
}
Then, create a new model for categories:
#[derive(Queryable, Insertable, Serialize, Deserialize)]
#[diesel(table_name = categories)]
pub struct Category {
    pub id: i32,
    pub name: String,
}
Next, create the migration by running the following commands in your terminal:
diesel migration generate category
Once the migration is successful, go ahead and add the following table creation code for the category in the category migration file up.sql that was generated:
-- Your SQL goes here
CREATE TABLE categories (
    id SERIAL PRIMARY KEY,
    name VARCHAR(255) NOT NULL,
);
Also, alter the post table by adding the category_id field a foreign key to it:
-- Your SQL goes here
CREATE TABLE posts (
    id SERIAL PRIMARY KEY,
    title VARCHAR(255) NOT NULL,
    body TEXT NOT NULL,
    published BOOLEAN NOT NULL,
    category_id INTEGER,
    FOREIGN KEY (category_id) REFERENCES categories(id)
);
Run the migration by running the code:
diesel migration run
It will apply the migration to the database. Now, we can go ahead to update the get endpoint to return posts with their categories. First, we’ll create a struct PostWithCategory to hold the new post type:
#[derive(Serialize, Deserialize, Queryable)]
struct PostWithCategory {
    id: i32,
    title: String,
    body: String,
    name: String
}
Then we’ll run an inner join query to get all the posts and their matching categories:
let query = posts::table
      .inner_join(categories::table.on(posts::category_id.eq(categories::id)))

let post_with_category: Vec<PostWithCategory> = query
      .select((posts::id, posts::title, posts::body, categories::name))
      .load(connection)
      .expect("Error loading post with category");
You can also use left join if you want to return posts regardless of whether it has a category or not. However, you might need to update the schema so that Rust knows that it’s possible that a category can be none for a left join to work. Right now, it’s assumed that all posts must have a category.
What if we want to add tags to each post? One post will have multiple tags, but others may have none. We can use multiple left joins to get the posts, tags, and the categories in one query, like so:
#[derive(Serialize, Deserialize, Queryable, Debug)]
struct PostWithCategoryAndTags {
    id: i32,
    title: String,
    body: String,
    category_name: Option<String>,
    tag_name: Option<String>,
}
let _query = posts::table
    .left_join(categories::table.on(posts::category_id.eq(categories::id.nullable())))
    .left_join(post_tags::table.on(posts::id.eq(post_tags::post_id)))
    .left_join(tags::table.on(post_tags::tag_id.eq(tags::id)));

let posts_with_categories_and_tags: Vec<PostWithCategoryAndTags> = _query
    .select((posts::id, posts::title, posts::body, categories::name.nullable(), tags::name.nullable()))
    .load(connection)
    .expect("Error loading posts with categories and tags");
Be sure to adjust the schema accordingly. In the left_join, we are matching the category and tags with their matching IDs in the post model and post_tags models, accordingly.
The select method resembles the SQL select method, allowing you to specify the data you want to return from the query. If converted to raw SQL syntax, the query above will look like the following:
SELECT
    posts.id,
    posts.title,
    posts.body,
    categories.name AS category_name,
    tags.name AS tag_name
FROM
    posts
LEFT JOIN
    categories ON posts.category_id = categories.id
LEFT JOIN
    post_tags ON posts.id = post_tags.post_id
LEFT JOIN
    tags ON post_tags.tag_id = tags.id;
Finally, to sort the query, you simply need to add an order method, like .order(posts::updated_at.desc()), and pass the ordering parameter as an argument to the function. In this case, we are ordering by updated_at field in descending order.
Although Diesel is robust and can make it much easier to manipulate your database, you might hit some bottlenecks due to its limitations, complexity, and design. Let’s review a few issues to look out for.
Handling nullable columns can be a bit tricky with Diesel. Diesel uses Option to represent nullable columns, and you need to be careful about how you handle these in joins and queries. You need to decide from the beginning of your system design if your fields will have null values, especially if you intend to run joins on the tables.
Diesel relies on schema inference for code generation. If your database schema changes, you need to ensure that you regenerate the schema file, schema.rs, using Diesel migration. Skipping this could cause inconsistencies between your code and the database. In fact, in most cases, your code won’t compile, and you’ll need to fix the issues first before you can proceed.
You should also make sure that the field in your structs matches the schema field. Otherwise, you’ll have issues. For example, let’s say the following code is your Post schema:
diesel::table! {
    posts (id) {
        id -> Int4,
        title -> Varchar,
        body -> Text,
        published -> Bool,
        category_id -> Int4,
    }
}
Your model looks like the following:
#[derive(Queryable, Insertable, Serialize, Deserialize)]
#[diesel(table_name = posts)]
pub struct Post {
    pub id: i32,
    pub title: String,
    pub body: String,
    pub published: bool,
    pub category_id: i32,
    pub tag: i32
}
You might start getting errors everywhere in your app because of that one tag field that was added. Don’t panic! First, check the error messages. If it gives you a mismatch error, check that the model and the schema are in sync.
Diesel’s error messages can sometimes be very verbose and difficult to decipher. This is especially true of type errors, which are the most common errors you’ll encounter while working with Diesel. You need to take your time, pay close attention to the error messages, and check the documentation if needed.
In this article, we learned how to create a web application with Rust, Rocket, and Diesel. We explored how to create an API endpoint, insert and read from a database, and render HTML templates. I hope you enjoyed reading this article as much as I enjoyed writing it.
For further reading, I encourage you to read this article about building a web app with Rocket. You should also check out the GitHub repo for the finished demo application. It should be a primary point of reference if you get confused.
Debugging Rust applications can be difficult, especially when users experience issues that are hard to reproduce. If you’re interested in monitoring and tracking the performance of your Rust apps, automatically surfacing errors, and tracking slow network requests and load time, try LogRocket.
LogRocket lets you replay user sessions, eliminating guesswork around why bugs happen by showing exactly what users experienced. It captures console logs, errors, network requests, and pixel-perfect DOM recordings — compatible with all frameworks.
LogRocket's Galileo AI watches sessions for you, instantly identifying and explaining user struggles with automated monitoring of your entire product experience.

Modernize how you debug your Rust apps — start monitoring for free.

React Server Components and the Next.js App Router enable streaming and smaller client bundles, but only when used correctly. This article explores six common mistakes that block streaming, bloat hydration, and create stale UI in production.

Gil Fink (SparXis CEO) joins PodRocket to break down today’s most common web rendering patterns: SSR, CSR, static rednering, and islands/resumability.

@container scroll-state: Replace JS scroll listeners nowCSS @container scroll-state lets you build sticky headers, snapping carousels, and scroll indicators without JavaScript. Here’s how to replace scroll listeners with clean, declarative state queries.

Explore 10 Web APIs that replace common JavaScript libraries and reduce npm dependencies, bundle size, and performance overhead.
Would you be interested in joining LogRocket's developer community?
Join LogRocket’s Content Advisory Board. You’ll help inform the type of content we create and get access to exclusive meetups, social accreditation, and swag.
Sign up now
One Reply to "How to create a web app in Rust with Rocket and Diesel"
Well explained thanks for sharing