Since the early 2000s, software engineers have been using REST APIs to query and mutate data. There is no doubt that REST is a great way to access resources, but when it comes to specificity, the REST model is not efficient.

In comes GraphQL, a new tool that gives developers the ability to access resources with regard to specificity, which leads to efficient resource consumption. As a result of the flexibility GraphQL offers, communities have started building utilities to use GraphQL in their favorite languages.
One such example is Absinthe, a library developed in Elixir, a functional programming language built on Erlang. Absinthe is used with the Phoenix Web Server, which is built with Elixir and is getting popular.
In this post, we’ll build our first GraphQL API using Phoenix and connect it with a React app.
The Replay is a weekly newsletter for dev and engineering leaders.
Delivered once a week, it's your curated guide to the most important conversations around frontend dev, emerging AI tools, and the state of modern software.
To get the most out of this tutorial, you’ll need:
We will be covering:
To set up our environment, we need to install:
Open your terminal and run the following commands:
$ wget https://packages.erlang-solutions.com/erlang-solutions_2.0_all.deb && sudo dpkg -i erlang-solutions_2.0_all.deb
$ sudo apt-get update
$ sudo apt-get install esl-erlang
$ sudo apt-get install elixir
Run the following command:
$ mix local.hex
To check the versions of Elixir and Erlang, run:
$ elixir -v
Erlang/OTP 25 [erts-13.0.4] [source] [64-bit] [smp:8:8] [ds:8:8:10] [async-threads:1] [jit:ns]

Elixir 1.13.4 (compiled with Erlang/OTP 25)
Run this command:
$ mix archive.install hex phx_new
Run these commands:
$ curl -fsSL https://deb.nodesource.com/setup_19.x | sudo -E bash - &&\
$ sudo apt-get install -y nodejs
Checking the version of Node.js:
$ node -v
Run these commands to install Docker:
$ sudo apt-get update
$ sudo apt-get install \
    apt-transport-https \
    ca-certificates \
    curl \
    gnupg \
    lsb-release
$ curl -fsSL https://download.docker.com/linux/ubuntu/gpg | sudo gpg --dearmor -o /usr/share/keyrings/docker-archive-keyring.gpg
$ echo \
  "deb [arch=amd64 signed-by=/usr/share/keyrings/docker-archive-keyring.gpg] https://download.docker.com/linux/ubuntu \
  $(lsb_release -cs) stable" | sudo tee /etc/apt/sources.list.d/docker.list > /dev/null
$ sudo apt-get update
$ sudo apt-get install docker-ce docker-ce-cli containerd.io
Run these commands to install Docker Compose:
$ sudo apt install docker-compose
Now, let’s set up our Phoenix server and create resources that can be consumed by the GraphQL Workspace and our React app.
Run this command to create the server:
$ mix phx.new booklist -no-html
Enter “Y” when prompted to fetch and install the dependencies.
Output:
We are almost there! The following steps are missing:

    $ cd booklist

Then configure your database in config/dev.exs and run:

    $ mix ecto.create

Start your Phoenix app with:

    $ mix phx.server

You can also run your app inside IEx (Interactive Elixir) as:

    $ iex -S mix phx.server
absinthe_plug dependenciesAbsinthe is a GraphQL library written for Elixir that is used for writing queries and mutations. Absinthe_plug helps us use GraphQL.
In Phoenix, dependencies have to be manually written in the mix.ex file, and then the deps.get command is used to install the added dependencies. It does not work like npm or Yarn.
To install absinthe and absinthe_plug, open your project in your favorite code editor and, in the root of your project directory, update the mix.ex file as shown:
# mix.ex
Defp deps do
[
...
{:absinthe, "~> 1.7"}
{:absinthe_plug, "~> 1.5"}
]
end
Now, run this command to install the dependencies:
$ mix deps.get
This is what our terminal should look like now:
Resolving Hex dependencies...
Dependency resolution completed:
Unchanged:
  castore 0.1.18
  connection 1.1.0
  cowboy 2.9.0
  cowboy_telemetry 0.4.0
  cowlib 2.11.0
  db_connection 2.4.2
  decimal 2.0.0
  ecto 3.9.1
  ecto_sql 3.9.0
  esbuild 0.5.0
  gettext 0.20.0
  jason 1.4.0
  mime 2.0.3
  phoenix 1.6.14
  phoenix_ecto 4.4.0
  phoenix_html 3.2.0
  phoenix_live_dashboard 0.7.1
  phoenix_live_view 0.18.2
  phoenix_pubsub 2.1.1
  phoenix_view 1.1.2
  plug 1.13.6
  plug_cowboy 2.5.2
  plug_crypto 1.2.3
  postgrex 0.16.5
  ranch 1.8.0
  swoosh 1.8.1
  telemetry 1.1.0
  telemetry_metrics 0.6.1
  telemetry_poller 1.0.0
New:
  absinthe 1.7.0
  absinthe_plug 1.5.8
  nimble_parsec 1.2.3
* Getting absinthe (Hex package)
* Getting absinthe_plug (Hex package)
* Getting nimble_parsec (Hex package)
Now we will spin up two Docker containers. One will run our PostgreSQL database, a relational database we can use with Phoenix, and the other will run Adminer, a fully-featrued database management tool.
In your project’s root directory, create a file using the following command:
$ touch docker-compose.yaml
You can also create it using your code editor’s user interface. Your choice!
Now, paste this code in your docker-compose file:
version: "3"
services:
  postgres:
    build: ./postgres-dev
    container_name: postgres
    ports:
      - 5432:5432
    environment:
      POSTGRES_USER: postgres
      POSTGRES_PASSWORD: postgres
      POSTGRES_DB_LIST: booklist_dev

  adminer:
    image: adminer
    container_name: adminer
    restart: always
    ports:
      - 8090:8080
    environment:
      ADMINER_DEFAULT_SERVER: postgres
Create a folder named postgres-dev in your root directory and create a Dockerfile and a Bash file, as follows:
$ mkdir postgres-dev
$ cd postgres-dev
$ touch Dockerfile
In the Dockerfile, paste this code:
FROM postgres:latest
COPY setup-databases.sh /docker-entrypoint-initdb.d/
Now, create a new file in the same folder:
$ touch setup-databases.sh
In the Bash file, paste this code:
#!/bin/bash

set -e
set -u

function create_user_and_database() {
    local DB=$1
    echo "  Creating user and database '$DB'"
    psql -v --username "$POSTGRES_USER" <<-EOSQL
        CREATE DATABASE $DB;
        GRANT ALL PRIVILEGES ON DATABASE $DB TO $POSTGRES_USER;
EOSQL
}

if [ -n "$POSTGRES_DB_LIST" ]; then
    echo "Multiple database creation requested: $POSTGRES_DB_LIST"
    for DB in $(echo $POSTGRES_DB_LIST | tr ',' ' '); do
        create_user_and_database $DB
    done
    echo "Multiple databases created"
fi
Now, go back to your root directory from the terminal and run this code:
$ docker-compose up -d -build
To check that our containers run, write the following:
$ docker ps
Our output should be:
CONTAINER ID   IMAGE      COMMAND                  CREATED          STATUS          PORTS                                       NAMES
d6831a68a985   adminer    "entrypoint.sh docke..."   13 seconds ago   Up 12 seconds   0.0.0.0:8090->8080/tcp, :::8090->8080/tcp   adminer
dca9812e757a   postgres   "docker-entrypoint.s..."   13 seconds ago   Up 12 seconds   0.0.0.0:5432->5432/tcp, :::5432->5432/tcp   postgres
Schemas are blueprints built with the same process by which queries are executed.
The GraphQL Workspace is a tool packaged with GraphQL used to query and mutate data. This tool is a user interface that can be accessed from the browser.
For now, we will be using test data that is hard-coded in our schema and will help us understand how GraphQL works. After successfully querying the sample data, we will head towards using PostgreSQL.
Create a file called schema.ex inside lib/booklist_web/. Copy and paste the following code into the file.
defmodule BooklistWeb.Schema do
  use Absinthe.Schema

  @desc "A Book"
    object :book do
      field :name, :string
      field :author, :string

    end

  # Example data
  @book_information %{
    "book1" => %{id: 1, name: "Harry Potter", author: "JK Rowling"},
    "book2" => %{id: 2, name: "Charlie Factory", author: "Bernard"},
    "book3" => %{id: 3, name: "Sherlock Holmes", author: "Sheikhu"}
  }

  query do
    field :book_info, :book do
      arg :id, non_null(:id)
      resolve fn %{id: book_id}, _ ->
        {:ok, @book_information[book_id]}
      end
    end
  end
 end
Here are some important definitions for code we used above:
query: is a root query object macro, where different queries are denied as fieldsfield: a field in the enclosing object, here it is a query and objectarg: an argument for the enclosing fieldresolve: a function to execute our query logicWe created a struct of object book and our test data containing the book information. The query block is a GraphQL query that will fetch this data in our GraphQL workspace.Book informationContexts are modules that have the business logic and encapsulate data access and its validation. It usually talks to the database or API.
To create a context for our book schema, open your terminal and run this command:
$ mix phx.gen.context Book Info information name:string author:string
The output should be:
==> nimble_parsec
Compiling 4 files (.ex)
Generated nimble_parsec app
==> absinthe
Compiling 1 file (.erl)
Compiling 256 files (.ex)
Generated absinthe app
==> absinthe_plug
Compiling 18 files (.ex)
Generated absinthe_plug app
==> booklist
* creating lib/booklist/book/info.ex
* creating priv/repo/migrations/20221022130430_create_information.exs
* creating lib/booklist/book.ex
* injecting lib/booklist/book.ex
* creating test/booklist/book_test.exs
* injecting test/booklist/book_test.exs
* creating test/support/fixtures/book_fixtures.ex
* injecting test/support/fixtures/book_fixtures.ex

Remember to update your repository by running migrations:

    $ mix ecto.migrate
Migrations are database schemas/structures that are populated into a relational database. In this section, we’ll run a migration that will create our table with the name information in our booklist_dev database. We will view it from adminer.
We’ll also use Ecto, an official Elixir project, which is an integrated query language and provides a database wrapper.
Run this command:
$ mix ecto.migrate
Our output should be:
warning: the :gettext compiler is no longer required in your mix.exs.

Please find the following line in your mix.exs and remove the :gettext entry:

    compilers: [..., :gettext, ...] ++ Mix.compilers(),

  (gettext 0.20.0) lib/mix/tasks/compile.gettext.ex:5: Mix.Tasks.Compile.Gettext.run/1
  (mix 1.13.4) lib/mix/task.ex:397: anonymous fn/3 in Mix.Task.run_task/3
  (mix 1.13.4) lib/mix/tasks/compile.all.ex:92: Mix.Tasks.Compile.All.run_compiler/2
  (mix 1.13.4) lib/mix/tasks/compile.all.ex:72: Mix.Tasks.Compile.All.compile/4
  (mix 1.13.4) lib/mix/tasks/compile.all.ex:59: Mix.Tasks.Compile.All.with_logger_app/2
  (mix 1.13.4) lib/mix/tasks/compile.all.ex:36: Mix.Tasks.Compile.All.run/1


18:10:08.705 [info]  == Running 20221022130430 Booklist.Repo.Migrations.CreateInformation.change/0 forward

18:10:08.708 [info]  create table information

18:10:08.713 [info]  == Migrated 20221022130430 in 0.0s
Below, you can see what this output looks like within the Adminer UI:
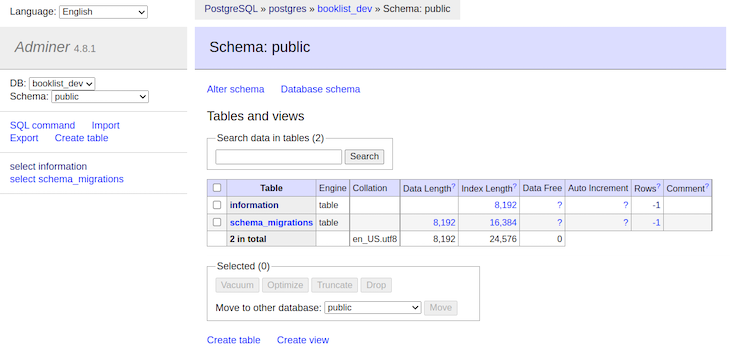
There is a table named information, which was created by the migration we ran in the previous step. To access the Adminer interface, enter the following address in your browser with the credentials we used in the Docker Compose file:
http://localhost:8090Run this command to start your server:
$ mix phx.server
After the server has started, we can hit localhost on port 4000 to use the GraphQL workspace.
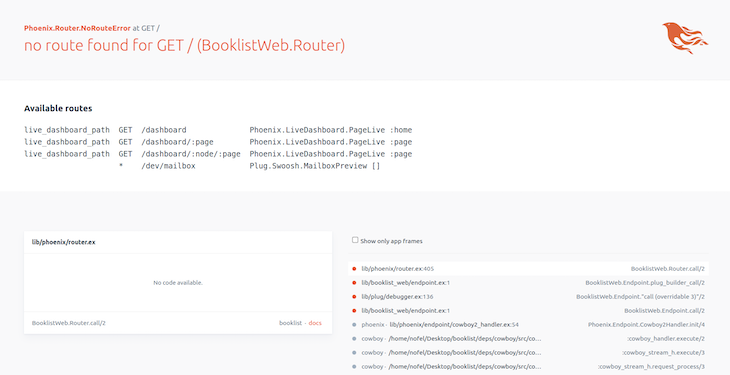
Phoenix will show you some endpoints that you can hit and explore various functionalities available via the user interface.
To access GraphQL from its user interface and its API, we have to configure the appropriate routes. This section will tell you how to properly configure routes.
To make queries and mutate data, we need to add routes in the router.ex file inside /lib/booklist_web/.
Open the router.ex file and add the following lines of code:
scope "/api" do
    pipe_through :api
    forward("/",Absinthe.Plug, schema: MenuxcardWeb.Schema)
  end


scope "/gql" do
    forward "/GraphiQL", Absinthe.Plug.GraphiQL, schema: MenuxcardWeb.Schema
  end
We can now access the GraphQL web interface using the second route. Enter the following URL in your address bar:
http://localhost:4000/gql/GraphiQL
You should now see this:
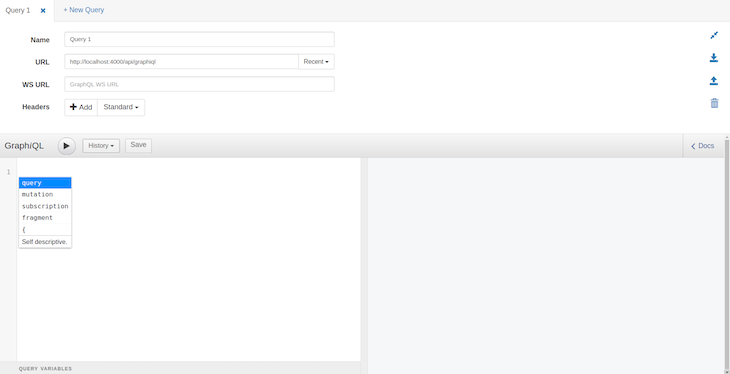
This is the GraphQL workspace, which fetches and mutates data for GraphQL just like Postman does for REST APIs. For starters, we will query the dummy data we hard-coded in our schema in the earlier step.
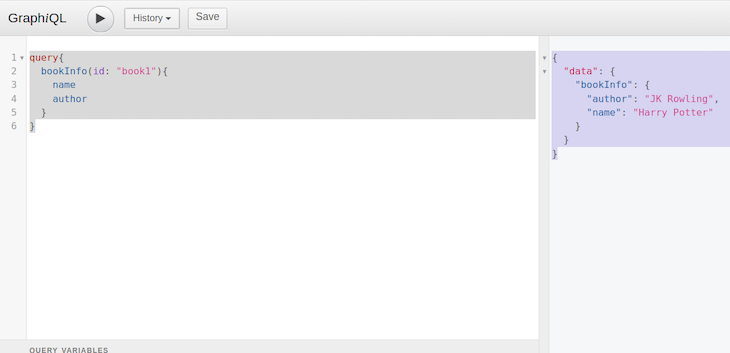
We will query book1 from our dummy data and fetch its name and author from the server.
Run the following query in the left panel of the GraphQL interface:
query{
  bookInfo(id: "book1"){
    name
    author
  }
}
You should receive this data in return:
{
  "data": {
    "bookInfo": {
      "author": "JK Rowling",
      "name": "Harry Potter"
    }
  }
}
Here is what this output looks like in GraphiQL:
Until now, we have been playing with dummy data. Now the real fun begins!
We will query and mutate the data directly from, and to, our PostgreSQL database and check instant changes.
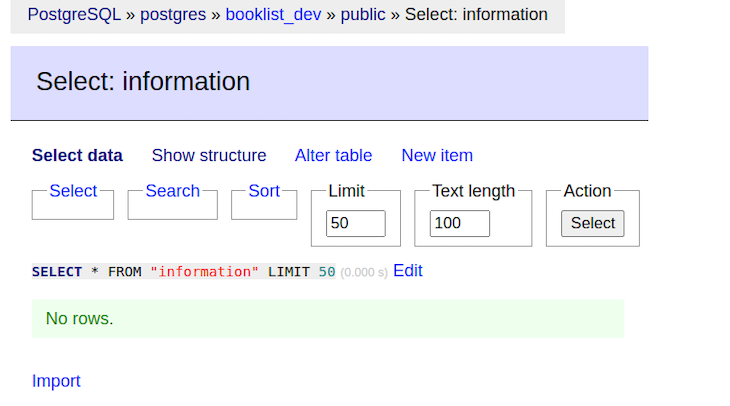
The table of information is empty. Let’s populate it by running a mutation. First, we will create a mutation and query in the schema.ex file.
Clear the query we wrote in the schema file and paste the below code:
query do
    field :get_book, :book do
      arg(:id, non_null(:id))
      resolve(fn args, _ ->
        {:ok, Booklist.Book.get_info!(args)}
      end)
    end
  end

  mutation do
    field :create_book, :book do
      arg(:name, non_null(:string))
      arg(:author, non_null(:string))
      resolve(fn args, _ ->
        {:ok, Booklist.Book.create_info(args)}
      end)
    end
  end
Paste this mutation in the GraphiQL interface and run it to see the magic.
mutation{
  createBook(name: "The Sunshine", author: "Nofel"){
   name
   author
  }
}
Check the database for changes:
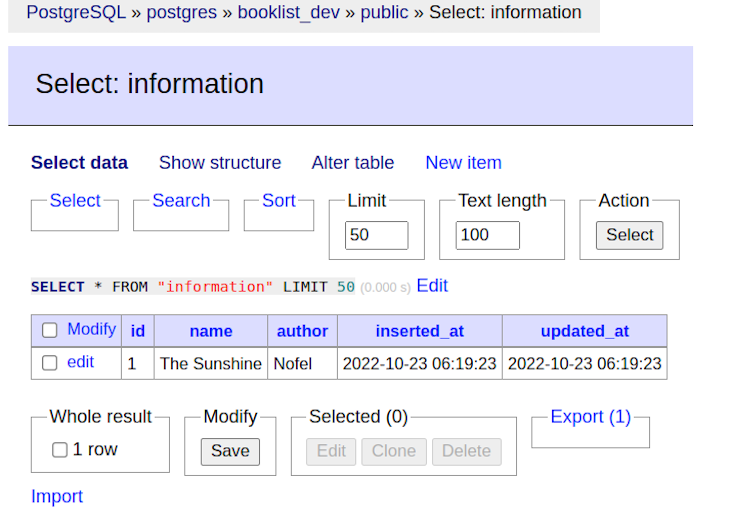
Our changes have been inserted into our database table. Hurray!
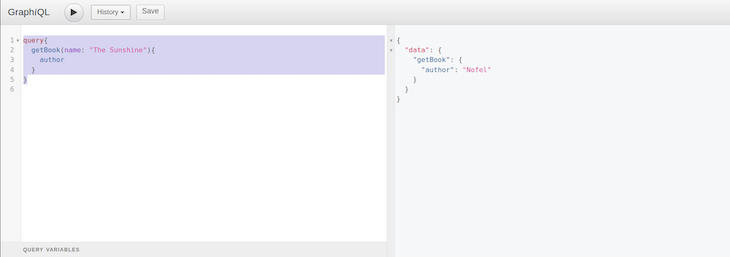
Now, to query this data, we will use the following query in the browser interface.
query{
  getBook(name: "The Sunshine"){
    author
  }
}
Below is the output:
So far, we’ve configured our environment, setup a Phoenix web server, and made several queries and mutations using both sample data and PostgreSQL data.
In the next section, we will be creating our React frontend and connecting it to our GraphQL server.
In this section we will be creating a React app with a booklist component that will fetch the data from PostgreSQL using a GraphQL library for React called Apollo.
To create a React project, open your terminal and run the following commands:
$ npx create-react-app my-gql-project
I have named my project my-gql-project. You can name it as you wish.
Applications that use the Apollo client require two dependencies:
@apollo/client: This package has everything our application needs to set up the Apollo client’s access GraphQL API, such as local state management, error handling, in-memory cache, and a React view layerRun this command to install these packages:
$ yarn install @apollo/client GraphQL
We can now initialize the Apollo client. Go to src/index.js and import the following, or just copy and paste this code:
import { ApolloClient, InMemoryCache, ApolloProvider, gql } from '@apollo/client';
After importing the necessary symbols, we will initialize our Apollo client, passing a set of configurations to its constructor object.
const client = new ApolloClient({
  uri: 'http://localhost:4000/api/GraphiQL',
  cache: new InMemoryCache(),});
Hurray! Our client is ready to connect with the GraphQL API we configured on the Phoenix server.
To connect our React app to our Apollo client, we need to wrap our React app with an <ApolloProvider> component. This component places the Apollo client in the context that enables access to it from anywhere in the component tree.
import React from 'react';
import * as ReactDOM from 'react-dom/client';
import { ApolloClient, InMemoryCache, ApolloProvider } from '@apollo/client';
import App from './App';

const client = new ApolloClient({
  uri: 'http://localhost:4000/api/GraphiQL',
  cache: new InMemoryCache(),
});

// Supported in React 18+
const root = ReactDOM.createRoot(document.getElementById('root'));

root.render(
  <ApolloProvider client={client}>
    <App />
  </ApolloProvider>
);
useQueryNow that ApolloProvider is hooked, we can start requesting data using useQuery. useQuery is a React Hook that shares GraphQL data with the frontend and UI.
Switch over to App.js and replace the existing code with the following code:
import { useQuery, gql } from "@apollo/client";

const GET_BOOKS = gql`
  query {
    getBook(name: "The Sunshine") {
      name
      author
    }
  }
`;
We have defined the query inside a gql template literal. This will fetch the data we need to query on every page reload of our frontend app.
Next, we will define a component named DisplayBookList that will execute our GET_BOOKS query with useQuery Hook.
  const { loading, error, data } = useQuery(GET_BOOKS);
  if (loading) return <p>Loading...</p>;
  if (error) return <p>Error :(</p>;
  return data.locations.map(({ name, author }) => (
    <div key={name}>
      <h3>{name}</h3>
      <br />
      <b>About this Book:</b>
      <p>Author: {author}</p>
      <br />
    </div>
  ));
Finally, we will add the DisplayBookList component to our existing component tree:
export default function App() {
  return (
    <div>
      <h2>My first Apollo app 🚀</h2>
      <DisplayBookList />
    </div>
  );
}
Our final App.js will look something like this:
import logo from "./logo.svg";
import "./App.css";
// Import everything needed to use the `useQuery` hook
import { useQuery, gql } from "@apollo/client";

const GET_BOOKS = gql`
  query {
    getBook(id: "1") {
      name
      author
    }
  }
`;

function DisplayBookList() {
  const { loading, error, data } = useQuery(GET_BOOKS);
  if (loading) return <p>Loading...</p>;
  if (error) return <p>Error :(</p>;
  return data.locations.map(({ name, author }) => (
    <div key={name}>
      <h3>{name}</h3>
      <br />
      <b>About this Book:</b>
      <p>{author}</p>
      <br />
    </div>
  ));

  export default function App() {
  return (
    <div>
      <h2>My first Apollo app 🚀</h2>
      <DisplayBookList />
    </div>
  );
}
Now that our code is ready, let’s start our React app and see the magic happen.
Run:
$ yarn start
Open the browser and go to http://localhost:3000 to see the output.
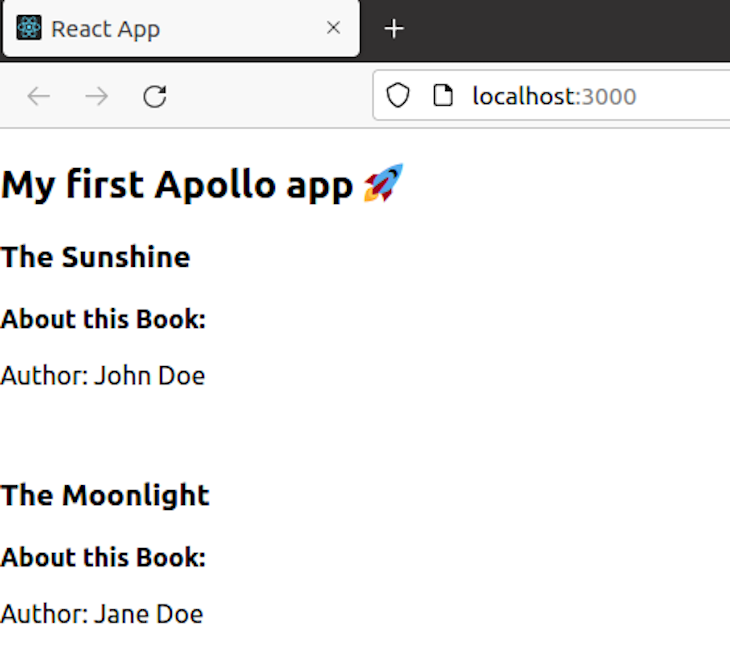
As you can see, our React app successfully queried the data from the Phoenix server on which GraphQL was set up.
In this tutorial, we learned how to create a GraphQL API with React and Phoenix, using schemas and contexts to build our business logic. We also learned how to use Docker to instantly spin up PostgreSQL and Adminer without installing anything other than Docker on our operating system. Finally, we used Apollo Client to connect to and fetch data from our Phoenix server that hosted GraphQL.
To explore Elixir further, visit the Elixir homepage or visit their documentation page.
Good luck learning! 😇
Install LogRocket via npm or script tag. LogRocket.init() must be called client-side, not
server-side
$ npm i --save logrocket

// Code:

import LogRocket from 'logrocket';
LogRocket.init('app/id');
// Add to your HTML:

<script src="https://cdn.lr-ingest.com/LogRocket.min.js"></script>
<script>window.LogRocket && window.LogRocket.init('app/id');</script>

Write agent-friendly API documentation with OpenAPI, clear schemas, workflow guidance, and llms.txt for safer AI automation.

Local AI proxy tutorial for detecting, masking, and rehydrating PII before prompts reach cloud LLMs.

Learn how Graph RAG uses connected knowledge structures to improve retrieval beyond simple text similarity.

Learn how sibling-index() enables clean, JavaScript-free stagger animations using native CSS.
Hey there, want to help make our blog better?
Join LogRocket’s Content Advisory Board. You’ll help inform the type of content we create and get access to exclusive meetups, social accreditation, and swag.
Sign up now

