
AdonisJs is a Node.js framework built specifically for writing microservices. Many consider it to be the best JavaScript framework out there for developers that are migrating from PHP (via Laravel) to JavaScript.

Like most Node.js frameworks, AdonisJs has its inbuilt CLI, and it supports the MVC pattern by default. AdonisJs supports both SQL databases like Postgres and noSQL databases like Firebase, which will be the focus of this tutorial.
Cloud Firestore is a flexible, scalable database for mobile, web, and server development from Firebase and Google Cloud Platform. Like Firebase Realtime Database, it keeps your data in sync across client apps through real-time listeners and offers offline support for mobile and web so you can build responsive apps that work regardless of network latency or internet connectivity.
In this tutorial, we will:
In order to follow along with this tutorial, it is important to have basic knowledge of JavaScript and MVC architecture. You can also check out the repo for this project before we begin.
The Replay is a weekly newsletter for dev and engineering leaders.
Delivered once a week, it's your curated guide to the most important conversations around frontend dev, emerging AI tools, and the state of modern software.
To get started, go to the Firebase console and create a new project. I will be naming mine adonisJs-firestore.
Next, go to the Cloud Firestore tab and create a new database:

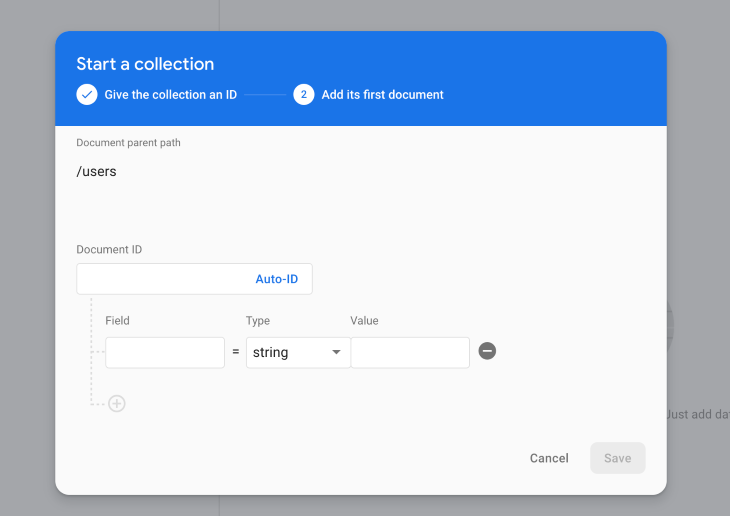
Once that’s done, Firestore will require us to create a new collection, which is simply a list of documents. For example, we could have a users collection that stores the information of all our users, each represented by a document. In my case, I’m creating a new users collection with name and email as fields.
AdonisJs was built using Node, so we can use npm to install and serve it. Installation guidelines are available here. We’ll use the following command to install the AdonisJs CLI:
npm i -g adonisjs/cli
If you don’t want to install the AdonisJs CLI globally, remove the -g flag from the above command.
Next, use the following command to create a new AdonisJs application with the project name adonisJs-firestore:
adonis new adonisJs-firestore
When the AdonisJs application is done installing, we can serve our application by using:
adonis serve --dev
This will open a local port on http://127.0.0.1:333.
To get Firestore working in AdonisJs, we need to install the Firebase admin SDK into our AdonisJs application with this command:
npm install firebase-admin --save
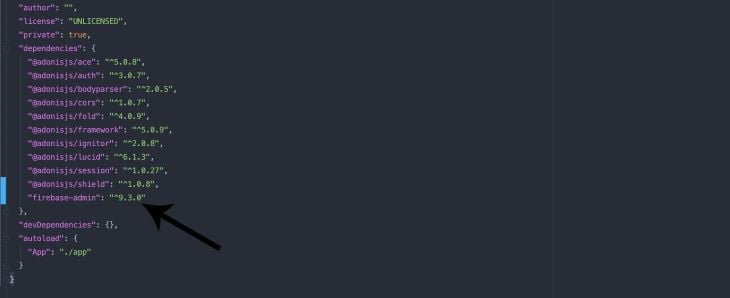
If our installation was successful, it will be added to our package.json file, as seen below:
We will store our Firestore data model in the app/Models/Firestore.js file, so let’s go ahead and create the model file.
const Model = use('Model');

const admin = require('firebase-admin');

class Firestore extends Model {

}

module.exports = Firestore;
Above, we created a new model and required the Firebase admin SDK that we installed earlier. The next process is to initialize Firestore and get our service account credentials.
const Model = use('Model');

const admin = require('firebase-admin');

admin.initializeApp({
  credential: admin.credential.applicationDefault()
});

const db = admin.firestore();

class Firestore extends Model {

}

module.exports = Firestore;
Above, we created a constant variable named db that has the value of admin.firestore(). We will be using this call on the particular Google service.
So at this point, we initialized Firestore, but we have yet to add our application credentials for Firestore to know which service it’s pointing to. We also have to get user permission for the application.
So now, we get our service account credentials by going to Settings > Service account on our Firebase console.
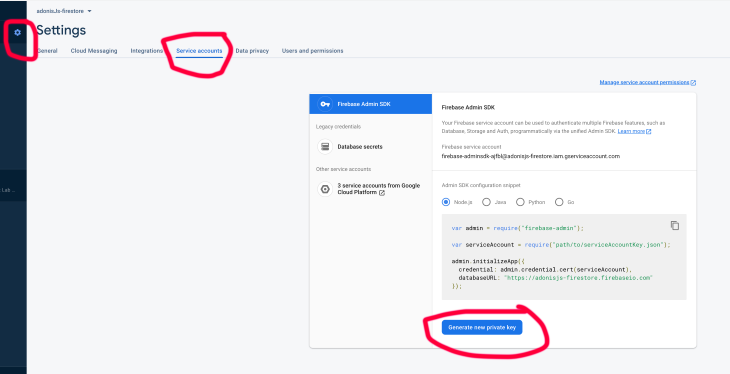
We then click on the Generate new private key button to download a JSON file containing our service account credentials. Copy the downloaded JSON file to your AdonisJs project folder and place it in the folder root directory.
When that is done, we require our downloaded service account credentials JSON file in our Firestore model and add the credentials to our Firestore initialization:
const Model = use('Model');

const admin = require('firebase-admin');

const serviceAccount = require("../../adonisjs-firestore-firebase-adminsdk-ajfbl-6a02cfaeb1.json");

admin.initializeApp({
  credential: admin.credential.cert(serviceAccount),
  databaseURL: "https://adonisjs-firestore.firebaseio.com"
});

class Firestore extends Model {

  // call on firestore
  db() {
  return admin.firestore();
  }
}

module.exports = Firestore;
A couple things to note:
databaseURL is essential — it must point to the correct database URL.We have finished installing and initializing Firestore in our AdonisJs application. Now we’ll write some CRUD requests. To do that, we need to:
To create a new user controller, we use the following command:
adonis make:controller UserController --type http
This will create a new file, UserController.js:
// app/Controllers/Http/UserController.js
'use strict';

class UserController {
}

module.exports = UserController;
When that’s done, we call our Firestore model in our controller to use our admin SDK for requests:
'use strict';

const Firestore = use('App/Models/Firestore');
const firestore = new Firestore;
const db = firestore.db();

class UserController {
}

module.exports = UserController;
Above, we called our model, then used the db function to pinpoint our Firestore service. Next, we point to the collection in Firestore from which we want to fetch data:
'use strict';

const Firestore = use('App/Models/Firestore');
const firestore = new Firestore;
const db = firestore.db();

// Reference to
const userReference = db.collection('users');

class UserController {
}

module.exports = UserController;
collection points to the particular collection in Firestore you want to fetch your data from; in our case, it’s users.
Now let’s create our CRUD functions.
To make a create request, we create an async function in our UserController called create, then we call on the inbuilt Validator function to check whether the request parameters are set:
// app/Controllers/Http/UserController.js
const { validate } = use('Validator');

class UserController {

  async create({ request, response}) {

    const rules = {
      name: 'required',
      email: 'required'
    };

    const data = request.only(['name', 'email']);

    const validation = await validate(request.all(), rules);

    if (validation.fails()) {
      return response.status(206).json({
        status: false,
        message: validation.messages()[0].message,
        data: null
      });
    }
  }
}
For Validator to work, we need to install it using the following command:
adonis install adonisjs/validator
Next, we need to register the provider inside the start/app.js file:
const providers = [
'@adonisjs/validator/providers/ValidatorProvider'
]
The Validator will throw error messages if the rules fields are not filled in. Next, we add the Firebase create function:
let create = await userReference.add({
  name: data.name,
  email: data.email
});

if(create) {
  return response.status(201).json({
    status: true,
    message: 'User created successfully',
    data: null
  });
}
The above code will create a new document in Firestore in the users collection, then return a 201 Created status if successful.
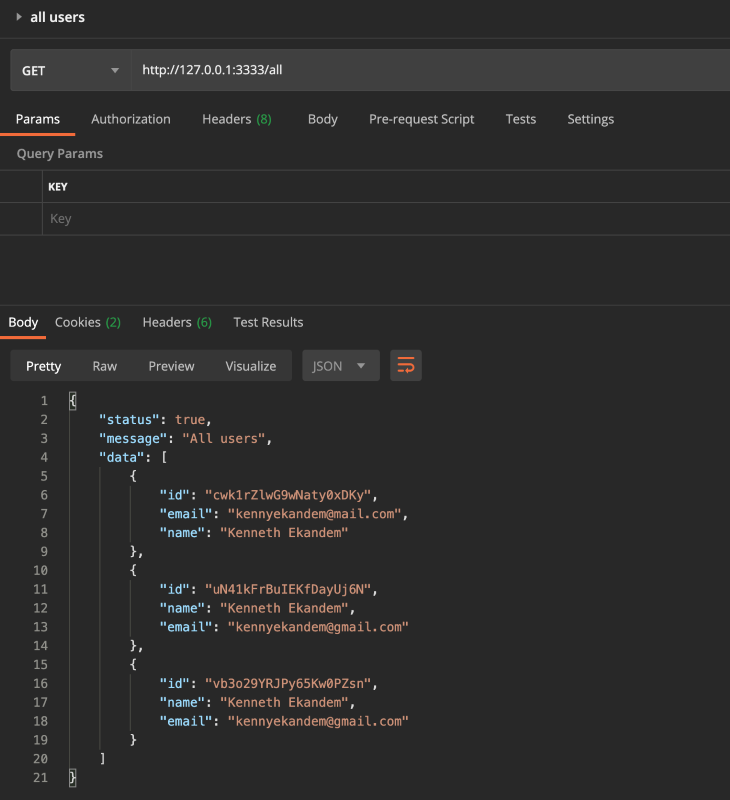
Now we’ll create our read request, all, which will fetch all users from the users collection.
async all({ response }) {

  let users = [];

  await userReference.get().then((snapshot) => {
    snapshot.forEach(doc => {
      let id = doc.id;
      let user = doc.data();

      users.push({
        id,
        ...user
      });
    })
  });

  return response.status(201).json({
    status: true,
    message: 'All users',
    data: users
  });
}
In the above code, we created an empty array, to which we will be pushing our data from Firestore. We also referenced the users collection and looped through it, then pushed the id and data into our users array.
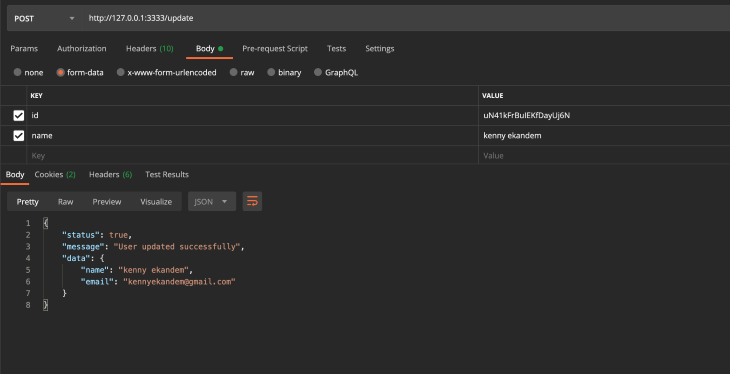
Now we’ll create a function that edits a single document in the users collection:
async update({ request, response }) {

  const rules = {
    id: 'required',
  };

  const data = request.only(['id', 'name', 'email']);

  const validation = await validate(request.all(), rules);

  if (validation.fails()) {
    return response.status(206).json({
      status: false,
      message: validation.messages()[0].message,
      data: null
    });
  }

  let getUser = await userReference.doc(data.id).get();
  let user = getUser.data();

  let update = await userReference.doc(data.id).update({
    name: data.name ? data.name : user.name,
    email: data.email ? data.email : user.email
  });

  if(update) {
    let getUser = await userReference.doc(data.id).get();
    let user = getUser.data();

    return response.status(201).json({
      status: true,
      message: 'User updated successfully',
      data: user
    });
  }
}
In the above code, we validated only id, meaning you can choose not to update name or email. We then fetched a single user document from the users collection from the id passed, after which we update either our name or email based on whichever was added.
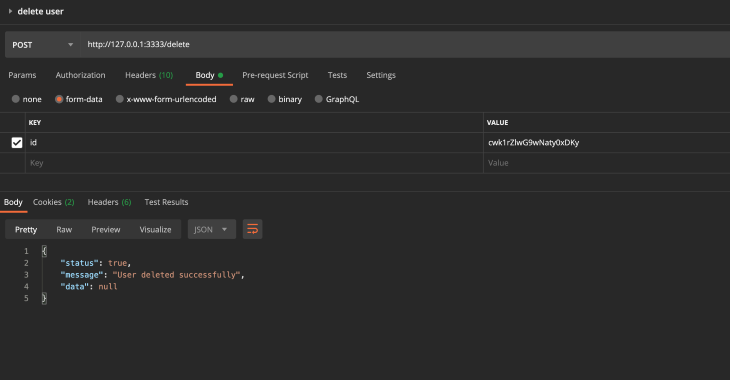
We have successfully created our create, read, and update request functions. All that’s left now is to add a delete function to remove a document from the users collection.
async delete({ request, response }) {

  const rules = {
    id: 'required',
  };

  const data = request.only(['id']);

  const validation = await validate(request.all(), rules);

  if (validation.fails()) {
    return response.status(206).json({
      status: false,
      message: validation.messages()[0].message,
      data: null
    });
  }

  await userReference.doc(data.id).delete();

  return response.status(201).json({
    status: true,
    message: 'User deleted successfully',
    data: null
  });
}
We have completed creating our CRUD request, so now we create routes that will link our APIs to our controller function. To do that, we go to our routes file start/routes.js:
// start/routes.js

'use strict'

const Route = use('Route')

Route.post('/create', 'UserController.create');
Route.get('/all', 'UserController.all');
Route.post('/update', 'UserController.update');
Route.post('/delete', 'UserController.delete');
And thus, we have added routes that point to our CRUD functions in UserController.
For the sake of testing, we will be using Postman for our request. Postman is a popular API client that makes it easy for developers to create, share, test, and document APIs.
Before we proceed, we need to enable CSRF (cross-site request forgery) protection for our requests to go through. This will protect our application from CSRF attacks by denying unidentified requests.
To enable it, we simply install AdonisJs shield middleware with the following command:
adonis install adonisjs/shield
Next, register the provider inside the start/app.js file:
const providers = [
'@adonisjs/shield/providers/ShieldProvider'
]
Register the global middleware inside the start/kernel.js file:
const globalMiddleware = [
  'Adonis/Middleware/Shield'
]
Finally, update config/shield.js file and edit the csrf object:
csrf: {
  enable: false,
  methods: ['POST', 'PUT', 'DELETE'],
  filterUris: [],
  cookieOptions: {
    httpOnly: false,
    sameSite: true,
    path: '/',
    maxAge: 7200
  }
}
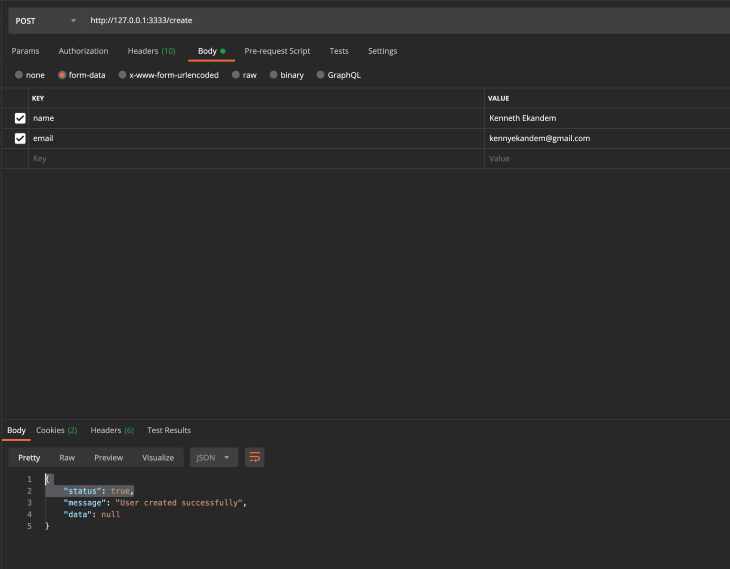
Now add a new request in postman for creating a new user, which will be calling on our create function in UserController.
Create user request:
Get all users request:
Update users request (we will get an id from our documents fetched from the all users request):
Delete user request:
We have successfully built a set of APIs that uses AdonisJs and Google Firebase Firestore for creating, fetching, storing, and deleting data. We have also gone through the basics of setting up Google Firestore as a database in the AdonisJs framework.
I hope this was helpful and that you now understand the basics of setting up Firestore in AdonisJs. You can go ahead and clone the repo and configure if for your own use.
 Monitor failed and slow network requests in production
Deploying a Node-based web app or website is the easy part. Making sure your Node instance continues to serve resources to your app is where things get tougher. If you’re interested in ensuring requests to the backend or third-party services are successful, try LogRocket.

LogRocket lets you replay user sessions, eliminating guesswork around why bugs happen by showing exactly what users experienced. It captures console logs, errors, network requests, and pixel-perfect DOM recordings — compatible with all frameworks.
LogRocket's Galileo AI watches sessions for you, instantly identifying and explaining user struggles with automated monitoring of your entire product experience.
LogRocket instruments your app to record baseline performance timings such as page load time, time to first byte, slow network requests, and also logs Redux, NgRx, and Vuex actions/state. Start monitoring for free.

React Server Components and the Next.js App Router enable streaming and smaller client bundles, but only when used correctly. This article explores six common mistakes that block streaming, bloat hydration, and create stale UI in production.

Gil Fink (SparXis CEO) joins PodRocket to break down today’s most common web rendering patterns: SSR, CSR, static rednering, and islands/resumability.

@container scroll-state: Replace JS scroll listeners nowCSS @container scroll-state lets you build sticky headers, snapping carousels, and scroll indicators without JavaScript. Here’s how to replace scroll listeners with clean, declarative state queries.

Explore 10 Web APIs that replace common JavaScript libraries and reduce npm dependencies, bundle size, and performance overhead.
Would you be interested in joining LogRocket's developer community?
Join LogRocket’s Content Advisory Board. You’ll help inform the type of content we create and get access to exclusive meetups, social accreditation, and swag.
Sign up now
2 Replies to "Configuring Cloud Firestore in AdonisJs for CRUD requests"
Great article…
Nice 👍