Supabase and Firebase are two of the most famous backend as a service (BaaS) products. Firebase, now owned by Google, provides the tools for developers to build and ship their applications on the web and mobile. Supabase, on the other hand, is an open source alternative to Firebase, built with a document-based datastore structure.

Supabase provides relational database management, known as PostgreSQL, which allows you to query your database with SQL.
In this article, we will learn how to choose and connect React Native backends and then learn how to create our own backend service using Node.js.
Jump ahead:
Supabase and Firebase provide suites of tools for building and managing web and mobile applications. Both platforms offer a range of features, including database management, user authentication, hosting, and real-time data synchronization. Here are some pros and cons of using Firebase and Supabase.
Firebase offers a comprehensive set of tools and services for building and managing web and mobile applications, including a real-time database, user authentication, hosting, analytics, and more. Another pro of Firebase is that Firebase offers real-time data synchronization, which means that any changes made to the database are automatically propagated to all connected clients in real time. This can be useful for applications that require real-time updates, such as chat or collaboration apps.
Firebase integrates seamlessly with other Google services, such as Google Cloud Storage and Google Cloud Functions, which can be helpful for developers already using these services. Lastly, Firebase is relatively easy to set up and use and has clear documentation and intuitive tools.
With Firebase, you have limited control over the database because the Firebase platform manages it. This can be a disadvantage if you need more control over your data or if you have specific requirements for data management. Firebase offers limited customization options for its tools and services, which can disadvantage developers who need more control over their application’s functionality.
Because Google owns Firebase, you depend on the company’s infrastructure and policies. This can be a concern for developers who are concerned about data privacy or who want more control over their application’s hosting environment.
Like Firebase, Supabase offers real-time data synchronization, which can be helpful for applications that require real-time updates. Supabase is an open source platform, meaning you have complete control over the source code and can customize it to meet your specific needs.
Supabase is built on top of PostgreSQL, which is helpful for developers who are already familiar with PostgreSQL or need more control over their database.
Because Supabase is a relatively new platform, it has a limited range of features compared to Firebase. Additionally, as a new platform, Supabase has limited documentation and community support compared to more established platforms like Firebase. Supabase is an open source platform, which means you will need more technical expertise to set it up and use it effectively.
When choosing between Firebase and Supabase for your React Native backend, there are a few key factors to consider:
What do you want to use the database for? Firebase is a general-purpose database that can be used for various applications, including real-time data synchronization, authentication, and cloud functions. Supabase is a Postgres-based database with real-time capabilities and built-in API support, which makes it well-suited for building modern web applications.
How do you want to structure your data? Firebase uses a NoSQL data model, which means data is stored as a collection of documents that can contain any number of fields. Supabase uses a SQL data model, storing data in tables with rows and columns. If you are familiar with SQL or need to work with structured data, Supabase may be the better choice.
What other tools and services do you need to integrate with your database? Firebase has a large and active developer community, and it integrates with a wide range of other Google Cloud services, including machine learning and analytics. Supabase has a smaller community but offers strong integration with the Postgres ecosystem, including tools like PostGIS for geospatial data and Timescale for time-series data.
Ultimately, the best choice for your React Native backend will depend on your specific needs and requirements. Evaluating both options and seeing which one aligns better with your project goals may be helpful.
We will be using Expo for the React Native development environment. We’ll start by scaffolding the Expo starter project files by running npx create-expo-app in our project folder terminal.
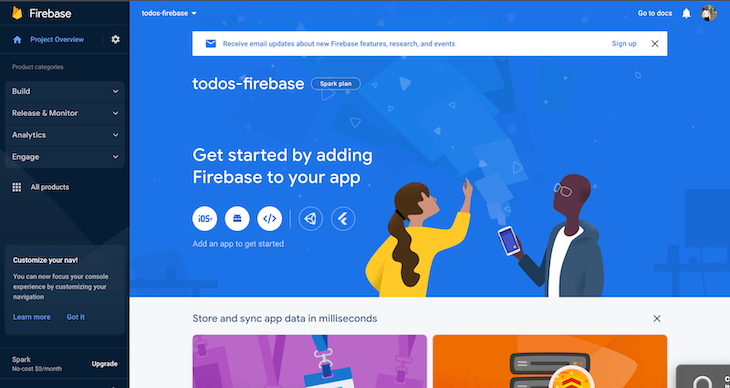
To begin creating our Firebase app, visit the Firebase website, sign in with your Google account, and go to the console tab. From there, you will see a button to create a new project. After naming your project and completing the steps to create a new project, you will see this:
Because we want to use a Firestore Database, we will first create an app by clicking the </> button to redirect you to this page:
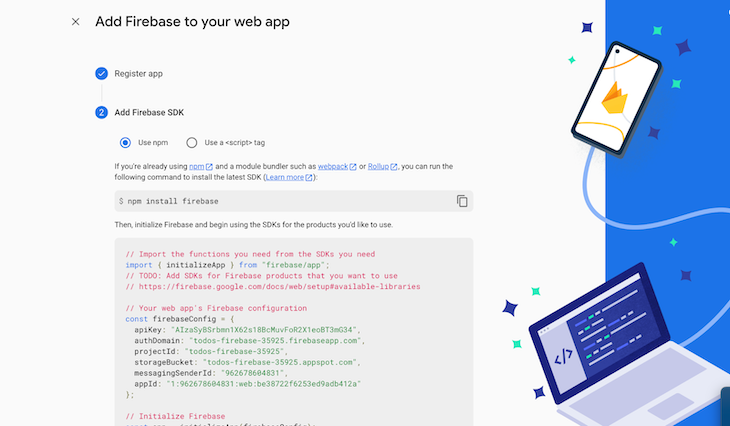
First, install Firebase using npm i firebase and copy the code block to our project. We will create a firebase folder and a firebase.js file inside it:
// Import the functions you need from the SDKs you need
import { initializeApp } from "firebase/app";
// TODO: Add SDKs for Firebase products that you want to use
// https://firebase.google.com/docs/web/setup#available-libraries

// Your web app's Firebase configuration
const firebaseConfig = {
 apiKey: "AIzaSyCGpnbYR-rubx9qC5XrGcQA3XMW6t0JdH0",
 authDomain: "todo-app-52801.firebaseapp.com",
 projectId: "todo-app-52801",
 storageBucket: "todo-app-52801.appspot.com",
 messagingSenderId: "961721982303",
 appId: "1:961721982303:web:ae37cc46b718ccf8cfaaea",
};

// Initialize Firebase
const app = initializeApp(firebaseConfig);

export { app };
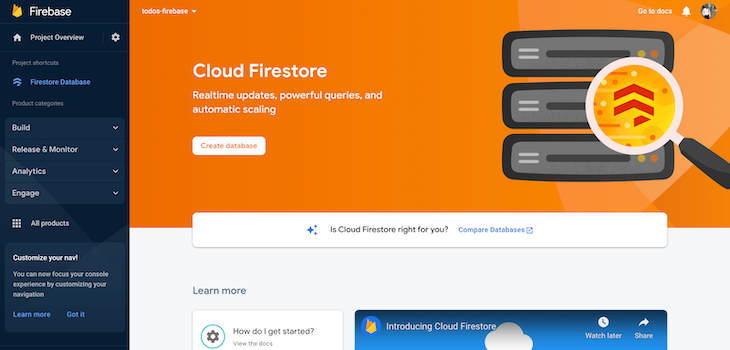
Now, we will create a database to store our to-dos. To get started, click the Build button and select Firestore Database:
After creating the database, we will have a dashboard where we can create our todos collection and store tasks in it:
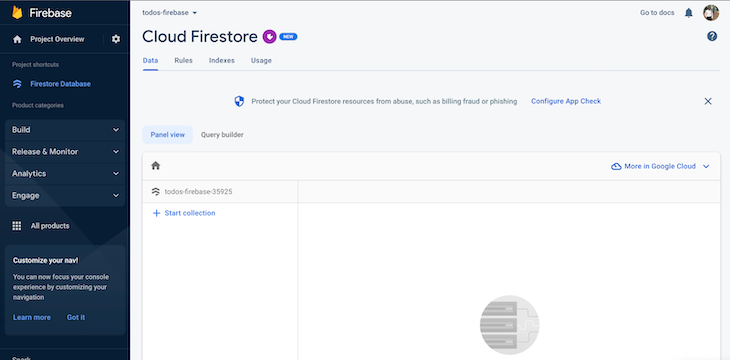
Then, click Start collection and give it a name or a collectionID. Our mini-project will have three fields: ID, Title, and Completed Field.
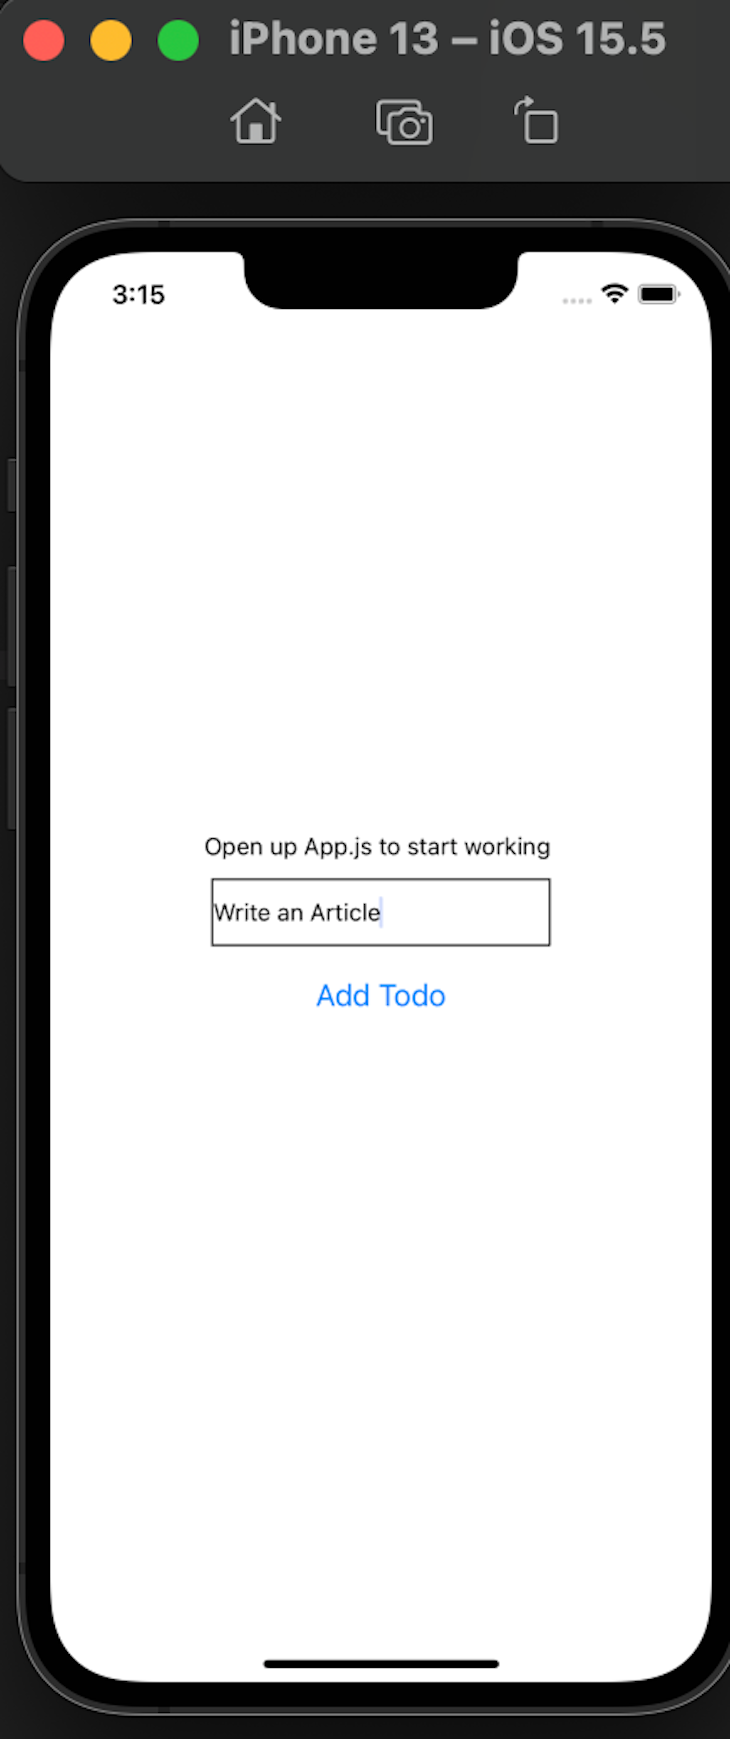
To create a new to-do task, we will have an interface with a text input and a call to action button in App.js. Remember, in the previous step, we exported the app in our Firebase app.
Now, we will import and use the app in App.js. First, we will create two states: title and completed. The TextInput value will be set to the value of the title, the value that the user enters, and the addTodo function will be called on the button component.
Here’s what it should look like:
import{
StyleSheet,
 Text,
 TextInput,
 View,
 Button,
 FlatList,
} from "react-native";
import { app } from "./firebase/firebase";
import {
 getFirestore,
 addDoc,
 getDocs,
 collection,
} from "firebase/firestore";
import { useEffect, useState } from "react";

export default function App() {
 const [title, setTitle] = useState("");
 const [completed, setCompleted] = useState(false);
 const db = getFirestore(app);

 const addTodo = async () => {
   try {
     const docRef = await addDoc(collection(db, "todos"), {
       title,
       completed,
     });
     setTitle("");
     console.log("Document written with ID: ", docRef.id);
   } catch (error) {
     console.log(error);
   }
 };

 return (
   <View style={styles.container}>
     <Text>Open up App.js to start working </Text>
     <TextInput
       value={title}
       onChangeText={(text) => setTitle(text)}
       placeholder="Enter a todo"
       style={styles.input}
     />
     <Button title="Add Todo" onPress={addTodo} />
   </View>
 );
}

const styles = StyleSheet.create({
 container: {
   flex: 1,
   backgroundColor: "#fff",
   marginTop: 400,
   alignItems: "center",
   justifyContent: "center",
 },
 input: {
   height: 40,
   width: 200,
   borderWidth: 1,
   borderColor: "black",
   margin: 10,
 },
});
Now, let’s check what we have in our simulator:
After creation, we can check our database and see if it is there:
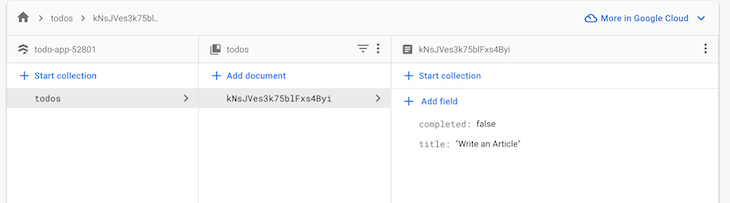
Nice job! We have successfully connected our React Native app to a Firestore Database and performed the create action while creating our to-do app. You can find the complete code for this project (for the read, create, and delete actions) in my repository here.
You can use Supabase completely or just the desired features for your project. This tutorial will show you how to connect React Native with Supabase to build a simple CRUD to-do application.
We will be using Expo for the React Native development environment. Start by running npx create-expo-app in the terminal in the project folder. This will scaffold the Expo starter project files needed for the build.
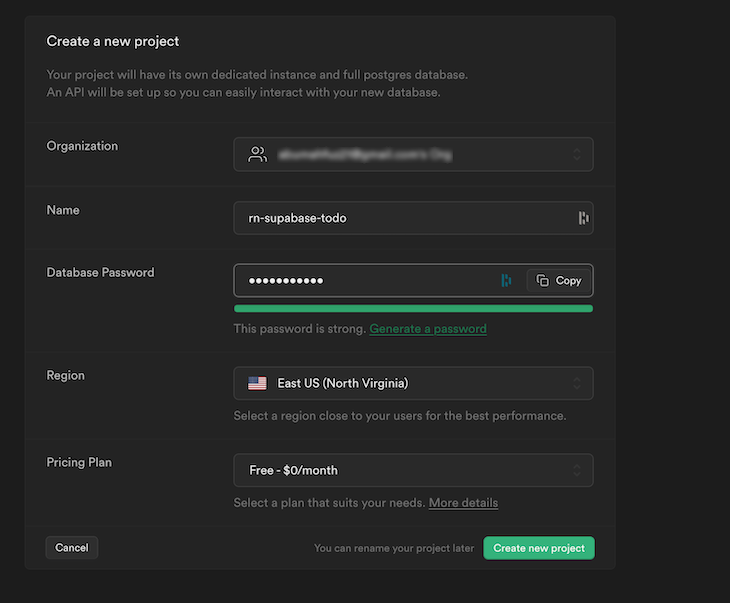
To start creating our Supabase app, navigate to the Supabase website and sign in with your GitHub account or manually with your email. Once successfully logged in, you can create a new project from the Organizations tab. Then, insert a project name and a password and select Create New Project:
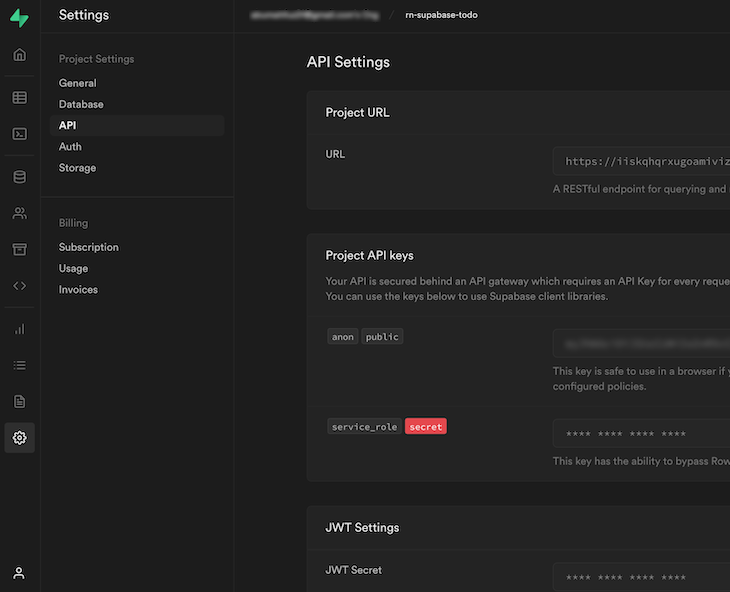
This will set up your project where you can get your API keys and Project URL. To do this, navigate to the Settings tab and click the API tab. It should look like this:
Now, in our project folder, we will create a lib folder and a supabase.js file to initiate the Supabase instance. We will use this to make our HTTP requests later in the project. Your code should look like this:
// this is a javascript file
import "react-native-url-polyfill/auto";
import AsyncStorage from "@react-native-async-storage/async-storage";
import { createClient } from "@supabase/supabase-js";

const supabaseUrl = "https://ojbnhwfgozggjfjetrmu.supabase.co";
const supabaseAnonKey =
 "eyJhbGciOiJIUzI1NiIsInR5cCI6IkpXVCJ9.eyJpc3MiOiJzdXBhYmFzZSIsInJlZiI6Im9qYm5od2Znb3pnZ2pmamV0cm11Iiwicm9sZSI6ImFub24iLCJpYXQiOjE2Njg0ODIzNDcsImV4cCI6MTk4NDA1ODM0N30.Y3_C-gzEHZ-Nt9dpqmbbhoXIHEz0vdQ4W7BOmGKyoZw";

export const supabase = createClient(supabaseUrl, supabaseAnonKey, {
 auth: {

   storage: AsyncStorage,
   autoRefreshToken: true,
   persistSession: true,
   detectSessionInUrl: false,
 },
});
To make the Supabase instance work with React Native, we will install two packages: react-native-url-polyfill/auto and @react-native-async-storage/async-storage.
Now, we will create a todo table in our Supabase Project app by clicking creating a new table in our table editor tab. We will have two columns: tasks and created_at. It should look like this:
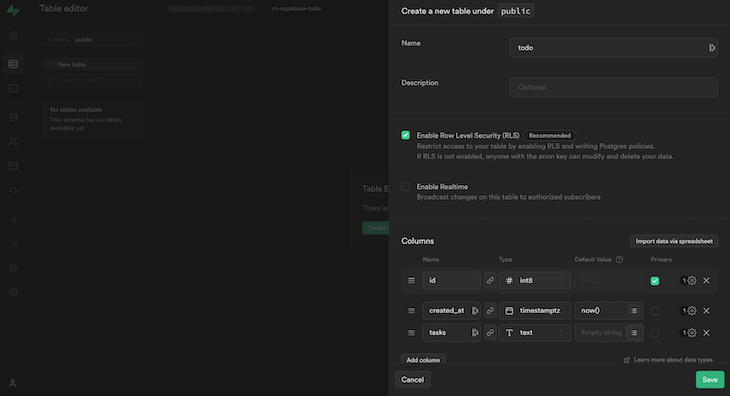

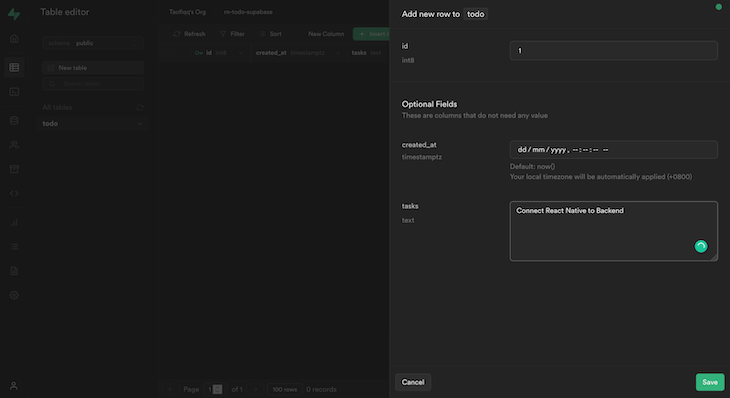
Also, disable the RLS policies to make unrestricted calls to the database. You can read more about Row Level Security here. A new row of data can be created manually from the table as shown below:

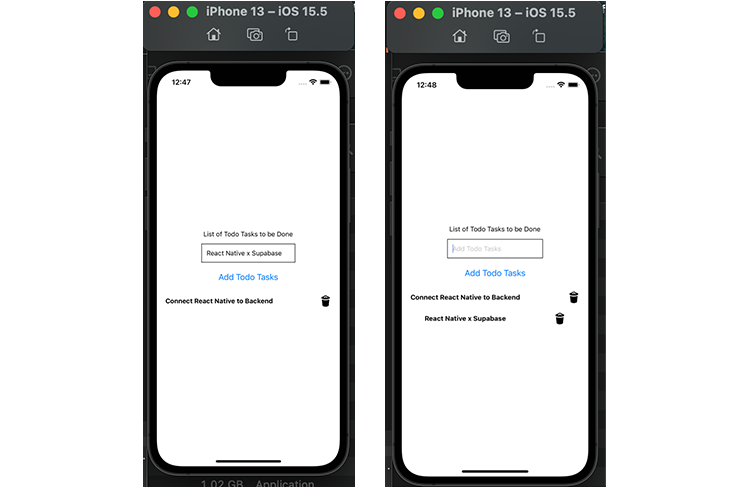
To create a new task, we will create a new AddTodo.js file and call the endpoint to create a new task from our app interface. A todo state is created to store the text imputed in the TextInput.
The insert method will be called on the Supabase instance, and the todo text entered in the TextInput will be passed as the value for the tasks field, as shown below:
// this is a javascript file
import { StyleSheet, Text, TextInput, Button, View } from "react-native";
import React, { useState } from "react";
import { supabase } from "../../lib/supabase";

const AddTodo = () => {
 const [todo, setTodo] = useState("");

 const handleSubmit = async (e) => {
   e.preventDefault();

   setLoading(true);
   const { data, error } = await supabase.from("todo").insert([
     {
       tasks: todo,
     },
   ]);

   setTodo("");
 };
 return (
   <View>
     <TextInput
       placeholder="Add Todo Tasks"
       value={todo}
       onChangeText={(e) => setTodo(e)}
       style={styles.input}
     />
     <Button title="Add Todo Tasks" onPress={handleSubmit} />
   </View>
 );
};

export default AddTodo;

const styles = StyleSheet.create({
 input: {
   height: 40,
   width: 200,
   margin: 12,
   borderWidth: 1,
   padding: 10,
 },
});
In the first part of the tutorial, we learned how to connect React Native to self-hosted solutions like Supabase. Now, we will learn how we can create our own backend server and connect it with React Native on the frontend. For this part, we will create a simple workout app using Node.js for the backend and MongoDB as our database.
To get started, we’ll create the frontend client and backend server folders. Next, we’ll navigate to the client folder and initialize a React Native CLI app by running npx react-native init RNWorkout in the terminal of our project folder. This will scaffold the starter project files needed for the build.
For the backend side, we will go into the directory by using the cd/server command and run the npm init -y command in the terminal. This will start our Node.js backend service, and we’ll create an app.js base file. Now, we will install the needed dependencies: npm i nodemon express mongoose cors dotenv.
In app.js, we will set up a basic Express.js server that will listen on port 3000. Here is what our server/ap.js will look like:
// this is a javascript file
const express = require("express");
const app = express();
// listen on port 3000
app.listen(3000, () => {
 console.log("Server is listening on port 3000");
});
Then, in our package.json file, we will set a new script that will start up the server when we run the command below:
 "scripts": {
   "test": "echo \"Error: no test specified\" && exit 1",
   "start": "nodemon app.js"
 },
Basically, we set up a start script to run the app.js file whenever we run the command npm run start in the terminal, as shown below:
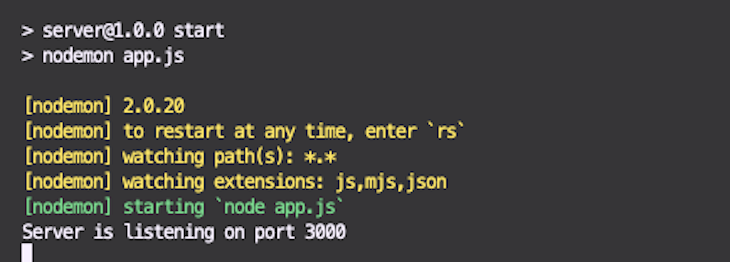
Now, we have successfully set up our server, and it’s listening on port 3000.
To get started, navigate to MongoDB Cloud to log in or sign up. Once you have logged in, create and name a new organization and project, then select a free cluster:
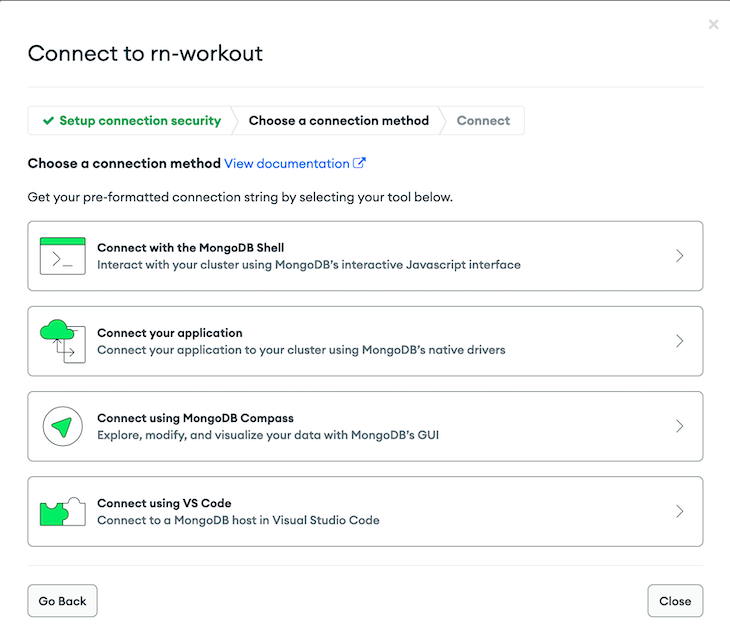
Once you have successfully created a new project, you will have a dashboard where you can get the connection string to connect your database to your app. Click the Connect button and select Connect your application to get your connection string.
Then, copy this string and create a .env file and variable name MONGODB_URI. Next, store this string in it like this:
server/.envMONGODB_URI=mongodb+srv:******************
NOTE: Remember to create a
.gitignorefile and include the.node_modulesand.envfile so it does not get pushed along to the repository
server/.gitignorenode_modules .env
Now, we will connect the database to our app in the app.js file. First, we will require the mongoose module and use the mongoose.connect method and connect our MONGODB_URI. We will also log a text into the console if our database has been successfully connected, as shown below:
// this is a javascript file
const express = require("express");
const mongoose = require("mongoose");
const app = express();

// implement dot env to read env variables
require("dotenv").config();

// connect mongodb with mongoose
mongoose
 .connect(process.env.MONGODB_URI, {
   useNewUrlParser: true,
   useUnifiedTopology: true,
 })
 .then(() => {
   console.log("Connected to MongoDB");
 })
 .catch((err) => console.log(err));
Once we start the server, our server should be successfully running at port 3000 and a text displaying "Connected to MongoDB" should be displayed in our terminal:

Nice! We have successfully connected our server with the database.
Now, we will create a new folder called models and a Workout.js file to define all our schemas. We will have three schemas props: title, reps, and load.
The Properties type and required will be set for all the schema props ( title:String, reps, and load: Number).
The Schema created here will be called every time we want to perform any of the CRUD operations:
// this is a javascript file
const mongoose = require("mongoose");

const WorkoutSchema = new mongoose.Schema({
 title: {
   type: String,
   required: true,
 },
 reps: {
   type: Number,
   required: true,
 },
 load: {
   type: Number,
   required: true,
 },
 // add created at
 createdAt: {
   type: Date,
   default: Date.now,
 },
});

module.exports = mongoose.model("Workout", WorkoutSchema);
Here’s the server/app.js for designing the API endpoint:
// this is a javascript file
app.post("/create", async (req, res) => {
 const title = req.body.title;
 const reps = req.body.reps;
 const load = req.body.load;
 const workout = new WorkoutModel({
   title: title,
   reps: reps,
   load: load,
 });
 try {
   await workout.save();
   res.status(201).json({
     message: "Workout created",
     workout,
   });
 } catch (error) {
   console.log(error);
 }
});
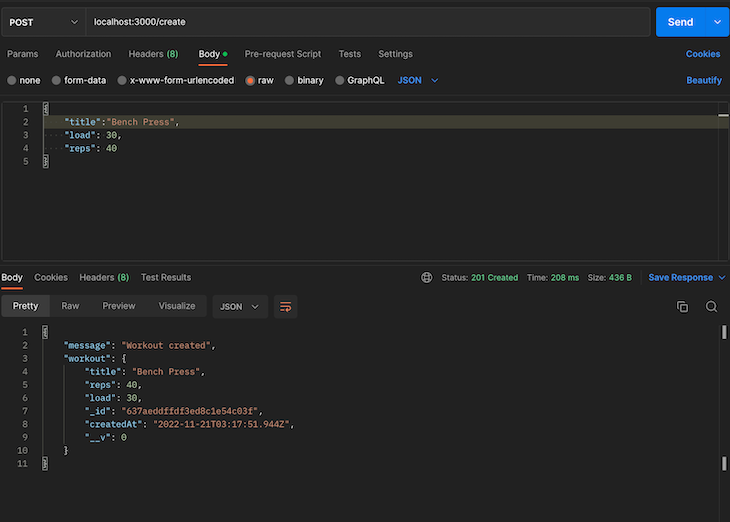
For the create workout endpoint, we will store the schema data in a variable and create a new schema model when the endpoint is called.
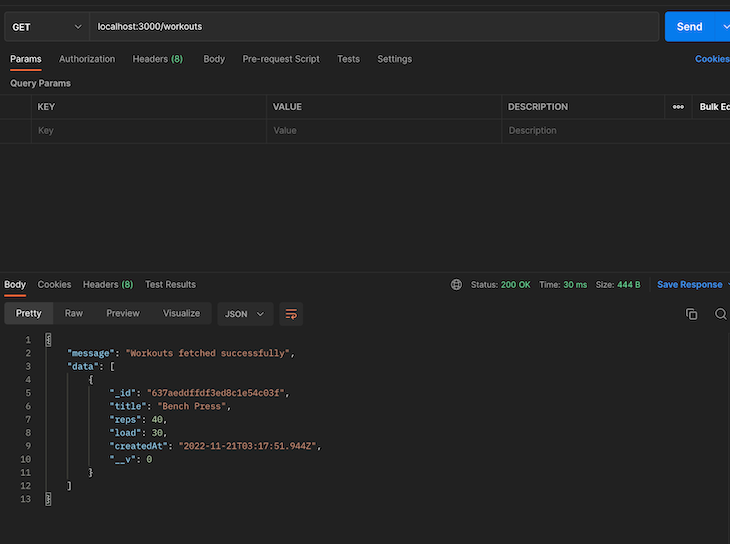
Then, when the request body has been filled, we save the workout designed in the database and return a JSON object of the workout details created and a successful message. Here’s testing in POSTMAN:
Now, when we make a get request for all workouts we should have an Array of one data:
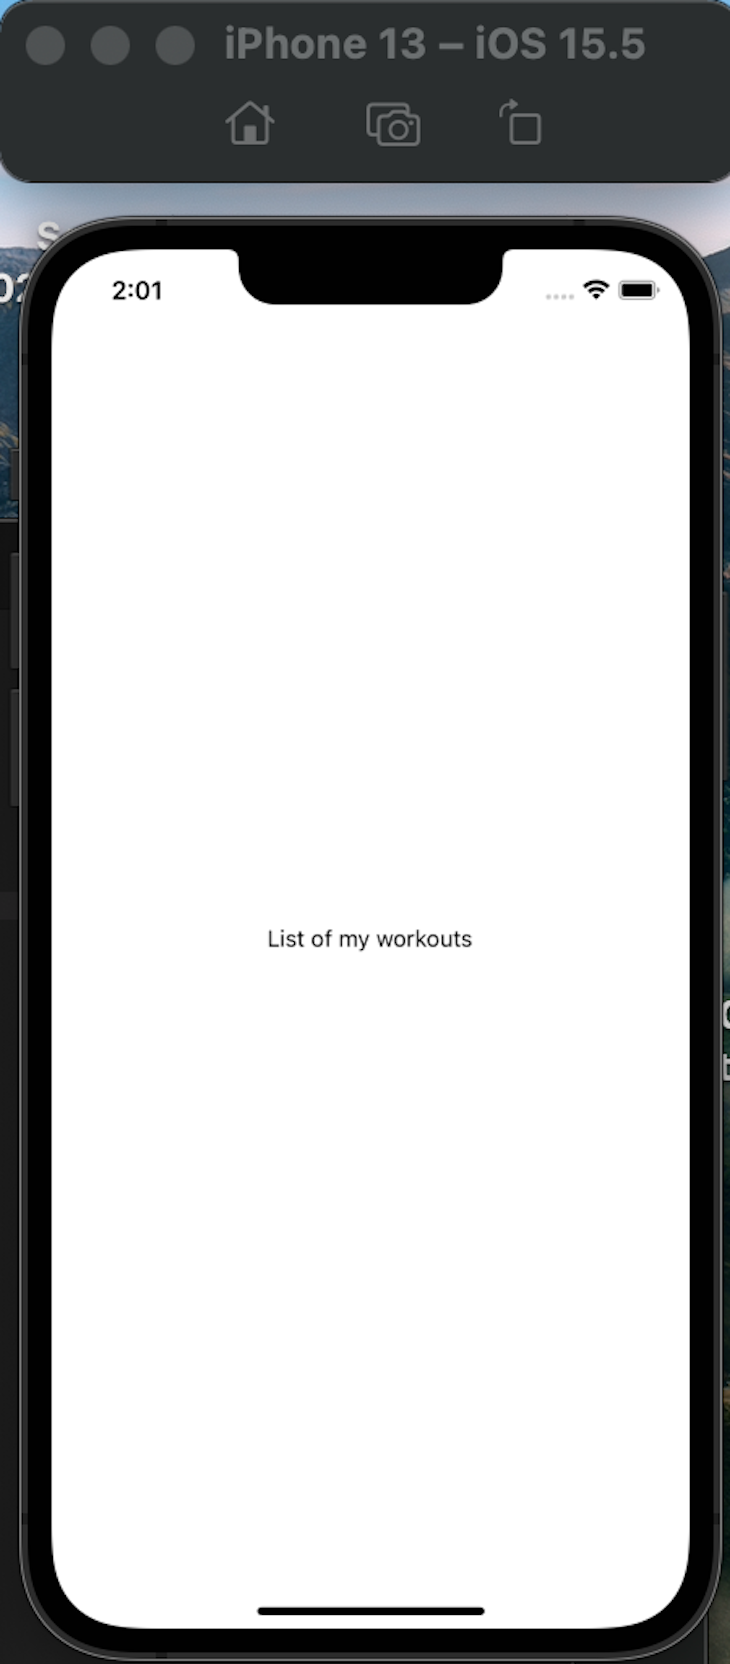
We have successfully created our React Native backend service and can now make requests for operations to carry out on the frontend. To get started, we will create two folders: src and components.
Our App.js will look like this:
// this is a javascript file
import {StyleSheet, Text, View} from 'react-native';
import React from 'react';
const App = () => {
 return (
   <View style={styles.container}>
     <Text>List of my workouts</Text>
       </View>
 );
};

export default App;

const styles = StyleSheet.create({
 container: {
   flex: 1,
   backgroundColor: '#fff',
   alignItems: 'center',
   justifyContent: 'center',
 },
});
Our simulator/emulator will look like this:
React Native does not allow localhost for making connections and network requests with a backend that is not hosted on the internet. Because we are still running our backend server in development, if we make a request to any of the backend endpoints using https://localhost:3000/workouts, it will always return an error saying Network Error/ Axios Network Error.
To solve this, right-click the Wi-Fi or LAN icon you are using for the build. Then, check the network properties to get the IP address you are connected to.
Click the Apple Icon – System Preferences – Network. From there, you should see your IP address:
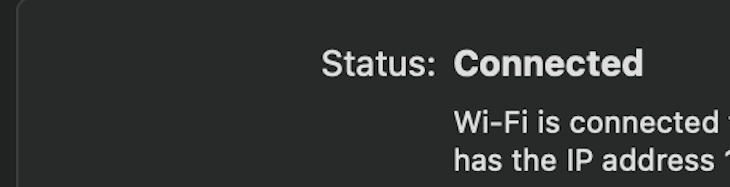
Right-click the Wi-Fi/LAN icon – Open Network and Internet Settings – Status – Wi-Fi – Properties – IP Address
Axios will be used to make requests to the backend service, which can be installed using the npm i axios command.
We have successfully learned how to choose and connect to React Native to self-hosted solutions like Supabase and Firebase. We also learned how to create a custom React Native backend service using Node.js and MongoDB. Choosing which React Native backend service depends on preference and use cases.
In some instances, you may want to build something simple and quick. In that case, Supabase might be the preferred go-to. However, creating your own custom backend service might be the best option when you want complete control over your backend service. You can view the entire GitHub repository here.

LogRocket's Galileo AI watches sessions for you and and surfaces the technical and usability issues holding back your React Native apps.
LogRocket also helps you increase conversion rates and product usage by showing you exactly how users are interacting with your app. LogRocket's product analytics features surface the reasons why users don't complete a particular flow or don't adopt a new feature.
Start proactively monitoring your React Native apps — try LogRocket for free.

Discover how React Fiber works under the hood. Learn how React builds the DOM, handles concurrent rendering, and works alongside React 19 features and the new React Compiler.

Learn how to use Skybridge, an open-source React framework, to build and deploy cross-platform AI apps and interactive UI widgets for ChatGPT, Claude, and MCP clients from a single codebase.

Learn how to set up Meilisearch, index documents, and build keyword, semantic, and hybrid search with AI-powered retrieval.

Compare pnpm and npm across security defaults, disk usage, dependency strictness, and workspace policy to decide which package manager fits your project.
Hey there, want to help make our blog better?
Join LogRocket’s Content Advisory Board. You’ll help inform the type of content we create and get access to exclusive meetups, social accreditation, and swag.
Sign up now

