Editor’s Note: This blog post was reviewed and rewritten 6 August 2021 by Atharva Deosthale to include the newest features of Firebase and clarify the original tutorial’s instructions. It was updated again 10 January 2022 to address breaking changes with the release of Firebase v9.

Nowadays, security is very important on websites and apps. That’s mainly to ensure that private data is not leaked to the public and someone doesn’t do actions on your behalf.
Sometimes, developers make their own backend incorporating their own custom security methods. Other developers use various BaaS (Backend as a service) platforms so that they don’t need to worry about specifics of security, and these platforms help developers with most secure ways of authenticating users.
Today, we are going to use Firebase, which is a BaaS that helps us with various services such as database authentication and cloud storage. We are going to see how we can use the authentication service in Firebase to secure our React app.
If you face any issues throughout the tutorial, you can refer to the code in the GitHub repository.
Before we dive into React and start coding some good stuff, we need to set up our own Firebase project through the Firebase Console. To get started, navigate your browser to Firebase Console. Make sure you are logged into your Google account.
Now, click on Add project and you should be presented with the following screen:
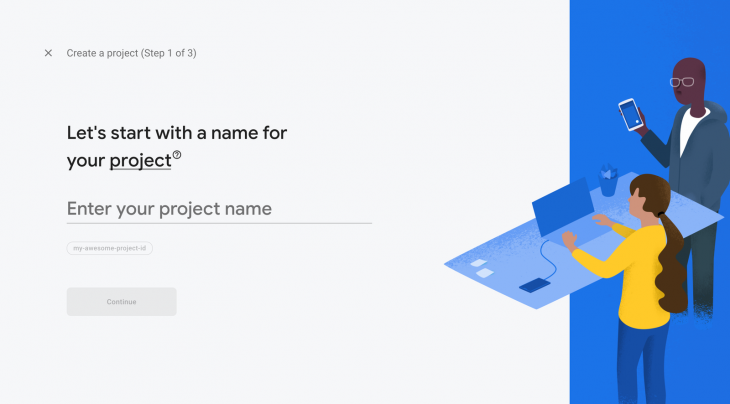
Enter a project name. In my case, I’ll name it firebase-auth-article.
Once you’ve given it a sweet name, click on Continue and you should be prompted for an option to enable Google Analytics. We don’t need Google Analytics for this tutorial, but turning it on won’t do harm, so go ahead and turn it on if you want.
Once you’ve completed all the steps, you should be presented with the dashboard, which looks something like this:
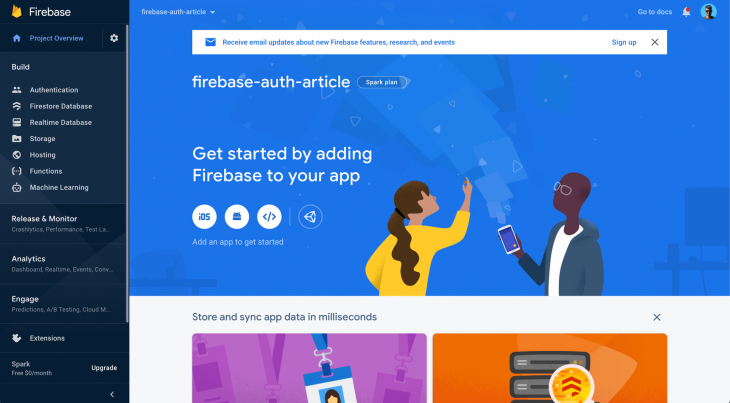
First, let’s set up authentication. Click on Authentication on the sidebar and click on Get Started to enable the module. Now you will be presented with various authentication options:
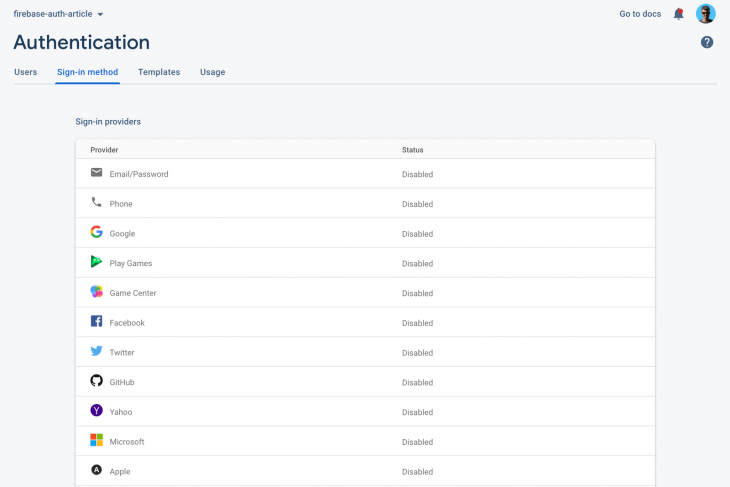
First click on Email/Password, enable it, and save it:

Now press on Google:
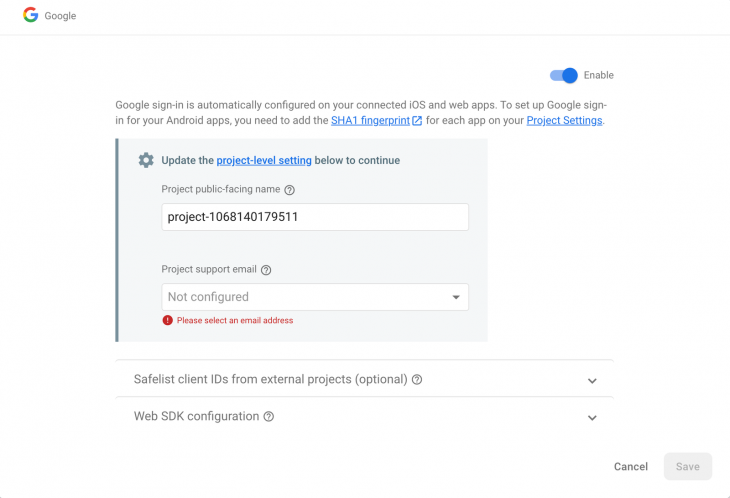
Press enable, select a project support email address, and click on Save to activate Google Authentication for our app.
Now, let’s set up the database we are going to use for our project, which is Cloud Firestore. Click on Cloud Firestore on the sidebar and click on Create Database. You should be presented with the following dialog:
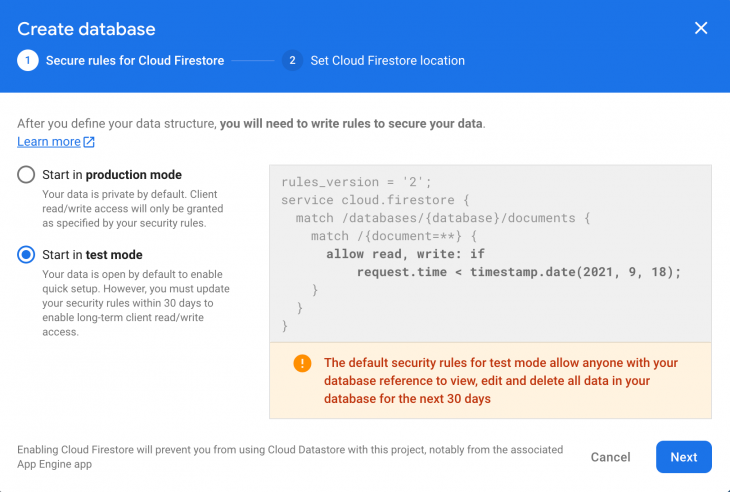
Remember to select Start in test mode. We are using test mode because we are not dealing with production-level applications in this tutorial. Production mode databases require a configuration of security rules, which is out of the scope of this tutorial.
Click Next. Select the region. I’ll leave it to the default, and then press Enable. This should completely set up your Cloud Firestore database.
Navigate to a safe folder and type the following command in the terminal to create a new React app:
npx create-react-app appname
Remember to replace appname with a name of your choice. The name doesn’t really affect how the tutorial works. Once the React app is successfully created, type the command to install a few npm packages we will need throughout the project:
npm install firebase react-router-dom react-firebase-hooks
Here, we are installing firebase to communicate with Firebase services, and we are also installing react-router-dom to handle the routing of the application. We use react-firebase-hooks to manage the authentication state of the user.
Type the following command to run your React app:
cd appname && npm start
This should fire up your browser and you should see the following screen:

Now, let’s do some cleanup so that we can continue with coding. Delete the following files from the src folder: App.test.js, logo.svg, and setupTests.js. Once you delete these files, delete all the contents of App.css and you will see an error on the React app. Don’t worry; just remove the logo imports in App.js and empty the div so that your App.js looks like this:
import './App.css';
function App() {
  return (
    <div className="app">

    </div>
  );
}
export default App;
Go to your Firebase Console dashboard, click on Project Settings, scroll down, and you should see something like this:

Click on the third icon (</>) to configure our Firebase project for the web. Enter the app name and click on Continue. Go back to the project settings and you should now see a config like this:
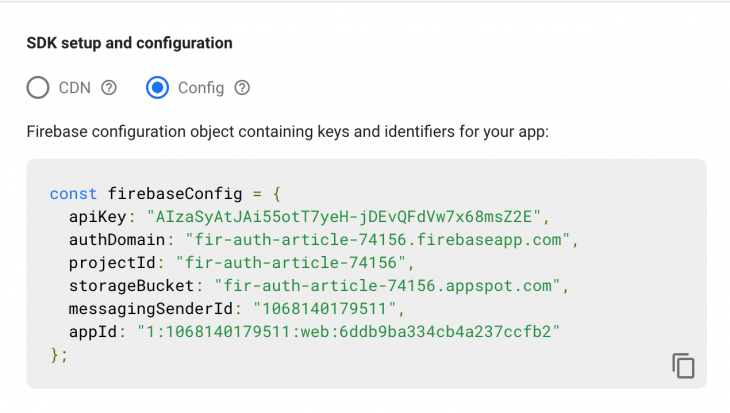
Copy the config. Create a new file in the src folder named firebase.js. Let’s first import firebase modules, since Firebase uses modular usage in v9::
import { initializeApp } from "firebase/app";
import {
GoogleAuthProvider,
getAuth,
signInWithPopup,
signInWithEmailAndPassword,
createUserWithEmailAndPassword,
sendPasswordResetEmail,
signOut,
} from "firebase/auth";
import {
getFirestore,
query,
getDocs,
collection,
where,
addDoc,
} from "firebase/firestore";
Now paste in the config we just copied. Let’s initialize our app and services so that we can use Firebase throughout our app:
const app = initializeApp(firebaseConfig); const auth = getAuth(app); const db = getFirestore(app);
This will use our config to recognize the project and initialize authentication and database modules.
We will be creating all important authentication-related functions in firebase.js itself. So first look at the Google Authentication function:
const googleProvider = new GoogleAuthProvider();
const signInWithGoogle = async () => {
  try {
    const res = await signInWithPopup(auth, googleProvider);
    const user = res.user;
    const q = query(collection(db, "users"), where("uid", "==", user.uid));
    const docs = await getDocs(q);
    if (docs.docs.length === 0) {
      await addDoc(collection(db, "users"), {
        uid: user.uid,
        name: user.displayName,
        authProvider: "google",
        email: user.email,
      });
    }
  } catch (err) {
    console.error(err);
    alert(err.message);
  }
};
In the above code block, we are using a try…catch block along with async functions so that we can handle errors easily and avoid callbacks as much as possible.
First, we are attempting to log in using the GoogleAuthProvider Firebase provides us. If the authentication fails, the flow is sent to the catch block.
Then we are querying the database to check if this user is registered in our database with the user uid. And if there is no user with the uid, which also means that the user is new to our app, we make a new record in our database with additional data for future reference.
Now let’s make a function for signing in using an email and password:
const logInWithEmailAndPassword = async (email, password) => {
  try {
    await signInWithEmailAndPassword(auth, email, password);
  } catch (err) {
    console.error(err);
    alert(err.message);
  }
};
This code is very simple. Since we know that the user is already registered with us, we don’t need to check the database. We can proceed with the authentication right away. We just pass in the email and password to signInWithEmailAndPassword functions, which is provided to us by Firebase.
Now, let’s create a function for registering a user with an email and password:
const registerWithEmailAndPassword = async (name, email, password) => {
  try {
    const res = await createUserWithEmailAndPassword(auth, email, password);
    const user = res.user;
    await addDoc(collection(db, "users"), {
      uid: user.uid,
      name,
      authProvider: "local",
      email,
    });
  } catch (err) {
    console.error(err);
    alert(err.message);
  }
};
Since we know that the user is new to our app, we create a record for the user without checking if there is one existing in our database. It’s similar to the approach we used in Google Authentication but without checks.
Create a function that will send a password reset link to an email address:
const sendPasswordReset = async (email) => {
  try {
    await sendPasswordResetEmail(auth, email);
    alert("Password reset link sent!");
  } catch (err) {
    console.error(err);
    alert(err.message);
  }
};
This code is simple. We are just passing in the email in the sendPasswordResetEmail function provided by Firebase. The password reset email will be sent by Firebase.
And finally, the logout function:
const logout = () => {
  signOut(auth);
};
Nothing much here, just firing up the signOut function from Firebase, and Firebase will do its magic and log out the user for us.
Finally we export all the functions, and here’s how your firebase.js should finally look:
import { initializeApp } from "firebase/app";
import {
  GoogleAuthProvider,
  getAuth,
  signInWithPopup,
  signInWithEmailAndPassword,
  createUserWithEmailAndPassword,
  sendPasswordResetEmail,
  signOut,
} from "firebase/auth";
import {
  getFirestore,
  query,
  getDocs,
  collection,
  where,
  addDoc,
} from "firebase/firestore";
const firebaseConfig = {
  apiKey: "AIzaSyDIXJ5YT7hoNbBFqK3TBcV41-TzIO-7n7w",
  authDomain: "fir-auth-6edd8.firebaseapp.com",
  projectId: "fir-auth-6edd8",
  storageBucket: "fir-auth-6edd8.appspot.com",
  messagingSenderId: "904760319835",
  appId: "1:904760319835:web:44fd0d957f114b4e51447e",
  measurementId: "G-Q4TYKH9GG7",
};
const app = initializeApp(firebaseConfig);
const auth = getAuth(app);
const db = getFirestore(app);
const googleProvider = new GoogleAuthProvider();
const signInWithGoogle = async () => {
  try {
    const res = await signInWithPopup(auth, googleProvider);
    const user = res.user;
    const q = query(collection(db, "users"), where("uid", "==", user.uid));
    const docs = await getDocs(q);
    if (docs.docs.length === 0) {
      await addDoc(collection(db, "users"), {
        uid: user.uid,
        name: user.displayName,
        authProvider: "google",
        email: user.email,
      });
    }
  } catch (err) {
    console.error(err);
    alert(err.message);
  }
};
const logInWithEmailAndPassword = async (email, password) => {
  try {
    await signInWithEmailAndPassword(auth, email, password);
  } catch (err) {
    console.error(err);
    alert(err.message);
  }
};
const registerWithEmailAndPassword = async (name, email, password) => {
  try {
    const res = await createUserWithEmailAndPassword(auth, email, password);
    const user = res.user;
    await addDoc(collection(db, "users"), {
      uid: user.uid,
      name,
      authProvider: "local",
      email,
    });
  } catch (err) {
    console.error(err);
    alert(err.message);
  }
};
const sendPasswordReset = async (email) => {
  try {
    await sendPasswordResetEmail(auth, email);
    alert("Password reset link sent!");
  } catch (err) {
    console.error(err);
    alert(err.message);
  }
};
const logout = () => {
  signOut(auth);
};
export {
  auth,
  db,
  signInWithGoogle,
  logInWithEmailAndPassword,
  registerWithEmailAndPassword,
  sendPasswordReset,
  logout,
};
Next, let’s work on the actual functionality.
Create two new files to create a new component, Login.js and Login.css. I highly recommend installing ES7 snippets in Visual Studio Code so that you can just start typing rfce and press Enter to create a component boilerplate.
Now, let’s assign this component to a route. To do that, we need to configure React Router. Go to App.js and import the following:
import { BrowserRouter as Router, Route, Routes } from "react-router-dom";
Then, in the JSX part of App.js, add the following configuration to enable routing for our app:
<div className="app">
  <Router>
    <Switch>
      <Route exact path="/" component={Login} />
    </Switch>
  </Router>
</div>
Remember to import the Login component on the top!
Go to Login.css and add the following styles. We won’t be focusing on styling much, so here are the styles for you to use:
.login {
  height: 100vh;
  width: 100vw;
  display: flex;
  align-items: center;
  justify-content: center;
}
.login__container {
  display: flex;
  flex-direction: column;
  text-align: center;
  background-color: #dcdcdc;
  padding: 30px;
}
.login__textBox {
  padding: 10px;
  font-size: 18px;
  margin-bottom: 10px;
}
.login__btn {
  padding: 10px;
  font-size: 18px;
  margin-bottom: 10px;
  border: none;
  color: white;
  background-color: black;
}
.login__google {
  background-color: #4285f4;
}
.login div {
  margin-top: 7px;
}
Go to Login.js, and let’s look at how our login functionality works:
import React, { useEffect, useState } from "react";
import { Link, useNavigate } from "react-router-dom";
import { auth, signInWithEmailAndPassword, signInWithGoogle } from "./firebase";
import { useAuthState } from "react-firebase-hooks/auth";
import "./Login.css";
function Login() {
  const [email, setEmail] = useState("");
  const [password, setPassword] = useState("");
  const [user, loading, error] = useAuthState(auth);
  const navigate = useNavigate();
  useEffect(() => {
    if (loading) {
      // maybe trigger a loading screen
      return;
    }
    if (user) navigate("/dashboard");
  }, [user, loading]);
  return (
    <div className="login">
      <div className="login__container">
        <input
          type="text"
          className="login__textBox"
          value={email}
          onChange={(e) => setEmail(e.target.value)}
          placeholder="E-mail Address"
        />
        <input
          type="password"
          className="login__textBox"
          value={password}
          onChange={(e) => setPassword(e.target.value)}
          placeholder="Password"
        />
        <button
          className="login__btn"
          onClick={() => signInWithEmailAndPassword(email, password)}
        >
          Login
        </button>
        <button className="login__btn login__google" onClick={signInWithGoogle}>
          Login with Google
        </button>
        <div>
          <Link to="/reset">Forgot Password</Link>
        </div>
        <div>
          Don't have an account? <Link to="/register">Register</Link> now.
        </div>
      </div>
    </div>
  );
}
export default Login;
The above code might look long and hard to understand, but it’s really not. We have already covered the main authentication parts and now we are just implementing them in our layouts.
Here’s what’s happening in the above code block. We are using the functions we made in firebase.js for authentication. We are also using react-firebase-hooks along with useEffect to track the authentication state of the user. So, if the user gets authenticated, the user will automatically get redirected to the dashboard, which we are yet to make.
Here’s what you’ll see on your screen:
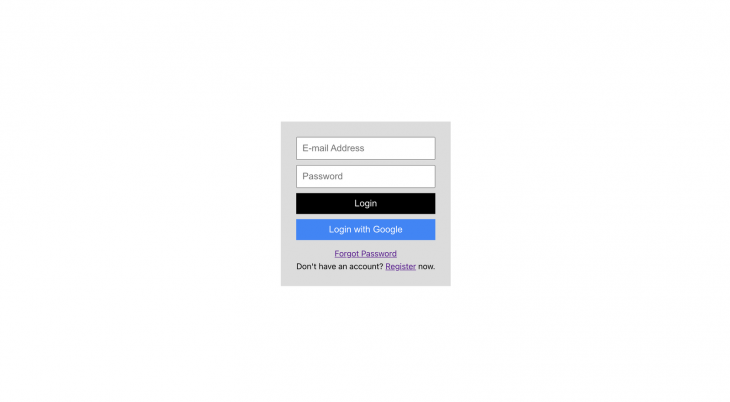
Create a new component called Register to handle user registrations. Here are the styles for Register.css:
.register {
  height: 100vh;
  width: 100vw;
  display: flex;
  align-items: center;
  justify-content: center;
}
.register__container {
  display: flex;
  flex-direction: column;
  text-align: center;
  background-color: #dcdcdc;
  padding: 30px;
}
.register__textBox {
  padding: 10px;
  font-size: 18px;
  margin-bottom: 10px;
}
.register__btn {
  padding: 10px;
  font-size: 18px;
  margin-bottom: 10px;
  border: none;
  color: white;
  background-color: black;
}
.register__google {
  background-color: #4285f4;
}
.register div {
  margin-top: 7px;
}
After that, let’s look at how the register functionality is implemented in the layout. Use this layout in Register.js:
import React, { useEffect, useState } from "react";
import { useAuthState } from "react-firebase-hooks/auth";
import { Link, useHistory } from "react-router-dom";
import {
  auth,
  registerWithEmailAndPassword,
  signInWithGoogle,
} from "./firebase";
import "./Register.css";
function Register() {
  const [email, setEmail] = useState("");
  const [password, setPassword] = useState("");
  const [name, setName] = useState("");
  const [user, loading, error] = useAuthState(auth);
  const history = useHistory();
  const register = () => {
    if (!name) alert("Please enter name");
    registerWithEmailAndPassword(name, email, password);
  };
  useEffect(() => {
    if (loading) return;
    if (user) history.replace("/dashboard");
  }, [user, loading]);
  return (
    <div className="register">
      <div className="register__container">
        <input
          type="text"
          className="register__textBox"
          value={name}
          onChange={(e) => setName(e.target.value)}
          placeholder="Full Name"
        />
        <input
          type="text"
          className="register__textBox"
          value={email}
          onChange={(e) => setEmail(e.target.value)}
          placeholder="E-mail Address"
        />
        <input
          type="password"
          className="register__textBox"
          value={password}
          onChange={(e) => setPassword(e.target.value)}
          placeholder="Password"
        />
        <button className="register__btn" onClick={register}>
          Register
        </button>
        <button
          className="register__btn register__google"
          onClick={signInWithGoogle}
        >
          Register with Google
        </button>
        <div>
          Already have an account? <Link to="/">Login</Link> now.
        </div>
      </div>
    </div>
  );
}
export default Register;
Here, we are using similar approach as we used in the Login component. We are just using the functions we previously created in firebase.js. Again, here we are using useEffect along with react-firebase-hooks to keep track of user authentication status.
Let’s look at resetting passwords. Create a new component called Reset, and here’s the styling for Reset.css:
.reset {
  height: 100vh;
  width: 100vw;
  display: flex;
  align-items: center;
  justify-content: center;
}
.reset__container {
  display: flex;
  flex-direction: column;
  text-align: center;
  background-color: #dcdcdc;
  padding: 30px;
}
.reset__textBox {
  padding: 10px;
  font-size: 18px;
  margin-bottom: 10px;
}
.reset__btn {
  padding: 10px;
  font-size: 18px;
  margin-bottom: 10px;
  border: none;
  color: white;
  background-color: black;
}
.reset div {
  margin-top: 7px;
}
This is the layout for Reset.js:
import React, { useEffect, useState } from "react";
import { useAuthState } from "react-firebase-hooks/auth";
import { useNavigate } from "react-router-dom";
import { Link } from "react-router-dom";
import { auth, sendPasswordResetEmail } from "./firebase";
import "./Reset.css";
function Reset() {
  const [email, setEmail] = useState("");
  const [user, loading, error] = useAuthState(auth);
  const navigate = useNavigate();
  useEffect(() => {
    if (loading) return;
    if (user) navigate("/dashboard");
  }, [user, loading]);
  return (
    <div className="reset">
      <div className="reset__container">
        <input
          type="text"
          className="reset__textBox"
          value={email}
          onChange={(e) => setEmail(e.target.value)}
          placeholder="E-mail Address"
        />
        <button
          className="reset__btn"
          onClick={() => sendPasswordResetEmail(email)}
        >
          Send password reset email
        </button>
        <div>
          Don't have an account? <Link to="/register">Register</Link> now.
        </div>
      </div>
    </div>
  );
}
export default Reset;
This is similar to what we did for the Login and Register components. We are simply using the functions we created earlier.
Now, let’s focus on the dashboard. Create a new component called Dashboard, and here’s the styling for Dashboard.css:
.dashboard {
  height: 100vh;
  width: 100vw;
  display: flex;
  align-items: center;
  justify-content: center;
}
.dashboard__container {
  display: flex;
  flex-direction: column;
  text-align: center;
  background-color: #dcdcdc;
  padding: 30px;
}
.dashboard__btn {
  padding: 10px;
  font-size: 18px;
  margin-top: 10px;
  border: none;
  color: white;
  background-color: black;
}
.dashboard div {
  margin-top: 7px;
}
And here’s the layout for Dashboard.js:
import React, { useEffect, useState } from "react";
import { useAuthState } from "react-firebase-hooks/auth";
import { useNavigate } from "react-router-dom";
import "./Dashboard.css";
import { auth, db, logout } from "./firebase";
import { query, collection, getDocs, where } from "firebase/firestore";
function Dashboard() {
  const [user, loading, error] = useAuthState(auth);
  const [name, setName] = useState("");
  const navigate = useNavigate();
  const fetchUserName = async () => {
    try {
      const q = query(collection(db, "users"), where("uid", "==", user?.uid));
      const doc = await getDocs(q);
      const data = doc.docs[0].data();
      setName(data.name);
    } catch (err) {
      console.error(err);
      alert("An error occured while fetching user data");
    }
  };
  useEffect(() => {
    if (loading) return;
    if (!user) return navigate("/");
    fetchUserName();
  }, [user, loading]);
  return (
    <div className="dashboard">
       <div className="dashboard__container">
        Logged in as
         <div>{name}</div>
         <div>{user?.email}</div>
         <button className="dashboard__btn" onClick={logout}>
          Logout
         </button>
       </div>
     </div>
  );
}
export default Dashboard;
Unlike the other components, there’s something else we are doing here. We are checking the authentication state. If the user is not authenticated, we redirect the user to the login page.
We are also fetching our database and retrieving the name of the user based on the uid of the user. Finally, we are rendering out everything on the screen.
Lastly, let’s add everything to the router. Your App.js should look like this:
import "./App.css";
import { BrowserRouter as Router, Route, Routes } from "react-router-dom";
import Login from "./Login";
import Register from "./Register";
import Reset from "./Reset";
import Dashboard from "./Dashboard";
function App() {
  return (
    <div className="app">
      <Router>
        <Routes>
          <Route exact path="/" element={<Login />} />
          <Route exact path="/register" element={<Register />} />
          <Route exact path="/reset" element={<Reset />} />
          <Route exact path="/dashboard" element={<Dashboard />} />
        </Routes>
      </Router>
    </div>
  );
}
export default App;
The app is fully functional!
Debugging React applications can be difficult, especially when users experience issues that are difficult to reproduce. If you’re interested in monitoring and tracking Redux state, automatically surfacing JavaScript errors, and tracking slow network requests and component load time, try LogRocket. 

LogRocket is like a DVR for web apps, recording literally everything that happens on your React app. Instead of guessing why problems happen, you can aggregate and report on what state your application was in when an issue occurred. LogRocket also monitors your app’s performance, reporting with metrics like client CPU load, client memory usage, and more.
The LogRocket Redux middleware package adds an extra layer of visibility into your user sessions. LogRocket logs all actions and state from your Redux stores.
Modernize how you debug your React apps — start monitoring for free.
Once you’re done with this build, I want you to play around with this. Try adding Facebook authentication next. What about GitHub authentication? I’d say keep experimenting with the code because that’s how you practice and learn things. If you just keep copying the code, you won’t understand the fundamentals of Firebase.
Again, if you have any errors or questions regarding the code, here’s the GitHub repository you can use for reference.
Would you be interested in joining LogRocket's developer community?
Join LogRocket’s Content Advisory Board. You’ll help inform the type of content we create and get access to exclusive meetups, social accreditation, and swag.
Sign up now
A breakdown of the wrapper and container CSS classes, how they’re used in real-world code, and when it makes sense to use one over the other.

This guide walks you through creating a web UI for an AI agent that browses, clicks, and extracts info from websites powered by Stagehand and Gemini.

This guide explores how to use Anthropic’s Claude 4 models, including Opus 4 and Sonnet 4, to build AI-powered applications.

Which AI frontend dev tool reigns supreme in July 2025? Check out our power rankings and use our interactive comparison tool to find out.
51 Replies to "Handling user authentication with Firebase in your React apps"
Hard to follow and incomplete
can you please just provide repo?
Here’s the repo: https://github.com/nodejss/Firebase-auth-article
After creating an account you call generateUserDocument(user, {displayName}}). Should the result of this call be used to update the context? Also, onAuthStateChanged is triggered as soon as you register which calls generateUserDocument(userAuth). How do we now that generateUserDocument(user, {displayName}}) is called after generateUserDocument(userAuth)?
Calling generateUserDocument(user, {displayName}) during account creation writes a new user document to firestore. The data contained in this document (the display name included) are now used to update the user context in onAuthStateChanged.
Thanks for your response. So is the write operation guaranteed to complete before onAuthStateChanged is triggered?
What if the onAuthChanged completes before the write operation? Wouldn’t we have an outdated user in the context?
So far, this seems to work without problems for me.
If you do, however, find any problems such as onAuthChanged completing before the write operation, I would be glad to look into it.
i am sorry,
but you hidden the firebase info in the article
const firebaseConfig = {
apiKey: ‘AIzaXXXXXXXXXXXXXXXXXXXXXXX’,
authDomain: ‘test-XXXX.firebaseapp.com’,
databaseURL: ‘https://test-XXXXXX.firebaseio.com’,
projectId: ‘test-XXXX’,
storageBucket: ‘test-XXXX.appspot.com’,
messagingSenderId: ‘XXXXXXX’,
appId: “XXXXXXXXXXXXXXXXXXXXXXXXXXXXXXXXXXXX”
};
but with developer tools i can see the data in plain text
const firebaseConfig = {
apiKey: “AIzaSyA9WZB5N6ekNxyN3yGaUwjuBilvXItUv38”,
authDomain: “fir-auth-article.firebaseapp.com”,
databaseURL: “https://fir-auth-article.firebaseio.com”,
projectId: “fir-auth-article”,
storageBucket: “fir-auth-article.appspot.com”,
messagingSenderId: “774252759419”,
appId: “1:774252759419:web:e014ddfa3553a4832a15de”,
measurementId: “G-77Z5WJ0SET”
};
are u sure this tutorial is safe to be taken as an example?
No problem if the Google API key is public, Even you can add it to your index.html page
Hi, I just directly downloaded your github repo and changed the API details for firebase.
I keep getting this error. Any help?
Unhandled Rejection (FirebaseError): Failed to get document because the client is offline.
Change the client ids.
Hi, thanks for this super helpful article! I’ve noticed that on page refresh, when the user is signed in, it flashes the authentication page before switching to the profile page. Do you have any tips on a best approach to solve this? Thanks!
I’ve same issue while page refresh after login, login page appears for 1 or 2 second and then route will be changed
You can render a loader/spinner until the user object is fully loaded.
Hi, I’ve been trying to render a spinner until the object is loaded but I can’t find a way to do it. Could you give a little more detail on how to implement this? Thank you!
It have the exact same issue as described by Nuur, during the account creation after the createUserWithEmailAndPassword I’m updating the user profile using updateProfile (https://firebase.google.com/docs/reference/js/firebase.User#updateprofile not storing in firestore) but in the meantime the onAuthStateChanged is triggered and so the register page component is unmounted (because i’m routing the /register to / if a user is connected). 2 main issue here : 1) the user state is outdated because onAuthStateChanged is triggered before the complete account creation (missing the displayName) and the 2) can’t catch the error of the 2nd async call (User.updateProfile) because the component is unmounted.
I’m seeing the same as Nuur and Di2pra. Didn’t notice it until I started using the sign in with email and password. Has anyone found a decent workaround?
Great article, nicely written!
Amazing tutorial! This helped me set up my own project. Maybe link the repo on top of the article for new readers?
Huge thanks and have a good day!
Same here, did you solve it?
I am trying to update the code from React.createClass To extends React.Component – I hit an issue when I convert from ‘const Home = () => {‘ to ‘class Home extends useContext {‘ because of the following lines:
const user = useContext(UserContext);
const {photoURL, displayName, email} = user;
How should I re-format these lines?
Thank you!
I’m just learning React and this has been an amazing guide. Really got me in the right headspace for using Firebase with React. You even got me learning about Hooks which I hadn’t gotten around to yet, so thanks for that too!
@Faruq – Thanks for the write up. Pretty good information here.
Just an FYI, in the write up you forget to mention after creating the UserContext/Provider – that you need to go back into your Application.js file and change the line:
const user = null
TO
const user = useContext(UserContext);
This is an important part of the application logic change, otherwise it will never detect the sign in and will never re-route to Profile page.
Hey @Faruq
Having issues on the destructuring in the profile page
here is the error
TypeError: Cannot destructure property ‘photoURL’ of ‘user’ as it is null.
Welcome
const user = useContext(UserContext);
const {photoURL, displayName, email} = user;
console.log(user);
I tried removing the photoURL then got this
TypeError: Cannot destructure property ‘displayName’ of ‘user’ as it is null.
wq
same with third property
TypeError: Cannot destructure property ’email’ of ‘user’ as it is null.
If I simply console log user I am getting the userobject properly But cant seem to access any of the properties
this is my setup
“dependencies”: {
“@material-ui/core”: “^4.10.2”,
“@material-ui/icons”: “^4.9.1”,
“@material-ui/lab”: “^4.0.0-alpha.56”,
“@testing-library/jest-dom”: “^4.2.4”,
“@testing-library/react”: “^9.5.0”,
“@testing-library/user-event”: “^7.2.1”,
“firebase”: “^7.15.1”,
“react”: “^16.13.1”,
“react-dom”: “^16.13.1”,
“react-firebase”: “^2.2.8”,
“react-router-dom”: “^5.2.0”,
“react-scripts”: “3.4.1”
},
Can you tell me whats going wrong
Thanks for the help
I keep getting the same error as @Trev. Can’t make it work properly :/ any help?
I’m having the same issues as @Mark when it comes to retrieving the props on the profile page, they show up as null. Could you provide any help? The article was great and has been a huge help so far
To get around the issue of the issue of the authOnStateChanged event listener firing before the user document has been written to firestore, I created a separate method named loadUser which through the use of setInterval polls firestore every second and checks to see if the document is written. I set it up to only make 3 attempts after which it stops. When you’ve reached the number of retries or you’ve gotten the full user document you can called clearInterval to stop the polling. This is really a poorly written hack and I’m still looking for a more elegant solution.
class UserProvider extends React.Component {
constructor(props) {
super(props);
this.state = { currentUser: null, isLoggedIn: false };
this.loadUser = this.loadUser.bind(this);
}
componentDidMount() {
this.retries = 3;
this.authListener = auth.onAuthStateChanged(userAuth => {
if (userAuth) {
this.intervalId = setInterval(this.loadUser, 1000, userAuth.uid);
console.log(this.intervalId);
} else {
this.setState({ currentUser: null, isLoggedIn: false });
}
});
}
componentWillUnmount() {
this.authListener();
}
async loadUser(userId) {
console.log(`Load user called. Number of retries: ${this.retries}`);
if (this.retries === 1) {
clearInterval(this.intervalId);
}
try {
const currentUser = await getUserDocument(userId);
if (currentUser.email) {
this.setState({ currentUser, isLoggedIn: true });
clearInterval(this.intervalId);
}
} catch (error) {
console.log(`Error logging the user in: ${error}`);
clearInterval(this.intervalId);
} finally {
this.retries -= 1;
}
}
You’ve imported firebase functions and never used in firebase.js
It does work, but needs a lot of cleaning to do. Thanks for sharing
Sir I am facing issue in this tutorial, need a help to solve the issue. Please help me out with the problem, I am stuck with sendResetEmail function in passwordreset component
Hello everybody, hello Faruq. I’m very new with React and I’m trying to add a Facebook Login button to this repo, but it doesn´t work . I open this thread on Stackoverflow. https://stackoverflow.com/questions/63736485/react-login-with-facebook-does-not-redirect-to-the-profile-page?noredirect=1#comment112710522_63736485
hi, How would you add the email verification functionality in this amazing tutorial?
Thanks for the post, it seems most missed the preface of being somewhat experienced with React. Brilliant explanation for an introduction to authentication within React, Thanks Again!
Hey, Yussuf,
Your code works like a charm for my project, I adapted it to my code for resseting password in Firebase.
Thx a lot!
did you solve this issue trev?
You are a lifesaver, I couldn’t figure out what was going on to save my life!
You save my life super hero💪💪💪
Great guide! No extra react-firebase dependencies and some good starter code for components.
Anyone that has “client is offline” error:
check console logs, there was a link for cloud storage,
https://console.cloud.google.com/firestore/
followed the link and created a database,
Then returned to firebase console,
https://console.firebase.google.com/project/, go to your project
check cloud firestore rules and change this:
allow read, write: if false;
to this:
allow read, write: if true;
allow read, write: if true; will give everyone access to the database regardless of authorisation. I suggest not doing this.
This is exactly what’s happening to me.
On registration user gets updated and generateUserDocument called twice.
The one from onAuthChanged is called first every time and my user being created without the ‘additionalData’.
Do you have any idea of how to solve this issue?
thankyou bro ur awesome, thanks
Excellent article, thank you man.
Hello and thanks for the tutorial. I have a question though. Can I use useAuthState in a redux reducer ? I want to store all my state variables at the same place so is there a way to store user, loading and error in my reducer ? Thanks by advance.
Good work man !
All the best
Love this. Simple and effective! Thank you very much, will bookmark this for future reference.
Wow man!
This is amazing, keep the good work going!
Why my useEffect looping on Maximum update depth exceeded? i’ve followed everything correctly.
Hi Rico, I had the same issue. For me, this solution worked: I just added the “navigate” hook to the dependency array.
useEffect(() => {
if (loading) return;
if (user) {
navigate(“/”)
} else {
navigate(“/login”)
}
}, [user, navigate]);
Another problem which is similar, that is whatever I use google or email login, it shows “An error occurred while fetching user data”, but it still shows as login?
Yusuff,
This is working great except for one thing. When I refresh the dashboard page after logging in, the screen turns white. Do you know how to fix this?
is this chat app for only two users or multiple?