I promise the most exciting part of this article won’t be that you’re reading about how to build a blog in a blog post. 😄 What will make this read genuinely intriguing is that you will build your new blog in Alinea, a new CMS written in TypeScript.

If you’re a big fan of content management systems and typed languages, and you’re ready to discover the very new and intriguing Alinea, I suggest you get your favorite beverage, roll your sleeves up and follow me on a journey of discovering this new CMS.
Over the years, I have played with a long list of content management systems. As someone who has been blogging for 18 years, CMSs were always close to my heart. From WordPress, Joomla, CouchCMS, and even Gatsby, I have tried multiple solutions out there, and I’ve come to the same conclusion every time: you need to use the right tool for the right job.
With that in mind, let’s discover Alinea and learn about what it’s best suited for and who would use it most.
At the time of writing, Alinea is in beta, which is exciting because you get to experiment with something new and shiny, and brag about it at the next coder meetup. However, my experience with it may be something other than a carbon copy of your experience. Beta software always comes with extra unpredictability and later changes that may not be reflected in this article.
Jump ahead:
For some hardware-software context, I am developing this Alinea blog on an Apple Silicon MacBook Air M2 with 16 GB of RAM and 512 GB SSD. It is on macOS v12.6, running Node.js v16.16. There are no Docker images, no virtual machine, nothing special, and a very straightforward setup — which brings me to my first point.
When building a new Alinea blog, you’ll ideally start with a host application. Here, we will use a simple React app with Next.js because it’s very well-supported by Alinea and is better for SEO. There’s no easier way to get one going than simply running everyone’s favorite React command:
npx create-next-app@latest --typescript
To stay true to Alinea’s mission of delivering a typed solution, I think our host app should be in TypeScript. The focus of this exercise won’t be TypeScript, and we’ll keep that part basic. It’s also worth noting that Alinea runs just fine as a JavaScript project. To enable that, rename your alinea.config.tsx file to alinea.config.js. For those new to TypeScript, I would recommend doing that and checking out our guide to using TypeScript in React.
Once your React app is up and running, you’re set to get going with Alinea in your project’s directory by installing it with npm install alinea.
Let’s initialize it and spin it up in the browser by typing the following into the command line: npx alinea init and then npx alinea serve. And that’s it. End of article. Enjoy your new CMS. 😆
OK, OK, I’m joking, of course, but you have to appreciate how laughingly simple it was to get our new CMS up and running. 🙂 Smooth sailing so far, so let’s make our new CMS do some work for us!
There are several ways to go about creating blogs; one way or another, you’ll likely end up creating pages and blog posts. If your blog supports multi-tenancy — multiple authors — you’d also have an author type. For brevity, we’ll focus on pages and blog posts.
Alinea operates based on a configuration file. This can be one file or broken up into multiple smaller configuration files. I think the latter is a better approach because it makes things easier to understand and manage.
So, without further ado, let’s create the main config file and each relevant file for our homepage, blog page, and blog post.
When you ran npx alinea init, among others, it created alinea.config.tsx. Let’s replace the contents of that with something a lot more manageable, like so:
import {IcRoundInsertDriveFile} from '@alinea/ui/icons/IcRoundInsertDriveFile'
import {IcRoundPermMedia} from '@alinea/ui/icons/IcRoundPermMedia'
import {alinea, BrowserPreview, MediaSchema} from 'alinea'
import {BlogCollection, BlogPost, HomePage} from './schema'

const schema = alinea.schema({
  ...MediaSchema,
  HomePage,
  BlogCollection,
  BlogPost
})

export const config = alinea.createConfig({
  schema,
  dashboard: {
    staticFile: './public/admin.html',
    dashboardUrl: '/admin.html',
    handlerUrl: '/api/cms'
  },
  workspaces: {
    main: alinea.workspace('Blog', {
      source: './content',
      mediaDir: './public/assets',
      roots: {
        pages: alinea.root('Blog', {
          icon: IcRoundInsertDriveFile,
          contains: ['HomePage', 'BlogCollection']
        }),
        assets: alinea.root('Assets', {
          icon: IcRoundPermMedia,
          contains: ['MediaLibrary']
        })
      },
      preview({entry, previewToken}) {
        const location =
          process.env.NODE_ENV === 'development' ? 'http://localhost:3000' : ''
        if (['Author', 'BlogCollection'].includes(entry.type)) return null
        return (
          <BrowserPreview
            url={`${location}/api/preview?${previewToken}`}
            prettyUrl={entry.url}
          />
        )
      }
    })
  }
})
So, let’s see what we have here. Firstly, we do some Alinea-specific imports and the schema files, which we have not created yet. The rest of the file is setting up the schema and creating the configuration for the CMS. This, among others, also makes use of the schema. To make more sense of this, let’s also set up the blog page, the homepage, and the blog post, so we can surface them in the CMS.
In your root folder, create another directory called schema. Inside, let’s create the following four files:
index.tshomePage.tsblogCollection.tsblogPost.tsIn the index.ts file, export the other three schema files like so:
export * from './blogCollection'
export * from './blogPost'
export * from './homePage'
In the homePage.ts file, set up the fields and data type we want to have available in the CMS:
import {Entry} from '@alinea/core'
import alinea from 'alinea'

export const HomePage = alinea.type('Homepage', {
  title: alinea.text('Title', {width: 0.5}),
  path: alinea.path('Path', {hidden: true}),
  intro: alinea.object('Intro', {
    fields: alinea.type('Intro fields', {
      title: alinea.text('Intro title'),
      byline: alinea.richText('Byline')
    })
  }),
  heroPost: alinea.entry('Hero post', {
    condition: Entry.type.is('BlogPost')
  })
})
Very similarly, in the blogCollection.ts file, we’ll set up the type and data as well. This is essentially a container for all the blog posts that you’ll be creating later:
import alinea from 'alinea'


export const BlogCollection = alinea
  .type('Blog posts', {
    title: alinea.text('Title', {width: 0.5}),
    path: alinea.path('Path', {width: 0.5})
  })
  .configure({
    isContainer: true,
    contains: ['BlogPost']
  })
And finally, let’s look at the blogPost.ts itself, which defines what we can have as data in each post:
import {Entry} from '@alinea/core'
import alinea from 'alinea'

export const BlogPost = alinea.type(
  'Blog post',
  alinea.tabs(
    alinea.tab('Content', {
      title: alinea.text('Title', {width: 0.5}),
      path: alinea.path('Path', {width: 0.5}),
      date: alinea.date('Publish date'),
      coverImage: alinea.image('Cover image', {width: 0.5}),
      author: alinea.entry('Author', {
        width: 0.5,
        condition: Entry.type.is('Author')
      }),
      excerpt: alinea.richText('Excerpt'),
      content: alinea.richText('Content')
    }),
    alinea.tab('Metadata', {
      ogImage: alinea.image('OG Image')
    })
  )
)
That’s about it regarding setup and configuration for a lightweight blog CMS. You can, of course, build on this basic configuration. To do that, refer to the official documentation. For now, let’s connect the CMS to our frontend, the React app we created in the first steps.
Now, one would hope that setting up our schemas and the generated files in the .alinea folder would be enough to simply pull the data from the pages and posts in the CMS. Unfortunately, that’s not quite enough. There are several ways to go about this, but I’ll show you the cleanest and possibly simplest way to get the data. Also, it’s the suggested method in Alinea’s demo projects. So, let’s create a little “API” to pull all that data.
First, create an api directory in your root folder, and inside add a file called api.ts that should look like this:
import {initPages} from '@alinea/content/pages'
import {PreviewData} from 'next'

export function createApi(previewToken?: PreviewData) {
  const pages = initPages(previewToken as string)
  return {
    async getHomePage() {
      return pages.whereType('HomePage').sure()
    },
    async getPostSlugs() {
      return pages.whereType('BlogPost').select(page => page.path)
    },
    async getPostBySlug(slug: string) {
      return pages.whereType('BlogPost').first(page => page.path.is(slug))
    },
    async getAllPosts() {
      return pages.whereType('BlogPost').select(page => ({
        title: page.title,
        date: page.date,
        path: page.path,
        author: page.author,
        coverImage: page.coverImage,
        excerpt: page.excerpt
      }))
    }
  }
}
All we’re really doing here is making our lives easier later in the view code. As you add more pages and content types, you can just extend this file with extra endpoints to hook into. Neat!
This is probably the most involved part of the process, but it also provides you with the most freedom. At this point, you are going to just pull data via the “API” we created in the previous step and show it on the screen.
That said, there’s more to it than just a simple view file. We’ll need at least a couple of pages and some supporting components, so in your root directory, create two additional folders: pages and components.
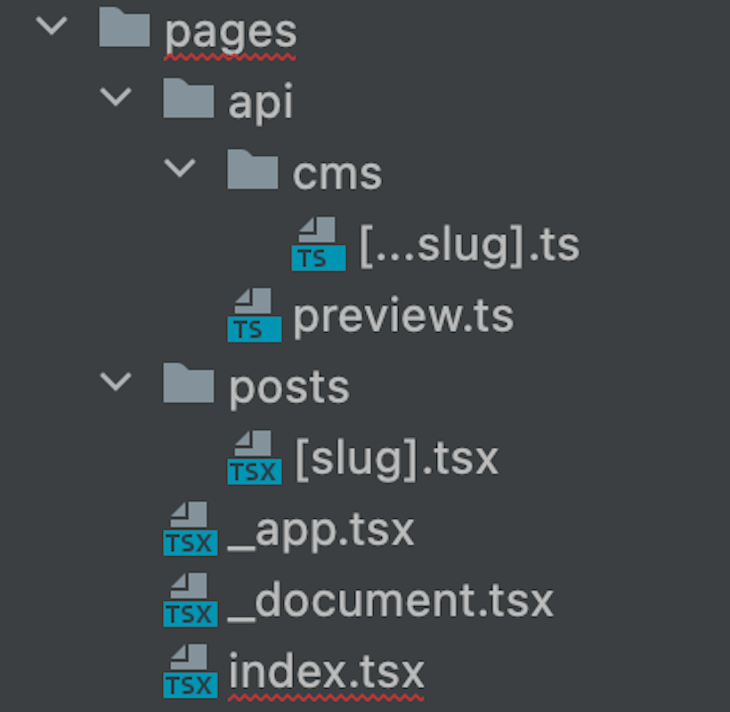
Inside the pages folder, we’ll also create two more directories: api and posts. In the api folder, we’ll have a cms folder inside, which we’ll create a [slug].ts file, while in api, we’ll have one file called preview.ts.
Then, in the posts folder, we’ll only have one file, and we’ll name it [slug].tsx. Finally, inside pages, we’ll create three files: index.tsx, _document.tsx, and _app.tsx.
I know, that’s a lot of folders and files and may be difficult to follow. So, here’s a screenshot of what your folder and file structure should look like:

What goes into each file is much more about React and Next.js than Alinea, so I won’t go into much detail. You will, however, see that there are some additional components you can bring into your views provided by the CMS, such as RichText and TextDoc. Let’s look at our pages.
pages/index.tsxThere’s nothing special going on here. There are a couple of headings and subheadings, and a hero post for our main page, which is populated by the props coming from Alinea:
import {Page} from '@alinea/content'
import Head from 'next/head'
import Hero from '../components/hero'
import Layout from '../components/layout'
import MoreBlogposts from '../components/moreBlogposts'
import {createApi} from '../api/api'
import {RichText} from '@alinea/ui'
import {TextDoc} from 'alinea'

type Props = {
  home: Page.Home
  allPosts: Page.BlogPost[]
  title: string
  byline: TextDoc
}

export default function Index({title, byline, home, allPosts}: Props) {
  const heroPost = allPosts[0]
  const morePosts = allPosts.slice(1)
  return (
    <>
      <Layout>
        <Head>
          <title>{home.title}</title>
        </Head>
        <div>
            <h1>
              {title}
            </h1>
            <h4>
              <RichText
                  doc={byline}
                  a={
                    <a/>
                  }
              />
            </h4>
          {heroPost && (
            <Hero
              title={heroPost.title}
              coverImage={heroPost.coverImage?.src}
              date={heroPost.date}
              slug={heroPost.path}
              excerpt={heroPost.excerpt}
            />
          )}
          {morePosts.length > 0 && <MoreBlogposts posts={morePosts} />}
        </div>
      </Layout>
    </>
  )
}

export const getStaticProps = async context => {
  const api = createApi(context.previewData)
  const home = await api.getHomePage()
  const allPosts = await api.getAllPosts()
  return {
    props: {home, allPosts}
  }
}
pages/_document.tsxThe root for all the other components in Next.js is as bog-standard as it gets. There’s nothing Alinea-specific here to worry about. However, make sure that the language is set in the HTML tag because it’s good for accessibility:
import {Head, Html, Main, NextScript} from 'next/document'

export default function Document() {
  return (
    <Html lang="en">
      <Head />
      <body>
        <Main />
        <NextScript />
      </body>
    </Html>
  )
}
pages/_app.tsxThis is just a root component, so like the others, nothing special is going on. Other than useNextPreview which enables preview in the CMS, its boilerplate Next.js code:
import {useNextPreview} from '@alinea/preview/next'
import {AppProps} from 'next/app'

export default function MyApp({Component, pageProps}: AppProps) {
  useNextPreview()
  return <Component {...pageProps} />
}
pages/api/cms/[...slug].tsFor this particular file, I think I need to give some extra context; otherwise, it looks too cryptic. The nodeHandler utility basically exports the backend handle as a Node.js http handler, then the generated backend file will connect to the backend. The CMS API routes are handled at /api/cms/[...slug] and finally, we disable the bodyParser injected by Next.js and let the handler deal with it:
import {nodeHandler} from '@alinea/backend/router/NodeHandler'
import {backend} from '@alinea/content/backend'
export default nodeHandler(backend.handle)
export const config = {api: {bodyParser: false}}
pages/api/preview.tsHere, the previewToken gets parsed from the /api/preview?token URL, which we ask Alinea to parse and validate. This will result in access to the URL of the entry we’re previewing. This token gets stored in the Next.js context so we can later use it in the Next route to query drafts.
Next.js relies on a temporary cookie to achieve and persist with this. Finally, the redirect to the page we actually want to view does this:
import {backend} from '@alinea/content/backend'
import type {NextApiRequest, NextApiResponse} from 'next'

export default async function handler(
  req: NextApiRequest,
  res: NextApiResponse
) {
  const previewToken = req.url!.split('?').pop()
    const {url} = await backend.parsePreviewToken(previewToken)

  res.setPreviewData(previewToken)

  res.redirect(url)
}
pages/posts/[slug].tsxAgain, relatively simple stuff. To render our individual blog post, we ensure it has a title that’s also visible in the browser tab. Here, add a header image and the body of the post, with props from Alinea:
import {Page} from '@alinea/content'
import {GetStaticPropsContext} from 'next'
import ErrorPage from 'next/error'
import Head from 'next/head'
import {useRouter} from 'next/router'
import Layout from '../../components/layout'
import PostBody from '../../components/postBody'
import PostHeader from '../../components/postHeader'
import PostTitle from '../../components/postTitle'
import {createApi} from '../../api/api'

type Props = {
  post: Page.BlogPost
  morePosts: Page.BlogPost[]
  preview?: boolean
}

export default function Post({post, morePosts, preview}: Props) {
  const router = useRouter()
  if (!router.isFallback && !post?.path) {
    return <ErrorPage statusCode={404} />
  }
  const title = `${post.title} | Next.js Blog Example with Alinea`
  return (
    <Layout preview={preview}>
        <h1>Attila's Blog</h1>
        {router.isFallback ? (
          <PostTitle>Loading...</PostTitle>
        ) : (
          <>
            <article>
              <Head>
                <title>{title}</title>
                <meta property="og:image" content={post.ogImage?.src} />
              </Head>
              <PostHeader
                title={post.title}
                coverImage={post.coverImage?.src}
                date={post.date}
              />
              <PostBody content={post.content} />
            </article>
          </>
        )}
    </Layout>
  )
}

type Params = {
  slug: string
}

export async function getStaticProps({
  params,
  previewData
}: GetStaticPropsContext<Params>) {
  const api = createApi(previewData)
  const post = await api.getPostBySlug(params.slug)
  return {
    props: {post}
  }
}

export async function getStaticPaths(context) {
  const api = createApi(context.previewData)
  const slugs = await api.getPostSlugs()
  return {
    paths: slugs.map(slug => {
      return {
        params: {slug}
      }
    }),
    fallback: false
  }
}
You can see that we finally made use of the API we created previously and the query content from Alinea. We also imported many components, which we don’t yet have, so let’s tackle that in the final step.
Your components can be as simple or complex as you’d like them to be. For brevity’s sake, I tried keeping them simple enough and left the browser to handle the styles for now. At the end of the day, this is now fully React territory, so whatever you fancy doing in terms of components and styling is entirely permitted. Alinea has no real say in what you can or cannot do on the frontend.
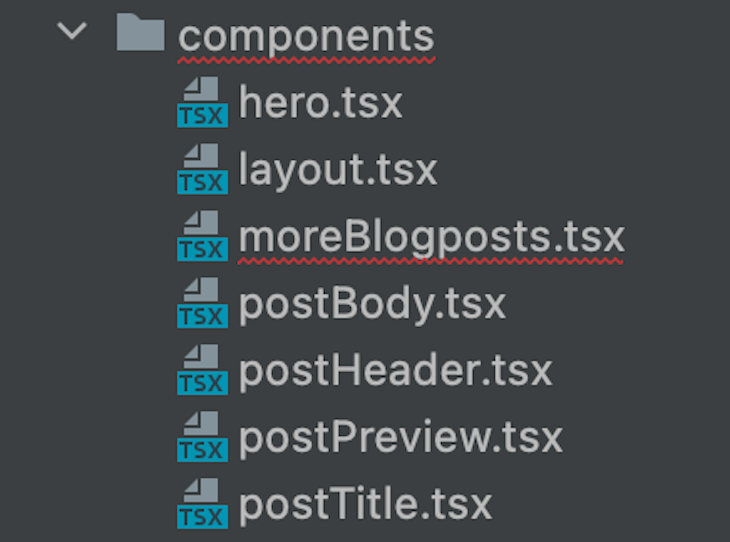
With that said, let’s create a few components in our components directory. This is just bog-standard React and Next, so I will not explain the details around the view code unless there is something Alinea-specific. Your components files should be:
hero.tsxlayout.tsxmoreBlogposts.tsxpostBody.tsxpostHeader.tsxpostPreview.tsxpostTitle.tsxTo avoid confusion, here’s a screenshot of what it should look like:

components/hero.tsxThis is the hero post component showing on the main page, and as you’d expect, we just need an image, link, title, and body. In this case, the excerpt is coming from Alinea while also relying on Alinea’s RichText component:
import {RichText} from '@alinea/ui'
import {TextDoc} from 'alinea'
import Link from 'next/link'

type Props = {
  title: string
  coverImage: string
  date: string
  excerpt: TextDoc
  slug: string
}

const Hero = ({title, coverImage, date, excerpt, slug}: Props) => {
  return (
    <section>
      <img src={`/assets/${coverImage}`} alt="some text description"/>
      <h3>
        <Link as={`/posts/${slug}`} href="/posts/[slug]">
          {title}
        </Link>
      </h3>
      <p>{date}</p>
          <RichText
            doc={excerpt}
            p={<p/>}
          />
    </section>
  )
}

export default Hero
components/layout.tsxThis is as basic as a wrapper for a layout can get in React. It naturally supports child components:
type Props = {
  preview?: boolean
  children: React.ReactNode
}

const Layout = ({ children }: Props) => {
  return (
    <>
        <main>{children}</main>
    </>
  )
}

export default Layout
components/moreBlogposts.tsxThis component has one role and one role only — to map over all posts and show the excerpts in the page via the PostPreview component:
import {BlogPost} from '../schema'
import PostPreview from './postPreview'

type Props = {
  posts: BlogPost[]
}

const MoreBlogposts = ({posts}: Props) => {
  return (
    <section>
      <h2>
        More Blogposts
      </h2>
      <div>
        {posts.map(post => (
          <PostPreview
            key={post.path}
            title={post.title}
            coverImage={post.coverImage?.src}
            date={post.date}
            slug={post.path}
            excerpt={post.excerpt}
          />
        ))}
      </div>
    </section>
  )
}

export default MoreBlogposts
components/postBody.tsxThe component name is pretty self-explanatory. It’s where we build our blog post’s body. The TextDoc is the content itself, which then gets passed into Alinea’s RichText component as a prop:
import {RichText} from '@alinea/ui'
import {TextDoc} from 'alinea'

type Props = {
  content: TextDoc
}

const PostBody = ({content}: Props) => {
  return (
    <div>
        <RichText doc={content} />
    </div>
  )
}

export default PostBody
components/postHeader.tsxI hope it’s all starting to make sense now since we’ve built a bit of a pattern here. Just like how we built the body, we’ll separately build the header for the blog post. Note, you don’t have to do these as individual components, but it’s React, after all, so when you can break things down, you probably should:
type Props = {
  title: string
  coverImage: string
  date: string
}

const PostHeader = ({title, coverImage, date}: Props) => {
  return (
    <>
        <h2>{title}</h2>
        <img alt="description of the image" src={`/assets${coverImage}`}/>
        <p>{date}</p>
    </>
  )
}

export default PostHeader
components/postPreview.tsxHere, we have more image, link, date, and excerpts that we’ve worked with before. However, this time, for the preview view. Oh, and yes, adding alt text to images is something I highly recommend for accessibility purposes:
import {RichText} from '@alinea/ui'
import {TextDoc} from 'alinea'
import Link from 'next/link'

type Props = {
  title: string
  coverImage: string
  date: string
  excerpt: TextDoc
  slug: string
}

const PostPreview = ({
  title,
  coverImage,
  date,
  excerpt,
  slug
}: Props) => {
  return (
    <div>
        <img src={`/assets/${coverImage}`} alt="some text description"/>
      <h3>
        <Link as={`/posts/${slug}`} href="/posts/[slug]">
          {title}
        </Link>
      </h3>
        <p>{date}</p>
      <RichText
        doc={excerpt}
        p={<p/>}
      />
    </div>
  )
}

export default PostPreview
components/postTitle.tsxFinally, have a title component to go with our body. It’s a simple heading level one React component that takes children:
import { ReactNode } from 'react'

type Props = {
  children?: ReactNode
}

const PostTitle = ({ children }: Props) => {
  return (
    <h1>
      {children}
    </h1>
  )
}

export default PostTitle
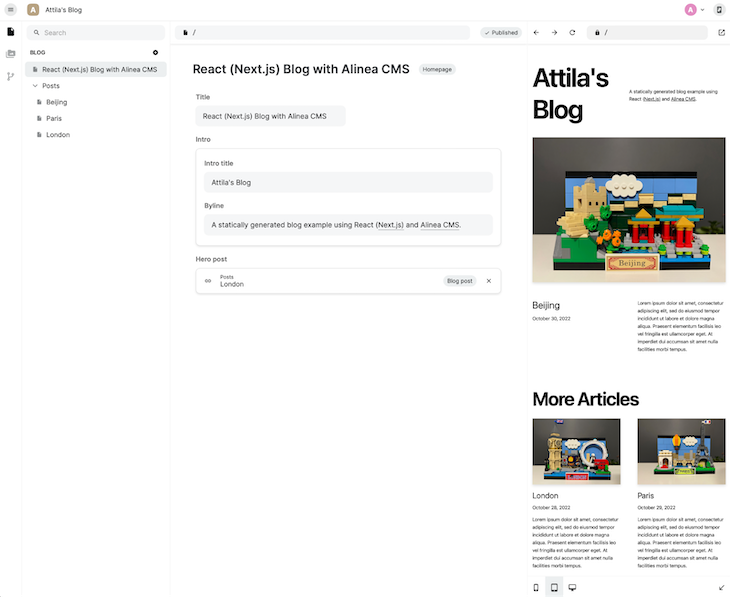
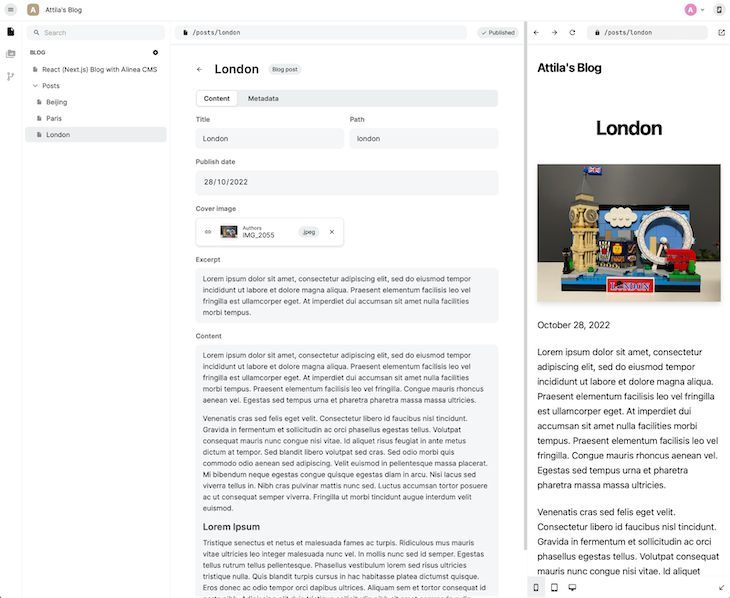
The only two dependencies that are Alinea related are the recurring RichText and TextDoc. The documentation for both of them can be found on the Alinea Docs page. For this demonstration, I also borrowed some styles from one of Alinea’s example projects. Still, you’re more than welcome to add your own or clone the entire project and replace it with your content, data types, and editable areas. That’s the power of open source right there! 😉 Anyhow, my final result looks something like this:


Note: The styling of the CMS itself comes by default with Alinea; no extra work is necessary
While this isn’t meant to be a review of Alinea, I think there are a couple of things worth taking away from building a blog with the new CMS. First, as with every beta software, the kinks are yet to be ironed out, so during the development process, I’ve had times when it felt a little brittle.
Second, the documentation isn’t quite up to what I would expect. I had to move a lot between the docs and example projects to make sense of what was going on and how the various pieces fit together. Building a blog with Alinea is in no way a straightforward experience. While it’s a promising development, it has yet to mature to become an alternative to everything else.
Having said all that, even in its beta state, one can build a functioning and reasonably good-looking, deployable Alinea blog, all with React and TypeScript. I advise starting with one of the example projects, as it will save you a lot of headaches in these early stages.
It’s undeniable that Alinea’s approach to generating an embedded SQLite database through the schemas, which are then pushed as part of the source code, resulting in blazing-fast query times, is an edge over some other traditional CMSs out there. Add to that the instant previews, and you have a potentially winning combination of features, ease of use, and speed.
Install LogRocket via npm or script tag. LogRocket.init() must be called client-side, not
server-side
$ npm i --save logrocket

// Code:

import LogRocket from 'logrocket';
LogRocket.init('app/id');
// Add to your HTML:

<script src="https://cdn.lr-ingest.com/LogRocket.min.js"></script>
<script>window.LogRocket && window.LogRocket.init('app/id');</script>
Would you be interested in joining LogRocket's developer community?
Join LogRocket’s Content Advisory Board. You’ll help inform the type of content we create and get access to exclusive meetups, social accreditation, and swag.
Sign up now
Not sure if low-code is right for your next project? This guide breaks down when to use it, when to avoid it, and how to make the right call.

Compare Firebase Studio, Lovable, and Replit for AI-powered app building. Find the best tool for your project needs.

Discover how to use Gemini CLI, Google’s new open-source AI agent that brings Gemini directly to your terminal.

This article explores several proven patterns for writing safer, cleaner, and more readable code in React and TypeScript.